2011 MERCEDES-BENZ E-Class COUPE hood open
[x] Cancel search: hood openPage 11 of 344

Premium-grade unleaded gasoline . 336
Refueling ........................................ 162
Specifications ................................ 336
Troubleshooting ............................. 165
Fuel consumption
Current (on-board computer) .........202
Notes ............................................. 167
Fuel filler cap (display message) ..... 229
Fuel filler flap Opening/closing ....... 163
Fuel level Calling up the range (on-board
computer) ...................................... 202
Fuses
Dashboard fuse box .......................300
Fuse allocation chart .....................300
Fuse box in the engine
compartment ................................. 301
Fuse box in the trunk .....................301
Notes ............................................. 300
G
Garage door opener Clearing the memory .....................268
Notes ............................................. 265
Opening/closing the garage door ..267
Programming the remote control ...265
Gear or selector lever (cleaning
guidelines) ......................................... 283
Genuine Mercedes-Benz parts ......... 332
Genuine wood trim and trim strips
(cleaning instructions) ...................... 283
Glove box ........................................... 250
H
Head bags ............................................ 40
Head bags ........................................ 40
Headlamp cleaning system .............. 124
Adding washer fluid .......................275
Notes ............................................. 339
Headlamp mode (daytime driving)
see Daytime running lamps
Headlamps
Cleaning ......................................... 282
Misting up ...................................... 125
Head level heating
AIRSCARF ...................................... 112
Head restraint
Lowering manually (rear) ...............109
Head restraints
Adjusting (electrically) ...................108
Adjusting (rear) .............................. 109
see NECK-PRO head restraints
Heating
see Climate control
High beam flasher ............................. 124
Hill start assist .................................. 154
HOLD function Display message ............................ 229
Function/notes ............................. 184
Hood
Closing ........................................... 273
Display message ............................ 237
Opening ......................................... 272
Hydroplaning ..................................... 170
I
Immobilizer .......................................... 70
Indicator and warning lamps DISTRONIC PLUS ........................... 247
Installing/removing the AIRCAP
wind screen ......................................... 98
Instrument cluster Overview .......................................... 26
Submenu (on-board computer) ......208
Warning and indicator lamps ...........27
Instrument cluster lighting ................ 26
Instrument lighting see Instrument cluster lighting
Interior lighting
Automatic control ..........................125
Delayed switch-off (on-board
computer) ...................................... 210
Emergency lighting ........................126
Manual control ............................... 126
Reading lamp ................................. 125
J
Jack Storage location ............................ 287
Using ............................................. 290
Jump-starting ..................................... 296
Index9BA 207 USA, CA Edition B 2011; 1; 3, en-USd2sboikeVersion: 3.0.3.62010-05-20T10:38:09+02:00 - Seite 9
Page 26 of 344

Exterior viewFunctionPage:Trunk lidVehicle tool kit287;Rear window defroster144=Lights126?Soft top (Cabriolet)89AFuel filler flap162BDefrosting the windshield142Cleaning the windows281CSliding sunroof (Coupe)101FunctionPageDExterior mirrors114EWindshield wipers129FOpening the hood272Engine oil273Coolant274GTowing298HTires and wheels304Flat tire28824Exterior viewAt a glance
BA 207 USA, CA Edition B 2011; 1; 3, en-USd2sboikeVersion: 3.0.3.62010-05-20T10:38:09+02:00 - Seite 24
Page 27 of 344

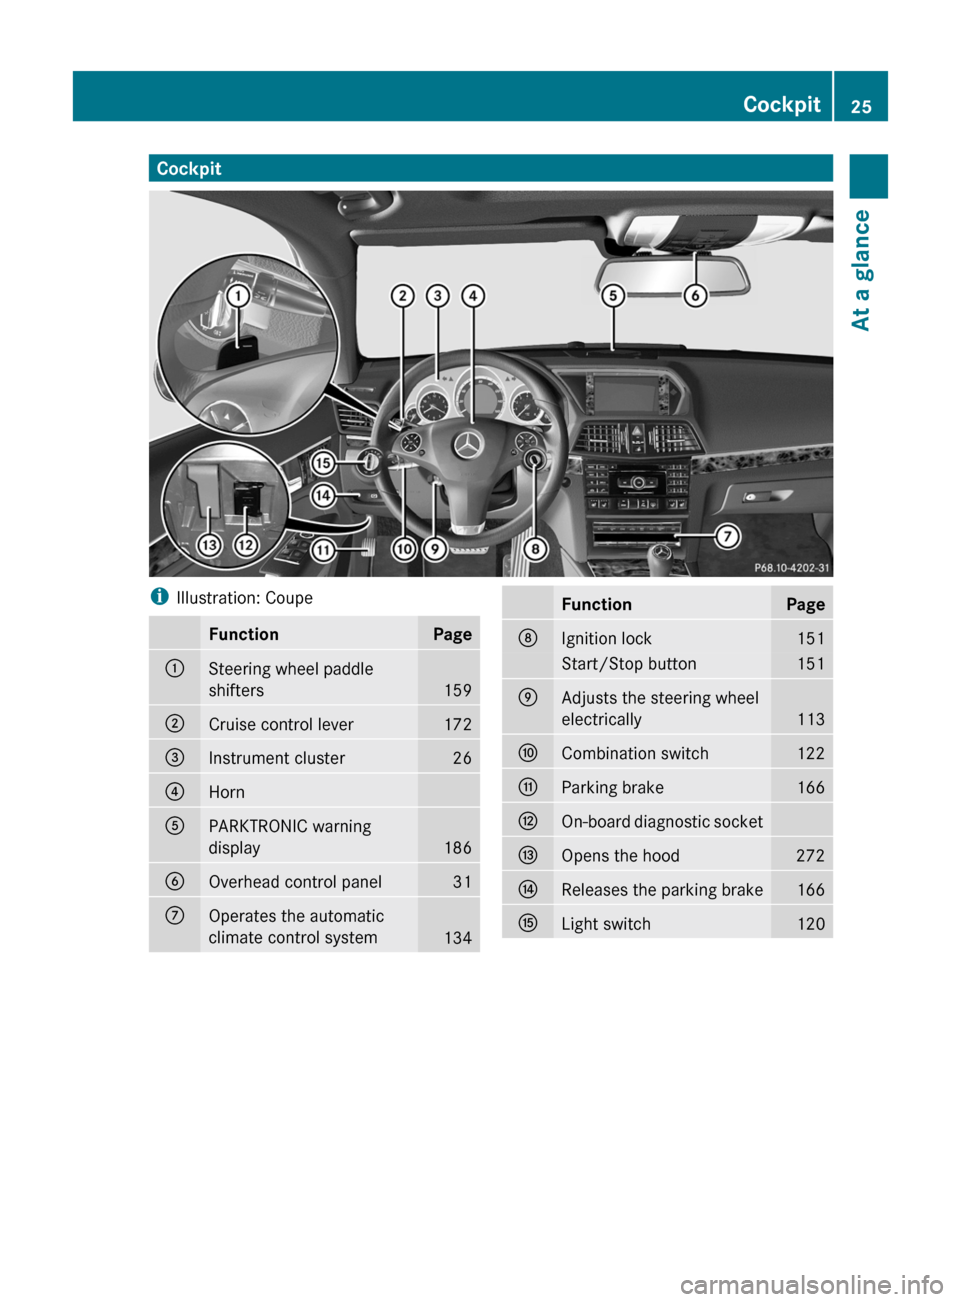
CockpitiIllustration: CoupeFunctionPage:Steering wheel paddle
shifters
159
;Cruise control lever172=Instrument cluster26?HornAPARKTRONIC warning
display
186
BOverhead control panel31COperates the automatic
climate control system
134
FunctionPageDIgnition lock151Start/Stop button151EAdjusts the steering wheel
electrically
113
FCombination switch122GParking brake166HOn-board diagnostic socketIOpens the hood272JReleases the parking brake166KLight switch120Cockpit25At a glanceBA 207 USA, CA Edition B 2011; 1; 3, en-USd2sboikeVersion: 3.0.3.62010-05-20T10:38:09+02:00 - Seite 25
Page 73 of 344

iThe immobilizer is always deactivated
when you start the engine.
In the event that the engine cannot be
started when the starter battery is fully
charged, the immobilizer may be faulty.
Contact an authorized Mercedes-Benz
Center or call 1-800-FOR-MERCedes (in
USA) or 1-800-387-0100 (in Canada).
ATA (Anti-Theft Alarm system)
A visual and audible alarm is triggered if the
alarm system is armed and you open:
Ra door
Rthe vehicle with the mechanical key
Rthe trunk lid
Rthe hood
The alarm is not switched off, even if you
close the open door that has triggered it, for
example.
iIf the alarm stays on for more than 30
seconds, the emergency call system
mbrace (USA only) or TELEAID (Canada
only) initiates a call to the Customer
Assistance Center automatically. The
emergency call system initiates the call
provided that:
Ryou have subscribed to the mbrace/
TELEAID service.
Rthe mbrace/TELEAID service has been
activated properly.
Rthe required mobile phone, power supply
and GPS are available.
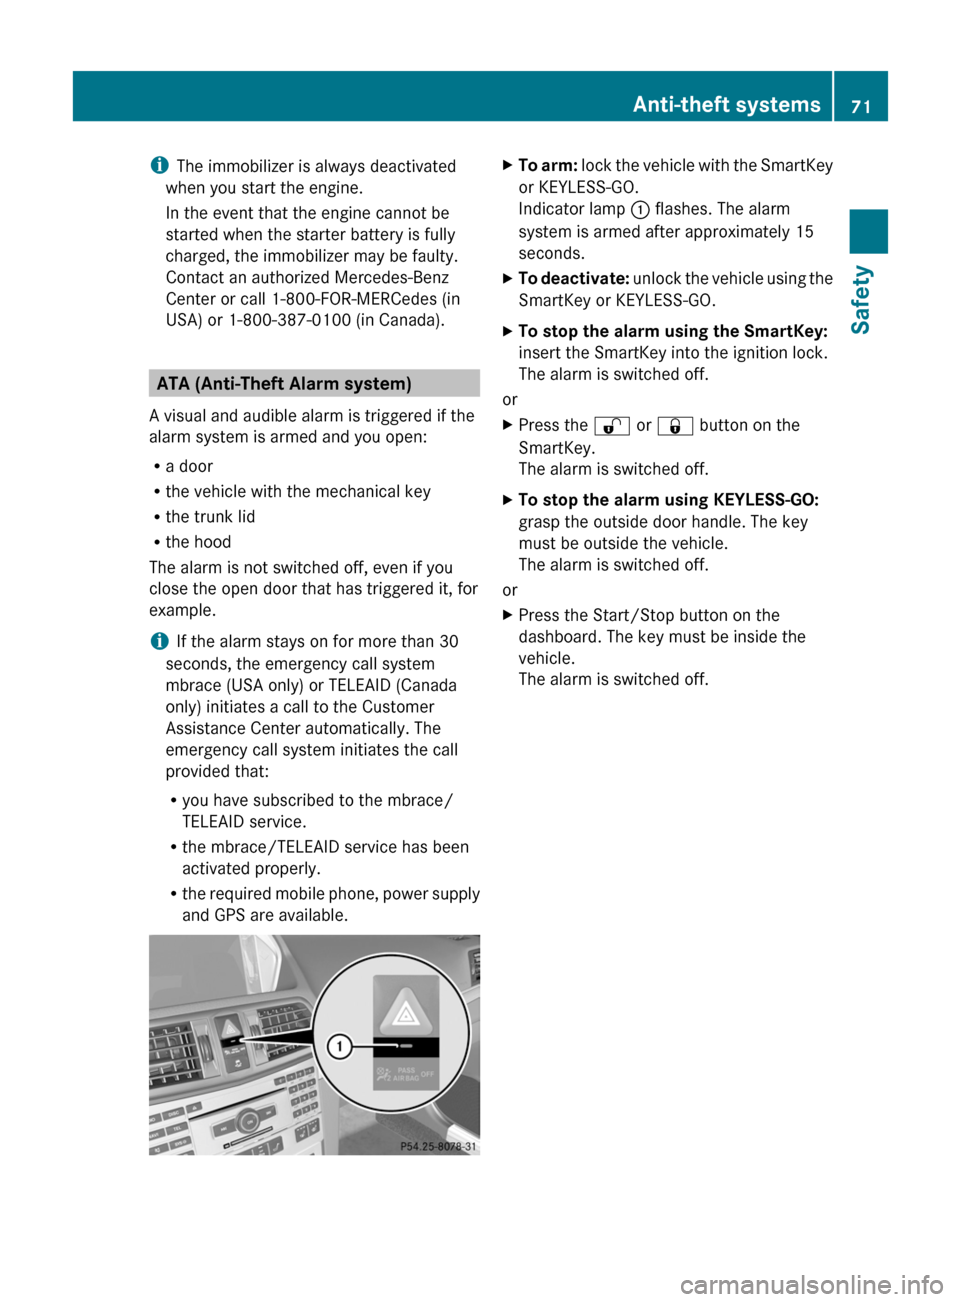
XTo arm: lock the vehicle with the SmartKey
or KEYLESS-GO.
Indicator lamp : flashes. The alarm
system is armed after approximately 15
seconds.
XTo deactivate: unlock the vehicle using the
SmartKey or KEYLESS-GO.
XTo stop the alarm using the SmartKey:
insert the SmartKey into the ignition lock.
The alarm is switched off.
or
XPress the % or & button on the
SmartKey.
The alarm is switched off.
XTo stop the alarm using KEYLESS-GO:
grasp the outside door handle. The key
must be outside the vehicle.
The alarm is switched off.
or
XPress the Start/Stop button on the
dashboard. The key must be inside the
vehicle.
The alarm is switched off.
Anti-theft systems71SafetyBA 207 USA, CA Edition B 2011; 1; 3, en-USd2sboikeVersion: 3.0.3.62010-05-20T10:38:09+02:00 - Seite 71Z
Page 129 of 344

Mercedes-Benz recommends that you use an
authorized Mercedes-Benz Center for this
purpose. In particular, work relevant to safety
or on safety-related systems must be carried
out at a qualified specialist workshop.
If you require assistance changing bulbs,
consult a qualified specialist workshop.
Do not touch the glass tube of new bulbs with
your bare hands. Even minor contamination
can burn into the glass surface and reduce
the service life of the bulbs. Always use a lint-
free cloth or only touch the base of the bulb
when installing.
Only use bulbs of the correct type.
If the new bulb still does not light up, consult
a qualified specialist workshop.
Bulbs and lamps are an important aspect of
vehicle safety. You must therefore make sure
that these function correctly at all times.
Have the headlamp setting checked regularly.
Overview: changing bulbs/bulb types
You can change the following bulbs. The bulb
type can be found in the legend.
Halogen headlamps
:Low-beam headlamps6: H7 55 W;High-beam headlamp: H7 55 W=Parking lamp/standing lamp: W 5 W?Turn signal lamp6: 3457A
Bi-Xenon headlamps
:Cornering lamp: H7 55 W
Changing the front bulbs
Low-beam headlamp (halogen
headlamp)
Due to their location, have the bulbs in the
left-hand headlamp changed at a qualified
specialist workshop, e.g. an authorized
Mercedes-Benz Center.
XSwitch off the lights.XOpen the hood.XTurn housing cover : counter-clockwise
and pull it out.
XTurn bulb holder ; counter-clockwise and
pull it out.
XTake the bulb out of bulb holder ;.XInsert the new bulb into bulb holder ;.6Due to their location, have the bulbs in the left-hand headlamp changed at a qualified specialist workshop,e.g. an authorized Mercedes-Benz Center.
Changing bulbs127Lights and windshield wipersBA 207 USA, CA Edition B 2011; 1; 3, en-USd2sboikeVersion: 3.0.3.62010-05-20T10:38:09+02:00 - Seite 127Z
Page 130 of 344

XInsert bulb holder ; into the lamp and turn
it clockwise.
XAlign housing cover : and turn it
clockwise until it engages.
High-beam headlamp (halogen
headlamp)/cornering lamp (bi-xenon
headlamp)
XSwitch off the lights.XOpen the hood.XTurn housing cover : counter-clockwise
and pull it out.
XTurn bulb holder ; counter-clockwise and
pull it out.
XTake the bulb out of bulb holder ;.XInsert the new bulb into bulb holder ;.XInsert bulb holder ; into the lamp and turn
it clockwise.
XAlign housing cover : and turn it
clockwise until it engages.
Parking lamp/standing lamp (halogen
headlamps)
XSwitch off the lights.XOpen the hood.XTurn housing cover : counter-clockwise
and pull it out.
XPull out bulb holder ;.XTake the bulb out of bulb holder ;.XInsert the new bulb into bulb holder ;.XInsert bulb holder ;.XAlign housing cover : and turn it
clockwise until it engages.
Turn signals (halogen headlamps)
Due to their location, have the bulbs in the
left-hand headlamp changed at a qualified
specialist workshop, e.g. an authorized
Mercedes-Benz Center.
XSwitch off the lights.XOpen the hood.XTurn bulb holder : counter-clockwise and
pull it out.
128Changing bulbsLights and windshield wipers
BA 207 USA, CA Edition B 2011; 1; 3, en-USd2sboikeVersion: 3.0.3.62010-05-20T10:38:09+02:00 - Seite 128
Page 132 of 344

prevents a person from being splashed
inadvertently when getting into or out of the
vehicle.
Intermittent wiping continues when all doors
are closed and
Ryou shift the automatic transmission to
drive position D or reverse gear R
or
Ryou change the wipe setting on the
combination switch.
iTo prevent smearing on the windshield or
noise when wiping, wipe the windshield
occasionally with washer fluid.
Replacing the wiper blades
Important safety notes
GWarning
For safety reasons, switch off the windshield
wipers and remove the key from the ignition
lock before changing the wiper blades
(vehicles with KEYLESS-GO: make sure that
the on-board electronics are in state 0).
Otherwise, the wiper motor could be switched
on suddenly and cause injury.
! To avoid damaging the wiper blades,
make sure that you touch only the wiper
arm of the wiper.
! Never open the hood if a windshield wiper
arm has been folded away from the
windshield.
Never fold a windshield wiper arm without
a wiper blade back onto the windshield.
Hold the windshield wiper arm firmly when
you change the wiper blade. If you release
the windshield wiper arm without a wiper
blade and it falls onto the windshield, the
windshield can be damaged by the force of
the impact.
Mercedes-Benz recommends that you have
the wiper blades replaced by a qualified
specialist workshop, e.g. at an authorized
Mercedes-Benz Center.
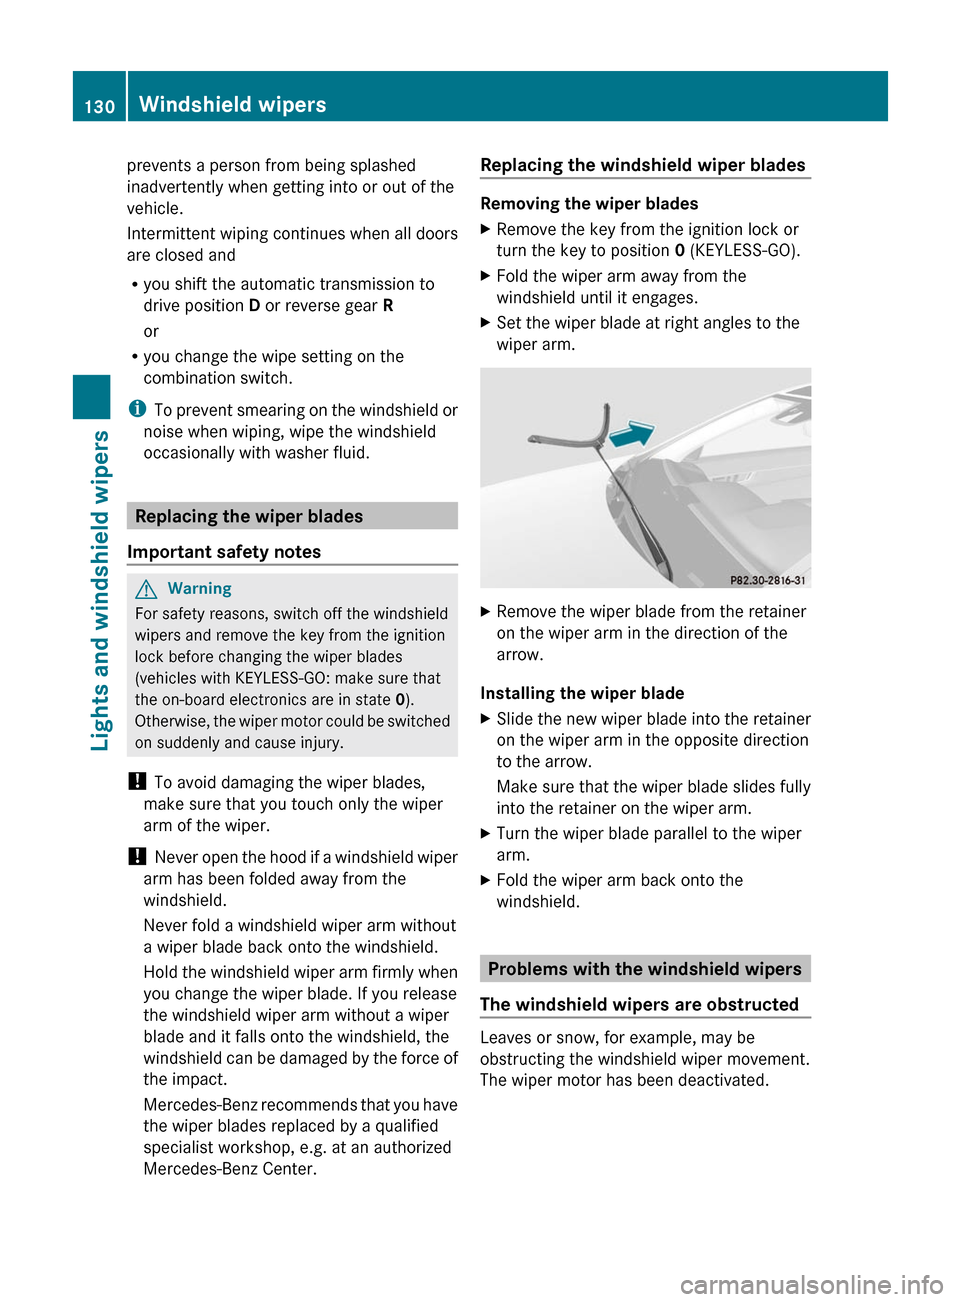
Replacing the windshield wiper blades
Removing the wiper blades
XRemove the key from the ignition lock or
turn the key to position 0 (KEYLESS-GO).
XFold the wiper arm away from the
windshield until it engages.
XSet the wiper blade at right angles to the
wiper arm.
XRemove the wiper blade from the retainer
on the wiper arm in the direction of the
arrow.
Installing the wiper blade
XSlide the new wiper blade into the retainer
on the wiper arm in the opposite direction
to the arrow.
Make sure that the wiper blade slides fully
into the retainer on the wiper arm.
XTurn the wiper blade parallel to the wiper
arm.
XFold the wiper arm back onto the
windshield.
Problems with the windshield wipers
The windshield wipers are obstructed
Leaves or snow, for example, may be
obstructing the windshield wiper movement.
The wiper motor has been deactivated.
130Windshield wipersLights and windshield wipers
BA 207 USA, CA Edition B 2011; 1; 3, en-USd2sboikeVersion: 3.0.3.62010-05-20T10:38:09+02:00 - Seite 130
Page 147 of 344

Coupe: the "residual heat" function only
works optimally when the side windows and
panorama roof with power tilt/sliding panel
are closed.
Cabriolet: the "residual heat" function only
works optimally when the soft top is closed.
iThe blower will run at a low speed
regardless of the airflow setting.
iIf you activate the "residual heat" function
at high temperatures, only the ventilation
will be activated. The blower runs at
medium speed.
iIt is possible that the "residual heat"
function may be activated automatically an
hour after the SmartKey is removed. The
vehicle is then ventilated for 30 minutes to
dry the air-conditioning system.
XTurn the SmartKey to position 0 in the
ignition lock or remove it.
XTo switch on: press the Ì button.
The indicator lamp above the Ì button
lights up.
XTo switch off: press the Ì button.
The indicator lamp above button Ì goes
out.
iResidual heat is deactivated
automatically:
Rafter about 30 minutes
Rwhen the ignition is switched on
Rif the battery voltage drops
Rif the coolant temperature is too low
Setting the air vents
Important safety notes
GWarning
When operating the climate control, the air
that enters the passenger compartment
through the air vents can be very hot or very
cold (depending on the set temperature). This
could cause burns or frostbite to unprotected
skin in the immediate area of the air vents.
Always keep sufficient distance between
unprotected parts of the body and the air
vents. If necessary, use the air distribution
adjustment to direct the air to air vents in the
vehicle interior that are not in the immediate
area of unprotected skin.
In order to ensure the direct flow of fresh air
through the air vents into the vehicle interior,
please observe the following notes:
Rkeep the air inlet between the windshield
and the hood free of blockages, such as ice,
snow or leaves
Rnever cover the vents or air inlet and outlet
grilles in the vehicle interior.
iFor virtually draft-free ventilation, adjust
the sliders of the air vents to the center
position.
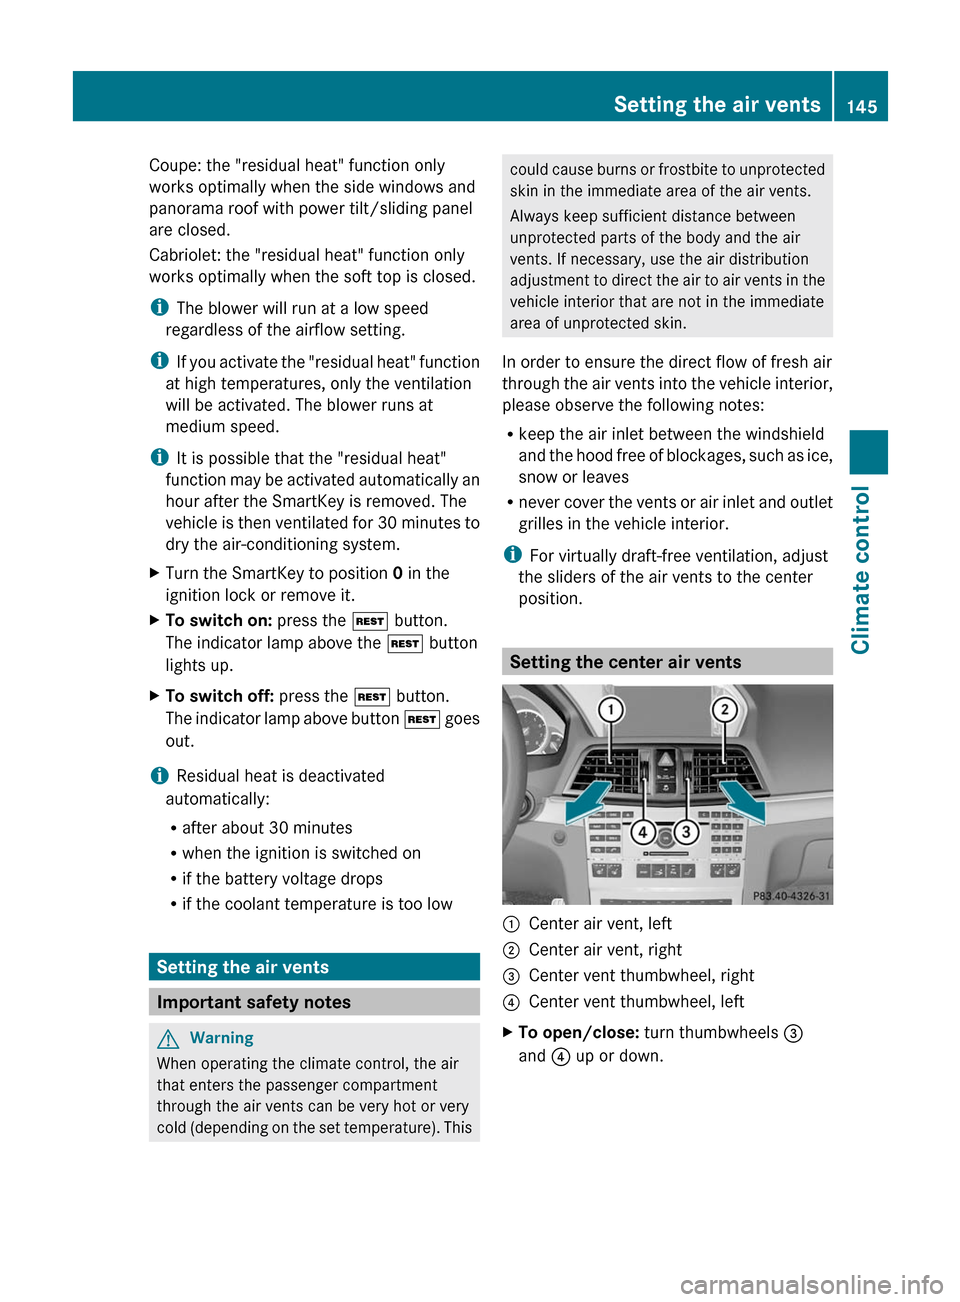
Setting the center air vents
:Center air vent, left;Center air vent, right=Center vent thumbwheel, right?Center vent thumbwheel, leftXTo open/close: turn thumbwheels =
and ? up or down.
Setting the air vents145Climate controlBA 207 USA, CA Edition B 2011; 1; 3, en-USd2sboikeVersion: 3.0.3.62010-05-20T10:38:09+02:00 - Seite 145Z