2011 MERCEDES-BENZ E-Class COUPE key
[x] Cancel search: keyPage 100 of 344
Retracting AIRCAPXTurn the key to position 2 in the ignition
lock.XOpen the cover on the lower center
console.XPress AIRCAP button :.
The two indicator lamps on the AIRCAP
button go out. Wind deflector ; retracts.
The head restraints on the rear bench seats
and AIRCAP wind screen = move to the
lowest position simultaneously.
i If there are passengers wearing seat belts
in the rear compartment, the head
restraints on the rear bench seats and the
AIRCAP wind screen remain in the upper
position.
Retracting the head restraints on the
rear bench seats from the driver's seat
To improve the rear view, you can retract the
head restraints on the rear bench seats
individually ( Y page 109). The wind deflector
remains in its current position.
Installing and removing the AIRCAP
wind screen
Preparation
You will need a 4 mm Allen key to install/
remove the AIRCAP wind screen.
Before installing or removing the AIRCAP
wind screen:
XTurn the key to position 2 in the ignition
lock.XOpen the folding roof fully ( Y page 90).XExtend the head restraints in the rear
compartment fully ( Y page 109).Removing
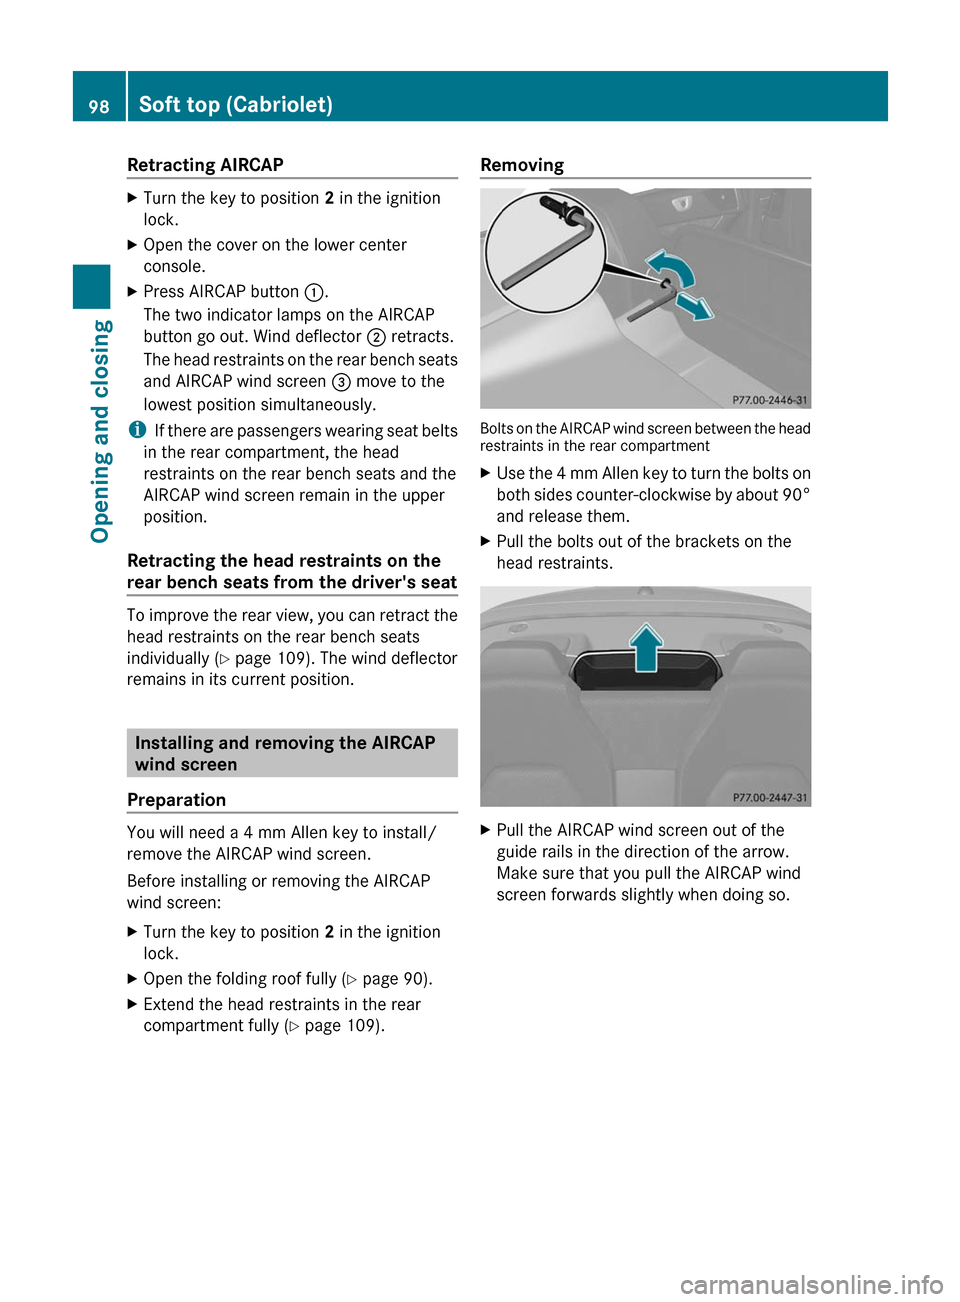
Bolts on the AIRCAP wind screen between the head
restraints in the rear compartment
XUse the 4 mm Allen key to turn the bolts on
both sides counter-clockwise by about 90°
and release them.XPull the bolts out of the brackets on the
head restraints.XPull the AIRCAP wind screen out of the
guide rails in the direction of the arrow.
Make sure that you pull the AIRCAP wind
screen forwards slightly when doing so.98Soft top (Cabriolet)Opening and closing
BA 207 USA, CA Edition B 2011; 1; 3, en-USd2sboikeVersion: 3.0.3.62010-05-20T10:38:09+02:00 - Seite 98
Page 101 of 344
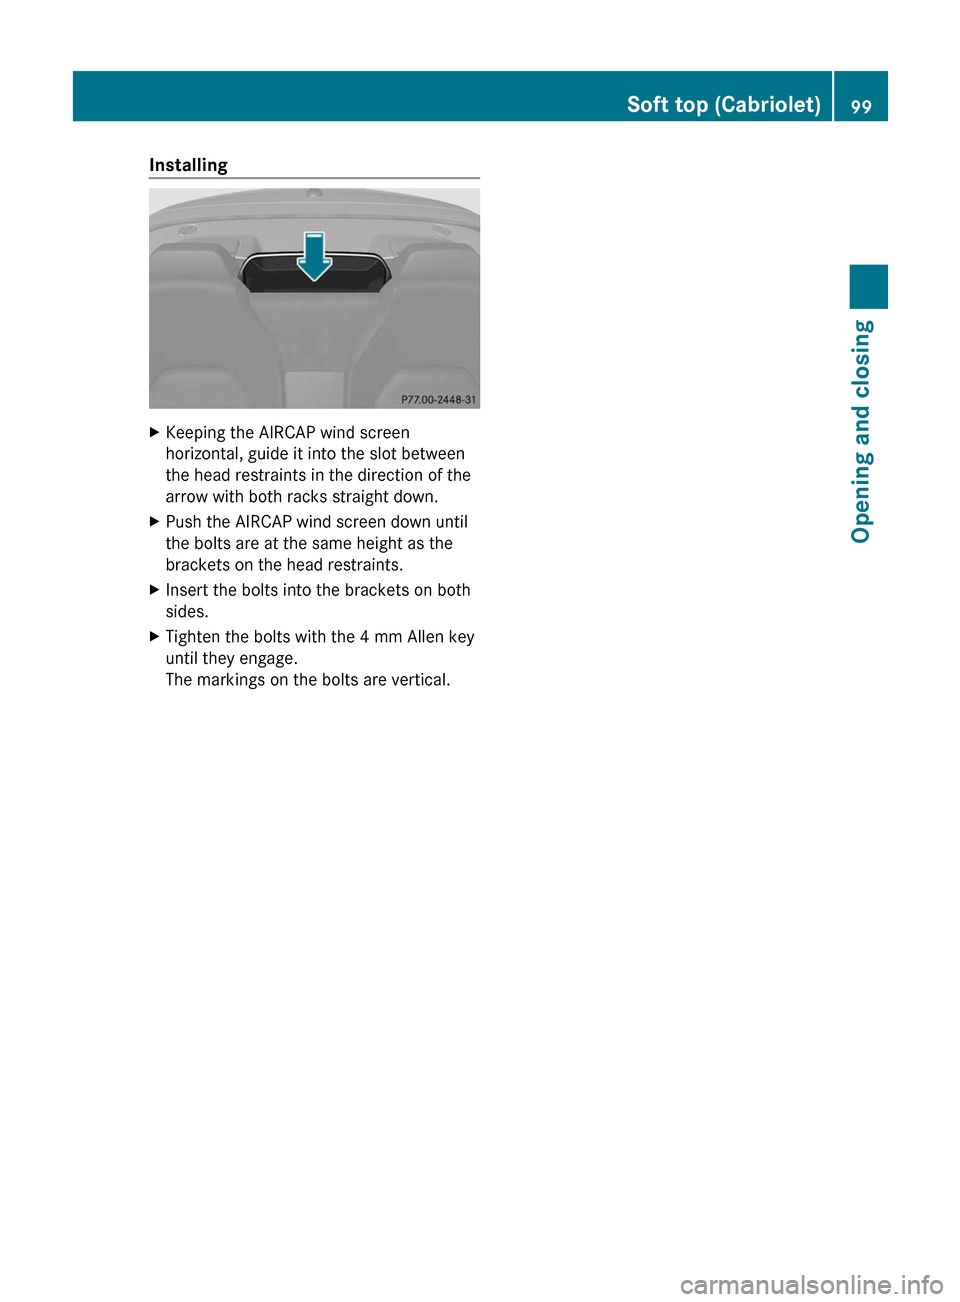
InstallingXKeeping the AIRCAP wind screen
horizontal, guide it into the slot between
the head restraints in the direction of the
arrow with both racks straight down.XPush the AIRCAP wind screen down until
the bolts are at the same height as the
brackets on the head restraints.XInsert the bolts into the brackets on both
sides.XTighten the bolts with the 4 mm Allen key
until they engage.
The markings on the bolts are vertical.Soft top (Cabriolet)99Opening and closingBA 207 USA, CA Edition B 2011; 1; 3, en-USd2sboikeVersion: 3.0.3.62010-05-20T10:38:09+02:00 - Seite 99Z
Page 102 of 344
Problems with the soft topProblemPossible causes/consequences and M SolutionsThe soft top will not
open or close.The ignition is not switched on.XMake sure that the key is in position 2 in the ignition lock.The trunk lid is open.XClose the trunk lid ( Y page 96).The trunk partition is not closed.XClose the trunk partition ( Y page 96).The roll bars have been deployed.XVisit a qualified specialist workshop.The head restraints in the rear compartment do not retract
automatically.XLower the head restraints in the rear compartment manually
( Y page 109).The soft-top mechanism or control system is defective.XClose the soft top manually if necessary ( Y page 91).XVisit a qualified specialist workshop.The soft top was opened and closed several times in succession.
The soft-top drive has been deactivated automatically for safety
reasons.
You can open or close the soft top again after approximately ten
minutes.XSwitch the ignition off and then on again.XRepeat the opening or closing procedure.100Soft top (Cabriolet)Opening and closing
BA 207 USA, CA Edition B 2011; 1; 3, en-USd2sboikeVersion: 3.0.3.62010-05-20T10:38:09+02:00 - Seite 100
Page 103 of 344

Sliding sunroof3
Important safety notes
GWarning!
When leaving the vehicle, always remove the
SmartKey from the starter switch. Always
take the SmartKey with you and lock the
vehicle. Do not leave children unattended in
the vehicle, even if they are secured in a child
restraint system, or with access to an
unlocked vehicle. A child's unsupervised
access to a vehicle could result in an accident
and/or serious personal injury. The children
could
R injure themselves on parts of the vehicle
R be seriously or fatally injured through
excessive exposure to extreme heat or cold
R injure themselves or cause an accident with
vehicle equipment that can be operated
even if the SmartKey is removed from the
starter switch or removed from the vehicle,
such as seat adjustment, steering wheel
adjustment, or the memory function
If children open a door, they could injure other
persons or get out of the vehicle and injure
themselves or be injured by following traffic.
Do not expose the child restraint system to
direct sunlight. The child restraint system's
metal parts, for example, could become very
hot, and the child could be burned by these
parts.
GWarning!
Do not carry heavy or hard objects in the
passenger compartment or trunk unless they
are firmly secured in place.
Unsecured or improperly positioned cargo
increases a child's risk of injury in the event
of
R strong braking maneuvers
R sudden changes of direction
R an accident
GWarning!
When opening or closing the tilt/sliding panel,
make sure there is no danger of anyone being
harmed by the opening/closing procedure.
The tilt/sliding panel is equipped with the
automatic operation and anti-entrapment
features. If the movement of the tilt/sliding
panel is blocked during the closing procedure,
the tilt/sliding panel will stop and open
slightly.
The tilt/sliding panel operates differently
when the roof panel switch is pressed and
held. See the relevant section in this chapter
for details.
The opening/closing procedure of the tilt/
sliding panel can be immediately halted by
releasing the roof panel switch or, if the roof
panel switch was moved past the resistance
point and released, by moving the roof panel
switch in any direction.
GWarning!
The panorama roof with tilt/sliding panel is
made out of glass. In the event of an accident,
the glass may shatter. This may result in an
opening in the roof.
In a vehicle rollover, occupants not wearing
their seat belts or not wearing them properly
may be thrown out of the opening. Such an
opening also presents a potential for injury for
occupants wearing their seat belts properly as
entire body parts or portions of them may
protrude from the passenger compartment.
! Only open the sliding sunroof if it is free
of snow and ice. Otherwise, malfunctions
may occur.
Do not allow anything to protrude from the
sliding sunroof. Otherwise, the seals could
be damaged.
! Do not forget that the weather can
change abruptly. Make certain that the
sliding sunroof is closed when you leave the
vehicle. The vehicle electronics can be
3 Coupe onlySliding sunroof101Opening and closingBA 207 USA, CA Edition B 2011; 1; 3, en-USd2sboikeVersion: 3.0.3.62010-05-20T10:38:09+02:00 - Seite 101Z
Page 104 of 344
damaged if water enters the vehicle
interior.
i Resonance noises can occur in addition
to the usual airflow noises when the sliding
sunroof is open. They are caused by minor
pressure fluctuations in the vehicle interior.
Change the position of the sliding sunroof
or open a side window slightly to reduce or
eliminate these noises.
Operating the panorama sliding
sunroof
Opening and closing
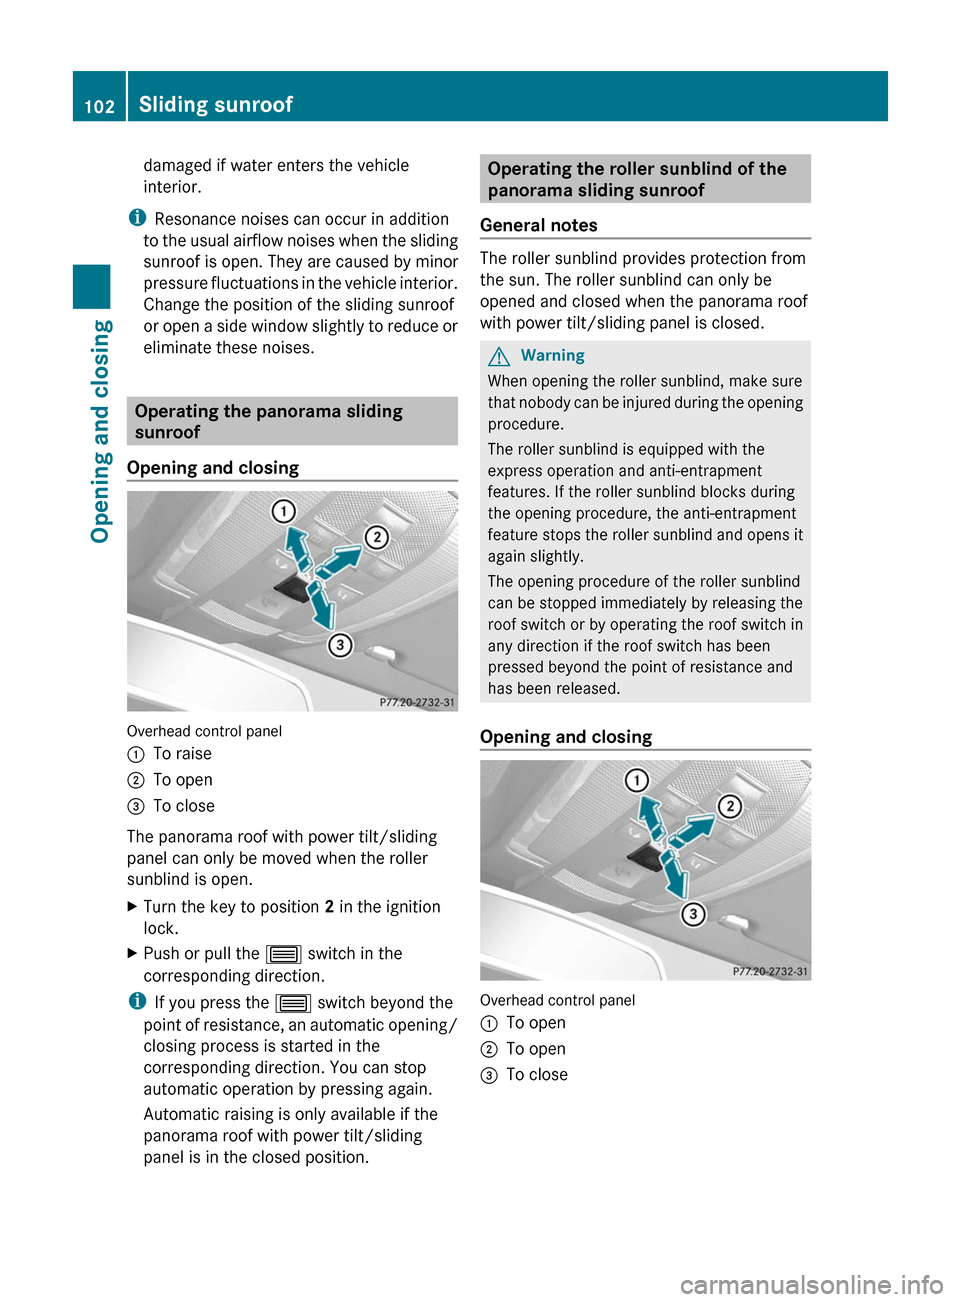
Overhead control panel
:To raise;To open=To close
The panorama roof with power tilt/sliding
panel can only be moved when the roller
sunblind is open.
XTurn the key to position 2 in the ignition
lock.XPush or pull the 3 switch in the
corresponding direction.
i If you press the 3 switch beyond the
point of resistance, an automatic opening/
closing process is started in the
corresponding direction. You can stop
automatic operation by pressing again.
Automatic raising is only available if the
panorama roof with power tilt/sliding
panel is in the closed position.
Operating the roller sunblind of the
panorama sliding sunroof
General notes
The roller sunblind provides protection from
the sun. The roller sunblind can only be
opened and closed when the panorama roof
with power tilt/sliding panel is closed.
GWarning
When opening the roller sunblind, make sure
that nobody can be injured during the opening
procedure.
The roller sunblind is equipped with the
express operation and anti-entrapment
features. If the roller sunblind blocks during
the opening procedure, the anti-entrapment
feature stops the roller sunblind and opens it
again slightly.
The opening procedure of the roller sunblind
can be stopped immediately by releasing the
roof switch or by operating the roof switch in
any direction if the roof switch has been
pressed beyond the point of resistance and
has been released.
Opening and closing
Overhead control panel
:To open;To open=To close102Sliding sunroofOpening and closing
BA 207 USA, CA Edition B 2011; 1; 3, en-USd2sboikeVersion: 3.0.3.62010-05-20T10:38:09+02:00 - Seite 102
Page 105 of 344
XTurn the key to position 2 in the ignition
lock.XPush or pull the 3 switch in the
corresponding direction.
i If you press the 3 switch beyond the
point of resistance, an automatic opening/
closing process is started in the
corresponding direction. You can stop
automatic operation by pressing again.
Resetting the panorama roof with
power tilt/sliding panel and the roller
sunblind
Reset the panorama roof with power tilt/
sliding panel and the roller sunblind if the
panorama roof with power tilt/sliding panel
or the roller sunblind does not close
smoothly.
! Do not open the panorama sliding sunroof
until it has been reset properly. Otherwise,
the panorama roof with power tilt/sliding
panel may lock in the open position.
If the panorama roof with power tilt/sliding
panel cannot be closed or adjusted,
contact a qualified specialist workshop,
e.g. a Mercedes-Benz Service Center.
XTurn the SmartKey to position 2 in the
ignition lock.XPull the 3 switch repeatedly to the point
of resistance in the direction of arrow =
until the panorama roof with power tilt/
sliding panel is fully closed.XKeep the 3 switch pulled for an
additional second.XPull the 3 switch repeatedly to the point
of resistance in the direction of arrow =
until the roller sunblind is fully closed.XKeep the 3 switch pulled for an
additional second.XMake sure that the panorama roof with
power tilt/sliding panel ( Y page 102) and
the roller sunblind (Y page 102) can be fully
opened again.Problems with the sliding sunroof
Problem: the sunroof cannot be closed
and you cannot see the cause.GWarning!
You could be severely or even fatally injured
when closing the sliding sunroof with
increased closing force or if the anti-
entrapment feature is deactivated. Make sure
that nobody can become trapped when
closing the sliding sunroof.
If the sliding sunroof is obstructed during
closing:
XImmediately after the sliding sunroof
blocks, pull the 3 switch in the
overhead control panel down to the point
of resistance and hold it until the sliding
sunroof is closed.
The sliding sunroof is closed with increased
force.
If the sliding sunroof is obstructed during
closing again:
XImmediately after the sliding sunroof
blocks, pull the 3 switch in the
overhead control panel down to the point
of resistance and hold it until the sliding
sunroof is closed.
The sliding sunroof is closed without the
anti-entrapment feature.GWarning!
Pressing and holding the sliding sunroof
switch to close the sliding sunroof
immediately after it had been blocked two
times will cause the sliding sunroof to close
without the anti-entrapment feature for as
long as you hold the switch.
Sliding sunroof103Opening and closingBA 207 USA, CA Edition B 2011; 1; 3, en-USd2sboikeVersion: 3.0.3.62010-05-20T10:38:09+02:00 - Seite 103Z
Page 111 of 344
Rear seat head restraints
Lowering and extending the rear seat
head restraints from the front (Cabriolet)
GWarning!
For safety reasons, always drive with the rear
head restraints in the raised position when
the rear seats are occupied.
Keep the area around head restraints clear of
articles (e.g. clothing) to not obstruct the
folding operation of the head restraints.
XMake sure that the SmartKey is in position
2 in the ignition lock.
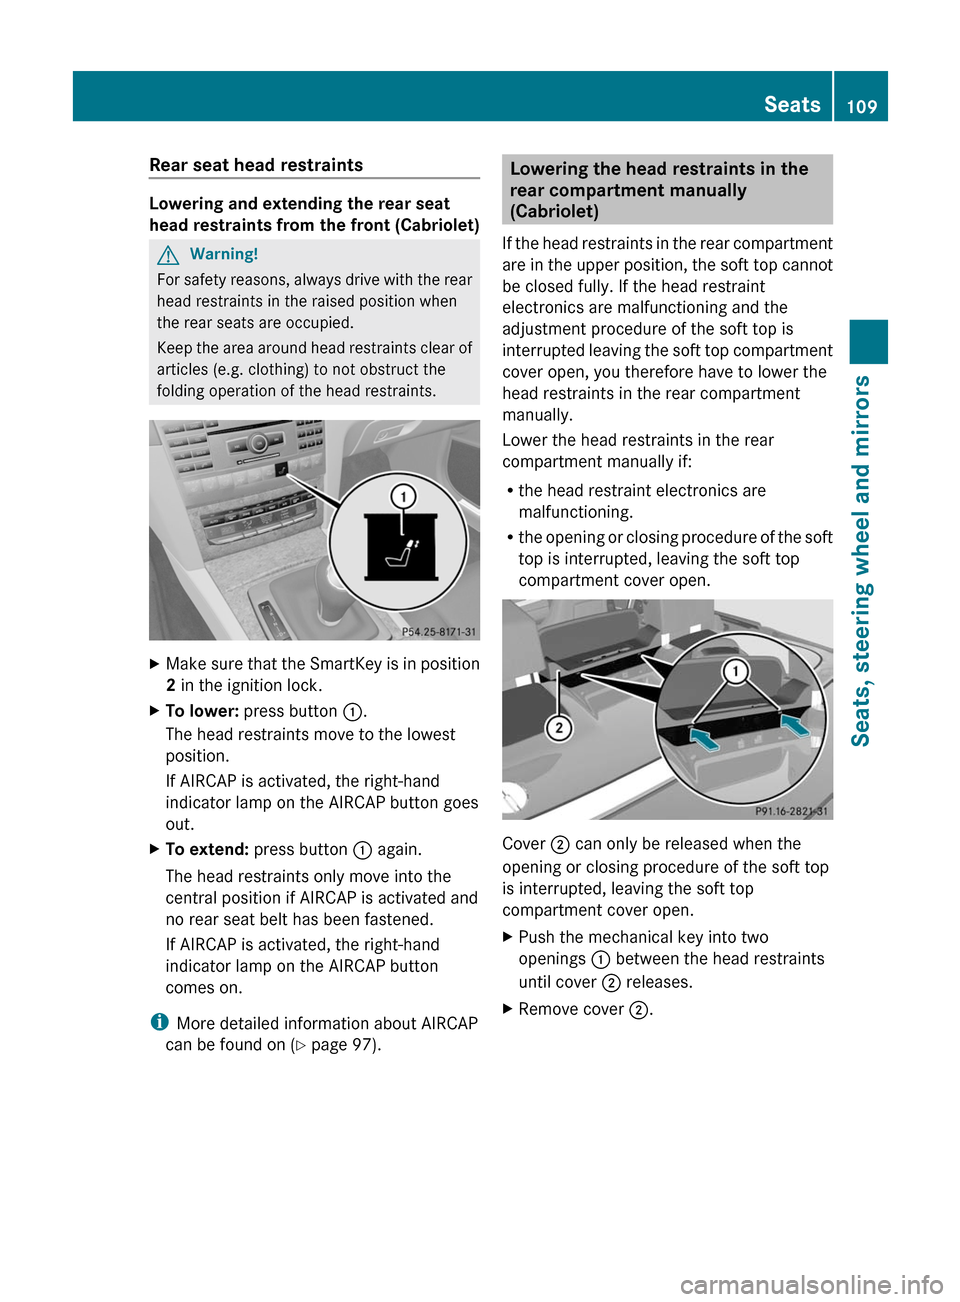
XTo lower: press button :.
The head restraints move to the lowest
position.
If AIRCAP is activated, the right-hand
indicator lamp on the AIRCAP button goes
out.
XTo extend: press button : again.
The head restraints only move into the
central position if AIRCAP is activated and
no rear seat belt has been fastened.
If AIRCAP is activated, the right-hand
indicator lamp on the AIRCAP button
comes on.
iMore detailed information about AIRCAP
can be found on (Y page 97).
Lowering the head restraints in the
rear compartment manually
(Cabriolet)
If the head restraints in the rear compartment
are in the upper position, the soft top cannot
be closed fully. If the head restraint
electronics are malfunctioning and the
adjustment procedure of the soft top is
interrupted leaving the soft top compartment
cover open, you therefore have to lower the
head restraints in the rear compartment
manually.
Lower the head restraints in the rear
compartment manually if:
Rthe head restraint electronics are
malfunctioning.
Rthe opening or closing procedure of the soft
top is interrupted, leaving the soft top
compartment cover open.
Cover ; can only be released when the
opening or closing procedure of the soft top
is interrupted, leaving the soft top
compartment cover open.
XPush the mechanical key into two
openings : between the head restraints
until cover ; releases.
XRemove cover ;.Seats109Seats, steering wheel and mirrorsBA 207 USA, CA Edition B 2011; 1; 3, en-USd2sboikeVersion: 3.0.3.62010-05-20T10:38:09+02:00 - Seite 109Z
Page 113 of 344
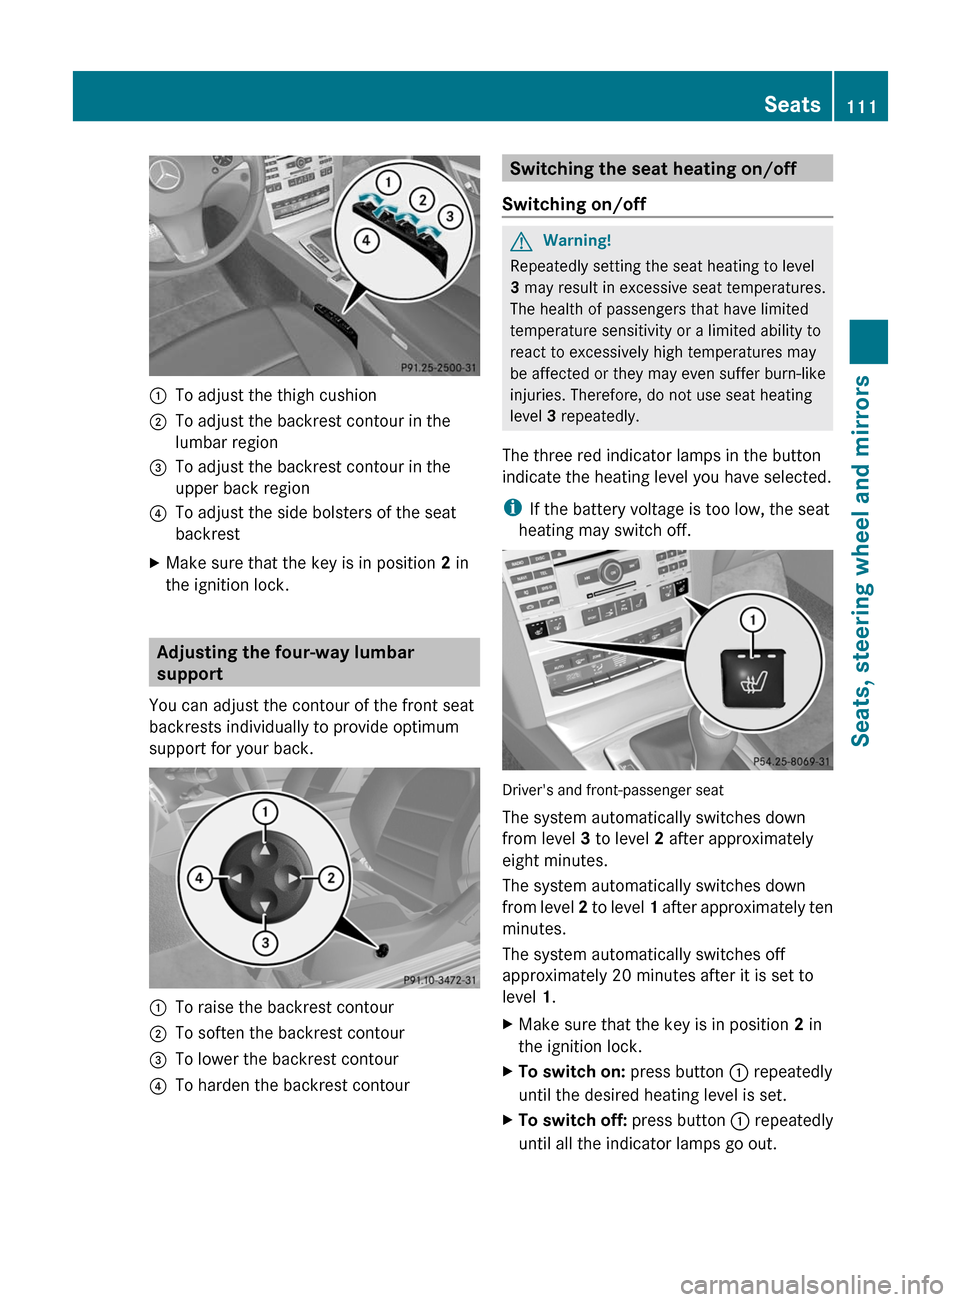
:To adjust the thigh cushion;To adjust the backrest contour in the
lumbar region
=To adjust the backrest contour in the
upper back region
?To adjust the side bolsters of the seat
backrest
XMake sure that the key is in position 2 in
the ignition lock.
Adjusting the four-way lumbar
support
You can adjust the contour of the front seat
backrests individually to provide optimum
support for your back.
:To raise the backrest contour;To soften the backrest contour=To lower the backrest contour?To harden the backrest contourSwitching the seat heating on/off
Switching on/off
GWarning!
Repeatedly setting the seat heating to level
3 may result in excessive seat temperatures.
The health of passengers that have limited
temperature sensitivity or a limited ability to
react to excessively high temperatures may
be affected or they may even suffer burn-like
injuries. Therefore, do not use seat heating
level 3 repeatedly.
The three red indicator lamps in the button
indicate the heating level you have selected.
iIf the battery voltage is too low, the seat
heating may switch off.
Driver's and front-passenger seat
The system automatically switches down
from level 3 to level 2 after approximately
eight minutes.
The system automatically switches down
from level 2 to level 1 after approximately ten
minutes.
The system automatically switches off
approximately 20 minutes after it is set to
level 1.
XMake sure that the key is in position 2 in
the ignition lock.
XTo switch on: press button : repeatedly
until the desired heating level is set.
XTo switch off: press button : repeatedly
until all the indicator lamps go out.
Seats111Seats, steering wheel and mirrorsBA 207 USA, CA Edition B 2011; 1; 3, en-USd2sboikeVersion: 3.0.3.62010-05-20T10:38:09+02:00 - Seite 111Z