2011 MERCEDES-BENZ E-Class COUPE height
[x] Cancel search: heightPage 62 of 344
RCanada only: Children 12 years old and
under may ride on the front seat if a
BabySmart™ compatible child restraint
system is installed on the front-passenger
seat. Use only Mercedes-Benz approved
BabySmart™ compatible child restraint
systems. A BabySmart™ compatible child
restraint system will deactivate the front-
passenger front air bag when installed
correctly. The front-passenger front air bag
will not be deactivated if the child restraint
systems that are installed are not
BabySmart™ compatible or if BabySmart™
compatible child restraint systems are not
installed correctly. If the front-passenger
front air bag is deployed in a collision, the
child could be struck by the air bag. This
could lead to serious or fatal injury.
R A child in a rear-facing child restraint on the
front-passenger seat will be seriously
injured or even killed if the front-passenger
front air bag inflates in a collision which
could occur under some circumstances,
even with the air bag technology installed
in your vehicle. The only way to completely
rule out this risk is by making sure you
never place a child in a rearward-facing
child restraint system on the front-
passenger seat. For this reason, we
strongly advise that you always carry
children in a rearward-facing child restraint
system on a rear seat.
R If you must install a rear-facing child
restraint on the front-passenger seat
because circumstances require you to do
so, make sure the 45 indicator lamp
is illuminated, indicating that the front-
passenger front air bag is deactivated. If the
45 indicator lamp does not light up
or goes out when the child restraint system
is installed, check the anchorages of the
restraint system. Check the 45
indicator lamp regularly while driving to
ensure that the 45 indicator lamp is
illuminated. If the 45 indicator lamp
goes out or remains out, you may only carrya child on the front-passenger seat once
the system has been repaired.
A child in a rear-facing child restraint on the
front-passenger seat will be seriously
injured or even killed if the front-passenger
front air bag inflates.
R when securing a child in a child restraint
system on the front-passenger seat, you
must:
- move the front-passenger seat as far
back as possible
- use a child restraint system that is
suitable for the age, size and weight of
the child
- observe the manufacturer's installation
instructions in order to install and secure
the child restraint system correctly.GWarning
Infants and small children should never share
a seat belt with another occupant. During an
accident, they could be crushed between the
occupant and seat belt.
A child's risk of serious or fatal injuries is
significantly increased if the child restraints
are not properly secured in the vehicle and/
or the child is not properly secured in the child
restraint.
Children too big for a toddler restraint must
ride in seats using regular seat belts. Position
the shoulder belt across the chest and
shoulder, not face or neck. A booster seat
may be necessary to achieve proper seat belt
positioning for children over 41 lb (18 kg) until
they reach a height where a lap/shoulder belt
fits properly without a booster.
When the child restraint is not in use, remove
it from the vehicle or secure it with the seat
belt to prevent the child restraint from
becoming a projectile in the event of an
accident.
60Children in the vehicleSafety
BA 207 USA, CA Edition B 2011; 1; 3, en-USd2sboikeVersion: 3.0.3.62010-05-20T10:38:09+02:00 - Seite 60
Page 63 of 344
Special seat belt retractorGWarning
Observe "Important safety notes"
( Y page 58).
All seat belts in the vehicle, except the
driver's seat belt, are equipped with a special
seat belt retractor. When activated, the
special seat belt retractor ensures that the
seat belt cannot slacken after being fastened.
Installing a child restraint system:
XAlways comply with the manufacturer's
installation instructions.XPull the seat belt smoothly from the inertia
reel.XEngage the seat belt tongue in the belt
buckle.
Activating the special seat belt retractor:
XPull the seat belt out fully and let the inertia
reel retract it again.
While the seat belt is retracting, you should
hear a ratcheting sound. The special seat
belt retractor function is enabled.XPush down on the child restraint system to
take up any slack.
Removing a child restraint system/
deactivating the special seat belt retractor:
XAlways comply with the manufacturer's
installation instructions.XPress the seat belt release button and
guide the belt tongue to the belt outlet.
The special seat belt retractor function is
deactivated.GWarning
Never release the seat belt buckle while the
vehicle is in motion, since the special seat belt
retractor will be deactivated.
LATCH-type (ISOFIX) child seat anchors
in the rearGWarning
Observe "Important safety notes"
( Y page 58).
GWarning
Children that are too large for a child restraint
must travel in seats using normal seat belts.
Position shoulder belt across the chest and
shoulder, not face or neck.
In order to attain the correct seating position
for children weighing over 41 lb (18 kg), it may
be necessary to use a booster seat until they
reach a height where a normal lap/shoulder
seat belt lies properly across their bodies
without the need for a booster seat.
Install the child restraint system according to
the manufacturer's instructions.
The child restraint system must be installed
firmly on both brackets.
An incorrectly installed child restraint system
can come loose in the event of an accident,
causing the child to be severely or fatally
injured.
Child restraint systems/child restraint
retaining brackets that are damaged or have
suffered damage due to an impact must be
replaced.
ISOFIX is a standardized securing system for
specially designed child restraint systems on
the rear seats. Securing rings for two LATCH-
type (ISOFIX) child restraint systems are
installed on the left and right of the rear seats.
Use the vehicle's seat belts to install child
restraint systems without the ISOFIX
securing system. Follow the manufacturer's
instructions for of child restraint systems.
Children in the vehicle61SafetyBA 207 USA, CA Edition B 2011; 1; 3, en-USd2sboikeVersion: 3.0.3.62010-05-20T10:38:09+02:00 - Seite 61Z
Page 101 of 344
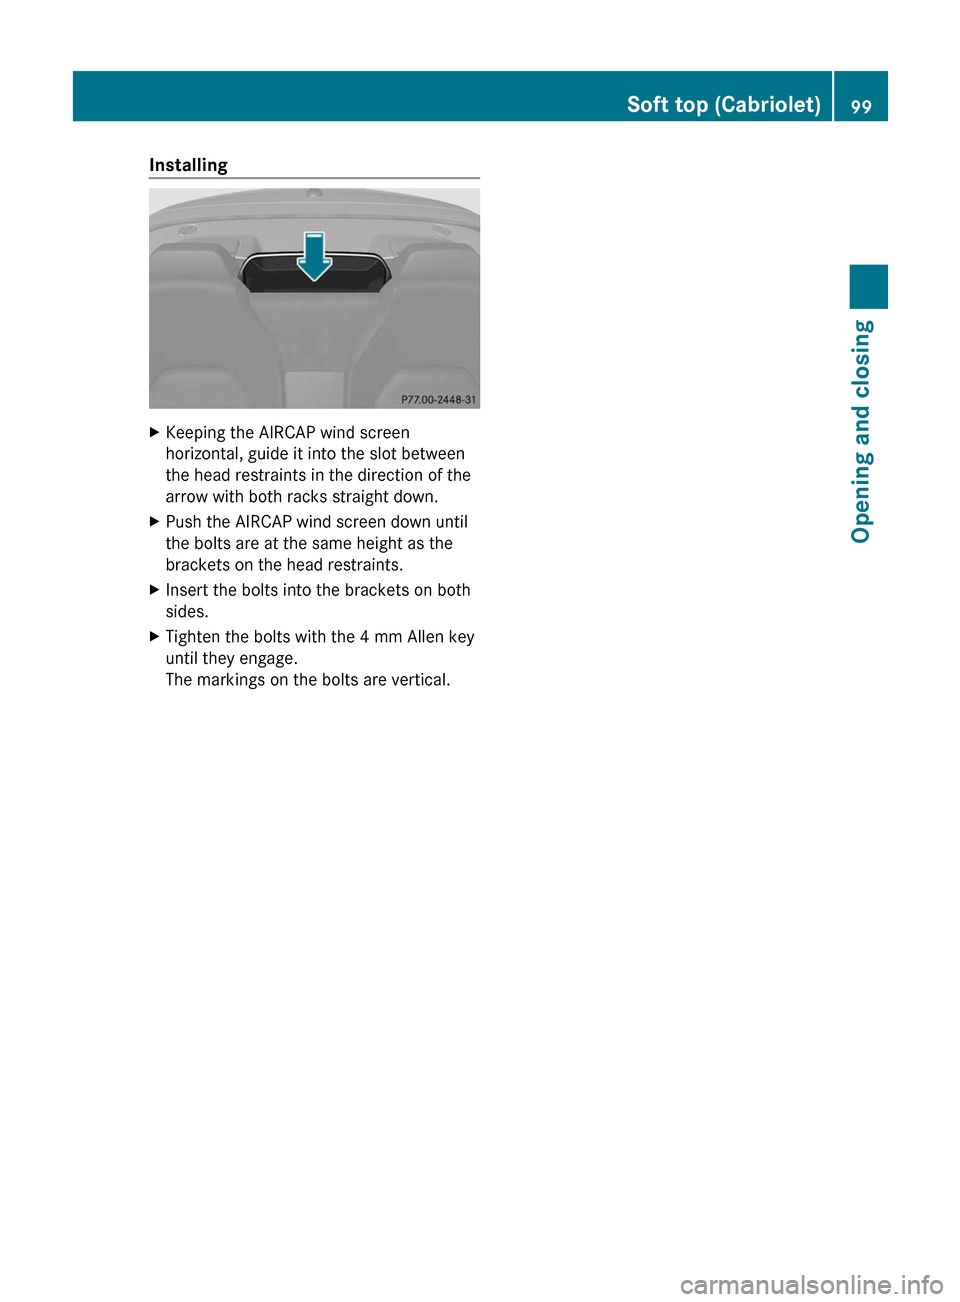
InstallingXKeeping the AIRCAP wind screen
horizontal, guide it into the slot between
the head restraints in the direction of the
arrow with both racks straight down.XPush the AIRCAP wind screen down until
the bolts are at the same height as the
brackets on the head restraints.XInsert the bolts into the brackets on both
sides.XTighten the bolts with the 4 mm Allen key
until they engage.
The markings on the bolts are vertical.Soft top (Cabriolet)99Opening and closingBA 207 USA, CA Edition B 2011; 1; 3, en-USd2sboikeVersion: 3.0.3.62010-05-20T10:38:09+02:00 - Seite 99Z
Page 110 of 344
Do not drive the vehicle without the seat head
restraints. Head restraints are intended to
help reduce injuries during an accident.
! To avoid damage to the seats and the seat
heating, observe the following information:
Rdo not spill any liquids on the seats. If
liquid is spilled on the seats, dry them as
soon as possible.
Rif the seat covers are damp or wet, do not
switch on the seat heating. The seat
heating should also not to be used to dry
the seats.
Rclean the seat covers as recommended;
see the " Interior care" section.
Rdo not transport heavy loads on the
seats. Do not place sharp objects on the
seat cushions, e.g. knives, nails or tools.
The seats should only be occupied by
passengers, if possible.
Rwhen the seat heating is in operation, do
not cover the seats with insulating
materials, e.g. covers, bags, seat covers,
child seats or booster seats.
! When you move the seats, make sure that
there are no objects in the footwell or
behind the seats. Otherwise, you could
damage the seats and the objects.
iThe head restraints in the front seats are
installed with the NECK-PRO system
(Y page 51). For this reason, it is not
possible to remove the head restraints
from the front seats.
Please contact an authorized Mercedes-
Benz Center for more information.
iRelated topics:
RThrough-loading feature in the rear
bench seat4 (folding the rear bench seat
forwards) (Y page 252)
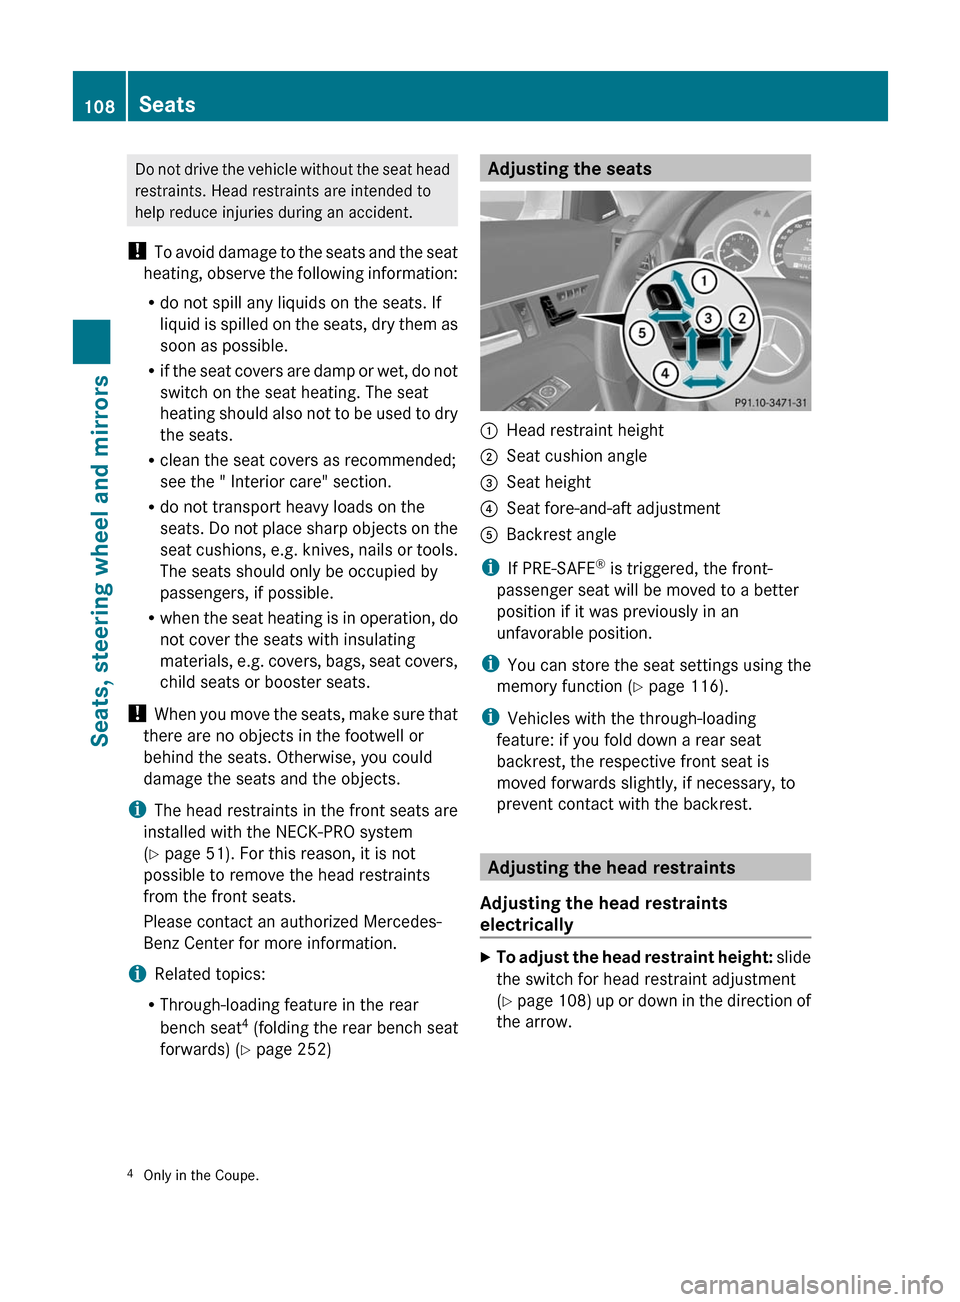
Adjusting the seats:Head restraint height;Seat cushion angle=Seat height?Seat fore-and-aft adjustmentABackrest angle
iIf PRE-SAFE® is triggered, the front-
passenger seat will be moved to a better
position if it was previously in an
unfavorable position.
iYou can store the seat settings using the
memory function (Y page 116).
iVehicles with the through-loading
feature: if you fold down a rear seat
backrest, the respective front seat is
moved forwards slightly, if necessary, to
prevent contact with the backrest.
Adjusting the head restraints
Adjusting the head restraints
electrically
XTo adjust the head restraint height: slide
the switch for head restraint adjustment
(Y page 108) up or down in the direction of
the arrow.
4Only in the Coupe.108SeatsSeats, steering wheel and mirrors
BA 207 USA, CA Edition B 2011; 1; 3, en-USd2sboikeVersion: 3.0.3.62010-05-20T10:38:09+02:00 - Seite 108
Page 115 of 344
XMake sure that the key is in position 2 in
the ignition lock.
XTo activate: press button :.
Three red indicator lamps in the button light
up. The blower starts up after a preheating
phase of seven seconds.
XPress button : repeatedly until the
desired heating level is set.
XTo switch off: press button : repeatedly
until all the indicator lamps go out.
You can use the adjustable fins on the head
restraint to adjust the height of the current of
air blown out according to your height.
Make sure that there are no objects covering
the intake grille on the back of the driver's
seat backrest.
iThe blower continues running for seven
seconds to cool down the heating
elements.
iIf the battery voltage is too low, AIRSCARF
may switch off.
Steering wheel
Important safety notes
GWarning!
Do not adjust the steering wheel while driving.
Adjusting the steering wheel while driving
could cause the driver to lose control of the
vehicle.
The electrical steering wheel adjustment
feature can be operated at any time.
Therefore, do not leave children unattended
in the vehicle, or with access to an unlocked
vehicle. A child's unsupervised access to a
vehicle could result in an accident and/or
serious personal injury.
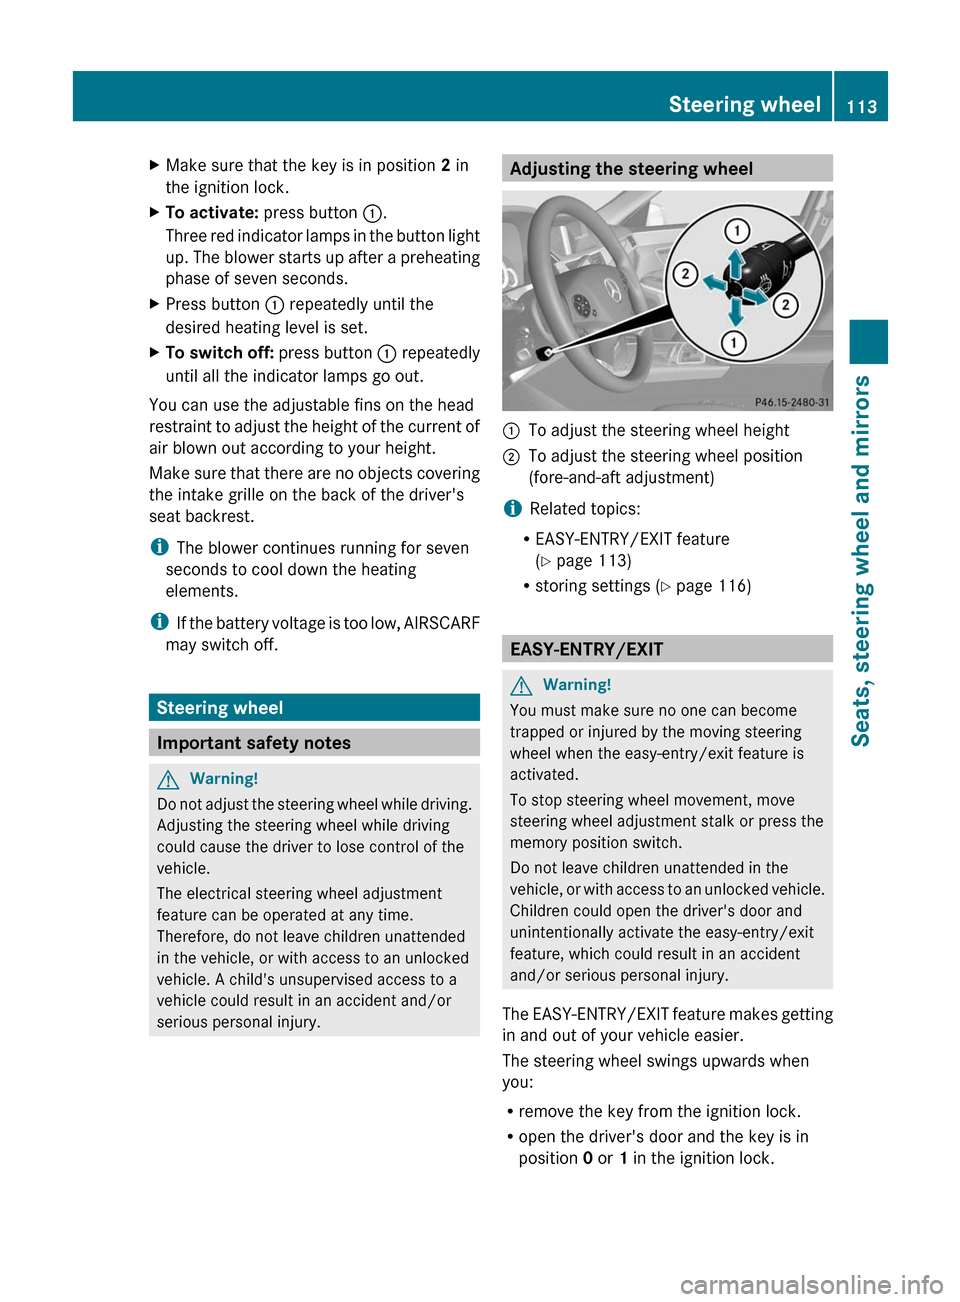
Adjusting the steering wheel:To adjust the steering wheel height;To adjust the steering wheel position
(fore-and-aft adjustment)
iRelated topics:
REASY-ENTRY/EXIT feature
(Y page 113)
Rstoring settings (Y page 116)
EASY-ENTRY/EXIT
GWarning!
You must make sure no one can become
trapped or injured by the moving steering
wheel when the easy-entry/exit feature is
activated.
To stop steering wheel movement, move
steering wheel adjustment stalk or press the
memory position switch.
Do not leave children unattended in the
vehicle, or with access to an unlocked vehicle.
Children could open the driver's door and
unintentionally activate the easy-entry/exit
feature, which could result in an accident
and/or serious personal injury.
The EASY-ENTRY/EXIT feature makes getting
in and out of your vehicle easier.
The steering wheel swings upwards when
you:
Rremove the key from the ignition lock.
Ropen the driver's door and the key is in
position 0 or 1 in the ignition lock.
Steering wheel113Seats, steering wheel and mirrorsBA 207 USA, CA Edition B 2011; 1; 3, en-USd2sboikeVersion: 3.0.3.62010-05-20T10:38:09+02:00 - Seite 113Z
Page 257 of 344
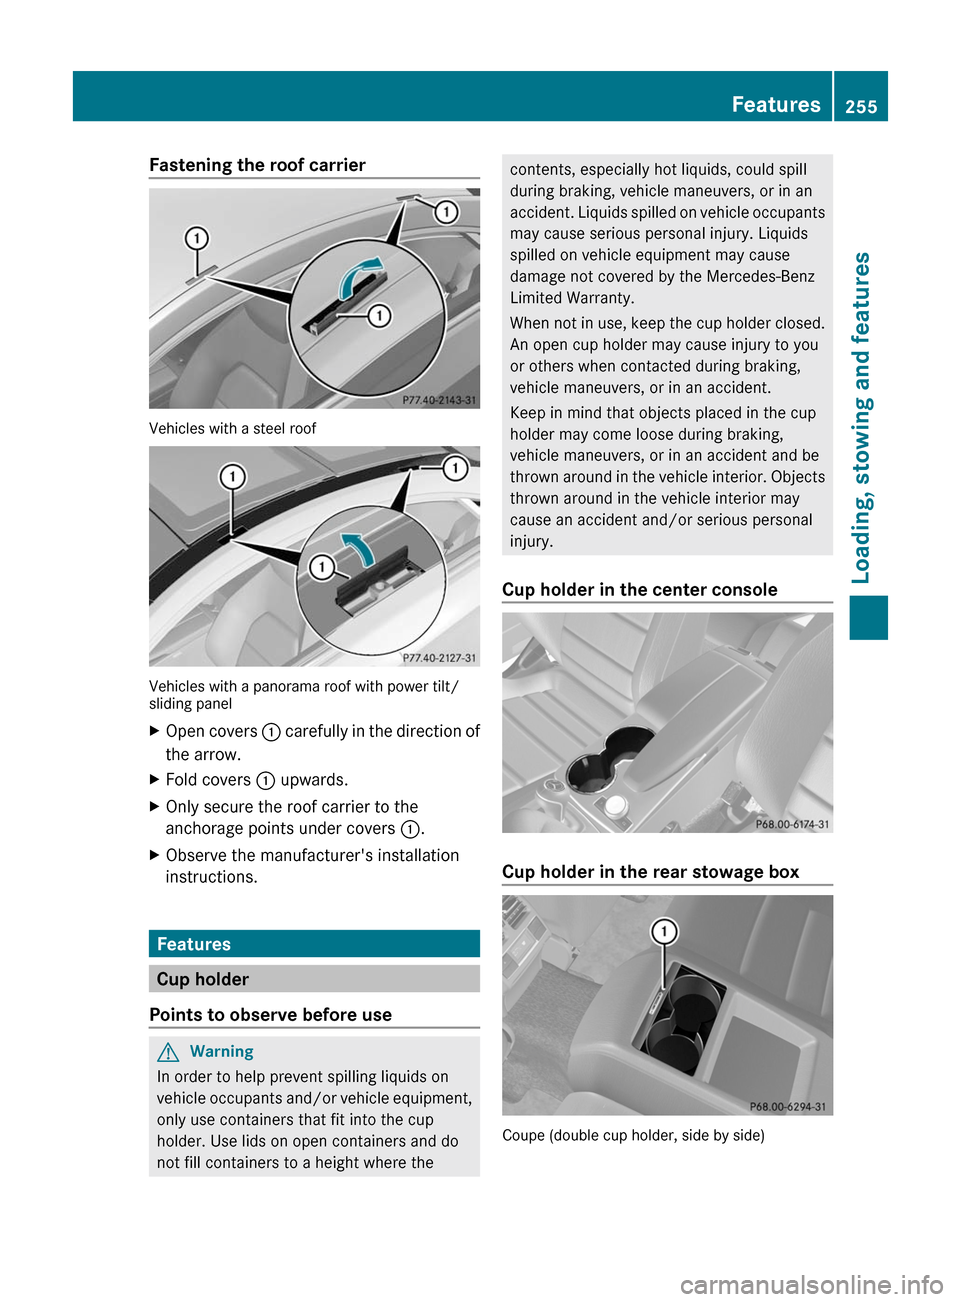
Fastening the roof carrier
Vehicles with a steel roof
Vehicles with a panorama roof with power tilt/sliding panel
XOpen covers : carefully in the direction of
the arrow.
XFold covers : upwards.XOnly secure the roof carrier to the
anchorage points under covers :.
XObserve the manufacturer's installation
instructions.
Features
Cup holder
Points to observe before use
GWarning
In order to help prevent spilling liquids on
vehicle occupants and/or vehicle equipment,
only use containers that fit into the cup
holder. Use lids on open containers and do
not fill containers to a height where the
contents, especially hot liquids, could spill
during braking, vehicle maneuvers, or in an
accident. Liquids spilled on vehicle occupants
may cause serious personal injury. Liquids
spilled on vehicle equipment may cause
damage not covered by the Mercedes-Benz
Limited Warranty.
When not in use, keep the cup holder closed.
An open cup holder may cause injury to you
or others when contacted during braking,
vehicle maneuvers, or in an accident.
Keep in mind that objects placed in the cup
holder may come loose during braking,
vehicle maneuvers, or in an accident and be
thrown around in the vehicle interior. Objects
thrown around in the vehicle interior may
cause an accident and/or serious personal
injury.
Cup holder in the center console
Cup holder in the rear stowage box
Coupe (double cup holder, side by side)
Features255Loading, stowing and featuresBA 207 USA, CA Edition B 2011; 1; 3, en-USd2sboikeVersion: 3.0.3.62010-05-20T10:38:09+02:00 - Seite 255Z
Page 275 of 344

XPull release lever : on the hood.
The hood is released.
! Make sure that the windshield wipers are
not folded away from the windshield. You
could otherwise damage the windshield
wipers or the hood.
XReach into the gap, pull hood catch
handle ; up and lift the hood.
Closing the hood
GWarning
When closing the hood, use extreme caution
not to catch hands or fingers. Be careful that
you do not close the hood on anyone.
Make sure the hood is securely engaged
before driving off. Do not continue driving if
the hood can no longer engage after an
accident, for example. The hood could
otherwise come loose while the vehicle is in
motion and injure you and/or others.
XLower the hood and let it fall from a height
of approximately 8 inches (20 cm).
XCheck that the hood has engaged properly.
If the hood can be raised slightly, it is not
properly engaged. Open it again and close
it with a little more force.
Engine oil
Notes on the oil level
Depending on the driving style, the vehicle
consumes up to 0.9 US qt (0.8 l) of oil over a
distance of 600 miles (1000 km). The oil
consumption may be higher than this when
the vehicle is new or if you frequently drive at
high engine speeds.
When checking the oil level:
Rpark the vehicle on a level surface.
Rthe engine should be switched off for at
least five minutes if the engine is at normal
operating temperature.
Rthe engine should be switched off for at
least 30 minutes if it is not at normal
operating temperature (i.e. if you only start
the engine briefly).
Checking the oil level using the oil
dipstick
Depending on the engine, the oil dipstick may
be installed in a different location.
XPull oil dipstick : out of the dipstick guide
tube.
XWipe off oil dipstick :.XSlowly insert oil dipstick : into the
dipstick guide tube to the stop, and take it
out again.
The oil level is correct if the level is between
MIN mark = and MAX mark ;.
XAdd oil if necessary.Engine compartment273Maintenance and careBA 207 USA, CA Edition B 2011; 1; 3, en-USd2sboikeVersion: 3.0.3.62010-05-20T10:38:09+02:00 - Seite 273Z
Page 292 of 344

Securing the vehicle on level ground (example:Coupe)
XOn level ground: place chocks or other
suitable items under the front and rear of
the wheel that is diagonally opposite the
wheel you wish to change.
Securing the vehicle on slight downhill gradients(example: Coupe)
XOn downhill gradients: place chocks or
other suitable items in front of the wheels
of the front and rear axle.
Raising the vehicle
GWarning
When jacking up the vehicle, only use the jack
which has been specifically approved by
Mercedes-Benz for your vehicle.
The jack is designed exclusively for jacking up
the vehicle at the jacking points built into both
sides of the vehicle. The jack saddle must be
placed centrally under the jacking point. The
jack must always be vertical when in use,
especially on inclines or declines.
The jack is intended only for lifting the vehicle
briefly for wheel changes. It is not suited for
performing maintenance work under the
vehicle. To help avoid personal injury, use the
jack only to lift the vehicle during a wheel
change.
Never get beneath the vehicle while it is
supported by the jack. Keep hands and feet
away from the area under the lifted vehicle.
Always lower the vehicle onto sufficient
capacity jackstands before working under the
vehicle.
Always firmly engage the parking brake and
block the wheels with wheel chocks or other
sizable objects before raising the vehicle with
the jack. Do not disengage the parking brake
while the vehicle is raised.
Make sure that the ground on which the
vehicle is standing and where you place the
jack is solid, level and not slippery. If
necessary, use a large underlay. On slippery
surfaces, such as tiled floors, you should use
a non-slip underlay, for example a rubber mat.
Do not use wooden blocks or similar objects
as a jack underlay. Otherwise, the jack may
not be able to achieve its load-bearing
capacity if it is not at its full height.
Never start the engine when the vehicle is
raised.
Also observe the notes on the jack.
XUsing lug wrench :, loosen the bolts on
the wheel you wish to change by about one
full turn. Do not unscrew the bolts
completely.
290Flat tireRoadside Assistance
BA 207 USA, CA Edition B 2011; 1; 3, en-USd2sboikeVersion: 3.0.3.62010-05-20T10:38:09+02:00 - Seite 290