2011 MERCEDES-BENZ E-Class COUPE Comand
[x] Cancel search: ComandPage 195 of 344
Rthe camera is exposed to a very bright white
light
Rthe immediate surroundings are
illuminated with fluorescent light (the
COMAND system display can flicker)
Rthere is a sudden change in temperature,
e.g. if you drive into a heated garage from
the cold (lens condensation)
Rthe camera lens is dirty or covered
Rthe rear of your vehicle is damaged
In this case, have the position and setting
of the camera checked by a qualified
specialist workshop. Mercedes-Benz
recommends that you contact a Mercedes-
Benz Center for this purpose.
Do not use the rear view camera in these
situations. Otherwise you could injure
yourself or others and/or damage property
including your vehicle while parking/
maneuvering.
Activating the rear view camera
XMake sure that the SmartKey is in
position 2 in the ignition lock.
XMake sure that the "rear view camera"
function is selected in COMAND (see the
separate operating instructions for
COMAND).
XEngage reverse gear.
The area behind the vehicle is shown in the
COMAND display.
Guide lines in the COMAND display
Depending on the date of manufacture of the
vehicle, the guide lines are shown in the
COMAND display.
GWarning!
Use of rear view camera can be dangerous if
you are color-blind or have impaired color
vision.
Only use rear view camera if you can see and
distinguish all colored guidelines shown by
rear view camera on the COMAND system
display.
GWarning
Please note that objects that do not touch the
ground may appear to be further away than
they actually are, for example:
Rthe bumper of a vehicle parked behind you
Rthe trailer drawbar
Rthe ball coupling of a trailer tow hitch
Rthe rear end of a truck
Ra slanted post
In such cases, you should not use the guide
lines to judge the distance. You may misjudge
the distance, which increases the risk of
impacting the objects.
Even if the object you approach is directly on
the ground, do not approach the object any
closer than the red guide line.
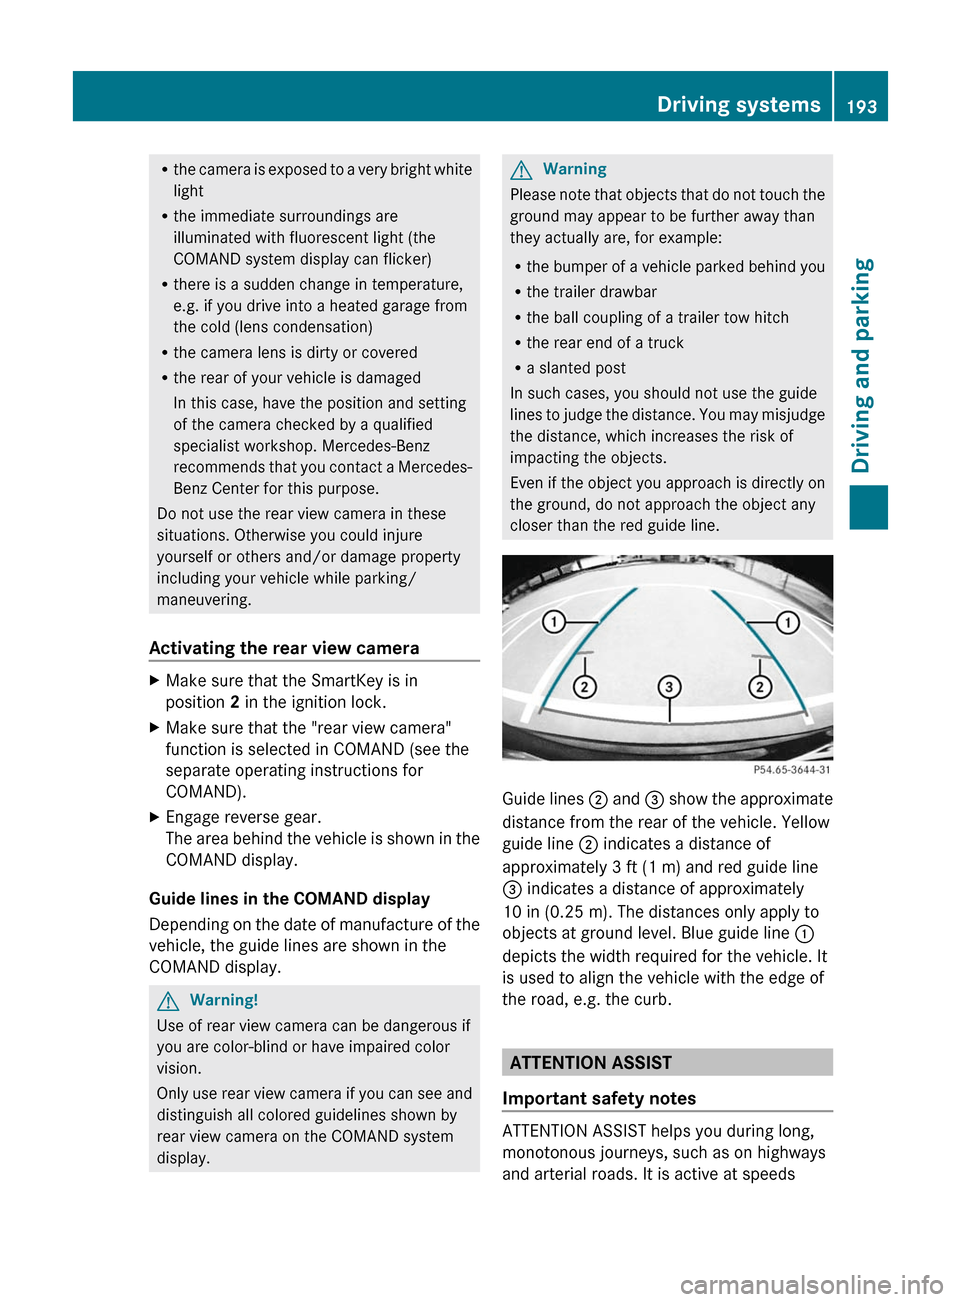
Guide lines ; and = show the approximate
distance from the rear of the vehicle. Yellow
guide line ; indicates a distance of
approximately 3 ft (1 m) and red guide line
= indicates a distance of approximately
10 in (0.25 m). The distances only apply to
objects at ground level. Blue guide line :
depicts the width required for the vehicle. It
is used to align the vehicle with the edge of
the road, e.g. the curb.
ATTENTION ASSIST
Important safety notes
ATTENTION ASSIST helps you during long,
monotonous journeys, such as on highways
and arterial roads. It is active at speeds
Driving systems193Driving and parkingBA 207 USA, CA Edition B 2011; 1; 3, en-USd2sboikeVersion: 3.0.3.62010-05-20T10:38:09+02:00 - Seite 193Z
Page 196 of 344

between 50 mph (80 km/h) and 112 mph
(180 km/h).
If ATTENTION ASSIST detects fatigue or
increasing lapses in concentration on the part
of the driver, it suggests taking a break.GWarning!
The ATTENTION ASSIST is only an aid to the
driver. It might not recognize fatigue or
increasing inattentiveness in time or fail to
recognize them at all. The system cannot
substitute a rested and attentive driver.
Fatigue can cause you to recognize dangers
too late, to misjudge potential dangers, or to
react slower. Therefore, make sure to be
rested before and during your trip. Take rests
early enough and regularly, especially during
long trips. Failure to do so could cause you to
recognize dangers too late which could result
in an accident and serious injury to you and/
or others.
ATTENTION ASSIST assesses your level of
fatigue or lapses in concentration by taking
the following criteria into account:
R your personal driving style, e.g. steering
characteristics
R journey details, e.g. time of day and length
of journey
The functionality of ATTENTION ASSIST is
restricted and warnings may be delayed or
not occur at all:
R if the road condition is poor, e.g. if the
surface is uneven or if there are potholes
R if there is a strong side wind
R if you have adopted a sporty driving style
with high cornering speeds or high rates of
acceleration
R if you predominantly drive at speeds under
50 mph (80 km/h) or over 112 mph
(180 km/h)
R if you are currently using COMAND or
making a telephone call with it
R if the time has been set incorrectly
R in active driving situations, such as when
you change lanes or change your speed
Warning and display messages in the
multifunction displayXActivate ATTENTION ASSIST using the on-
board computer ( Y page 207).
Symbol : appears in the multifunction
display.
If ATTENTION ASSIST is active, it will not warn
you until at least 20 minutes after your
journey has begun. You then hear an
intermittent warning tone twice and the
Attention Assist: Time for a rest?
message appears in the multifunction
display.
XIf necessary, take a break.XPress a to confirm the message.
On long journeys, take regular breaks in good
time to allow yourself to rest properly. If you
do not take a break and ATTENTION ASSIST
still detects fatigue or increasing lapses in
concentration, you will be warned again after
15 minutes at the earliest.
ATTENTION ASSIST is reset when you
continue your journey; it reassesses your
tiredness if:
R you switch off the engine.
R you take off your seat belt and open the
driver's door, e.g. for a change of drivers or
to take a break.
Blind Spot Assist
Important safety notes
Blind Spot Assist uses a radar sensor system
to monitor the areas on both sides of your
vehicle. It is active at speeds above
approximately 20 mph (30 km/h). A warning
display in the exterior mirrors draws your
194Driving systemsDriving and parking
BA 207 USA, CA Edition B 2011; 1; 3, en-USd2sboikeVersion: 3.0.3.62010-05-20T10:38:09+02:00 - Seite 194
Page 205 of 344
Resetting values
You can reset the values of the following
functions:
R Trip odometer
R Trip computer "From start"
R Trip computer "From reset"
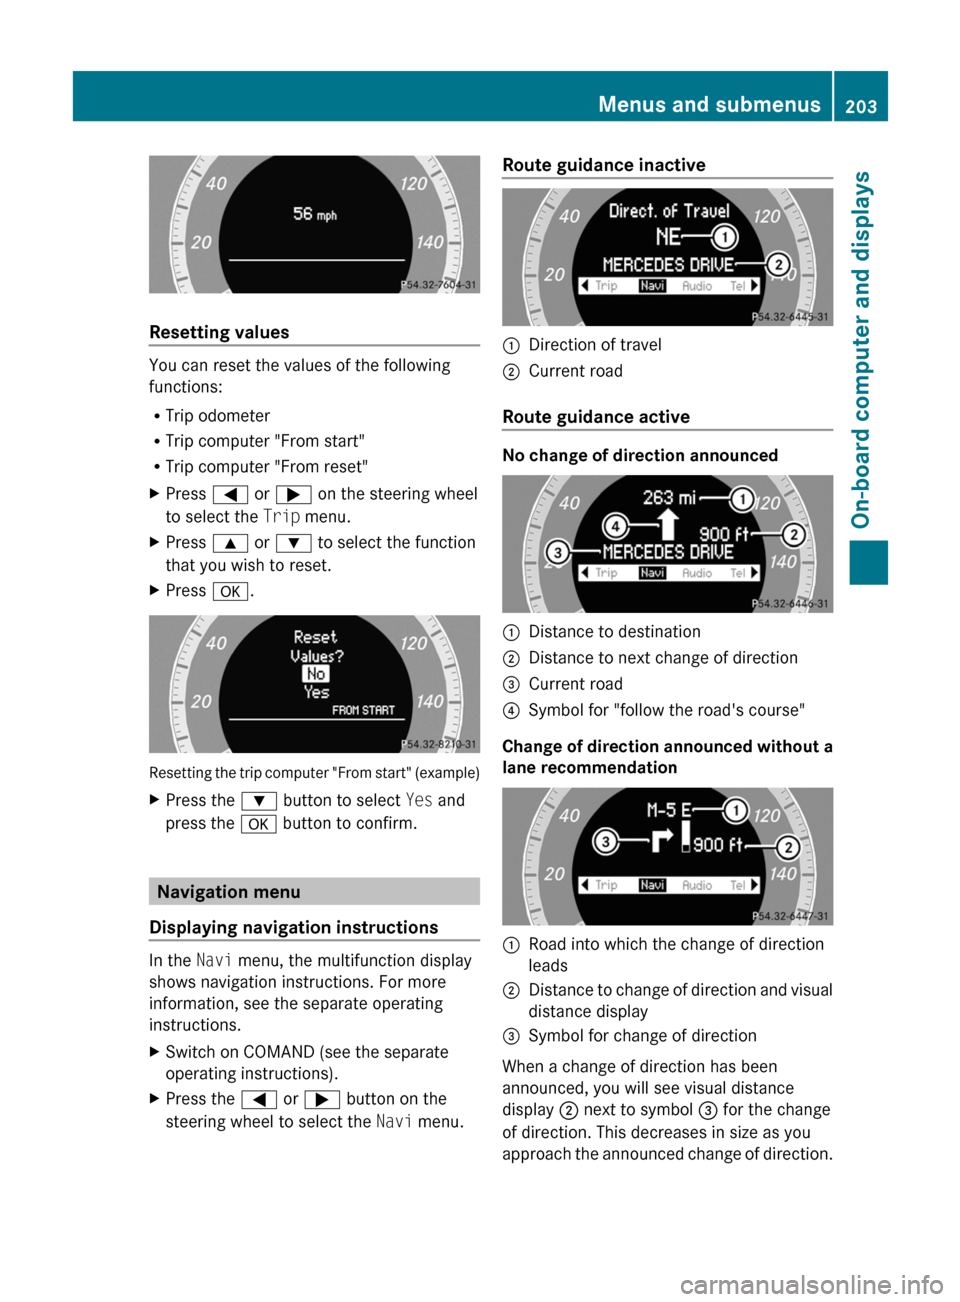
XPress = or ; on the steering wheel
to select the Trip menu. XPress 9 or : to select the function
that you wish to reset.XPress a.
Resetting the trip computer "From start" (example)
XPress the : button to select Yes and
press the a button to confirm.
Navigation menu
Displaying navigation instructions
In the Navi menu, the multifunction display
shows navigation instructions. For more
information, see the separate operating
instructions.
XSwitch on COMAND (see the separate
operating instructions).XPress the = or ; button on the
steering wheel to select the Navi menu.Route guidance inactive:Direction of travel;Current road
Route guidance active
No change of direction announced
:Distance to destination;Distance to next change of direction=Current road?Symbol for "follow the road's course"
Change of direction announced without a
lane recommendation
:Road into which the change of direction
leads;Distance to change of direction and visual
distance display=Symbol for change of direction
When a change of direction has been
announced, you will see visual distance
display ; next to symbol = for the change
of direction. This decreases in size as you
approach the announced change of direction.
Menus and submenus203On-board computer and displaysBA 207 USA, CA Edition B 2011; 1; 3, en-USd2sboikeVersion: 3.0.3.62010-05-20T10:38:09+02:00 - Seite 203Z
Page 206 of 344
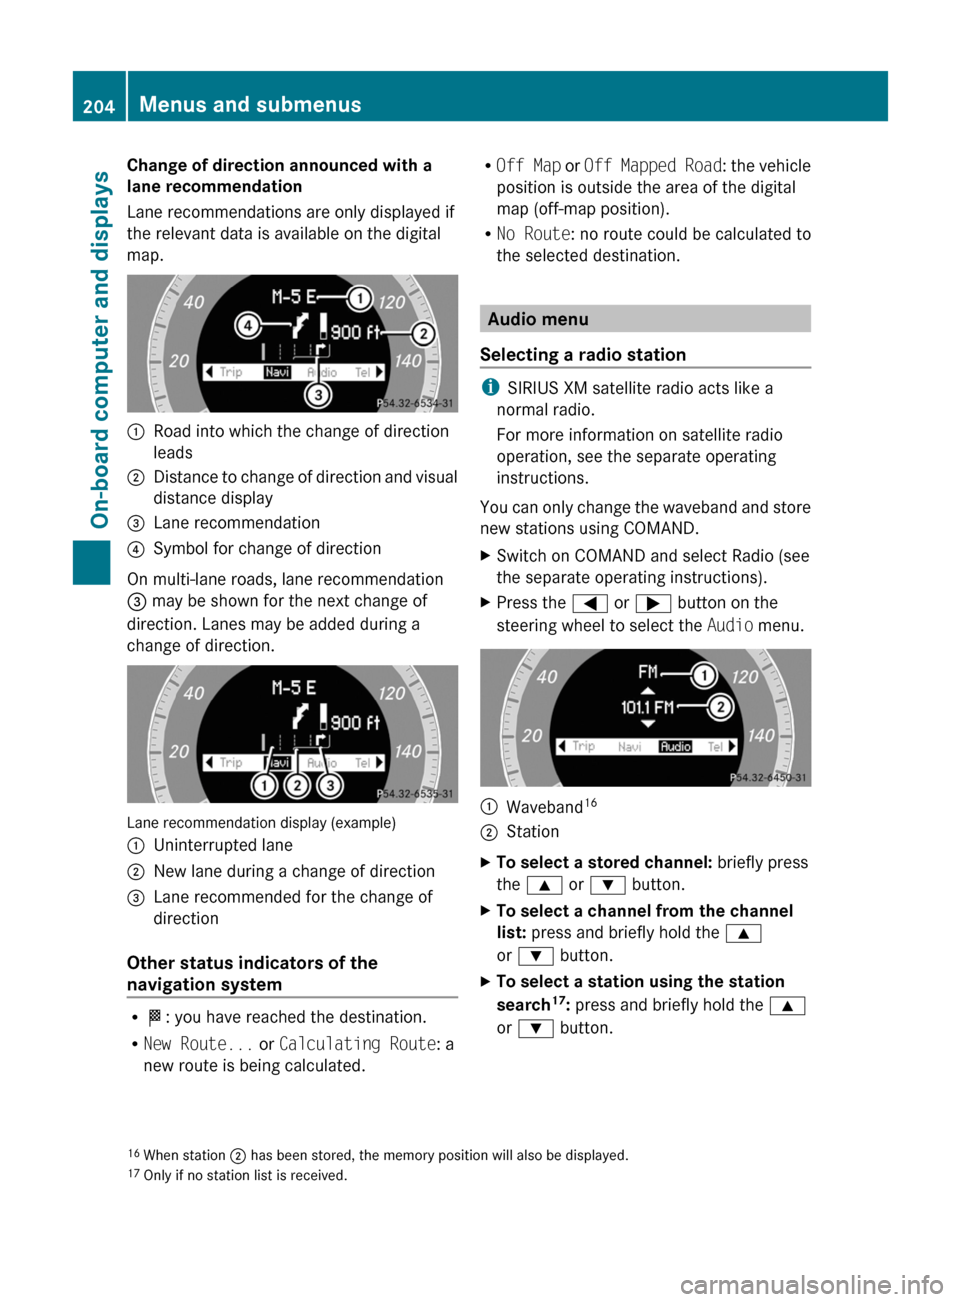
Change of direction announced with a
lane recommendation
Lane recommendations are only displayed if
the relevant data is available on the digital
map.:Road into which the change of direction
leads;Distance to change of direction and visual
distance display=Lane recommendation?Symbol for change of direction
On multi-lane roads, lane recommendation
= may be shown for the next change of
direction. Lanes may be added during a
change of direction.
Lane recommendation display (example)
:Uninterrupted lane;New lane during a change of direction=Lane recommended for the change of
direction
Other status indicators of the
navigation system
R O : you have reached the destination.
R New Route... or Calculating Route : a
new route is being calculated.
R Off Map or Off Mapped Road : the vehicle
position is outside the area of the digital
map (off-map position).
R No Route : no route could be calculated to
the selected destination.
Audio menu
Selecting a radio station
i SIRIUS XM satellite radio acts like a
normal radio.
For more information on satellite radio
operation, see the separate operating
instructions.
You can only change the waveband and store
new stations using COMAND.
XSwitch on COMAND and select Radio (see
the separate operating instructions).XPress the = or ; button on the
steering wheel to select the Audio menu.:Waveband 16;StationXTo select a stored channel:
briefly press
the 9 or : button.XTo select a channel from the channel
list: press and briefly hold the 9
or : button.XTo select a station using the station
search 17
: press and briefly hold the 9
or : button.16
When station ; has been stored, the memory position will also be displayed.
17 Only if no station list is received.204Menus and submenusOn-board computer and displays
BA 207 USA, CA Edition B 2011; 1; 3, en-USd2sboikeVersion: 3.0.3.62010-05-20T10:38:09+02:00 - Seite 204
Page 207 of 344
Audio player or audio media operation
Audio data from various audio devices or
media can be played, depending on the
equipment installed in the vehicle.
XSwitch on COMAND and select the audio
player or medium (see the separate
operating instructions).XPress the = or ; button on the
steering wheel to select the Audio menu.
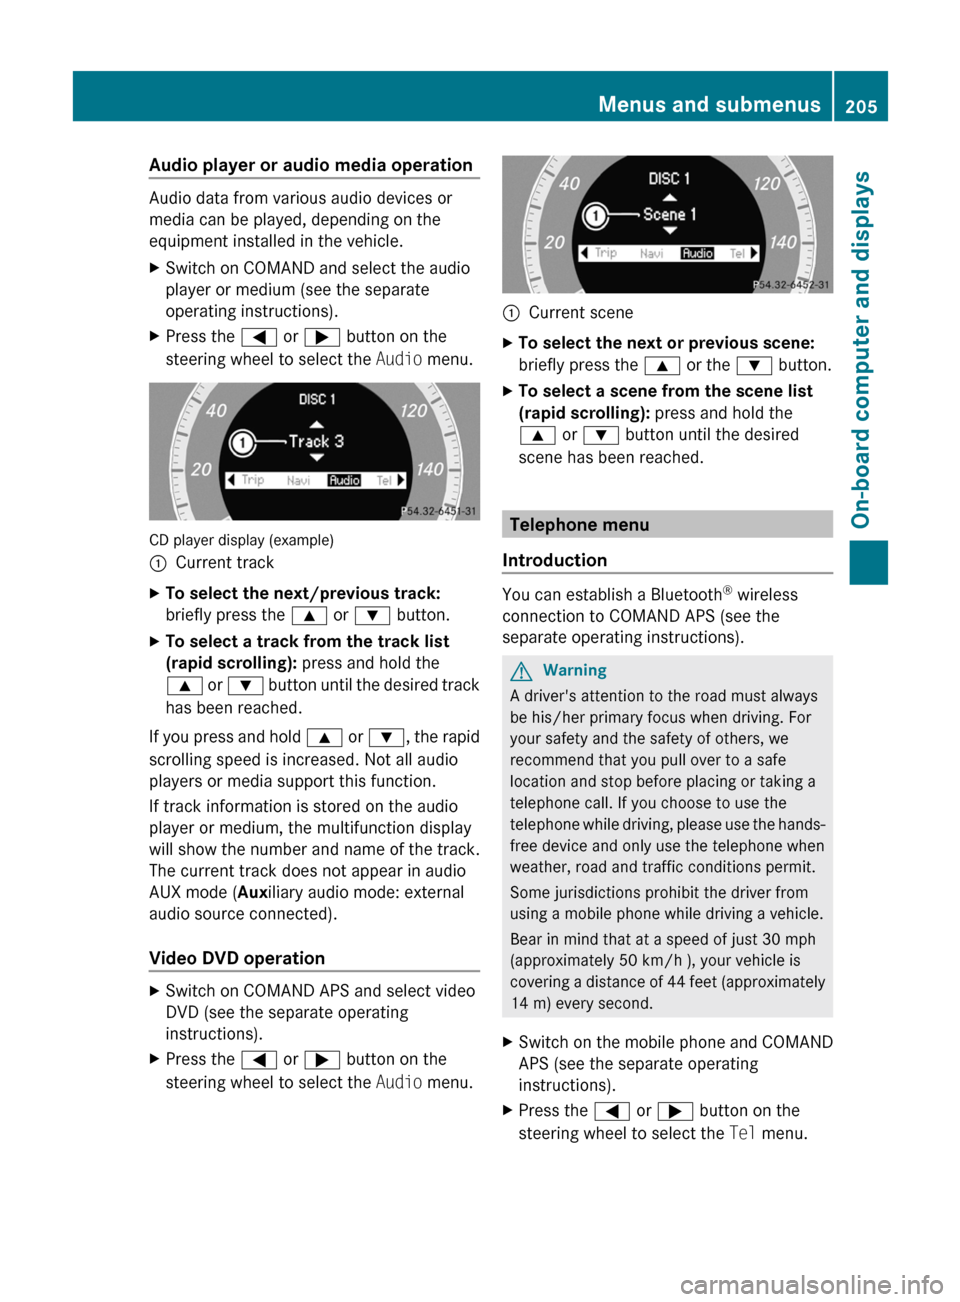
CD player display (example)
:Current trackXTo select the next/previous track:
briefly press the 9 or : button.XTo select a track from the track list
(rapid scrolling): press and hold the
9 or : button until the desired track
has been reached.
If you press and hold 9 or : , the rapid
scrolling speed is increased. Not all audio
players or media support this function.
If track information is stored on the audio
player or medium, the multifunction display
will show the number and name of the track.
The current track does not appear in audio
AUX mode ( Auxiliary audio mode: external
audio source connected).
Video DVD operation
XSwitch on COMAND APS and select video
DVD (see the separate operating
instructions).XPress the = or ; button on the
steering wheel to select the Audio menu.:Current sceneXTo select the next or previous scene:
briefly press the 9 or the : button.XTo select a scene from the scene list
(rapid scrolling): press and hold the
9 or : button until the desired
scene has been reached.
Telephone menu
Introduction
You can establish a Bluetooth ®
wireless
connection to COMAND APS (see the
separate operating instructions).
GWarning
A driver's attention to the road must always
be his/her primary focus when driving. For
your safety and the safety of others, we
recommend that you pull over to a safe
location and stop before placing or taking a
telephone call. If you choose to use the
telephone while driving, please use the hands-
free device and only use the telephone when
weather, road and traffic conditions permit.
Some jurisdictions prohibit the driver from
using a mobile phone while driving a vehicle.
Bear in mind that at a speed of just 30 mph
(approximately 50 km/h ), your vehicle is
covering a distance of 44 feet (approximately
14 m) every second.
XSwitch on the mobile phone and COMAND
APS (see the separate operating
instructions).XPress the = or ; button on the
steering wheel to select the Tel menu.Menus and submenus205On-board computer and displaysBA 207 USA, CA Edition B 2011; 1; 3, en-USd2sboikeVersion: 3.0.3.62010-05-20T10:38:09+02:00 - Seite 205Z
Page 208 of 344
You will see one of the following display
messages in the multifunction display:
R Telephone Ready or the name of the
network provider: the mobile phone has
found a network and is ready to receive.
R No Service : No network is available.
Accepting a call
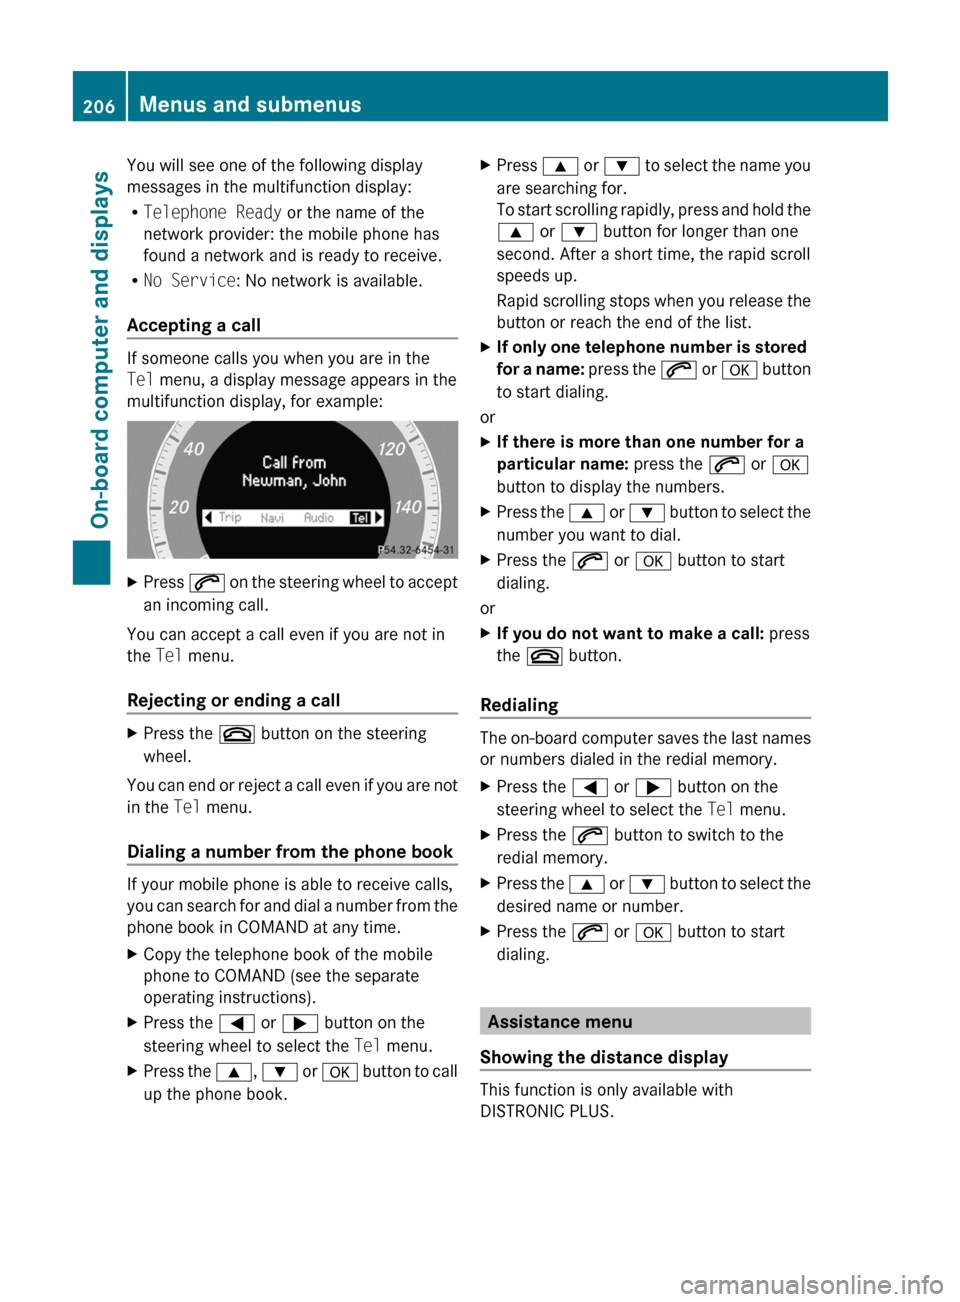
If someone calls you when you are in the
Tel menu, a display message appears in the
multifunction display, for example:
XPress 6 on the steering wheel to accept
an incoming call.
You can accept a call even if you are not in
the Tel menu.
Rejecting or ending a call
XPress the ~ button on the steering
wheel.
You can end or reject a call even if you are not
in the Tel menu.
Dialing a number from the phone book
If your mobile phone is able to receive calls,
you can search for and dial a number from the
phone book in COMAND at any time.
XCopy the telephone book of the mobile
phone to COMAND (see the separate
operating instructions).XPress the = or ; button on the
steering wheel to select the Tel menu.XPress the 9, : or a button to call
up the phone book.XPress 9 or : to select the name you
are searching for.
To start scrolling rapidly, press and hold the
9 or : button for longer than one
second. After a short time, the rapid scroll
speeds up.
Rapid scrolling stops when you release the
button or reach the end of the list.XIf only one telephone number is stored
for a name: press the 6 or a button
to start dialing.
or
XIf there is more than one number for a
particular name: press the 6 or a
button to display the numbers.XPress the 9 or : button to select the
number you want to dial.XPress the 6 or a button to start
dialing.
or
XIf you do not want to make a call: press
the ~ button.
Redialing
The on-board computer saves the last names
or numbers dialed in the redial memory.
XPress the = or ; button on the
steering wheel to select the Tel menu.XPress the 6 button to switch to the
redial memory.XPress the 9 or : button to select the
desired name or number.XPress the 6 or a button to start
dialing.
Assistance menu
Showing the distance display
This function is only available with
DISTRONIC PLUS.
206Menus and submenusOn-board computer and displays
BA 207 USA, CA Edition B 2011; 1; 3, en-USd2sboikeVersion: 3.0.3.62010-05-20T10:38:09+02:00 - Seite 206
Page 253 of 344
devices; see separate COMAND operating
instructions.
iThe glove box can be ventilated
(Y page 146).
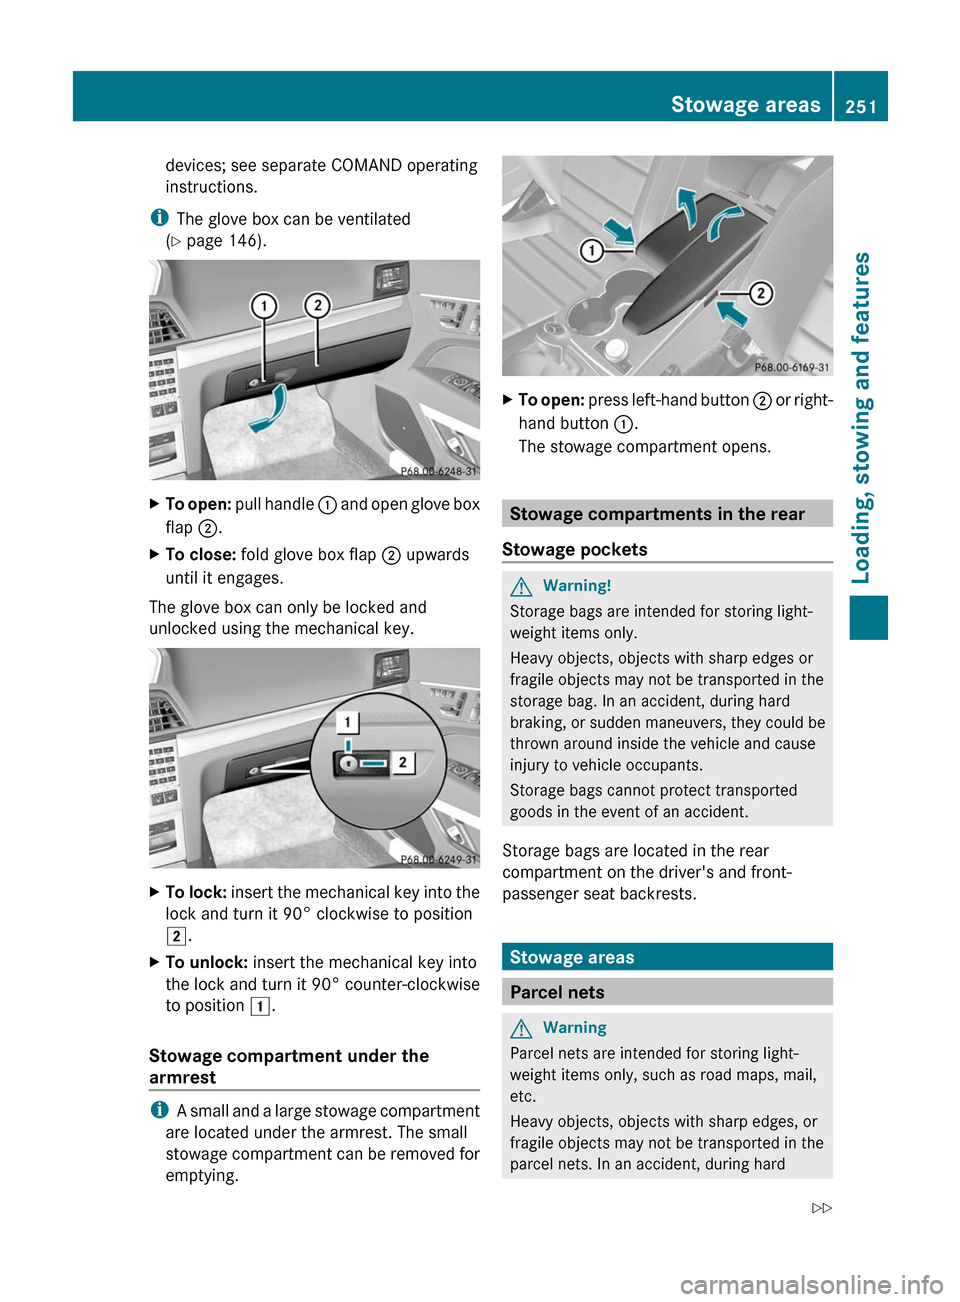
XTo open: pull handle : and open glove box
flap ;.
XTo close: fold glove box flap ; upwards
until it engages.
The glove box can only be locked and
unlocked using the mechanical key.
XTo lock: insert the mechanical key into the
lock and turn it 90° clockwise to position
2.
XTo unlock: insert the mechanical key into
the lock and turn it 90° counter-clockwise
to position 1.
Stowage compartment under the
armrest
iA small and a large stowage compartment
are located under the armrest. The small
stowage compartment can be removed for
emptying.
XTo open: press left-hand button ; or right-
hand button :.
The stowage compartment opens.
Stowage compartments in the rear
Stowage pockets
GWarning!
Storage bags are intended for storing light-
weight items only.
Heavy objects, objects with sharp edges or
fragile objects may not be transported in the
storage bag. In an accident, during hard
braking, or sudden maneuvers, they could be
thrown around inside the vehicle and cause
injury to vehicle occupants.
Storage bags cannot protect transported
goods in the event of an accident.
Storage bags are located in the rear
compartment on the driver's and front-
passenger seat backrests.
Stowage areas
Parcel nets
GWarning
Parcel nets are intended for storing light-
weight items only, such as road maps, mail,
etc.
Heavy objects, objects with sharp edges, or
fragile objects may not be transported in the
parcel nets. In an accident, during hard
Stowage areas251Loading, stowing and featuresBA 207 USA, CA Edition B 2011; 1; 3, en-USd2sboikeVersion: 3.0.3.62010-05-20T10:38:09+02:00 - Seite 251Z
Page 262 of 344
service subscription to a surveillance
service provider.
R the battery is sufficiently charged.
R the corresponding cellular phone network
is available for transmitting data to the
customer center.
i Determining the location of the vehicle on
a map is only possible if there is sufficient
GPS reception and the vehicle position can
be forwarded to the customer center.
The mbrace system
The mbrace system provides three different
services:
R automatic and manual emergency call
R Roadside Assistance call
R MB info call
To control the volume during an mbrace call,
proceed as follows:
XPress the W or X button on the
multifunction steering wheel.
or
XUse the volume controller of COMAND.
You can find information and a description of
all available features under "Owners Online"
at http://www.mbusa.com 22
System self-test
After you have switched on the ignition, the
system carries out a self-diagnosis.
GWarning
A malfunction in the system has been
detected if any or all of the following
conditions occur:
R The indicator lamp in the SOS button does
not come on during the system self-test.
R The indicator lamp in Roadside Assistance
button F does not come on during the
system self-test.
R The indicator lamp in Information button
ï does not come on during the system
self-test.
R The indicator lamp in the SOS button,
Roadside Assistance button F, or
Information button ï remains
illuminated constantly in red after the
system self-test.
R The message Tele Aid Inoperative or
Tele Aid Not Activated appears in the
multifunction display after the system self-
test.
If a malfunction is indicated as outlined above,
the system may not operate as expected. In
case of an emergency, help will have to be
summoned by other means.
Have the system checked at the nearest
authorized Mercedes-Benz Center or contact
the following service hotlines:
R USA: Response Center under the number
866-990-9007
R Canada: Customer Service under
1-888-923-8367.
Emergency call
Important safety notes
! A license agreement must exist in order
to activate the mbrace service. Make sure
that your system is activated and ready for
use, and press the ï MB info call button
to register. If you cannot carry out any of
the steps mentioned, the system may not
be activated.
If you have any questions concerning
activation, please contact one of the
following service hotlines:
R USA: Response Center under
866-990-9007
R Canada: Customer Service under
1-888-923-8367
22 USA only.260FeaturesLoading, stowing and features
BA 207 USA, CA Edition B 2011; 1; 3, en-USd2sboikeVersion: 3.0.3.62010-05-20T10:38:09+02:00 - Seite 260