2011 MERCEDES-BENZ E-Class COUPE key
[x] Cancel search: keyPage 276 of 344

Adding engine oilHEnvironmental note
When adding oil, take care not to spill any. If
oil enters the soil or waterways, it is harmful
to the environment.
! Only use engine oils and oil filters which
have been approved for vehicles with a
service system. A list of the engine oils and
oil filters that have been tested and
approved according to the Mercedes-Benz
specifications for service products can be
found on the Internet at http://
www.mbusa.com (USA only). Further
information on tested and approved engine
oils and oil filters can be obtained from any
authorized Mercedes-Benz Center.
The following causes engine failure or
damage to the exhaust system:
Rusing engine oils and oil filters that are
not specifically approved for the service
system
Rreplacing the engine oil and oil filter later
than the specified replacement interval
required by the service system
Rusing engine oil additives
Example: engine oil cap
XTurn cap : counter-clockwise and remove
it.
XAdd the amount of oil required.
Fill carefully to the maximum mark on the oil
dipstick.
iThe difference in quantity between the
MIN mark and the MAX mark on the
dipstick is (depending on the engine)
approximately 1.6 to 2.1 US qt. (1.5 to 2 l).
! Do not add too much oil. If the oil level is
above the MAX mark on the dipstick, too
much oil has been added. This can lead to
damage to the engine or the catalytic
converter. Have excess oil siphoned off.
Further information on engine oil
(Y page 337).
XReplace cap : on the filler neck and
tighten clockwise.
Ensure that the cap locks into place
securely.
Checking and adding other service
products
Checking the coolant level
Only check the coolant level when the vehicle
is on a level surface and the engine has cooled
down.
XTurn the SmartKey to position
2(Y page 151) in the ignition lock.
On vehicles with KEYLESS-GO, press the
Start/Stop button twice (Y page 151).
XCheck the coolant temperature display in
the instrument cluster.
The coolant temperature must be below
158 ‡ (70 †).
GWarning
In order to avoid any potentially serious burns:
Ruse extreme caution when opening the
hood if there are any signs of steam or
coolant leaking from the cooling system, or
if the coolant temperature display indicates
that the coolant is overheated.
Rdo not remove the pressure cap on the
coolant reservoir if the coolant temperature
is above 158 ‡ (70 †). Allow the engine to
cool down before removing the cap. The
274Engine compartmentMaintenance and care
BA 207 USA, CA Edition B 2011; 1; 3, en-USd2sboikeVersion: 3.0.3.62010-05-20T10:38:09+02:00 - Seite 274
Page 280 of 344

carefully after washing the vehicle until the
brakes have dried.GRisk of accident
The vehicle is braked when the HOLD function
or DISTRONIC PLUS is activated. Therefore,
deactivate the HOLD function and DISTRONIC
PLUS before the vehicle is washed in an
automatic car wash.
You can wash the vehicle in an automatic car
wash from the very start.
! It is preferable to use car washes with
adjustable 26
high-pressure precleaning. In
car washes that use high water pressures,
there is a risk that a small amount of water
may leak into the vehicle.
! Cabriolet: do not treat the vehicle with
hot wax under any circumstances.
! Cabriolet: pull the SmartKey out of the
ignition lock when washing the vehicle. This
ensures that the wind deflector on the
windshield is retracted. The wind deflector
may otherwise be damaged.
! Never clean your vehicle in a Touchless
Automatic Car Wash as these use special
cleaning agents. These cleaning agents can
damage the paintwork or plastic parts.
If the vehicle is very dirty, pre-wash it before
cleaning it in an automatic car wash.
! In car washes with a towing mechanism,
make sure that the automatic transmission
is in transmission position N, otherwise the
vehicle could be damaged.
! Make sure that the side windows are
completely closed, that the ventilation/
heating is switched off and that the
windshield wiper switch is set to 0.
Otherwise, the rain/light sensor could be
activated, triggering unintended wiper
movements. This can cause damage to the
vehicle.
After using an automatic car wash, wipe off
wax from the windshield and the wiper
blades. This will prevent smears and reduce
wiping noises caused by residue on the
windshield.
Washing by hand
Carefully remove all deposits of road salt as
soon as possible when driving in winter.
Also, clean the insides of the wheels when
washing the underbody of the vehicle.
XDo not use hot water and do not wash the
vehicle in direct sunlight.XUse a soft car sponge for cleaning.XUse a gentle cleaning agent, e.g. a
Mercedes-Benz approved car shampoo.XWash down the vehicle with a gentle water
jet.XDo not point the water jet directly at the air
inlets.XUse plenty of water and rinse the sponge
frequently.XRinse the vehicle with clean water and dry
it thoroughly with a chamois.XDo not allow the cleaning agent to dry on
the paintwork.
Power washers
GWarning!
Do not use power washers with circular-jet
nozzles (dirt grinders) to clean your vehicle, in
particular the tires. You could otherwise
damage the tires and cause an accident.
! Maintain the distance between the
vehicle and the nozzle of the power washer
at 11.8 in (30 cm). Information about the
correct distance is available from the
equipment manufacturer.
Move the power washer nozzle around
when cleaning your vehicle.
26 Corresponds to the specification for the Cabriolet program.278CareMaintenance and care
BA 207 USA, CA Edition B 2011; 1; 3, en-USd2sboikeVersion: 3.0.3.62010-05-20T10:38:09+02:00 - Seite 278
Page 282 of 344
Rtar or stain remover
R other organic solvents
! Remove bird droppings immediately as
they are corrosive and, therefore, can make
the soft-top fabric leak. Do not use high-
pressure cleaning equipment to clean the
vehicle. Do not use sharp-edged equipment
to remove ice and snow.
Frequent cleaning reduces the resistance to
dirt of the soft top.
To restore this resistance to dirt, clean the
soft top using soft top cleaning agents that
have been recommended and approved by
Mercedes-Benz.
Improper cleaning and care, as well as aging,
can cause the soft top seams to leak. Have
the soft top seams sealed at a qualified
specialist workshop, e.g. at an authorized
Mercedes-Benz Center.
i Cover the soft top with a suitable cover if
you plan to leave the vehicle outside for a
long period of time.
Cleaning AIRCAP
Cleaning the wind deflector
Clean the wind deflector on the windshield
with the soft top closed.
XApply the parking brake firmly.XVehicles with SmartKey: turn the
SmartKey to position 2(Y page 151) in the
ignition lock.XVehicles with KEYLESS-GO: press the
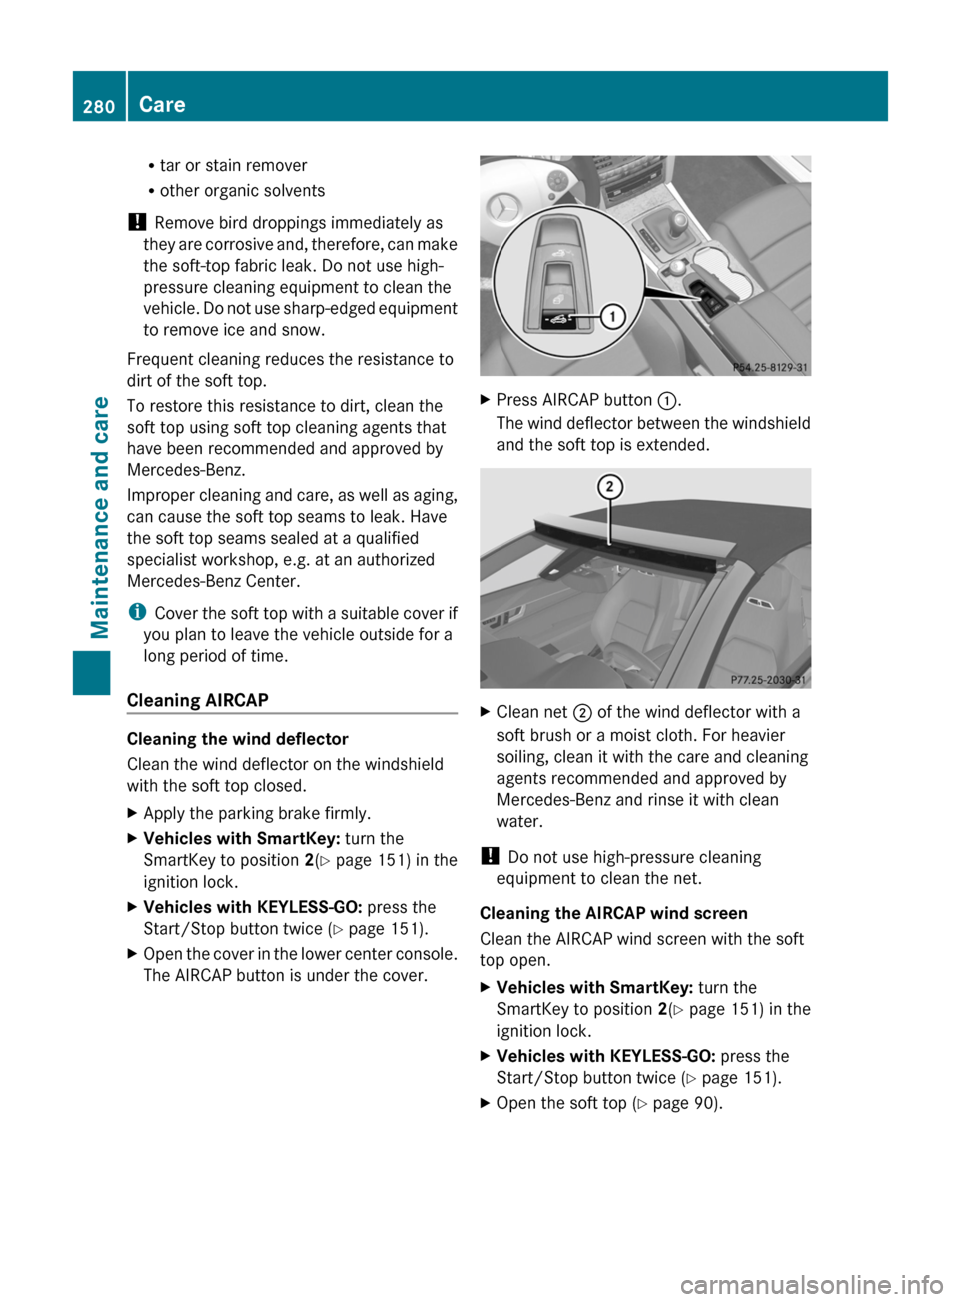
Start/Stop button twice ( Y page 151).XOpen the cover in the lower center console.
The AIRCAP button is under the cover.XPress AIRCAP button :.
The wind deflector between the windshield
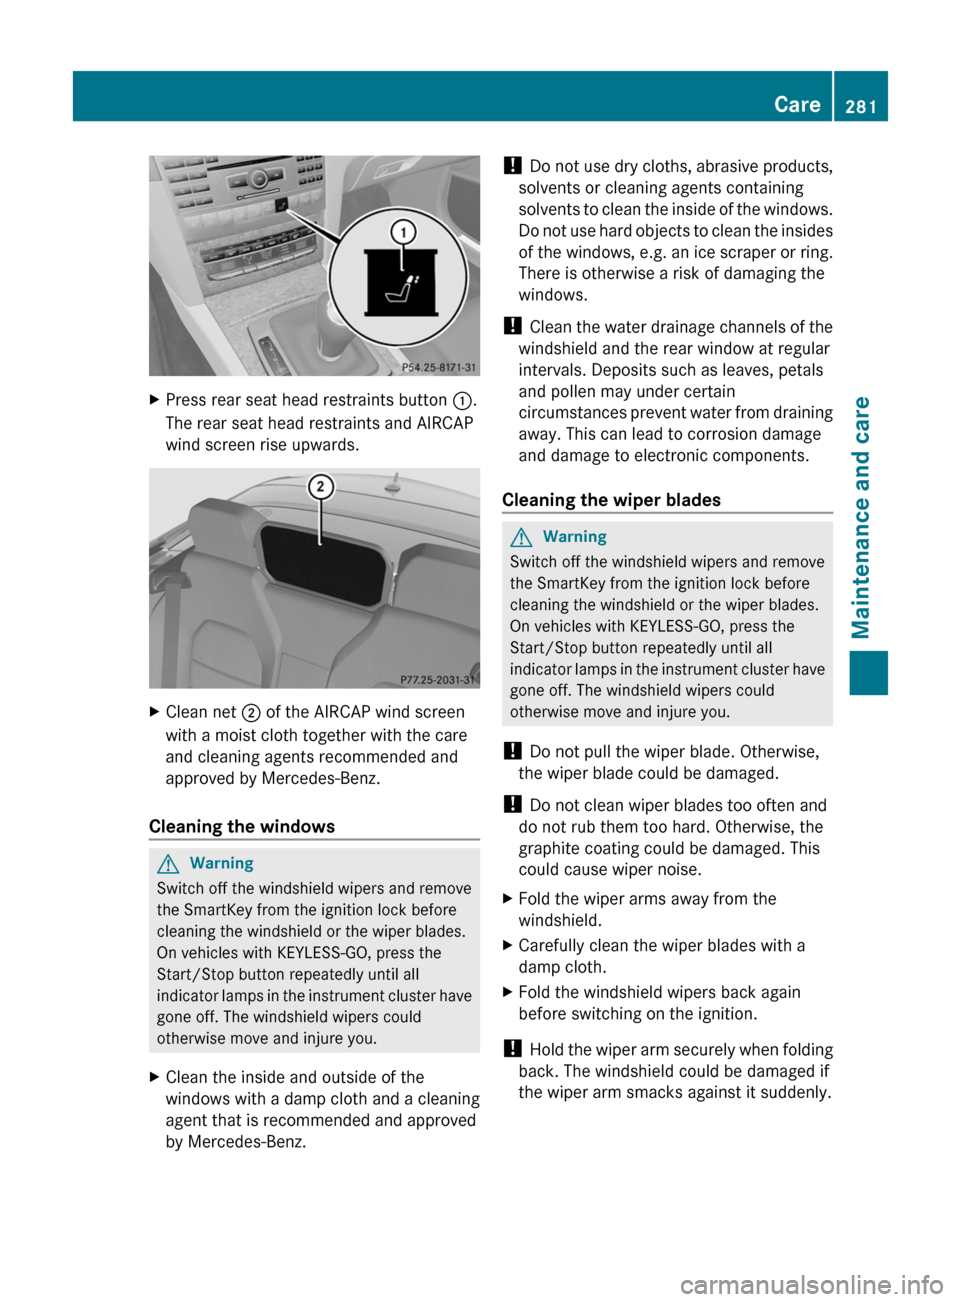
and the soft top is extended.XClean net ; of the wind deflector with a
soft brush or a moist cloth. For heavier
soiling, clean it with the care and cleaning
agents recommended and approved by
Mercedes-Benz and rinse it with clean
water.
! Do not use high-pressure cleaning
equipment to clean the net.
Cleaning the AIRCAP wind screen
Clean the AIRCAP wind screen with the soft
top open.
XVehicles with SmartKey: turn the
SmartKey to position 2(Y page 151) in the
ignition lock.XVehicles with KEYLESS-GO: press the
Start/Stop button twice ( Y page 151).XOpen the soft top ( Y page 90).280CareMaintenance and care
BA 207 USA, CA Edition B 2011; 1; 3, en-USd2sboikeVersion: 3.0.3.62010-05-20T10:38:09+02:00 - Seite 280
Page 283 of 344
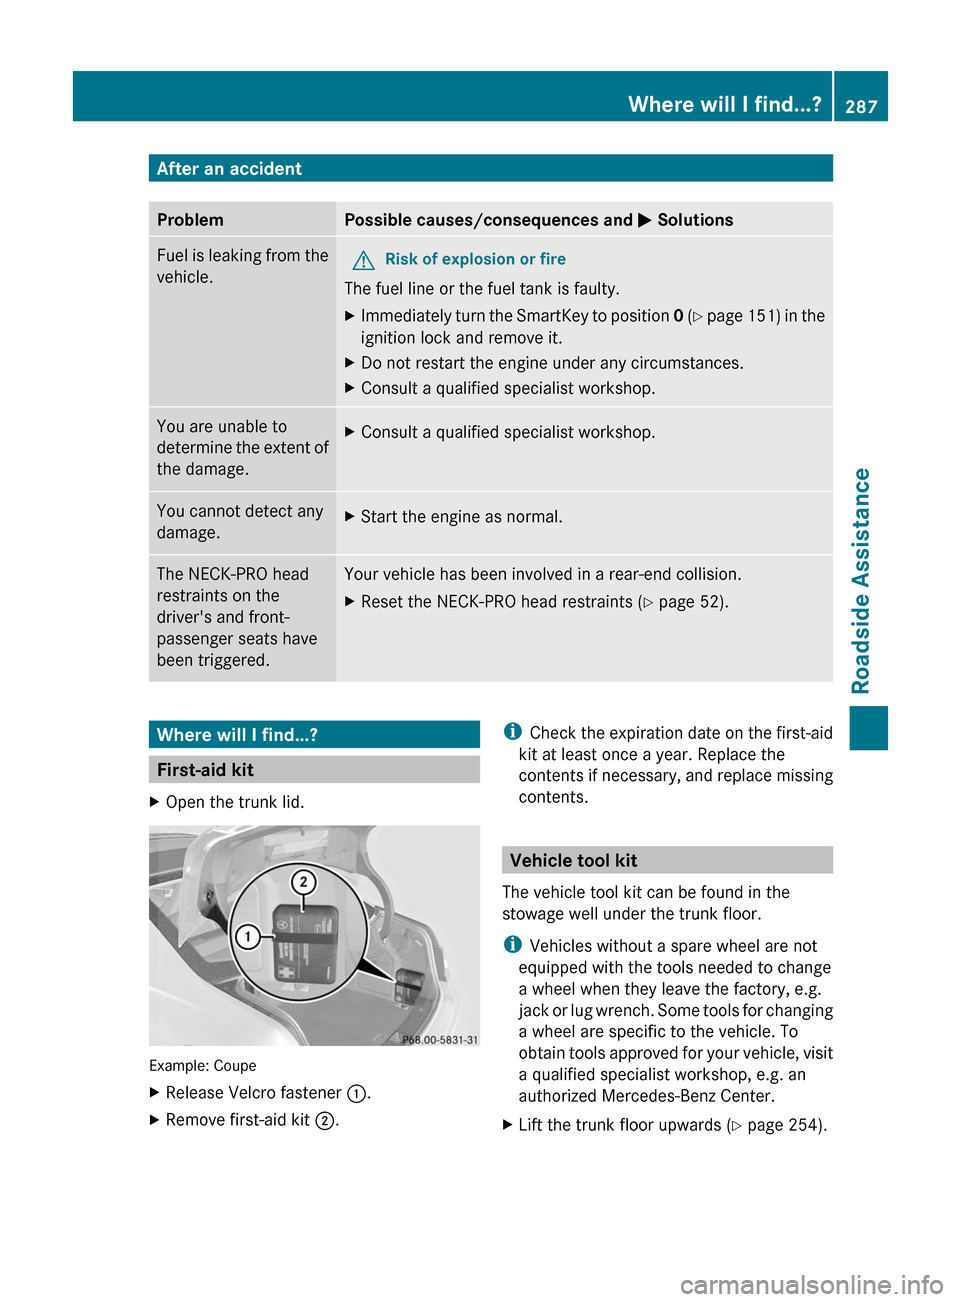
XPress rear seat head restraints button :.
The rear seat head restraints and AIRCAP
wind screen rise upwards.
XClean net ; of the AIRCAP wind screen
with a moist cloth together with the care
and cleaning agents recommended and
approved by Mercedes-Benz.
Cleaning the windows
GWarning
Switch off the windshield wipers and remove
the SmartKey from the ignition lock before
cleaning the windshield or the wiper blades.
On vehicles with KEYLESS-GO, press the
Start/Stop button repeatedly until all
indicator lamps in the instrument cluster have
gone off. The windshield wipers could
otherwise move and injure you.
XClean the inside and outside of the
windows with a damp cloth and a cleaning
agent that is recommended and approved
by Mercedes-Benz.
! Do not use dry cloths, abrasive products,
solvents or cleaning agents containing
solvents to clean the inside of the windows.
Do not use hard objects to clean the insides
of the windows, e.g. an ice scraper or ring.
There is otherwise a risk of damaging the
windows.
! Clean the water drainage channels of the
windshield and the rear window at regular
intervals. Deposits such as leaves, petals
and pollen may under certain
circumstances prevent water from draining
away. This can lead to corrosion damage
and damage to electronic components.
Cleaning the wiper blades
GWarning
Switch off the windshield wipers and remove
the SmartKey from the ignition lock before
cleaning the windshield or the wiper blades.
On vehicles with KEYLESS-GO, press the
Start/Stop button repeatedly until all
indicator lamps in the instrument cluster have
gone off. The windshield wipers could
otherwise move and injure you.
! Do not pull the wiper blade. Otherwise,
the wiper blade could be damaged.
! Do not clean wiper blades too often and
do not rub them too hard. Otherwise, the
graphite coating could be damaged. This
could cause wiper noise.
XFold the wiper arms away from the
windshield.
XCarefully clean the wiper blades with a
damp cloth.
XFold the windshield wipers back again
before switching on the ignition.
! Hold the wiper arm securely when folding
back. The windshield could be damaged if
the wiper arm smacks against it suddenly.
Care281Maintenance and careBA 207 USA, CA Edition B 2011; 1; 3, en-USd2sboikeVersion: 3.0.3.62010-05-20T10:38:09+02:00 - Seite 281Z
Page 289 of 344
After an accidentProblemPossible causes/consequences and M SolutionsFuel is leaking from the
vehicle.
GRisk of explosion or fire
The fuel line or the fuel tank is faulty.
XImmediately turn the SmartKey to position 0 (Y page 151) in the
ignition lock and remove it.
XDo not restart the engine under any circumstances.XConsult a qualified specialist workshop.You are unable to
determine the extent of
the damage.
XConsult a qualified specialist workshop.You cannot detect any
damage.
XStart the engine as normal.The NECK-PRO head
restraints on the
driver's and front-
passenger seats have
been triggered.
Your vehicle has been involved in a rear-end collision.XReset the NECK-PRO head restraints (Y page 52).Where will I find...?
First-aid kit
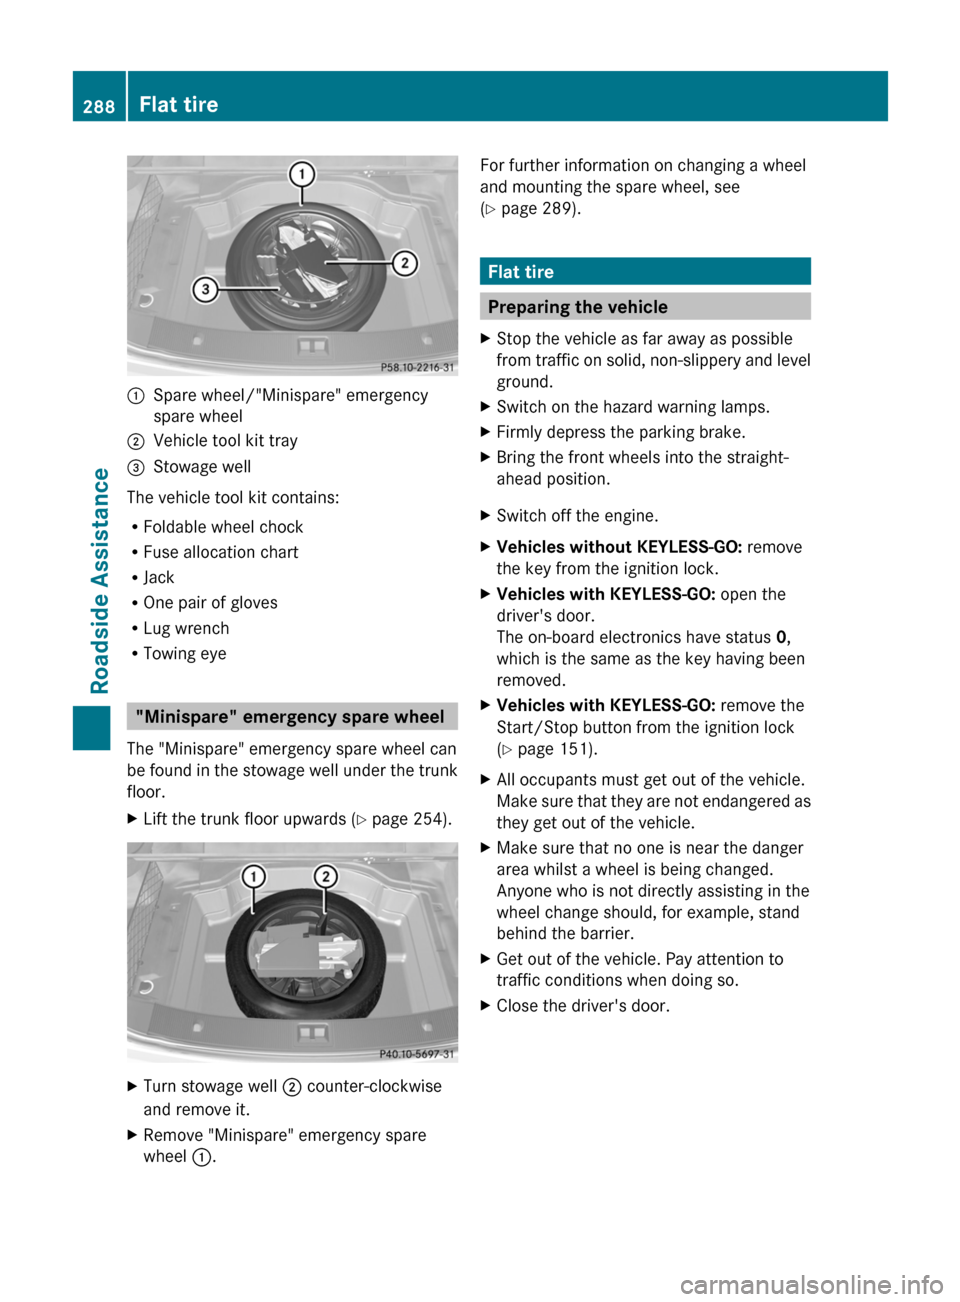
XOpen the trunk lid.
Example: Coupe
XRelease Velcro fastener :.XRemove first-aid kit ;.iCheck the expiration date on the first-aid
kit at least once a year. Replace the
contents if necessary, and replace missing
contents.
Vehicle tool kit
The vehicle tool kit can be found in the
stowage well under the trunk floor.
iVehicles without a spare wheel are not
equipped with the tools needed to change
a wheel when they leave the factory, e.g.
jack or lug wrench. Some tools for changing
a wheel are specific to the vehicle. To
obtain tools approved for your vehicle, visit
a qualified specialist workshop, e.g. an
authorized Mercedes-Benz Center.
XLift the trunk floor upwards (Y page 254).Where will I find...?287Roadside AssistanceBA 207 USA, CA Edition B 2011; 1; 3, en-USd2sboikeVersion: 3.0.3.62010-05-20T10:38:09+02:00 - Seite 287Z
Page 290 of 344
:Spare wheel/"Minispare" emergency
spare wheel
;Vehicle tool kit tray=Stowage well
The vehicle tool kit contains:
RFoldable wheel chock
RFuse allocation chart
RJack
ROne pair of gloves
RLug wrench
RTowing eye
"Minispare" emergency spare wheel
The "Minispare" emergency spare wheel can
be found in the stowage well under the trunk
floor.
XLift the trunk floor upwards (Y page 254).XTurn stowage well ; counter-clockwise
and remove it.
XRemove "Minispare" emergency spare
wheel :.
For further information on changing a wheel
and mounting the spare wheel, see
(Y page 289).
Flat tire
Preparing the vehicle
XStop the vehicle as far away as possible
from traffic on solid, non-slippery and level
ground.
XSwitch on the hazard warning lamps.XFirmly depress the parking brake.XBring the front wheels into the straight-
ahead position.
XSwitch off the engine.XVehicles without KEYLESS-GO: remove
the key from the ignition lock.
XVehicles with KEYLESS-GO: open the
driver's door.
The on-board electronics have status 0,
which is the same as the key having been
removed.
XVehicles with KEYLESS-GO: remove the
Start/Stop button from the ignition lock
(Y page 151).
XAll occupants must get out of the vehicle.
Make sure that they are not endangered as
they get out of the vehicle.
XMake sure that no one is near the danger
area whilst a wheel is being changed.
Anyone who is not directly assisting in the
wheel change should, for example, stand
behind the barrier.
XGet out of the vehicle. Pay attention to
traffic conditions when doing so.
XClose the driver's door.288Flat tireRoadside Assistance
BA 207 USA, CA Edition B 2011; 1; 3, en-USd2sboikeVersion: 3.0.3.62010-05-20T10:38:09+02:00 - Seite 288
Page 296 of 344

GWarning
Failure to follow these instructions can result
in severe injury or death.
Never lean over batteries while connecting.
You might get injured.
Battery fluid contains sulfuric acid. Do not
allow this fluid to come in contact with eyes,
skin or clothing. In case it does, immediately
flush affected area with water and seek
medical help if necessary.
A battery will also produce hydrogen gas,
which is flammable and explosive. Keep
flames or sparks away from battery, avoid
improper connection of jumper cables,
smoking etc.
GWarning
Do not place any metal objects on the battery
as this could result in a short circuit.
Use leak-proof batteries only to avoid the risk
of acid burns in the event of an accident.
Take care that you do not become statically
charged, e.g. by wearing synthetic clothing or
rubbing against textiles. For this reason, you
also should not pull or push the battery over
carpets or other synthetic materials.
Never touch the battery first. First, touch the
outside body of the vehicle in order to release
any possible electrostatic charges.
Do not rub the battery with rags or cloths. The
battery could explode if touched due to
electrostatic charge or due to spark
formation.
! Switch off the engine and remove the key
before disconnecting the terminal clamps
from the battery. On vehicles with
KEYLESS-GO, make sure that the ignition is
switched off. Check that all the indicator
lamps in the instrument cluster are off. You
may otherwise destroy electronic
components, such as the alternator.
! Like other batteries, the vehicle battery
may discharge over time if you do not use
the vehicle. In this case, have the battery
disconnected at a qualified specialist
workshop, e.g. an authorized Mercedes-
Benz Center. You can also charge the
battery with a charger recommended by
Mercedes-Benz. Contact an authorized
Mercedes-Benz Center for further
information.
The battery, breather hose and cover of the
positive terminal clamp must be installed
securely during operation.
i Remove the key if you park the vehicle
and do not require any electrical
consumers. The vehicle will then use very
little energy, thus conserving battery
power.
Mercedes-Benz recommends that you do not
carry out work on batteries yourself, e.g.
removing, charging or replacing. Always have
this work performed at a qualified specialist
workshop, e.g. an authorized Mercedes-Benz
Center.
Charging the battery
GWarning
Never charge a battery while still installed in
the vehicle unless the accessory battery
charge unit approved by Mercedes-Benz is
being used. Gases may escape during
charging and cause explosions that may
result in paint damage, corrosion or personal
injury.
An accessory battery charge unit specially
adapted for Mercedes-Benz vehicles and
tested and approved by Mercedes-Benz is
available. It permits the charging of the
battery in its installed position. Contact an
authorized Mercedes-Benz Center for
information and availability.
Charge the battery in accordance with the
separate instructions for the accessory
battery charger.
GWarning!
There is a risk of acid burns during the
charging process due to the gases which
294BatteryRoadside Assistance
BA 207 USA, CA Edition B 2011; 1; 3, en-USd2sboikeVersion: 3.0.3.62010-05-20T10:38:09+02:00 - Seite 294
Page 300 of 344
Towing and tow-starting
Important safety notes
GWarning
If you tow the vehicle, you must use a rigid
towing bar if:
R the engine will not run.
R there is a malfunction in the brake system.
R there is a malfunction in the power supply
or the vehicle's electrical system.
With the engine not running, there is no power
assistance for the brake and steering
systems. You will then need considerably
more force to steer and to brake and the
brake pedal travel will be longer. If necessary,
depress the brake pedal with maximum force.
Before towing away, make sure that the
steering can be moved and is not locked.
If you tow or tow-start another vehicle, its
weight must not exceed the maximum
permissible gross vehicle weight of your
vehicle.
GWarning
The vehicle is braked when the HOLD function
or DISTRONIC PLUS is activated. Therefore,
deactivate HOLD and DISTRONIC PLUS if the
vehicle is to be towed.
It is better to have the vehicle transported
than to have it towed.
! You may only tow the vehicle a maximum
distance of 30 miles (50 km). A towing
speed of 30 mph (50 km/h) must not be
exceeded.
For towing distances over 30 miles
(50 km), the vehicle must loaded onto a
transporter.
! Only secure the tow rope or tow bar at the
towing eyes. Otherwise, the vehicle could
be damaged.
! Do not use the towing eye for recovery,
as this could damage the vehicle. If in
doubt, recover the vehicle with a crane.
! Drive slowly and smoothly when towing.
Excessive tractive power could otherwise
damage the vehicles.
! Do not tow with sling-type equipment.
This could damage the vehicle.
! On vehicles with KEYLESS-GO, use the
SmartKey instead of the Start/Stop
button. Turn the SmartKey to position 2 in
the ignition lock and shift the automatic
transmission to N. Then, turn the SmartKey
back to 0 and leave it in the ignition lock.
! Vehicles with automatic transmission
must not be started by tow-starting. This
could otherwise damage the transmission.
The automatic transmission must be in
position N when the vehicle is being towed.
Make sure that the battery is connected and
charged. You will otherwise not be able to:
R turn the SmartKey to position 2 in the
ignition lock.
R shift the automatic transmission to
position N.
Vehicles with automatic transmission:
manually release the selector lever lock in
position P (Y page 162).
i Switch off the automatic locking feature
before the vehicle is towed ( Y page 81).
Otherwise, you could lock yourself out of
the vehicle when pushing or towing the
vehicle.
Installing/removing the towing eye
Installing the towing eye
XRemove the towing eye from the vehicle
tool kit ( Y page 287).GWarning
The exhaust tail pipe may be hot. You could
burn yourself if you touch the tail pipe. Be
particularly careful when removing the rear
cover.
298Towing and tow-startingRoadside Assistance
BA 207 USA, CA Edition B 2011; 1; 3, en-USd2sboikeVersion: 3.0.3.62010-05-20T10:38:09+02:00 - Seite 298