2011 MERCEDES-BENZ E-Class COUPE light
[x] Cancel search: lightPage 191 of 344

Problems with PARKTRONICProblemPossible causes/consequences and M SolutionsOnly the red segments
in the PARKTRONIC
warning displays are lit.
You also hear a warning
tone for approximately
two seconds.
PARKTRONIC is
deactivated after
approximately
20 seconds, and the
indicator lamp in the
PARKTRONIC button
lights up.PARKTRONIC has malfunctioned and has switched off.XIf problems persist, have PARKTRONIC checked at a qualified
specialist workshop.Only the red segments
in the PARKTRONIC
warning displays are lit.
PARKTRONIC is
deactivated after
approximately 20
seconds.The PARKTRONIC sensors are dirty or there is interference.XClean the PARKTRONIC sensors ( Y page 282).XSwitch the ignition back on.The problem may be caused by an external source of radio or
ultrasound waves.XSee if PARKTRONIC functions in a different location.Parking Guidance
Important safety notes
Parking Guidance is an electronic parking aid
with ultrasound. Ultrasound is used to
measure the road on both sides of the vehicle.
A suitable parking space is indicated by the
parking symbol. You receive steering
instructions when parking. You may also use
PARKTRONIC ( Y page 186).
GWarning
Parking Guidance is merely an aid and may
display parking spaces that are not suitable
for parking, for example:
R no-parking areas
R parking spaces with unsuitable surfaces
(road surface)
R driveways
R entrances and exits
Parking Guidance detects and measures
potential parking spaces while driving past.
Changes to the parking space after this point
are not taken into account, for example if the
vehicle in front of or behind the parking space
changes position or objects in the parking
space are moved.
Even when using Parking Guidance, you are
still responsible for driving carefully. If you
rely on Parking Guidance alone, you could
cause an accident and injure yourself and
others.
Safety always remains your responsibility and
you must continue paying careful attention to
your immediate surroundings when parking
and maneuvering.Driving systems189Driving and parkingBA 207 USA, CA Edition B 2011; 1; 3, en-USd2sboikeVersion: 3.0.3.62010-05-20T10:38:09+02:00 - Seite 189Z
Page 195 of 344
Rthe camera is exposed to a very bright white
light
Rthe immediate surroundings are
illuminated with fluorescent light (the
COMAND system display can flicker)
Rthere is a sudden change in temperature,
e.g. if you drive into a heated garage from
the cold (lens condensation)
Rthe camera lens is dirty or covered
Rthe rear of your vehicle is damaged
In this case, have the position and setting
of the camera checked by a qualified
specialist workshop. Mercedes-Benz
recommends that you contact a Mercedes-
Benz Center for this purpose.
Do not use the rear view camera in these
situations. Otherwise you could injure
yourself or others and/or damage property
including your vehicle while parking/
maneuvering.
Activating the rear view camera
XMake sure that the SmartKey is in
position 2 in the ignition lock.
XMake sure that the "rear view camera"
function is selected in COMAND (see the
separate operating instructions for
COMAND).
XEngage reverse gear.
The area behind the vehicle is shown in the
COMAND display.
Guide lines in the COMAND display
Depending on the date of manufacture of the
vehicle, the guide lines are shown in the
COMAND display.
GWarning!
Use of rear view camera can be dangerous if
you are color-blind or have impaired color
vision.
Only use rear view camera if you can see and
distinguish all colored guidelines shown by
rear view camera on the COMAND system
display.
GWarning
Please note that objects that do not touch the
ground may appear to be further away than
they actually are, for example:
Rthe bumper of a vehicle parked behind you
Rthe trailer drawbar
Rthe ball coupling of a trailer tow hitch
Rthe rear end of a truck
Ra slanted post
In such cases, you should not use the guide
lines to judge the distance. You may misjudge
the distance, which increases the risk of
impacting the objects.
Even if the object you approach is directly on
the ground, do not approach the object any
closer than the red guide line.
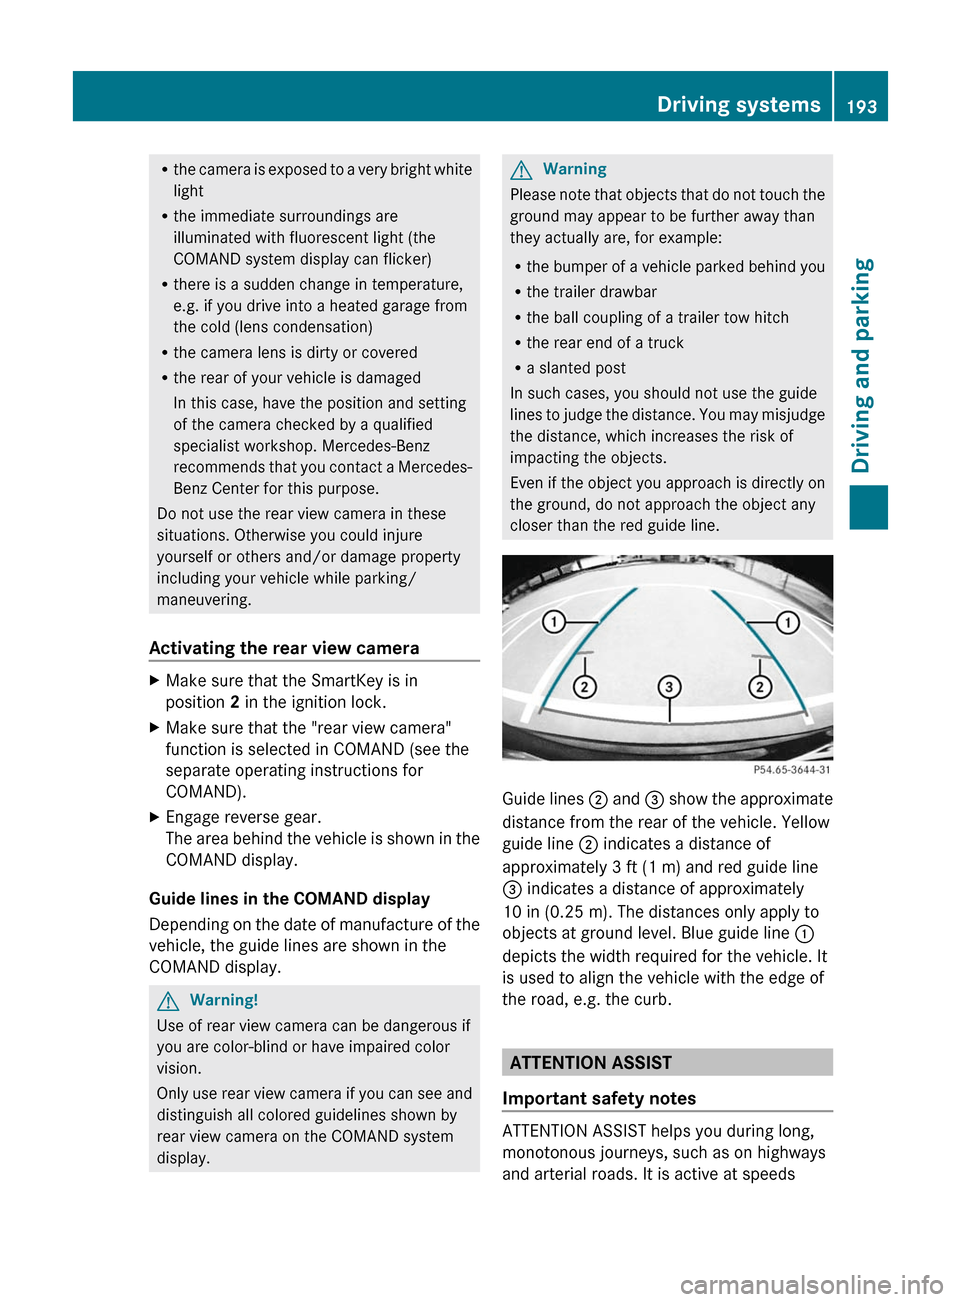
Guide lines ; and = show the approximate
distance from the rear of the vehicle. Yellow
guide line ; indicates a distance of
approximately 3 ft (1 m) and red guide line
= indicates a distance of approximately
10 in (0.25 m). The distances only apply to
objects at ground level. Blue guide line :
depicts the width required for the vehicle. It
is used to align the vehicle with the edge of
the road, e.g. the curb.
ATTENTION ASSIST
Important safety notes
ATTENTION ASSIST helps you during long,
monotonous journeys, such as on highways
and arterial roads. It is active at speeds
Driving systems193Driving and parkingBA 207 USA, CA Edition B 2011; 1; 3, en-USd2sboikeVersion: 3.0.3.62010-05-20T10:38:09+02:00 - Seite 193Z
Page 198 of 344

Due to the nature of the system:
R warnings may be issued unnecessarily
when driving close to crash barriers or
similar solid lane borders.
R warnings may be interrupted when driving
alongside particularly long vehicles for a
prolonged time.
The two sensors for Blind Spot Assist are
integrated into the sides of the rear bumper.
Make sure that the bumper is free of dirt, ice
or slush around the sensors. For example, the
radar sensors must not be covered by bicycle
racks or overhanging loads. In the event of a
severe impact or damage to the bumpers,
have the function of the radar sensors
checked at a qualified specialist workshop,
e.g. an authorized Mercedes-Benz Center.
Blind Spot Assist may otherwise not work
properly.
Indicator and warning display:Yellow indicator lamp/red warning lamp
If Blind Spot Assist is switched on, indicator
lamp : in the exterior mirrors lights up in
yellow up to a speed of 20 mph (30 km/h). At
speeds above 20 mph (30 km/h), the
indicator lamp goes out and Blind Spot Assist
is operational.
If a vehicle is detected within the monitoring
range of Blind Spot Assist at speeds above
20 mph (30 km/h), warning lamp : on the
corresponding side lights up in red. This
warning is always emitted when a vehicle
enters the blind spot monitoring range from
behind or from the side. When you overtake
a vehicle, the warning only occurs if the
difference in speed is less than 7 mph
(12 km/h).
The yellow indicator lamp goes out if reverse
gear is engaged. In this event, Blind Spot
Assist is no longer active.
The brightness of the indicator/warning
lamps is adjusted automatically according to
the ambient light.GWarning
Blind Spot Assist is not active at speeds under
approximately 20 mph (30 km/h). The
indicator lamps in the exterior mirrors are
yellow. Vehicles in the monitoring range are
then not indicated.
Always pay attention to traffic conditions and
your surroundings. Otherwise, you may fail to
recognize dangers in time, cause an accident
and injure yourself and others.
Collision warning
If a vehicle is detected in the monitoring range
of Blind Spot Assist and you switch on the turn
signal, a double warning tone sounds. Red
warning lamp : flashes. If the turn signal
remains on, detected vehicles are indicated
by the flashing of red warning lamp :. There
are no further warning tones.
Switching on Blind Spot Assist
XMake sure that the radar sensor system
( Y page 211) and Blind Spot Assist
( Y page 208) are activated in the on-board
computer.XTurn the SmartKey to position 2 in the
ignition lock.
Warning lamps : light up in red in the
exterior mirrors for approximately 1.5
seconds and then turn yellow.196Driving systemsDriving and parking
BA 207 USA, CA Edition B 2011; 1; 3, en-USd2sboikeVersion: 3.0.3.62010-05-20T10:38:09+02:00 - Seite 196
Page 201 of 344
If the coolant temperature rises above
248 ‡(120 †), do not drive any further as
this could damage the engine.
Tachometer
The red band in the tachometer indicates the
engine's overrevving range.
! Do not drive in the overrevving range, as
this could damage the engine.
The fuel supply is interrupted to protect the
engine when the red band is reached.
Outside temperature display
The outside temperature display is in the
multifunction display.
GWarning!
The outside temperature indicator is not
designed to serve as an ice-warning device
and is therefore unsuitable for that purpose.
Indicated temperatures just above the
freezing point do not guarantee that the road
surface is free of ice. The road may still be icy,
especially in wooded areas or on bridges.
Changes in the outside temperature are
displayed after a short delay.
Speedometer with segments
The segments in the speedometer indicate
which speed range is available.
Cruise control mode:
The segments light up from the stored speed
to the maximum speed.
DISTRONIC PLUS mode:
One or two segments around the stored
speed light up.
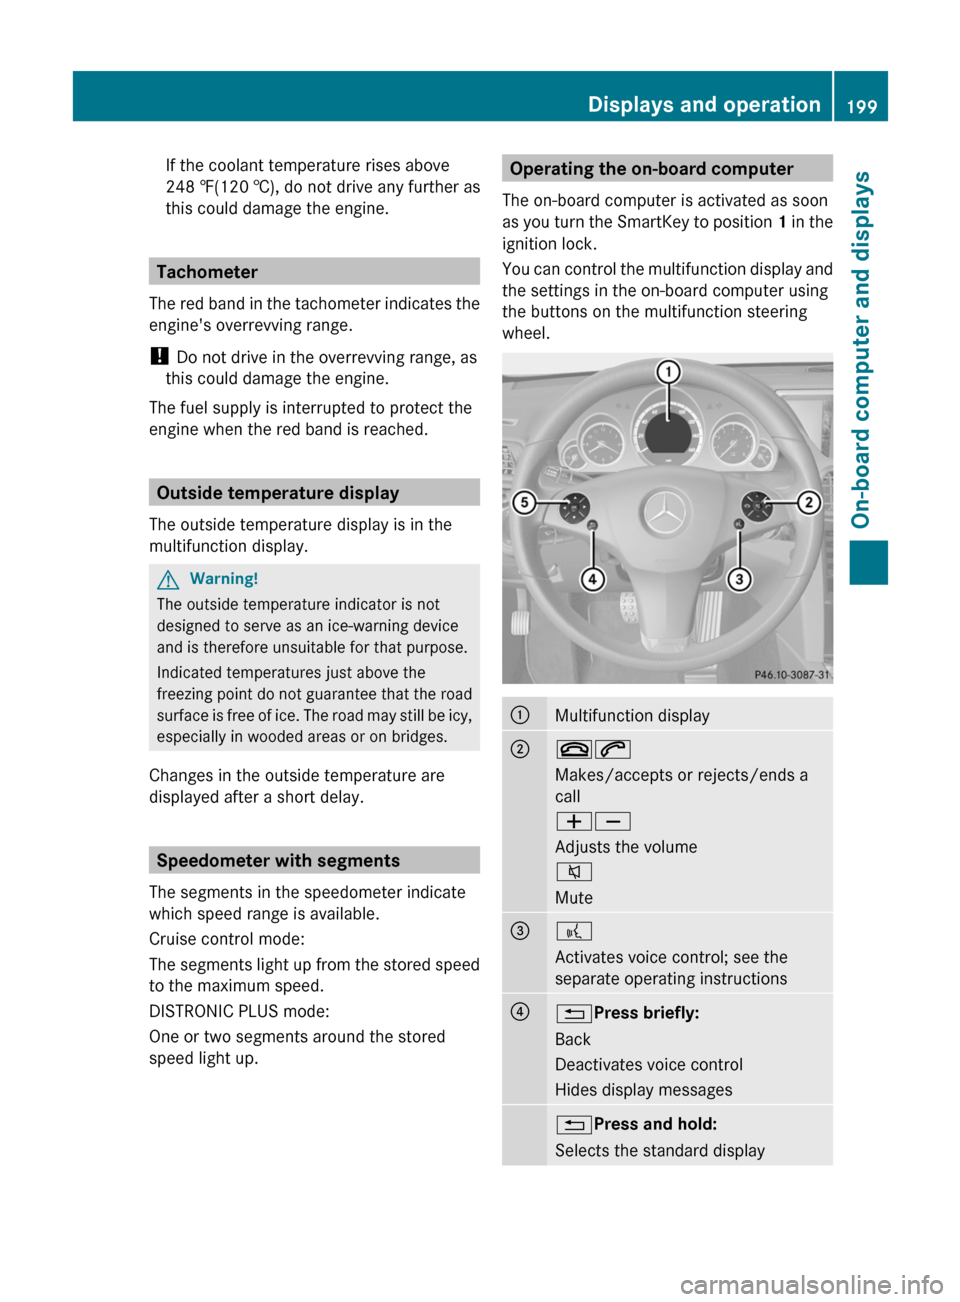
Operating the on-board computer
The on-board computer is activated as soon
as you turn the SmartKey to position 1 in the
ignition lock.
You can control the multifunction display and
the settings in the on-board computer using
the buttons on the multifunction steering
wheel.:Multifunction display;~6
Makes/accepts or rejects/ends a
call
WX
Adjusts the volume
8
Mute=?
Activates voice control; see the
separate operating instructions?% Press briefly:
Back
Deactivates voice control
Hides display messages% Press and hold:
Selects the standard displayDisplays and operation199On-board computer and displaysBA 207 USA, CA Edition B 2011; 1; 3, en-USd2sboikeVersion: 3.0.3.62010-05-20T10:38:09+02:00 - Seite 199Z
Page 202 of 344
A=;
Calls up the menu and menu bar9: Press briefly:
Selects the submenu or scrolls
through lists
In the Audio menu: selects a stored
station, an audio track or a video
scene
In the Tel (telephone) menu:
switches to the phone book and
selects a name or telephone number9: Press and hold:
In the Audio menu: selects the
previous/next station or selects an
audio track or a video scene using
rapid scrolling
In the Tel (telephone) menu: starts
rapid scrolling through the phone
booka
Confirms selections and hides
display messages
In the Tel (telephone) menu:
switches to the phone book and
starts dialing
Multifunction display
To activate the multifunction display:
R switch on the ignition.
R switch on the lights.
R open the driver's door.
Values and settings as well as display
messages are shown in the multifunction
display.
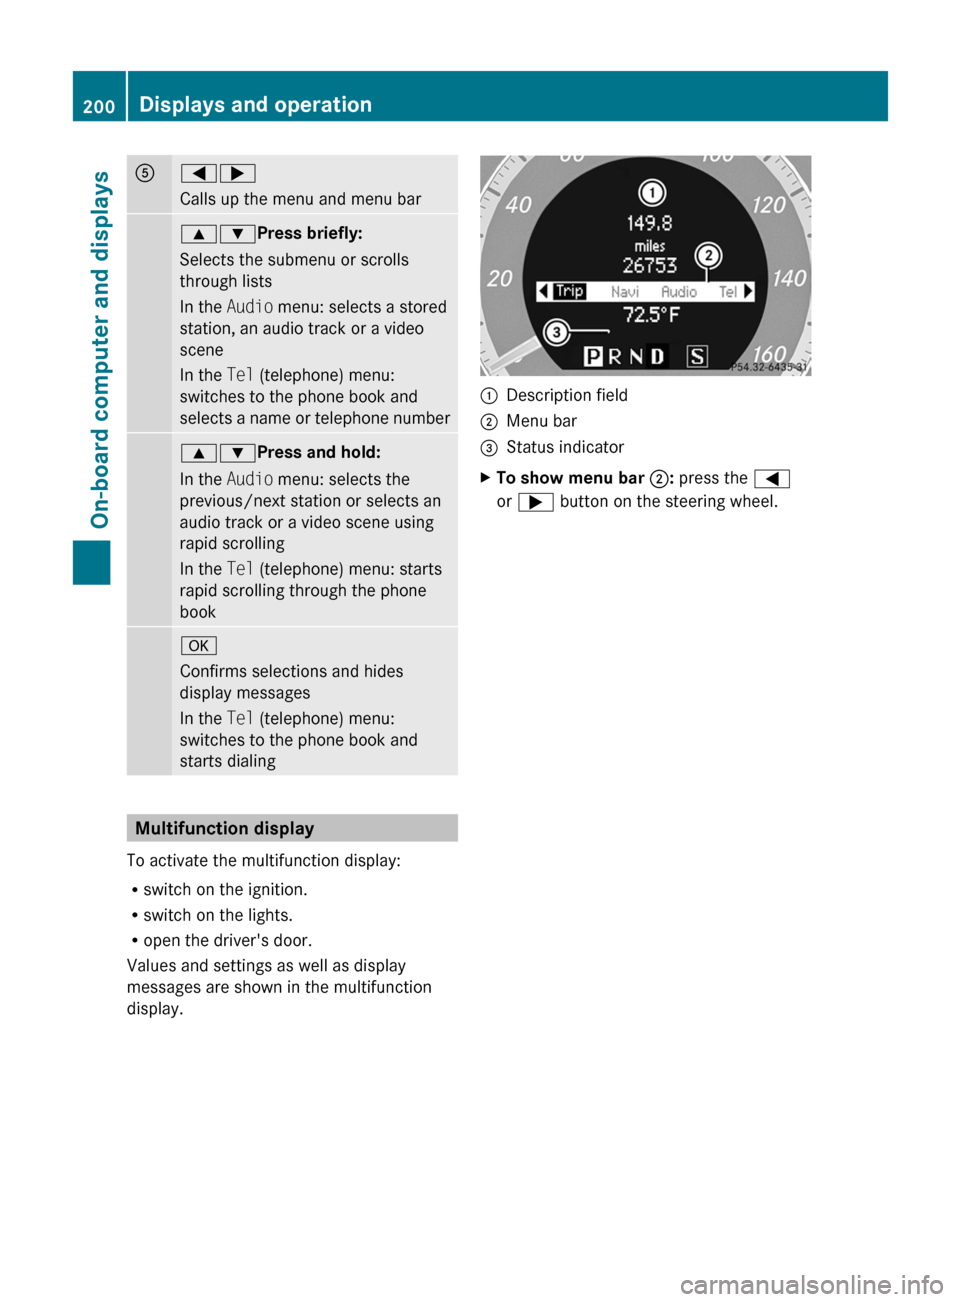
:Description field;Menu bar=Status indicatorXTo show menu bar ;: press the =
or ; button on the steering wheel.200Displays and operationOn-board computer and displays
BA 207 USA, CA Edition B 2011; 1; 3, en-USd2sboikeVersion: 3.0.3.62010-05-20T10:38:09+02:00 - Seite 200
Page 209 of 344
XPress the = or ; button on the
steering wheel to select the DriveAssist
menu.XPress the 9 or : button to select
Distance Display .XPress a.
The DISTRONIC PLUS distance display
( Y page 180) appears in the multifunction
display.
Deactivating/activating ESP ®
GWarning!
Never switch off the ESP when you see the
ESP warning lamp ä flashing in the
instrument cluster. In this case proceed as
follows:
R When driving off, apply as little throttle as
possible.
R While driving, ease up on the accelerator
pedal.
R Adapt your speed and driving style to the
prevailing road conditions.
Failure to observe these guidelines could
cause the vehicle to skid. The ESP cannot
prevent accidents resulting from excessive
speed.
Further information about ESP ®
(Y page 66).
XStart the engine.XPress the = or ; button on the
steering wheel to select the DriveAssist
menu.XPress 9 or : to select ESP.XPress a.XTo deactivate: press a again.
The å warning lamp in the instrument
cluster comes on.GWarning
When the å ESP OFF warning lamp lights
up, ESP is switched off.
When the ä ESP warning lamp and the
å ESP OFF warning lamp are on
continuously, ESP is not operational due to a
malfunction.
When ESP is switched off or not operational,
the vehicle's stability during standard driving
maneuvers is reduced.
Adapt your driving style to suit the prevailing
road conditions/weather conditions and to
the non-operating status of ESP.XTo activate: press a again.
The å warning lamp in the instrument
cluster goes out.
Activating/deactivating PRE-SAFE ®
Brake
This function is only available with
DISTRONIC PLUS.
XPress the = or ; button on the
steering wheel to select the DriveAssist
menu.XPress 9 or : to select PRE-SAFE
Brake .XPress a.
The current selection is displayed.XTo activate/deactivate: press a
again.
When PRE-SAFE ®
Brake ( Y page 68) is
activated, the multifunction display shows
the Ä symbol.
Activating/deactivating ATTENTION
ASSIST
XPress the = or ; button on the
steering wheel to select the DriveAssist
menu.XPress the 9 or : button to select
Attention Asst.XPress a.
The current selection is displayed.XTo activate/deactivate: press a
again.Menus and submenus207On-board computer and displaysBA 207 USA, CA Edition B 2011; 1; 3, en-USd2sboikeVersion: 3.0.3.62010-05-20T10:38:09+02:00 - Seite 207Z
Page 210 of 344
When ATTENTION ASSIST (Y page 193) is
activated, the À symbol appears in the
multifunction display when the ignition is on.
Activating/deactivating Blind Spot
Assist
You can use the Blind Spot Asst. function
to activate or deactivate Blind Spot Assist
( Y page 194).
XPress the = or ; button on the
steering wheel to select the DriveAssist
menu.XPress the 9 or : button to select
Blind Spot Asst. .XPress a.
The current selection is displayed.XTo activate/deactivate: press a
again.
Maintenance menu
In the Serv. menu, you can:
R call up display messages ( Y page 213)
R restart the tire pressure loss warning
system (Canada only) ( Y page 309)
R check the tire pressure electronically (USA
only) ( Y page 311)
R call up the service due date ( Y page 277)
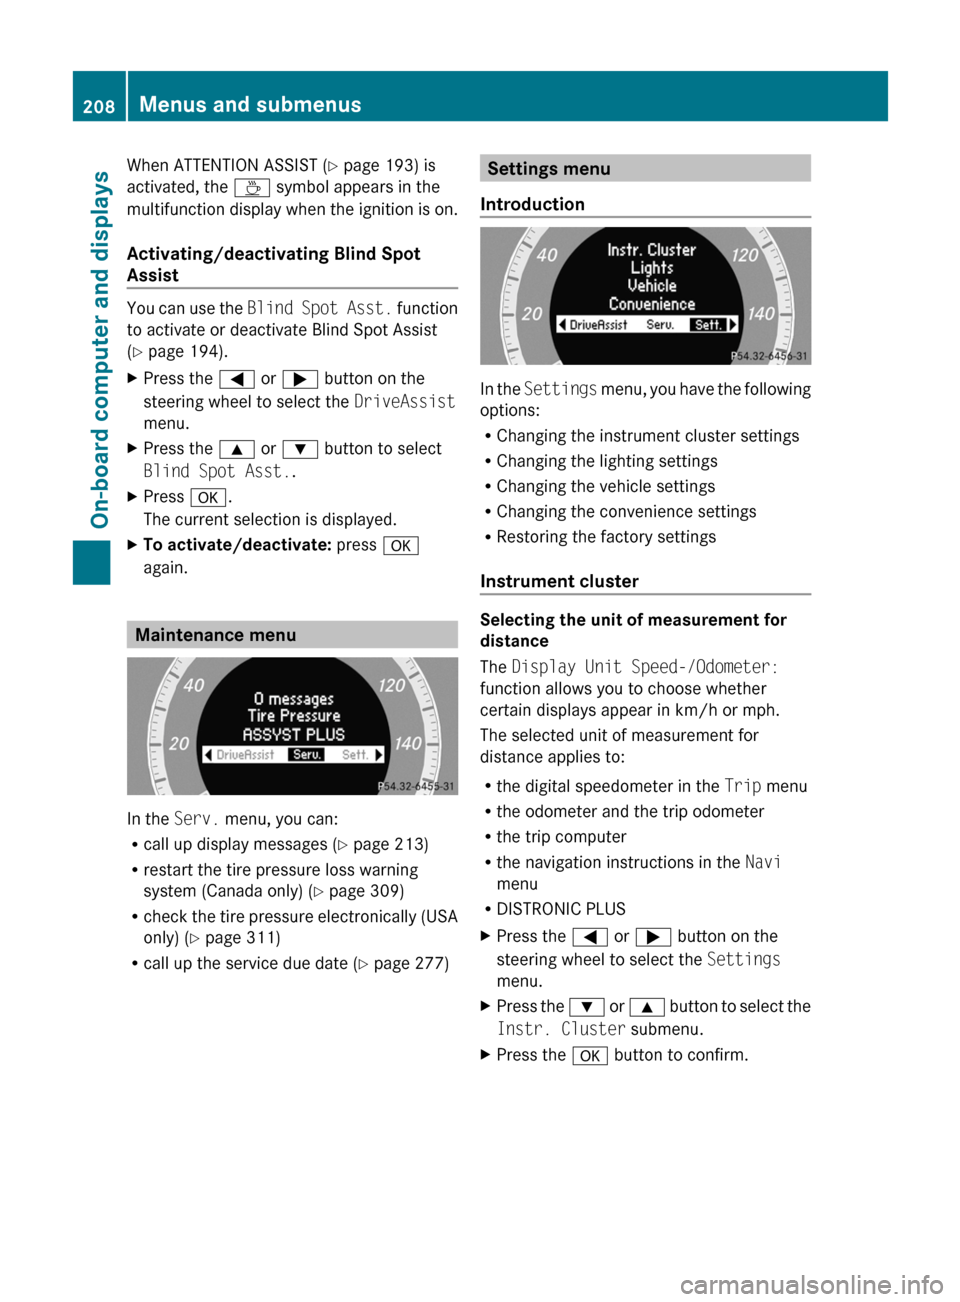
Settings menu
Introduction
In the Settings menu, you have the following
options:
R Changing the instrument cluster settings
R Changing the lighting settings
R Changing the vehicle settings
R Changing the convenience settings
R Restoring the factory settings
Instrument cluster
Selecting the unit of measurement for
distance
The Display Unit Speed-/Odometer:
function allows you to choose whether
certain displays appear in km/h or mph.
The selected unit of measurement for
distance applies to:
R the digital speedometer in the Trip menu
R the odometer and the trip odometer
R the trip computer
R the navigation instructions in the Navi
menu
R DISTRONIC PLUS
XPress the = or ; button on the
steering wheel to select the Settings
menu.XPress the : or 9 button to select the
Instr. Cluster submenu.XPress the a button to confirm.208Menus and submenusOn-board computer and displays
BA 207 USA, CA Edition B 2011; 1; 3, en-USd2sboikeVersion: 3.0.3.62010-05-20T10:38:09+02:00 - Seite 208
Page 211 of 344

XPress the : or 9 button to select the
Display Unit Speed-/Odometer.
function.
You will see the selected setting: km or
miles .XPress the a button to save the setting.
Selecting the permanent display function
The Permanent Display: function allows
you to choose whether the multifunction
display always shows the outside
temperature or the speed in km/h (USA) or
mph (Canada).
XPress the = or ; button on the
steering wheel to select the Settings
menu.XPress the : or 9 button to select the
Instr. Cluster submenu.XPress the a button to confirm.XPress : or 9 to select the
Permanent Display: function.
You will see the selected setting Outside
Temperature or Speedometer [km/h]: .XPress the a button to save the setting.
Lights
Switching the daytime running lamps on/
off
This function is not available in Canada.
If you have activated the Daytime Running
Lights: function and the light switch is in the
c position the daytime running lamps are
switched on automatically when the engine is
running.
In the dark, the following also light up:
R the low-beam headlamps
R the parking lamps
R the tail lamps
R the license plate lamp
R the side marker lamps
XPress the = or ; button on the
steering wheel to select the Settings
menu.XPress the : or 9 button to select the
Lights submenu.XPress the a button to confirm.XPress the : or 9 button to select the
Daytime Running Lights: function.
You will see the selected setting: Enabled
or Disabled .XPress the a button to save the setting.
Switching Adaptive Highbeam Assist on/
off
XPress the = or ; button on the
steering wheel to select the Settings
menu.XPress the : or 9 button to select the
Lights submenu.XPress the a button to confirm.XPress the : or 9 button to select the
Adaptive Highbeam Assist: function.
You will see the selected setting: Enabled
or Disabled .XPress the a button to save the setting.
Activating/deactivating surround
lighting and exterior lighting delayed
switch-off
If you switch on the Locator Lighting:
function and the light switch is set to c,
R the exterior lighting switches on when it is
dark after unlocking the vehicle with the
SmartKey.
The exterior lighting switches off when you
open the driver’s door.
R the exterior lighting remains on for 15
seconds when it is dark after closing the
doors.
If the engine is switched off and then none
of the doors are opened, or if an open door
is not closed, the exterior lighting goes out
after 60 seconds.
Menus and submenus209On-board computer and displaysBA 207 USA, CA Edition B 2011; 1; 3, en-USd2sboikeVersion: 3.0.3.62010-05-20T10:38:09+02:00 - Seite 209Z