2011 MERCEDES-BENZ E-Class COUPE set clock
[x] Cancel search: set clockPage 84 of 344

iWhen you push either of the two buttons
and an audible warning signal does not
sound, the relevant setting has already
been selected.
You can switch the automatic locking
function on and off using the on-board
computer (Y page 210).
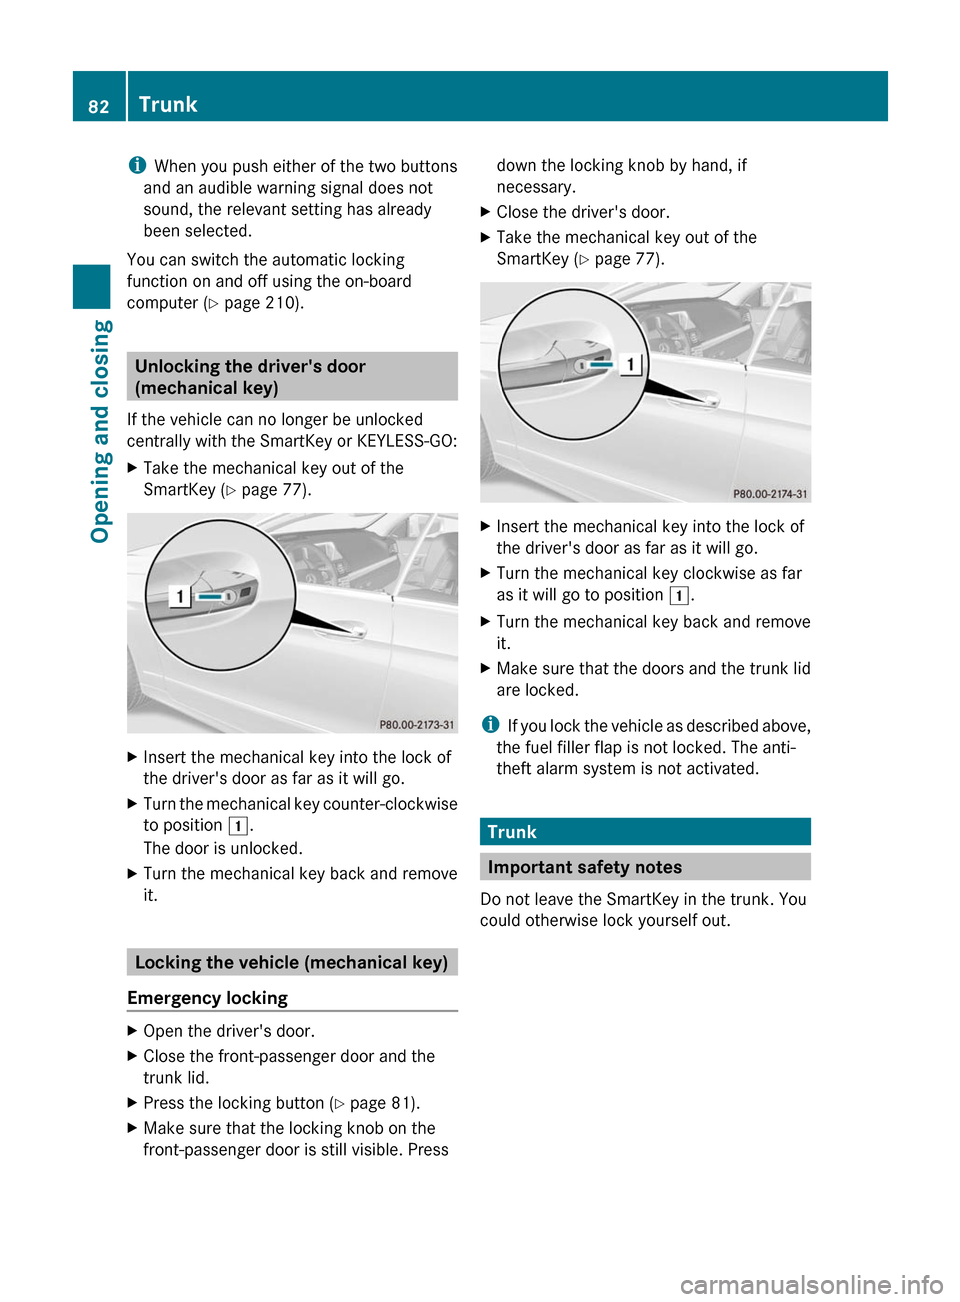
Unlocking the driver's door
(mechanical key)
If the vehicle can no longer be unlocked
centrally with the SmartKey or KEYLESS-GO:
XTake the mechanical key out of the
SmartKey (Y page 77).
XInsert the mechanical key into the lock of
the driver's door as far as it will go.
XTurn the mechanical key counter-clockwise
to position 1.
The door is unlocked.
XTurn the mechanical key back and remove
it.
Locking the vehicle (mechanical key)
Emergency locking
XOpen the driver's door.XClose the front-passenger door and the
trunk lid.
XPress the locking button (Y page 81).XMake sure that the locking knob on the
front-passenger door is still visible. Press
down the locking knob by hand, if
necessary.
XClose the driver's door.XTake the mechanical key out of the
SmartKey (Y page 77).
XInsert the mechanical key into the lock of
the driver's door as far as it will go.
XTurn the mechanical key clockwise as far
as it will go to position 1.
XTurn the mechanical key back and remove
it.
XMake sure that the doors and the trunk lid
are locked.
iIf you lock the vehicle as described above,
the fuel filler flap is not locked. The anti-
theft alarm system is not activated.
Trunk
Important safety notes
Do not leave the SmartKey in the trunk. You
could otherwise lock yourself out.
82TrunkOpening and closing
BA 207 USA, CA Edition B 2011; 1; 3, en-USd2sboikeVersion: 3.0.3.62010-05-20T10:38:09+02:00 - Seite 82
Page 129 of 344

Mercedes-Benz recommends that you use an
authorized Mercedes-Benz Center for this
purpose. In particular, work relevant to safety
or on safety-related systems must be carried
out at a qualified specialist workshop.
If you require assistance changing bulbs,
consult a qualified specialist workshop.
Do not touch the glass tube of new bulbs with
your bare hands. Even minor contamination
can burn into the glass surface and reduce
the service life of the bulbs. Always use a lint-
free cloth or only touch the base of the bulb
when installing.
Only use bulbs of the correct type.
If the new bulb still does not light up, consult
a qualified specialist workshop.
Bulbs and lamps are an important aspect of
vehicle safety. You must therefore make sure
that these function correctly at all times.
Have the headlamp setting checked regularly.
Overview: changing bulbs/bulb types
You can change the following bulbs. The bulb
type can be found in the legend.
Halogen headlamps
:Low-beam headlamps6: H7 55 W;High-beam headlamp: H7 55 W=Parking lamp/standing lamp: W 5 W?Turn signal lamp6: 3457A
Bi-Xenon headlamps
:Cornering lamp: H7 55 W
Changing the front bulbs
Low-beam headlamp (halogen
headlamp)
Due to their location, have the bulbs in the
left-hand headlamp changed at a qualified
specialist workshop, e.g. an authorized
Mercedes-Benz Center.
XSwitch off the lights.XOpen the hood.XTurn housing cover : counter-clockwise
and pull it out.
XTurn bulb holder ; counter-clockwise and
pull it out.
XTake the bulb out of bulb holder ;.XInsert the new bulb into bulb holder ;.6Due to their location, have the bulbs in the left-hand headlamp changed at a qualified specialist workshop,e.g. an authorized Mercedes-Benz Center.
Changing bulbs127Lights and windshield wipersBA 207 USA, CA Edition B 2011; 1; 3, en-USd2sboikeVersion: 3.0.3.62010-05-20T10:38:09+02:00 - Seite 127Z
Page 131 of 344

XTurn the bulb counter-clockwise, applying
slight pressure, and remove it from bulb
holder :.XInsert the new bulb into bulb holder : and
turn it clockwise.XInsert bulb holder : into the lamp and turn
it clockwise.
Windshield wipers
Important safety notes
GWarning!
Wiper blades are components that are subject
to wear and tear. Replace the wiper blades
twice a year, preferably in the spring and fall.
Otherwise the windshield will not be wiped
properly. As a result, you may not be able to
observe surrounding traffic conditions and
could cause an accident.
! Do not operate the windshield wipers
when the windshield is dry, as this could
damage the wiper blades. Moreover, dust
that has collected on the windshield can
scratch the glass if wiping takes place when
the windshield is dry.
If it is necessary to switch on the windshield
wipers in dry weather conditions, always
use washer fluid when operating the
windshield wipers.
Switching the windshield wipers on/
off
Combination switch
1$ Windshield wipers off2Ä Intermittent wipe, low 73Å
Intermittent wipe, high 84°
Continuous wipe, slow5¯ Continuous wipe, fastBí Single wipe/ î to wipe the
windshield using washer fluidXSwitch the ignition on.XTurn the combination switch to the
corresponding position.
! Intermittent wiping with rain sensor: due
to optical influences and the windshield
becoming dirty in dry weather conditions,
the windshield wipers may be activated
inadvertently. This could then damage the
windshield wiper blades or scratch the
windshield.
For this reason, you should always switch
off the windshield wipers in dry weather.
In the Ä or Å position, the appropriate
wiping frequency is automatically set
according to the intensity of the rain. In
the Å position, the rain sensor is more
sensitive than in the Ä position, causing
the windshield wipers to wipe more
frequently.
Intermittent wiping is interrupted when you
stop the vehicle and open a door. This
7 Rain sensor set to low sensitivity.
8 Rain sensor set to high sensitivity.Windshield wipers129Lights and windshield wipersBA 207 USA, CA Edition B 2011; 1; 3, en-USd2sboikeVersion: 3.0.3.62010-05-20T10:38:09+02:00 - Seite 129Z
Page 148 of 344

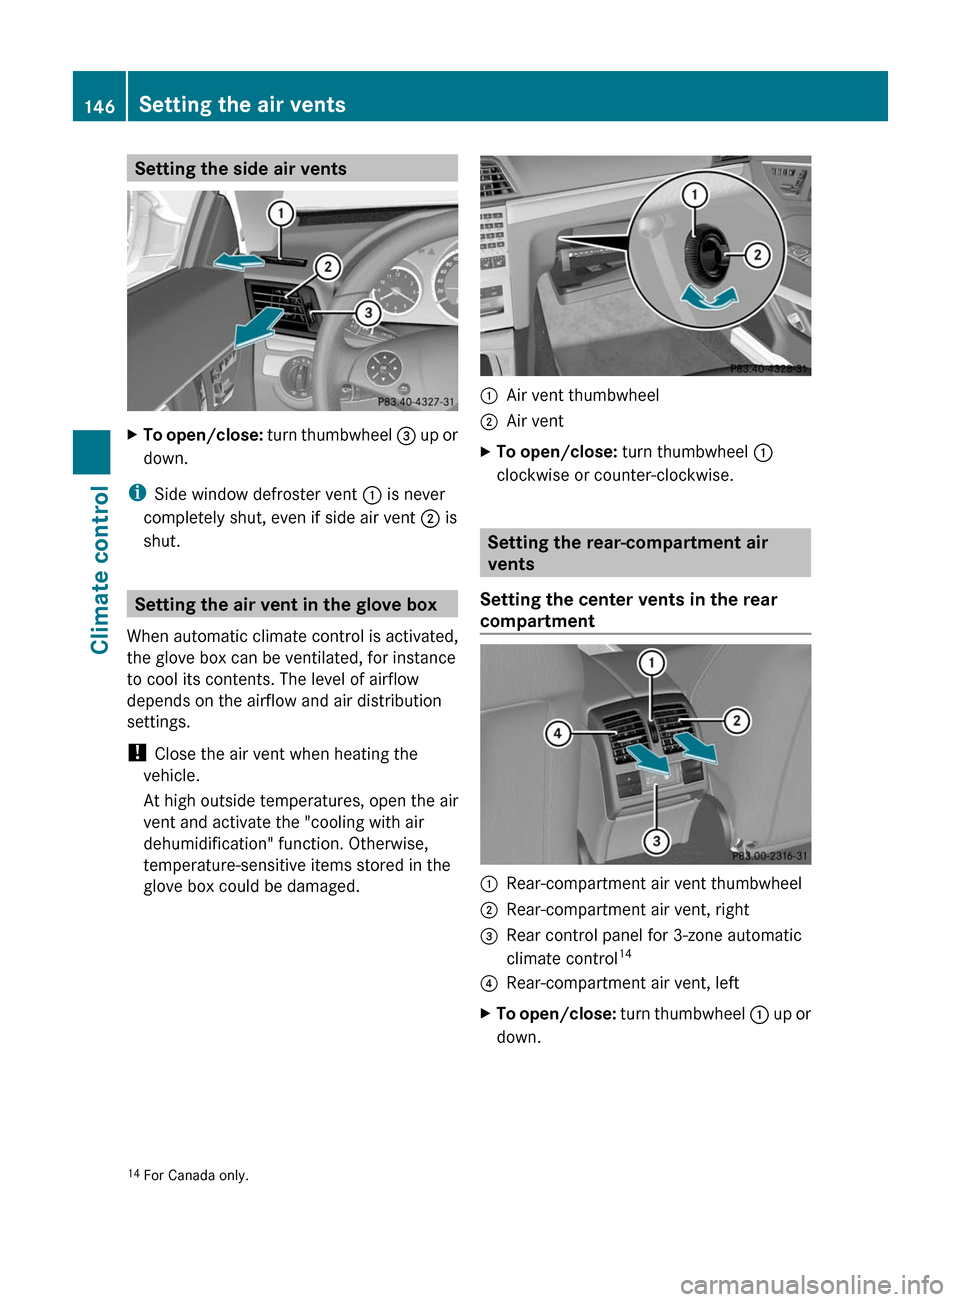
Setting the side air ventsXTo open/close: turn thumbwheel = up or
down.
iSide window defroster vent : is never
completely shut, even if side air vent ; is
shut.
Setting the air vent in the glove box
When automatic climate control is activated,
the glove box can be ventilated, for instance
to cool its contents. The level of airflow
depends on the airflow and air distribution
settings.
! Close the air vent when heating the
vehicle.
At high outside temperatures, open the air
vent and activate the "cooling with air
dehumidification" function. Otherwise,
temperature-sensitive items stored in the
glove box could be damaged.
:Air vent thumbwheel;Air ventXTo open/close: turn thumbwheel :
clockwise or counter-clockwise.
Setting the rear-compartment air
vents
Setting the center vents in the rear
compartment
:Rear-compartment air vent thumbwheel;Rear-compartment air vent, right=Rear control panel for 3-zone automatic
climate control14?Rear-compartment air vent, leftXTo open/close: turn thumbwheel : up or
down.14For Canada only.146Setting the air ventsClimate control
BA 207 USA, CA Edition B 2011; 1; 3, en-USd2sboikeVersion: 3.0.3.62010-05-20T10:38:09+02:00 - Seite 146
Page 301 of 344

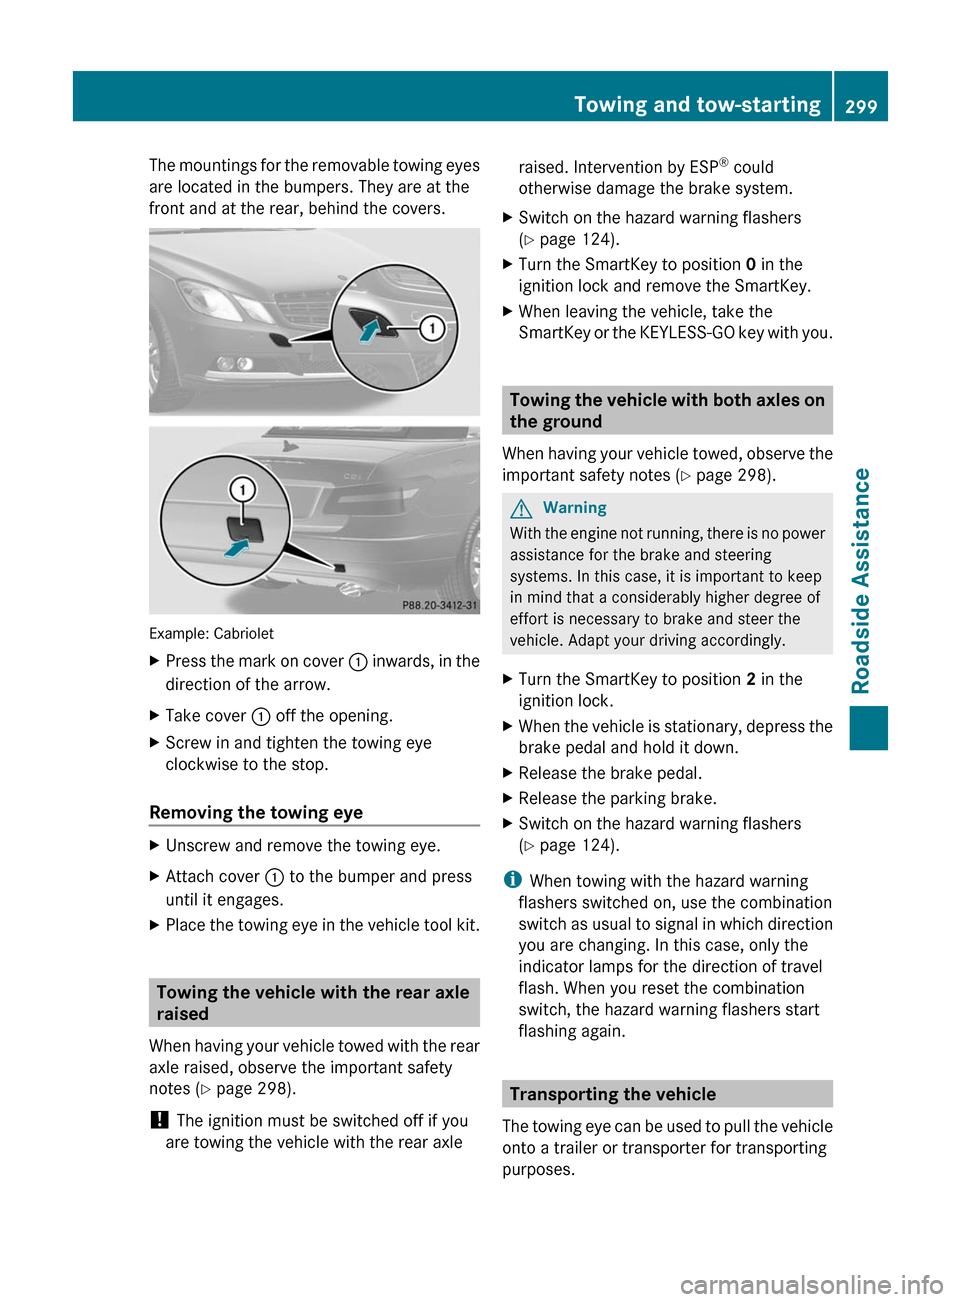
The mountings for the removable towing eyes
are located in the bumpers. They are at the
front and at the rear, behind the covers.
Example: Cabriolet
XPress the mark on cover : inwards, in the
direction of the arrow.
XTake cover : off the opening.XScrew in and tighten the towing eye
clockwise to the stop.
Removing the towing eye
XUnscrew and remove the towing eye.XAttach cover : to the bumper and press
until it engages.
XPlace the towing eye in the vehicle tool kit.
Towing the vehicle with the rear axle
raised
When having your vehicle towed with the rear
axle raised, observe the important safety
notes (Y page 298).
! The ignition must be switched off if you
are towing the vehicle with the rear axle
raised. Intervention by ESP® could
otherwise damage the brake system.
XSwitch on the hazard warning flashers
(Y page 124).
XTurn the SmartKey to position 0 in the
ignition lock and remove the SmartKey.
XWhen leaving the vehicle, take the
SmartKey or the KEYLESS-GO key with you.
Towing the vehicle with both axles on
the ground
When having your vehicle towed, observe the
important safety notes (Y page 298).
GWarning
With the engine not running, there is no power
assistance for the brake and steering
systems. In this case, it is important to keep
in mind that a considerably higher degree of
effort is necessary to brake and steer the
vehicle. Adapt your driving accordingly.
XTurn the SmartKey to position 2 in the
ignition lock.
XWhen the vehicle is stationary, depress the
brake pedal and hold it down.
XRelease the brake pedal.XRelease the parking brake.XSwitch on the hazard warning flashers
(Y page 124).
iWhen towing with the hazard warning
flashers switched on, use the combination
switch as usual to signal in which direction
you are changing. In this case, only the
indicator lamps for the direction of travel
flash. When you reset the combination
switch, the hazard warning flashers start
flashing again.
Transporting the vehicle
The towing eye can be used to pull the vehicle
onto a trailer or transporter for transporting
purposes.
Towing and tow-starting299Roadside AssistanceBA 207 USA, CA Edition B 2011; 1; 3, en-USd2sboikeVersion: 3.0.3.62010-05-20T10:38:09+02:00 - Seite 299Z
Page 303 of 344

XTo open: pull out cover : slightly at the
bottom in the direction of arrow =.
XPull cover : outwards in the direction of
arrow ; and remove it.
XTo close: clip in cover : on the front of
the dashboard.
XFold cover : inwards until it engages.
Fuse box in the engine compartment
XMake sure that the windshield wipers are
turned off.
GRisk of injury
Make sure that the windshield wipers are
turned off and the key is pulled out of the
ignition lock before you open the cover of the
fuse box. Otherwise, the windshield wipers
and the wiper rods above the cover could be
set in motion. This could lead to you or others
being injured by the wiper rods.
XOpen the hood (Y page 272).XRemove any existing moisture from the
fuse box using a dry cloth.
XTake lines ; from the guides.XMove aside lines ;. Route the lines behind
connection = to do this.
XTo open: open clamps :.XRemove the fuse box cover forwards.XTo close: check whether the rubber seal is
lying correctly in the cover.
XInsert the cover at the rear of the fuse box
into the retainer.
XFold down the cover and close clamps :.XSecure lines ; in the guides.
! The cover must be seated properly,
otherwise moisture or dirt could impair the
function of the fuses.
XClose the hood (Y page 273).
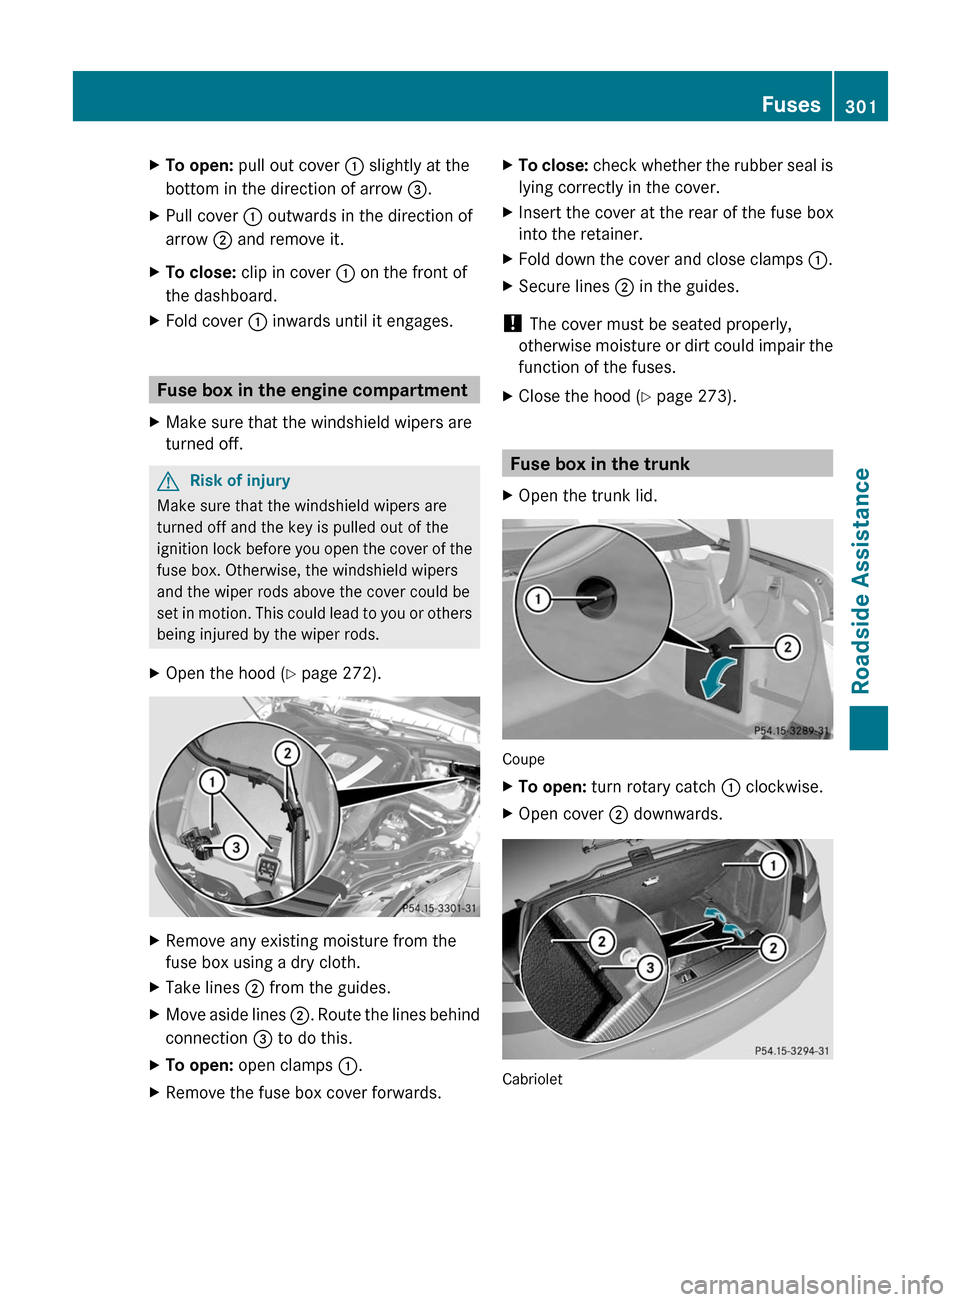
Fuse box in the trunk
XOpen the trunk lid.
Coupe
XTo open: turn rotary catch : clockwise.XOpen cover ; downwards.
Cabriolet
Fuses301Roadside AssistanceBA 207 USA, CA Edition B 2011; 1; 3, en-USd2sboikeVersion: 3.0.3.62010-05-20T10:38:09+02:00 - Seite 301Z