2011 MERCEDES-BENZ E-CLASS CABRIOLET engine
[x] Cancel search: enginePage 90 of 353

Opening and closing with the key
Important safet ynotes G
WARNING
Make sure nobody can be trapped or injured
by movin gparts such as the soft-top linkage
or soft-top compartment cover when opening
or closing the soft top.
If there is arisk of entrapment ,immediately
release the %or& button on the key.
The soft-top mechanism stops immediately.
Opening and closing i
The key must be close to the driver's door
handle.
X Point the tip of the key at the driver's door
handle.
X To open: press and hold the %button
on the key until the soft top is fully opened.
The Top in operation message appears
in the multifunction display. The seat ven-
tilation is switched on. The rear side win-
dows open.
X To close: press and hold the &button
on the key until the soft top is fully closed.
The Top in operation message appears
in the multifunction display. The soft top
and the side windows close. Closing the soft top manually
If the soft top cannot be closed automatically,
chec kthe following points:
R Is the boot separator engaged
(Y page 92)?
R Are the head restraintsont he rear bench
seats extended?
R Is the boot lid closed?
R Is the on-board voltage sufficient?
Start the engine if necessary.
If automatic operation still does not work, the
soft top can be closed manually.
This work must be performed by two persons. i
Closing the soft top manually is acom-
plex, technically demanding process which
requires agreat deal of force. Only close
the soft top manually in extreme emergen-
cies. In these situations, it is better to get
in touch with aqualified specialist work-
shop, e.g. aMercedes-Ben zService
Centre. G
WARNING
Remove wristwatches and any jewellery such
as rings or bracelets .You could otherwise get
caught, injured and damage the vehicle.
Always grip the soft top at the indicated grip-
ping points when closing the soft top man-
ually.Y ou could otherwise be injured.
X Depress the parking brake.
X Open the side windows.
X Lower the head restraint s(automatically
(Y page 103) or manually (Y page 103)).
X Remove the key from the ignition lock.
X Open the boot.
X Take the two straps out of the vehicle tool
kit (Y page 295).
X Take the hex-socket wrench out of the
Owner's Manual walleta nd keepitwith
you. X
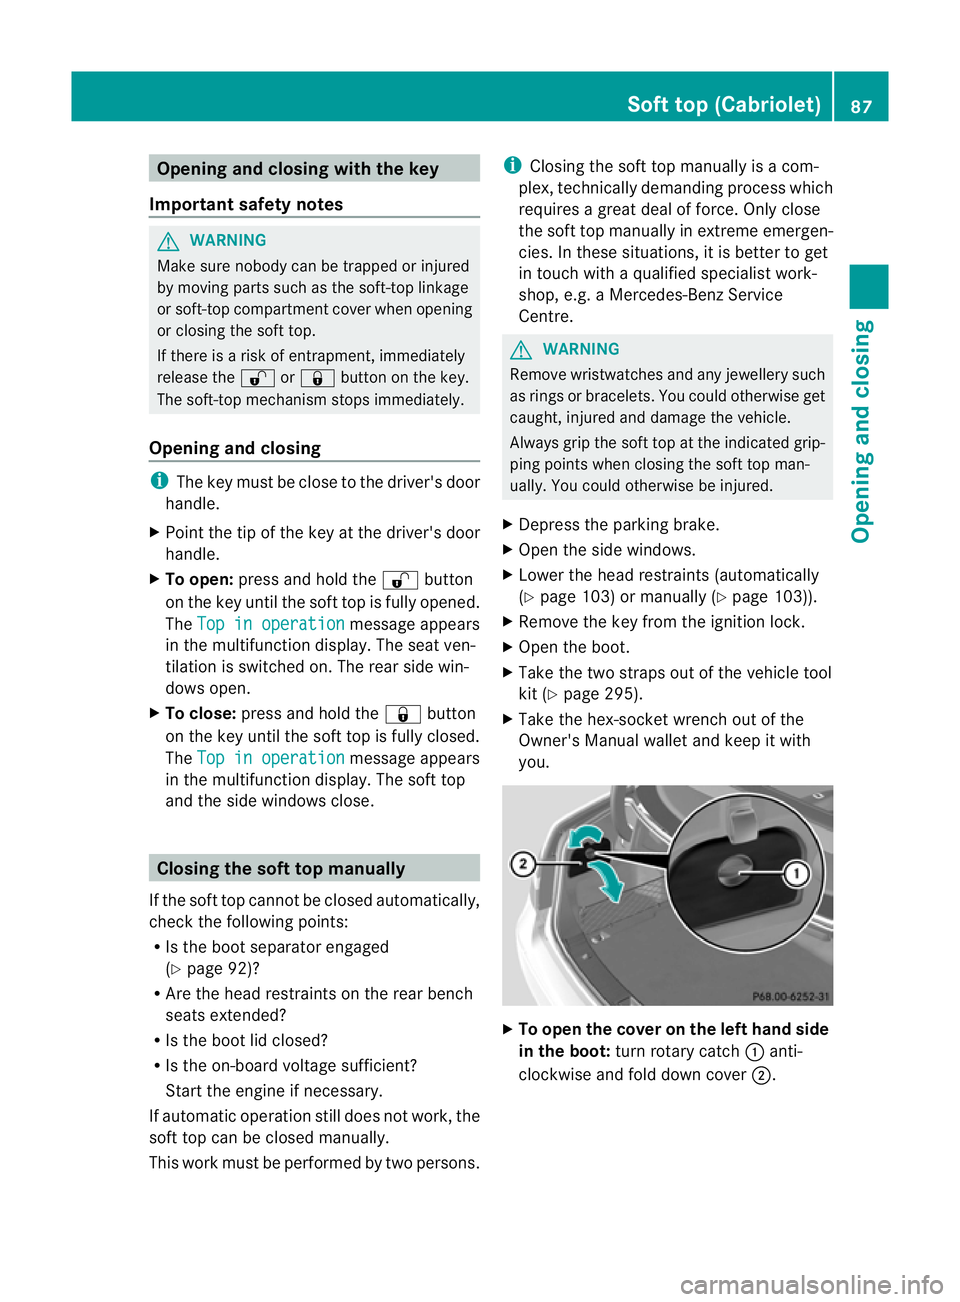
To ope nthe cove ronthe left hand side
in the boot: turn rotary catch :anti-
clockwise and fold down cover ;. Soft top (Cabriolet)
87Opening and closing Z
Page 96 of 353

stationary or when driving up to
aspeed of
160 km/h.
AIRCAP has the following components:
R aw ind deflector between the windscreen
and the soft top
R an AIRCAP draught stop between the two
head restraints on the rear bench seat G
WARNING
When extending and retractingA IRCAP, make
sure that no one can become trapped. If there
is ar isk of entrapment,p ress the button again
to retract AIRCAP again.
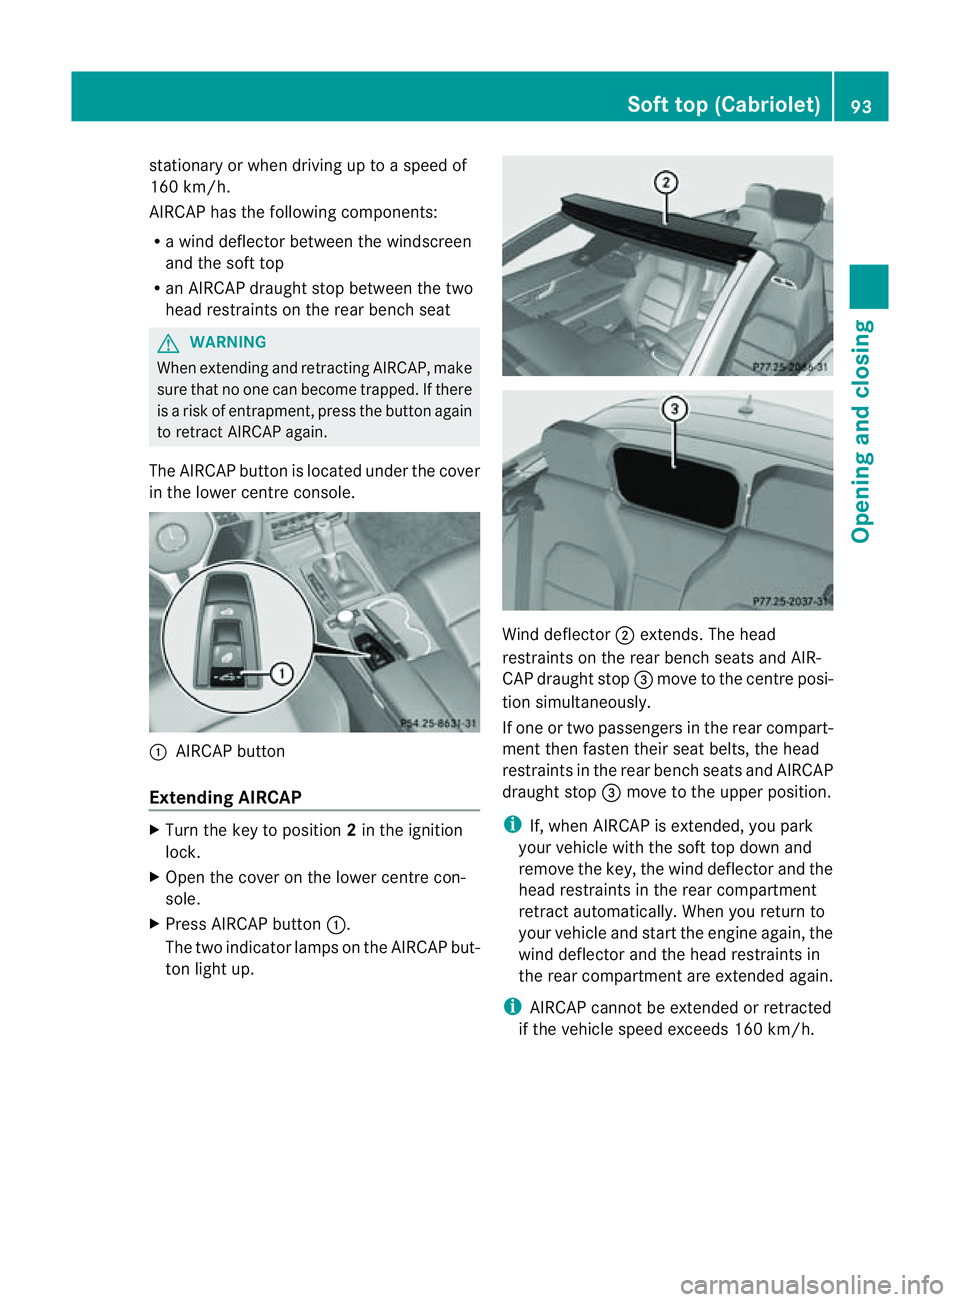
The AIRCAP button is located under the cover
in the lower centre console. :
AIRCAP button
Extending AIRCAP X
Turn the key to position 2in the ignition
lock.
X Open the cover on the lower centre con-
sole.
X Press AIRCAP button :.
The two indicator lamps on the AIRCAP but-
ton light up. Wind deflector
;extends. The head
restraints on the rear bench seats and AIR-
CAP draught stop =move to the centre posi-
tion simultaneously.
If one or two passengers in the rear compart-
ment then fasten their seat belts, the head
restraints in the rear bench seats and AIRCAP
draught stop =move to the upper position.
i If, when AIRCAP is extended, you park
your vehicle with the soft top down and
remove the key, the wind deflector and the
head restraints in the rear compartment
retract automatically. When you return to
your vehicle and start the engine again, the
wind deflector and the head restraints in
the rear compartment are extended again.
i AIRCAP cannot be extended or retracted
if the vehicle speed exceeds 160 km/h. Soft top (Cabriolet)
93Opening and closing Z
Page 118 of 353

If you hear
awarning tone when you leave the
vehicle ,the lights may still be switched on.
X Turn the lights witchtoà .
Dipped-beam headlamps X
To switch on th edipped-bea mhead-
lamps: turnthe key in th eignitio nlock to
position 2or start th eengine.
X Turn th elight switch to L.
The L indicator lamp in th einstrument
cluster light sup.
Daytime driving lights You can activat
eordeactivat ethe daytime
driving light sfunction usin gthe on-board
compute r(Ypage 226).
X Daytime driving lights: activatethe day-
tim edriving light sfunction usin gthe on-
board computer.
X Turn th elight switch to Ã.
When th eengine is on: depending on the
ambien tlight conditions, the daytime driv-
ing light sorthe parking and dipped-beam
headlamps are switched on.
When the dipped-beam headlamps are
switched on, the Lindicator lamp in the
instrumen tcluster light sup.
Automatic headlam pmode X
To switch on automatic headlamp
mode: turnthe light switc htoÃ.
Key in position 1in the ignition lock :the
side lamps are switched on or off automat-
ically depending on the brightnes softhe
ambien tlight.
With the engine running: depending on the
brightnes softhe ambien tlight ,the daytime
drivin glights 8
or the dipped-beam head-
lamps are switched on or off automatically.
When the dipped-beam headlamps are
switched on, the Lindicator lamp in the
instrumen tcluster light sup. G
WARNING
If the light switc hisset to Ã,t he dipped-
beam headlamps will not com eonautomati-
cally if it is foggy. This could endanger you and
others. Therefore, tur nthe light switch to
L in fog.
The automatic headlamp feature is only an
aid. The driver is responsible for the vehicle's
lighting at all times.
Foglampsa nd rear foglamp Front foglamps
Only vehicles with front foglamps have the
"Foglamps" function.
G
WARNING
If you suspect that driving conditions will be
foggy, turn the light switch to Lbefore you
start your journey. Otherwise, your vehicle
may not be visible and you could endanger
yourself and others.
X To switch on the front foglamps: turn the
key in the ignition lock to position 2or start
the engine.
X Turn the light switch to T,Lor
Ã.
X Press the Nbutton.
The green Nindicator lamp in the instru-
ment cluster lights up.
X To switch off the front foglamps: press
the N button.
The green Nindicator lamp in the instru-
ment cluster goes out.
i If you switch the engine off (key in posi-
tion 1in the ignition lock) and then restart
it, the previous foglamp settings are
restored.
8 Only if daytime driving lights have been activated via the on-board computer. Exterior lighting
115Lights and windscreen wipers Z
Page 119 of 353

Rear foglamp
X
To switc honthe rear foglamp: turn the
key in the ignition lock to position 2or start
the engine.
X Turn the light switch to LorÃ.
X Press the Rbutton.
The yellow Rindicator lamp in the
instrument cluster lights up.
X To switc hoff the rear foglamp: press the
R button.
The yellow Rindicator lamp in the
instrument cluster goe sout.
Vehicles with front foglamps: when the light
switch is in the Tposition, the rea rfog-
lamp can only be switched on if the foglamps
(without dipped-beam headlamps) are
switched on.
i If you switch the engine off (key in posi-
tion 1in the ignition lock) and then restart
it, the previous rear foglamp settings are
restored.
Adjusting the headlam prange (halogen
headlamps) The headlamp range control allow
syou to
adjust the cone of light from the headlamps
to sui tthe vehicle load. g
Driver's seat and front-passenger seat
occupied
1 Driver's seat, front-passenger seat and
rear seats occupied 2
Driver's seat, front-passenger seat and
rear seats occupied, boot laden
3 Driver's and front-passenger seats occu-
pied and maximum permissible rear axle
load utilised, e.g. when towing atrailer
X Start the engine.
X Turn headlamp range control to the posi-
tion which corresponds to the load in your
vehicle.
Headlampc leaning system The headlamps are cleaned automatically if
the "Wipe with washer fluid" function is oper-
ated ten times while the light
sare on and the
engin eisrunning (Y page 124). When you
switc hoff the ignition, the automatic head-
lamp cleaning syste misreset and counting is
resumed from 0. Combination switch
Turns ignals :
Main-beam headlamps
; Turn signal, right
= Headlamp flasher
? Turn signal, left 116
Exterior lightingLights and windscreen wipers
Page 120 of 353

X
To indicate briefly: press the combination
switch briefl ytothe pressure point in the
direction of arrow ;or?.
The corresponding tur nsignal flashes three
times.
X To indicate: press the combination switch
beyond the pressure point in the direction
of arrow ;or?.
Main-bea mheadlamps X
To switch on th emain-bea mhead-
lamps: turnthe key in the ignition lock to
position 2or start the engine.
X Turn the light switc htoLorÃ.
X Press the combination switc hbeyond the
pressure point in the direction of
arrow :.
In the Ãposition ,the main-beam head-
lamps are only switched on when it is dark
and the engin eisrunning.
The K indicator lamp in the instrument
cluster lights up when the main-beam head-
lamps are switched on.
X To switch off the main-beam head-
lamps: move the combination switch back
to its normal position.
The K indicator lamp in the instrument
cluster goes out.
Headlamp flasher X
To switch on: turn the key in the ignition
lock to position 1or 2or start the engine.
X Pull the combination switch in the direction
of arrow =. Hazard warning lamps
The hazard warning lamps automatically
switch on if:
R
an airbag is deployed.
R the vehicle decelerates rapidly from a
speed of more than 70 km/ha nd comesto
as tandstill.
X To switc honthe hazard warning lamps:
press button :.
All tur nsignals flash. If you now switc hon
at urns ignal using the combination switch,
only the tur nsignal lamp on the corre-
sponding side of the vehicle will flash.
X To switch off th ehazar dwarning
lamps: press button :.
The hazar dwarnin glamps switc hoff auto-
matically if the vehicle reaches aspeed of
over 10 km/h again after full brak eapplica-
tion.
i The hazar dwarnin glamps still operat eif
the ignition is switched off. Exterior lighting
117Lightsand windscreen wipers Z
Page 124 of 353

The interior lighting automatically switches
on if you:
R unlock the vehicle
R open adoor
R remove the key from the ignition lock
The interior light is activated for ashort while
when the key is removed from the ignition
lock. You can activat ethis delayed switch-off
using the on-board computer (Y page 228).
Manual interior lighting control X
To switch the interior lighting on/off:
press the cbutton.
X To switch the reading lamps on/off:
press the pbutton. Crash-responsive emergency lighting
The interior lighting is activated automatically
if the vehicle is involved in an accident.
X To switch off the crash-responsive
emergency lighting: press the hazard
warning lamp button.
or
X Lock and then unlock the vehicle using the
key. Changing bulbs
Important safety notes
Xenon bulbs If your vehicle is equipped with xenon bulbs,
you can recognise this by the following: the
cone of light from the xenon bulbs moves
from the top to the bottom and back again
when you start the engine. For this to be
observed, the lights must be switched on
before startingt he engine. G
DANGER
Xenon bulbs carry ahigh voltage. You could
get an electric shock and be seriously or even
fatally injured if you touch the electric con- tacts on xenon bulbs. Therefore, never
remove the cover from xenon bulbs.
Do not change xenon bulbs yourself, but have
them replaced at
aqualified specialist work-
shop which has the necessary specialist
knowledge and tools to carry out the work
required.
Mercedes-Ben zrecommends that you use a
Mercedes-Benz Service Centr efor this pur-
pose. In particular, work relevant to safety or
on safety-related systems must be carried out
at aq ualified specialist workshop.
Bulbs and lamps are an important aspect of
vehicle safety. You must therefore make sure
that these function correctly at all times.
Have the headlamp setting checked regularly.
Other bulbs There are bulbs other than the xenon bulbs
that you cannot replace. Replace only the
bulbs listed (Y
page 122). Have the bulbs that
you cannot replace yourself changed at a
qualified specialist workshop.
Mercedes-Benz recommends that you use a
Mercedes-Benz Service Centr efor this pur-
pose. In particular, work relevant to safety or
on safety-related systems must be carried out
at aq ualified specialist workshop.
If you require assistanc echangin gbulbs, con-
sult aqualified specialist workshop.
Do not touch the glass tube of new bulbs with
your bare hands. Even minor contamination
can burn into the glass surface and reduce
the servic elife of the bulbs. Always use alint-
free cloth or only touch the base of the bulb
when fitting.
Only use bulbs of the correct type.
If the new bulb still does not light up, consult
aq ualified specialist workshop.
Bulbs and lamps are an important aspect of
vehicle safety. You must therefore make sure
that these function correctly at all times.
Have the headlamp setting checked regularly. Changing bulbs
121Lights and windscreen wipers Z
Page 128 of 353

Replacing the wiper blades
Important safety notes G
WARNING
The wiper arm scould star tmoving and cause
an injury if you leave the windscreen wipers
switched on.
Remove the key from the ignition lock before
replacing the wiper blades.
! To avoid damaging the windscreen wiper
blades, make sure that you touch only the
wiper arm of the windscreen wiper.
! Never open the bonnet if awindscreen
wiper arm has been folded away from the
windscreen.
Never fold awindscreen wiper arm without
aw iper blade back ontot he windscreen.
Hold the windscreen wiper arm firmly when
you change the wiper blade. If you release
the windscreen wiper arm without awiper
blade and it falls ontot he windscreen, the
windscreen may be damaged by the force
of the impact.
Mercedes-Benz recommends that you have
the wiper blades replaced by aqualified
specialist workshop, e.g. at aMercedes-
Ben zServic eCentre.
Replacin gthe wiper blades Removing th
ewiper blades
X Remove th ekeyfrom th eignition loc kor
tur nthe key to position 0(KEYLESS-GO).
X Fold the wiper arm away from the wind-
screen until it engages.
X Set the wiper blade at right angles to the
wiper arm. X
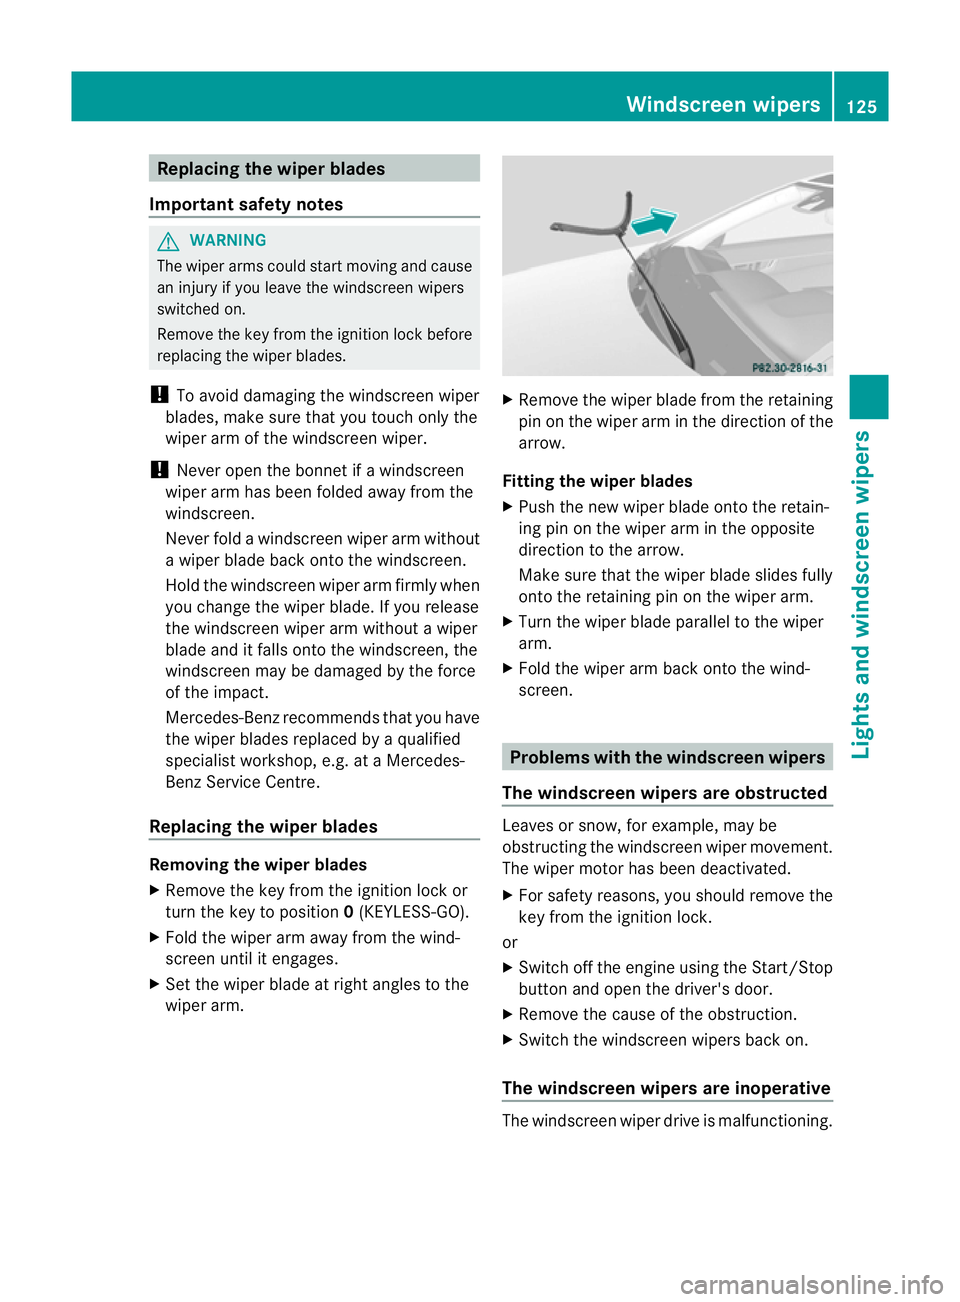
Remove the wiper blade from the retaining
pin on the wiper arm in the direction of the
arrow.
Fitting the wiper blades
X Push the new wiper blade onto the retain-
ing pin on the wiper arm in the opposite
direction to the arrow.
Make sure that the wiper blade slides fully
onto the retaining pin on the wiper arm.
X Turn the wiper blade parallel to the wiper
arm.
X Fold the wiper arm back onto the wind-
screen. Problems with the windscreen wipers
The windscreen wipers are obstructed Leaves or snow, for example, may be
obstructing the windscreen wiper movement.
The wiper motor has been deactivated.
X For safety reasons, you should remove the
key from the ignition lock.
or
X Switch off the engine using the Start/Stop
button and open the driver's door.
X Remove the cause of the obstruction.
X Switch the windscreen wipers back on.
The windscreen wipers are inoperative The windscreen wiper drive is malfunctioning. Windscreen wipers
125Lights and windscreen wipers Z
Page 131 of 353

Useful information
i This Owner's Manual describes all models
and all standard and optional equipment
available to your vehicle at the time of pub-
lication of the Owner's Manual. Country-
specific deviation sare possible. Please
not ethat your vehicle may not be equipped
with all feature sdescribed. This also
applies to safety-relevan tsystems and
functions.
i Pleas ereadt he information on qualified
specialist workshop s(Ypage 22). Overview of climat
econtro lsystems Important safet
ynotes G
WARNING
Observ ethe setting srecommended on the
following pages. Otherwise ,the windows
could mist up. This may obstruct your view of
the traffic situation and, as aresult ,you may
cause an accident.
THERMATIC/THERMOTRONIC automatic cli-
mate control controls the temperature and
the humidit yofthe vehicle interior and filters
out undesirable substances fro mthe air.
THERMATIC/THERMOTRONIC automatic cli-
mate control is only operational when the
engine is running. 12
i Ventilate the vehicle for abrief period
during warm weather, e.g. using the con-
venience opening feature (Y page 83). This
will speed up the cooling process and the
desired vehicle interior temperature will be
reached more quickly.
i The integrated filter can filter out most
particles of dust and completely filters out
pollen. Aclogged filter reduces the amount
of air supplied to the vehicle interior .For
this reason, you should always observe the interval for replacing the filter, which is
specified in the Servic
eBooklet .Asit
depends on environmental conditions, e.g.
heavy air pollution, the interval may be
shorter than stated in the Service Booklet.
i It is possible that the residualh eat func-
tion may be activated automaticallyanh our
after the key is removed. The vehicle is then
ventilated for 30 minutes to dry the air-
conditioning system.
12 THERMOTRONIC automatic climate control: the residualh eat function can only be activated/deactivated
when the ignition is switched off. 128
Overview of climatec
ontrol systemsClimatecontrol