2011 MERCEDES-BENZ E-CLASS CABRIOLET keyless
[x] Cancel search: keylessPage 152 of 353
Using KEYLESS-G
Otostart the engine G
WARNING
Your vehicle can be started using avalid KEY-
LESS-GO key. For this reason ,children should
neve rbel eft unsupervised in the vehicle.
Always take the key with you when leaving the
vehicle, even if you are only leaving it for a
short time.
i The Start/Stop button can be used to
start the vehicle manually without inserting
the key into the ignition lock. The key must
be in the vehicle and the Start/Stop button
must be inserted in the ignition lock. This
mode for starting the engine operates inde-
pendently of the ECO start/stop automatic
engine start function.
X Depress the brake pedal and keep it
depressed.
X To star tapetrol engine: pressthe Start/
Stop button (Y page 147) once.
The engine starts.
X To start adiesel engine: press the Start/
Stop button (Y page 147)once.
Preglow is activated and the engin estarts. Pulling away
Manual transmission X
Depress the brake pedal and keep it
depressed.
X Fully depress the clutch pedal.
X Shif ttoe itherfirst gear or reverse gear R.
X Release the parkin gbrake (Y page 166).
X Release the brake pedal.
X Slowly release the clutch pedal and gently
depress the accelerato rpedal.
! Change gear in good time and avoid spin-
ning the wheels. Otherwise, you could dam-
age the vehicle.
i Follow the shift recommendations in the
multifunction display for an economical
driving style (Y page 154). i
The vehicle locks centrally oncey ou have
pulled away. The lockin gknobs in the doors
drop down.
You can open the doors from the inside at
any time.
You can also deactivat ethe automatic lock-
ing feature (Y page 228).
Automatic transmission i
It is only possible to shift the transmission
from position Pto the desired position if
you depress the brake pedal. Only then is
the selector lever lock released.
X Depress the brake pedal and keep it
depressed.
X Shift the transmission to position Dor R.
X Release the parkin gbrake (Y page 166).
X Release the brake pedal.
X Carefully depress the accelerator pedal.
i The vehicle locks centrally oncey ou have
pulled away. The lockin gknobs in the doors
drop down.
You can open the doors from the inside at
any time.
You can also deactivat ethe automatic lock-
ing feature (Y page 228).
i Upshift stake place at higher engine
speeds after acold start .This helps the
catalytic converter to reach its operating
temperature more quickly.
Hill starta ssist Hill start assist helps you when pulling away
forwards or in reverse on an uphill gradient.
It holds the vehicle for
ashort time after you
have removed your foot from the brake pedal.
This gives you enough time to move your foot
from the brake pedal to the accelerator pedal
and depress it before the vehicle begins to
roll. Driving
149Driving and parking Z
Page 166 of 353
Refuelling
Fue lfille rflap The fuel filler flap is unlocked or locked auto-
matically when you open or close the vehicle
with the key or using KEYLESS-GO.
The position of the fuel filler cap is displayed
in the instrumen tcluster 8.T he arrow
next to the filling pump indicates the side of
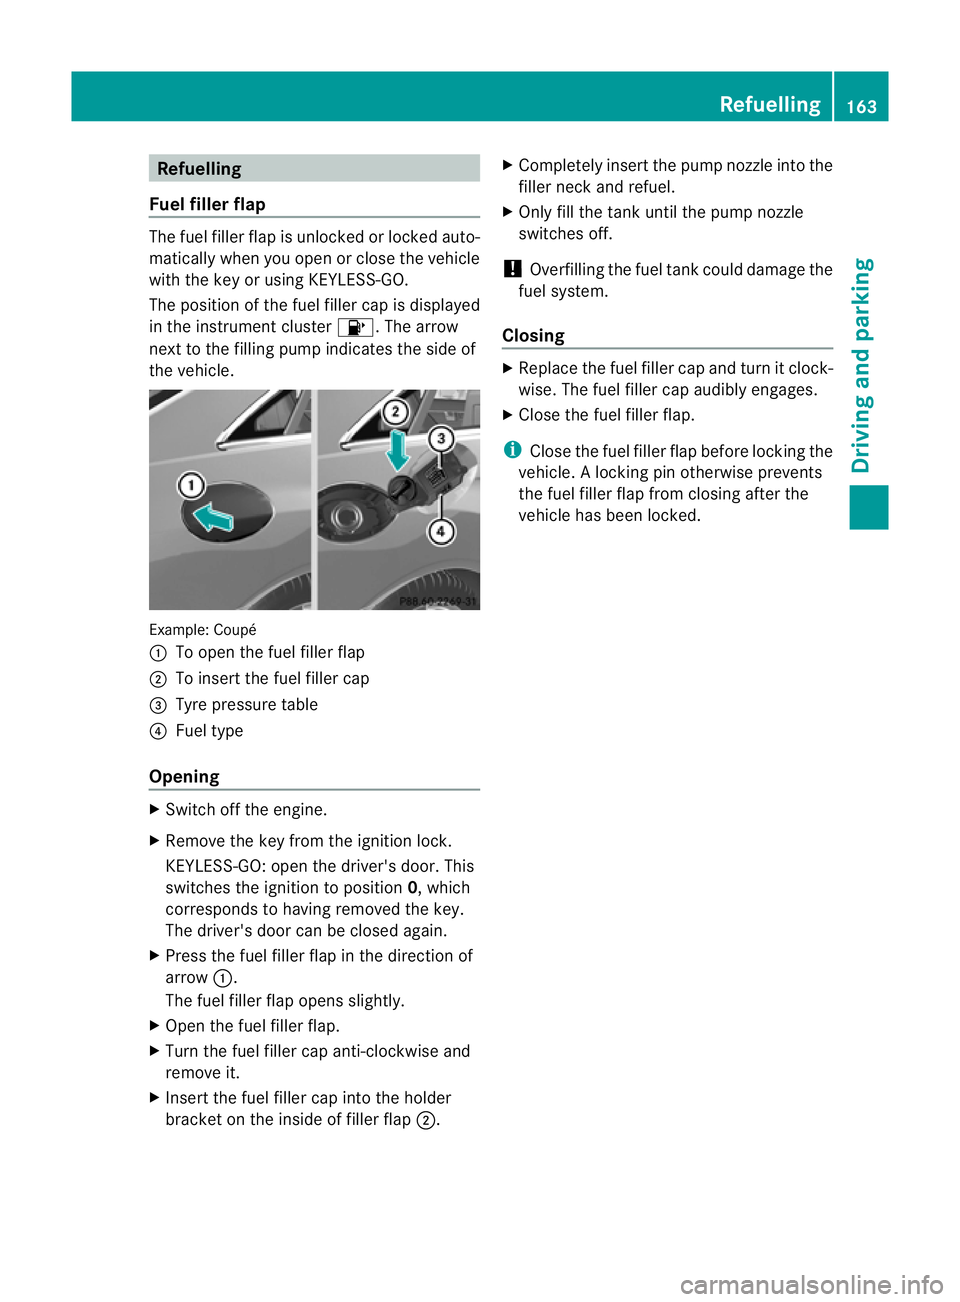
the vehicle. Example: Coupé
:
To open the fuel filler flap
; To insert the fuel filler cap
= Tyre pressure table
? Fuel type
Opening X
Switch off the engine.
X Remove the key from the ignition lock.
KEYLESS-GO: open the driver's door. This
switches the ignition to position 0,which
corresponds to having removed the key.
The driver's door can be closed again.
X Press the fuel filler flap in the direction of
arrow :.
The fuel filler flap opens slightly.
X Open the fuel filler flap.
X Turn the fuel filler cap anti-clockwise and
remove it.
X Insert the fuel filler cap into the holder
bracket on the inside of filler flap ;.X
Completely insert the pump nozzle into the
filler neck and refuel.
X Only fill the tank until the pump nozzle
switches off.
! Overfilling the fuel tank could damage the
fuel system.
Closing X
Replace the fuel filler cap and turn it clock-
wise. The fuel filler cap audibly engages.
X Close the fuel filler flap.
i Close the fuel filler flap before locking the
vehicle. Alockingp in otherwise prevents
the fuel filler flap from closing after the
vehicle has been locked. Refuelling
163Driving and parking Z
Page 169 of 353

Vehicles with automatic transmission
X
Apply the parking brake firmly.
X Shift the transmission to position P.
Usin gthe key
X Turn the key to position 0in the ignition
lock and remove it.
The immobiliser is activated.
i The key can onl yberemove difthe trans-
mission is in position P.
Usin gKEYLESS -GO
X Press the Start/Sto pbutton (Y page 147).
The engine stop sand al lthe indicator
lamps in the instrument cluster go out.
i Whe nthe driver's door is closed, this cor-
responds to key position 1.When the driv-
er's door is open, this corresponds to key
position 0,i.e. key removed.
i The engine can be turned off while the
vehicle is in motion by pressing and holding
the Start/Stop button for three seconds.
This function operates independently of the
ECO start/stop automatic engine switch-
off function. Parking brake X
To apply: depress parking brake ;firmly.
The J indicator lamp in the instrument
cluster lights up if the engine is running.
X To release: depress the brake pedal and
keep it depressed.
X Pull release handle :.
The J indicator lamp in the instrument
cluster goes out. Parking up the vehicle
If you leave the vehicle parked up for longer
than four weeks, the battery may be damaged
by exhaustive discharge.
X Disconnect the battery (Y page 307) or
connect it to atrickle charger.
i You can obtain information about trickle
chargers from aqualified specialist work-
shop, e.g. aMercedes-Ben zService
Centre.
If you leave the vehicle parked up for longer
than six weeks, the vehicle may suffer dam-
age as aresult of lack of use.
X Visit aqualified specialist worksho pand
seek advice. Driving tips
General driving tips
Rolling with the engine switched off G
WARNING
Never switch the engin eoff while the vehicle
is in motion.
There is no power assistanc efor the steering
and the service brake when the engine is not
running.
You will require considerably more effort to
steer and brake, and you could therefor elose
control of the vehicle and cause an accident. 166
Driving tipsDriving and parking
Page 256 of 353
Display messages Possible causes/consequences and
M Solutions
The sof
ttop has been opened and closed several times in arow.
The soft-top drive has been switched off automatically for safety
reasons.
You can open and close the soft top again after approximately ten
minutes.
X Switch off the ignition and turn it back on.
X Repeat the opening or closing procedure (Y page 86).¥
Top
up washer fluid The washer fluid level in the washer fluid reservoir has dropped
below the minimum.
X
Top up the washer fluid (Y page 284).Key
Display messages Possible causes/consequences and
M Solutions
+
Key does not
belong to vehicle You have put the wrong key in the ignition lock.
X
Use the correc tkey. +
Replace key The key needs to be replaced.
X
Visit aqualified specialist workshop. +
Change key batter‐
ies The batteries of the KEYLESS-GO key are discharged.
X
Change the batteries (Y page 74).+
Key not detected
(Red display message) The KEYLESS-GO key is not in the vehicle.
Aw
arning tone also sounds.
If th eengineiss witched off ,you can no longer loc kthe vehicle
centrally or start the engine.
X Pull over and stop the vehicle safely as soon as possible, paying
attention to road and traffic conditions.
X Apply the parking brake.
X Locate the KEYLESS-GO key. Display messages
253On-board computer and displays Z
Page 257 of 353

Display messages Possible causes/consequences and
M Solutions
The KEYLESS-GO ke
yisnot detecte dwhile the engin eisrunning
because ther eisinterference from astrong source of radio waves.
Aw arning tone also sounds.
X Pull ove rand stop the vehicl esafelyass oonasp ossible,p aying
attention to road and traffic conditions.
X Apply the parking brake.
X Operate the vehicle with the key in the ignition lock if necessary. +
Key not detected
(White displaym
es-
sage) The KEYLESS-GO key cannot be detected at present.
X
Change the location of the key with the KEYLESS-GO functions
in the vehicle.
If the KEYLESS-GO key is still not detected:
X Change the location of the key with the KEYLESS-GO functions
in the vehicle.
X Operate the vehicle with the key in the ignition lock if necessary. +
Key still in vehi‐
cle The KEYLESS-GO key has been detected inside the vehicle during
locking.
X
Remove the KEYLESS-GO key from the vehicle. +
Remove starting
button, then
insert key KEYLESS-GO is temporarily malfunctioning or is defective.
Awarn-
ing tone also sounds.
X Inser tthe keyintot he ignition loc kand tur nittot hedesired
position.
X Visi taq ualified specialist workshop. +
Close doors to
lock vehicle At least one door is open.
Awarning tone also sounds.
X Close all door sand loc kthe vehicle again. 254
Display messagesOn-board computer and displays
Page 284 of 353
If you push the lidsb
ack, you willnotice a
resistance.
X Release bonnet :.
X Check whether the lidsofb onnet lifter;
are resting on housings =(arrow).
X The lids of bonnet lifter ; are resting
on the housings: close bonnet:
(Y page 282).
or
X The lids of bonnet lifter ; are not rest-
ing on the housings: first lift up bon-
net :on left-hand side ?and then on
right-hand side B.Lift up bonnet :until
the respective lid of bonnet lifter ;no lon-
ger moves.
The lidsofb onnet lifter;must rest on
housings =(arrow).
X Close bonnet :(Ypage 282).
If you cannot close bonnet :or the L
symbola ppears in the multifunction display,
repeatt he steps. G
WARNING
If the bonnet can still not be engaged properly
or the Lsymbol appears in the multifunc-
tion display,don ot continue driving. The bon-
net can then open when the vehicle is in
motion and obscure your field of vision. Con-
sult aqualified specialist workshop. Other-
wise, you may cause an accident and injure
yourself and others.
Opening the bonnet G
WARNING
Do not pull the release lever while the vehicle
is in motion. If you do so, the bonnet may open
up and block your view. G
WARNING
There is arisk of injury if the bonnet is open,
even if the engine is not running.
Some engine components can become very
hot. To avoid the risk of burns, only touch those
components described in the Owner's Manual
and observe the relevant safety notes.
G
WARNING
The radiator fan between the radiator and the
engine can start automatically, even if the key
has been removed from the ignition lock. For
this reason, you must not reach into the fan
rotation area. You could otherwise be injured.
Vehicles with apetrol engine: The elec-
tronic ignitio nsystem uses high voltage. For
this reason ,you mus tnever touch ignition
system components( ignition coil, ignition
cables, spark plug connectors or test socket)
while:
R the engine is running
R the engine is being started
R the ignition is switched on and the engine
is being cranked by hand
You could otherwise suffer an electric shock
and be seriously or even fatally injured.
Vehicles with adiesel engine: The elec-
tronic injection control uses high voltage. For
this reason ,you must never touc hinjection
system components while:
R the engin eisrunning
R the engin eisbeing started
R the ignition is switched on
You could otherwise suffer an electric shock
and be seriously or even fatally injured.
X Make sure that the windscreen wipers are
switched off. G
WARNING
The windscreen wipers and wiper linkage
could be set in motion.
When the bonnet is open, you or others could
be injured by the wiper linkage.
Make sure that the windscreen wipers are
switched off. Remove the key or make sure
that no ignition position has been selected
with KEYLESS-GO. All indicator lamps must be
off in the instrumen tpanel. Engine compartment
281Maintenance and care Z
Page 286 of 353

X
Slowl yslide oi ldipstick :into the guide
tub etot he stop ,and take it ou tagain.
The oil level is correc tifthe level is between
MIN mark =and MAX mark ;.
X Top up the oil if necessary.
Adding engine oil H
Environmental note
When topping up the oil, take care not to spill
any. If oil enters the soil or waterways, it is
harmful to the environment. G
WARNING
If engine oil comes into contact with hot
engine parts, it may ignite and you could burn
yourself. Do not spill any engine oil on hot
engine parts. Example: engine oil cap
X
Turn cap :anti-clockwise and remove it.
X Top up with the amount of oil required.
Fill carefully to the maximum mark on the oil
dipstick.
i Depending on the engine, the difference
between the minimum mark and the maxi-
mum mark is approximately 1.5 –2litres.
! Do not add too much oil. If the oil level is
above the "max" mark on the dipstick, too
much oil has been added. This can lead to
damage to the engine or the catalytic con-
verter. Have excess oil siphoned off.
For further information on engine oil, see
(Y page 335). X
Replace cap :on the filler neck and
tighten clockwise.
Ensure that the cap locks into place
securely. Checking and adding other service
products
Checking the coolant level Only check the coolant level when the vehicle
is on alevel surface and the engine has cooled
down.
X Turn the key to position 2(Y page 147) in
the ignition lock.
On vehicles with KEYLESS-GO, press the
Start/Stop button twice (Y page 147).
X Check the coolant temperature displayin
the instrumentc luster. G
WARNING
The cooling system is pressurised. Therefore,
only unscrew the cap once the engine has
cooled down. The coolant temperature gauge
must display less than 70 †.Otherwise, you
could be scalded if hot coolant escapes. X
Slowl yturnc ap : half aturna nti-clock-
wise and allow exces spressure to escape.
X Turn cap :further anti-clockwis eand
remove it.
If th ecoolan tisatt heleve lofm arkerbar
= in th efille rneck when cold, there is
enough coolant in coolant expansion
tank ;. Engine compartment
283Maintenance and care Z
Page 291 of 353
!
The following may cause the paint to
become shiny and thus reduce the matt
effect:
R Vigorous rubbing with unsuitablem ate-
rials.
R Frequent use of car washes.
R Washing the vehicle in direct sunlight.
! Never use paint cleaner, buffing or pol-
ishing products, or gloss preserver, e.g.
wax. These products are only suitablef or
high-gloss surfaces. Their use on vehicles
with matt finish leadstoc onsiderable sur-
face damage (shiny, spotted areas).
Alwaysh ave paintwork repairs performed
at aq ualified specialist workshop, e.g. a
Mercedes-Benz Service Centre.
! Do not use wash programs with ahot wax
treatment under any circumstances.
i The vehicle should preferably be washed
by hand using asoft sponge, car shampoo
and plenty of water.
i Use only insect remover and car shampoo
from the range of recommended and
approved Mercedes-Benz care products.
Cleaning the Cabriolets oft topX
Light soiling: you can clean th esoftt op
while it is dry or rinse it with clear water.
X Norma ltoheavy soiling: clean theroof
with abrush and clear water .Clean stains
and other dirt with abrush and aMercedes-
Ben zrecommended and approved cleaning
agent. Always brush from fron ttoback in
the direction of the fabric.
! Never use any of the following to clean the
soft top:
R petrol
R thinner
R tar or stain remover
R other organic solvents
! Remove bird droppings immediately as
they are corrosive and, therefore, can make the soft-top fabric leak. Do not use high-
pressure cleanin
gequipment to clean the
vehicle. Do not use sharp-edged equipment
to remove ice and snow.
Frequent cleanin greduces the resistance to
dirt of the soft top.
To restore this resistance to dirt, clean the
soft top using soft top cleanin gagents that
have been recommended and approved by
Mercedes-Benz.
Incorrec tcleanin gand care ,aswell as ageing,
can cause the soft top seams to leak. Have
the soft-top seams sealed at aqualified spe-
cialist workshop, e.g. at aMercedes-Benz
Servic eCentre.
i Cover the soft top with asuitable cover if
you plan to leave the vehicle outside for a
long period of time.
Cleaning AIRCAP Cleaning th
ewind deflector
Clean the wind deflector on the windscreen
with the soft top closed.
X Apply the parking brak efirmly.
X Vehicles with key: turnthe key to position
2 (Y page 147) in the ignition lock.
X Vehicles with KEYLESS-GO: press the
Start/Stop button twice (Y page 147).
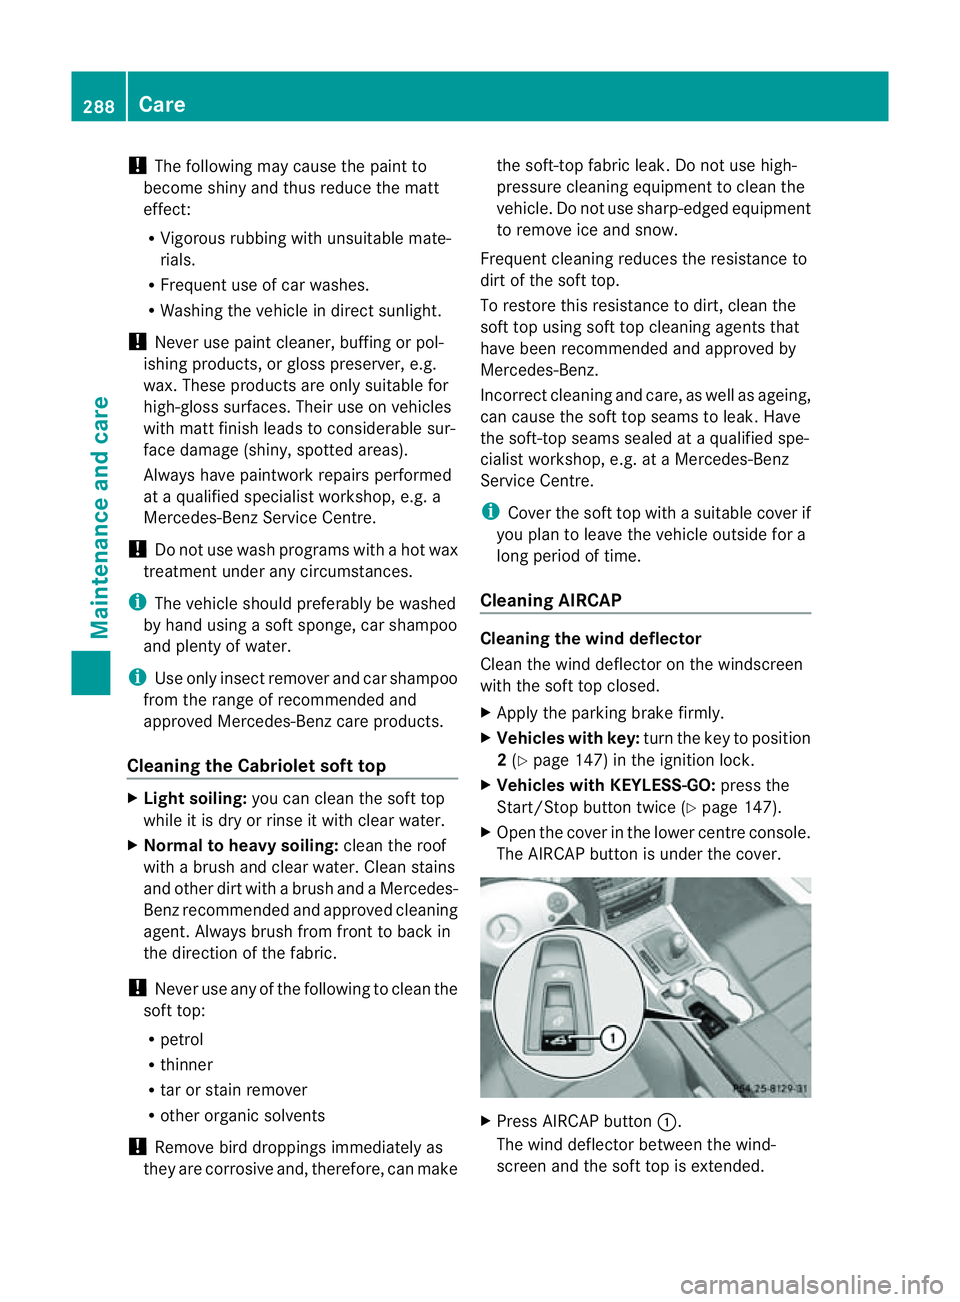
X Open the cover in the lower centre console.
The AIRCAP button is under the cover. X
Press AIRCAP button :.
The wind deflector between the wind-
screen and the soft top is extended. 288
CareMaintenance and care