2011 MERCEDES-BENZ E-CLASS CABRIOLET keyless
[x] Cancel search: keylessPage 81 of 353

Only for the United Kingdom:
if the vehicle
has been locked with the key, the double lock
function is activated as standard. It is then
not possible to open the doors from inside the
vehicle. Deactivate the interior motion sensor
(Y page 69) before you lock the vehicle with
the key. The doors can then be opened from
the inside after the vehicle has been locked
from the outside with the key. X
Pull door handle ;.
If the door is locked, lockin gknob :pops
up. The door is unlocked and can be
opened.
i When adoor is opened, the side window
on that side opens slightly. When the door
is closed, the side window closes again.
! The side windows will not open/close if
the batter yisdischarged or if the side win-
dows have iced up. It will then not be pos-
sible to close the door. Do not attempt to
forc ethe door to close. You could other-
wise damage the door or the side window. Centrally locking and unlocking the
vehicle from the inside
You can centrally lock or unlock the vehicle
from the inside.
The central locking/unlocking button does
not lock or unlock the fuel filler flap.
i You cannot unlock the vehicle centrally
from the inside if the vehicle has been
locked with the key or KEYLESS-GO. X
To unlock: press button :.
X To lock: press button ;. Automatic locking feature
The vehicle is locked automatically when the
ignition is switched on and the wheels are
turning.
You could therefore be locked out when:
R the vehicle is being pushed.
R the vehicle is being towed.
R the vehicle is being tested on adynamom-
eter. X
To deactivate: press and hold button :
for about five seconds until atones ounds.
X To activate: press and hold button ;for
about five seconds until atones ounds.
You can also switch the automatic locking
function on and off using the on-board com-
puter (Y page 228). 78
DoorsOpening and closing
Page 83 of 353

i
You will fin ddetails of the boot lid opening
dimension sinthe Technical data section
(Y page 343).
The boot lid can be:
R opened and closed manually fro moutside
R opened automatically from outside
R opened automatically from inside
R locke dseparately
R unlocked wit hthe emergenc ykey element Opening/closing manually
Opening X
Press the %button on the key. X
Pull handle :.
X Raise the boot lid.
Closing G
WARNING
Make sure that nobody can become trapped
when closing the boot lid. X
Pull the boot lid down using recess :.
X If necessary, lock the vehicle with
the & button on the key (Y page 72) or
with KEYLESS-GO (Y page 73).
i IfaK EYLESS-GO key is detected in the
boot, the boot lid cannot be locked and
then opens again. Opening/closing automatically from
outside
Important safet ynotes G
WARNING
Only for the United Kingdom: if the vehicle
has been locked with the key, the double lock
function is activated as standard. It is then not
possible to open the doors from inside the
vehicle.
Therefore, do not leave any people behind in
the vehicle, particularly children ,elderly peo-
ple or people in need of special assistanc eif
the vehicle has been locked with the key. As
ar esult, they may not be able to free them-
selves in the event of an emergency. As a
result, they could be seriously or even fatally
injured by prolonged exposure to extremely
high or low temperatures, for example. In this
case, rescuin gpeople from outside the vehi-
cle is difficult.
Deactivate the interior motion sensor before
you lock the vehicle with the key. The doors
can then be opened from the inside after the
vehicle has been locked from the outside with
the key.
! The boot lid swings upwards when
opened. Therefore, make sure that ther eis
sufficien tclearance above the boot lid.
i You will fin ddetails of the boot lid opening
dimension sinthe Technical data section
(Y page 343). 80
BootOpening and closing
Page 84 of 353

Opening
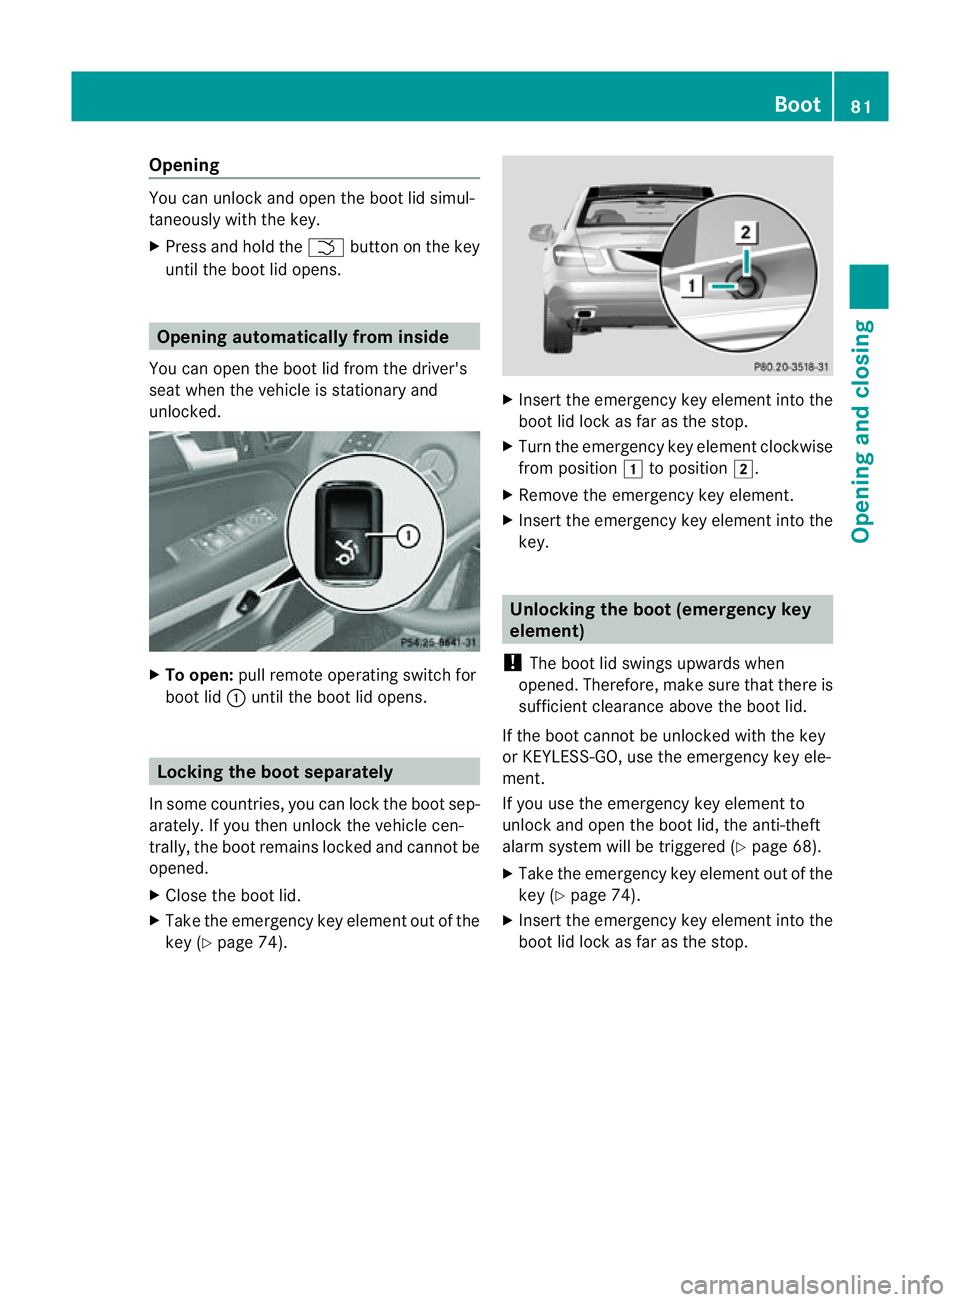
You can unlock and open the boot lid simul-
taneously with the key.
X Press and hold the Fbutton on the key
until the boot lid opens. Opening automatically from inside
You can open the boot lid from the driver's
seat when the vehicle is stationary and
unlocked. X
To open: pull remot eoperatin gswitch for
boot lid :until the boot lid opens. Locking the boot separately
In some countries, you can lock the boot sep-
arately. If you then unlock the vehicle cen-
trally, the boot remains locked and cannot be
opened.
X Close the boot lid.
X Take the emergency key element out of the
key (Y page 74). X
Inser tthe emergency key element into the
boot lid lock as far as the stop.
X Turn the emergency key element clockwise
from position 1to position 2.
X Remove the emergency key element.
X Insert the emergency key element into the
key. Unlocking the boot (emergency key
element)
! The boot lid swings upwards when
opened. Therefore, make sure that there is
sufficient clearance above the boot lid.
If the boot cannot be unlocked with the key
or KEYLESS-GO, use the emergency key ele-
ment.
If you use the emergency key element to
unlock and open the boot lid, the anti-theft
alarm system will be triggered (Y page 68).
X Take the emergency key element out of the
key (Y page 74).
X Insert the emergency key element into the
boot lid lock as far as the stop. Boot
81Opening and closing Z
Page 87 of 353

Convenience closing (Coupé)
General notes When you loc
kthe vehicle, you can simulta-
neously:
R close the side windows
R close the panorama sliding sunroof
On vehicles with apanorama sliding sunroof,
you can then close the roller sunblind. G
WARNING
When using the convenience closing feature,
make sure that nobody can become trapped.
Proceed as follows if there is arisk of entrap-
ment:
With the key:
R release the &button.
R press and hold the %button until the
side windows and the panorama sliding
sunroof open again.
With KEYLESS-GO:
R release the sensor surface on the door han-
dle.
R pull the door handle immediately and hold
it.
The side windows and the panorama sliding
sunroof open.
Using the key i
The key must be close to the driver's door
handle.
X Point the tip of the key at the driver's door
handle.
X Press and hold the &button until the
side windows and the panorama sliding
sunroof are fully closed.
X Make sure that all the side windows and the
panorama sliding sunroof are closed.
On vehicles with apanorama sliding sunroof:
X Press and hold the &button again until
the roller sunblind of the panorama sliding
sunroof closes. X
To interrupt conveniencec losing:
release the &button.
Using KEYLESS-GO The KEYLESS-GO key must be outside the
vehicle. All the doors must be closed.
X
Touch recessed sensor surface :on the
door handle until the side windows and the
panorama sliding sunroof are fully closed.
i Make sure you only touch recessed sen-
sor surface :.
X Make sure that all the side windows and the
panorama sliding sunroof are closed.
On vehicles with apanorama sliding sunroof:
X Touch recessed sensor surface :on the
door handle again until the roller sunblind
of the panorama sliding sunroof closes.
X To interrupt conveniencec losing:
release recessed sensor surface :on the
door handle. Resetting the side windows
You must reset each side window if aside
window can no longer be closed fully.
X Close all the doors.
X Turn the key to position 1or 2in the ignition
lock.
X Pull the corresponding switch on the door
control panel until the side window is com-
pletely closed. (Y page 82).
X Hold the switch for an additional second. 84
Side windowsOpening and closing
Page 112 of 353

thereb
yunintentionall yactivate the EASY-
ENTRY/EXIT featur eand become trapped.
Positio nofthe steering whee lwhent he
EASY-ENTRY/EXI Tfeatur eisactive The steerin
gwheel tilts upwards if you:
R remove the key from the ignition lock
R open the driver's door and the key is in
position 0or 1in the ignition lock
i The steerin gwheel only moves upwards if
it has not already reached the upper end
stop.
If you insert the key into the ignition lock with
the driver's door closed, the steerin gwheel is
automatically moved to the previously set
position.
Position of the steering wheel for driv-
ing The steerin
gwheel is moved to the previously
set position if:
R the driver's door is closed
R you insert the key into the ignition lock
or
R you press the Start/Stop button onceon
vehicles with KEYLESS-GO.
If you close the driver's door with the key
inserted into the ignition lock, the steering
wheel is automatically moved to the previ-
ously set position.
The last position of the steerin gwheel is
stored after each manual setting or when you
stor ethe setting with the memory function
(Y page 112).
Crash-responsive EASY-EXIT feature If the crash-responsive EASY-EXIT feature is
triggered in an accident ,the steerin gcolumn
will move upwards when the driver's door is
opened. This occurs irrespective of the posi-
tion of the key in the ignition lock. This makes
it easier to exit the vehicle and rescue the
occupants. The crash-responsive EASY-EXIT feature is
only operational if the EASY-EXIT/ENTRY fea-
ture is activated in the on-board computer. Mirrors
Rear-view mirror
Rear-view mirror (manual anti-dazzle) X
Anti-dazzle mode: flick anti-dazzle
switch :forwards or back. Exterior mirrors
Adjusting the exterior mirrors G
WARNING
The exterior mirrors reduce the size of the
image. Objects are actually closer than they
appear. You could misjudge the distanc efrom
vehicles driving behind and cause an acci-
dent ,e.g. when changin glane. For this rea-
son ,makes ure of th eactual distanc efromt he
vehicle driving behin dbyglancingovery our
shoulder.
The convex exterior mirrors provide alarger
field of vision.
The exterior mirrors are automatically heated
if the rear window heating is switched on and
the outside temperature is low. Mirrors
109Seats, steering wheel and mirrors Z
Page 128 of 353

Replacing the wiper blades
Important safety notes G
WARNING
The wiper arm scould star tmoving and cause
an injury if you leave the windscreen wipers
switched on.
Remove the key from the ignition lock before
replacing the wiper blades.
! To avoid damaging the windscreen wiper
blades, make sure that you touch only the
wiper arm of the windscreen wiper.
! Never open the bonnet if awindscreen
wiper arm has been folded away from the
windscreen.
Never fold awindscreen wiper arm without
aw iper blade back ontot he windscreen.
Hold the windscreen wiper arm firmly when
you change the wiper blade. If you release
the windscreen wiper arm without awiper
blade and it falls ontot he windscreen, the
windscreen may be damaged by the force
of the impact.
Mercedes-Benz recommends that you have
the wiper blades replaced by aqualified
specialist workshop, e.g. at aMercedes-
Ben zServic eCentre.
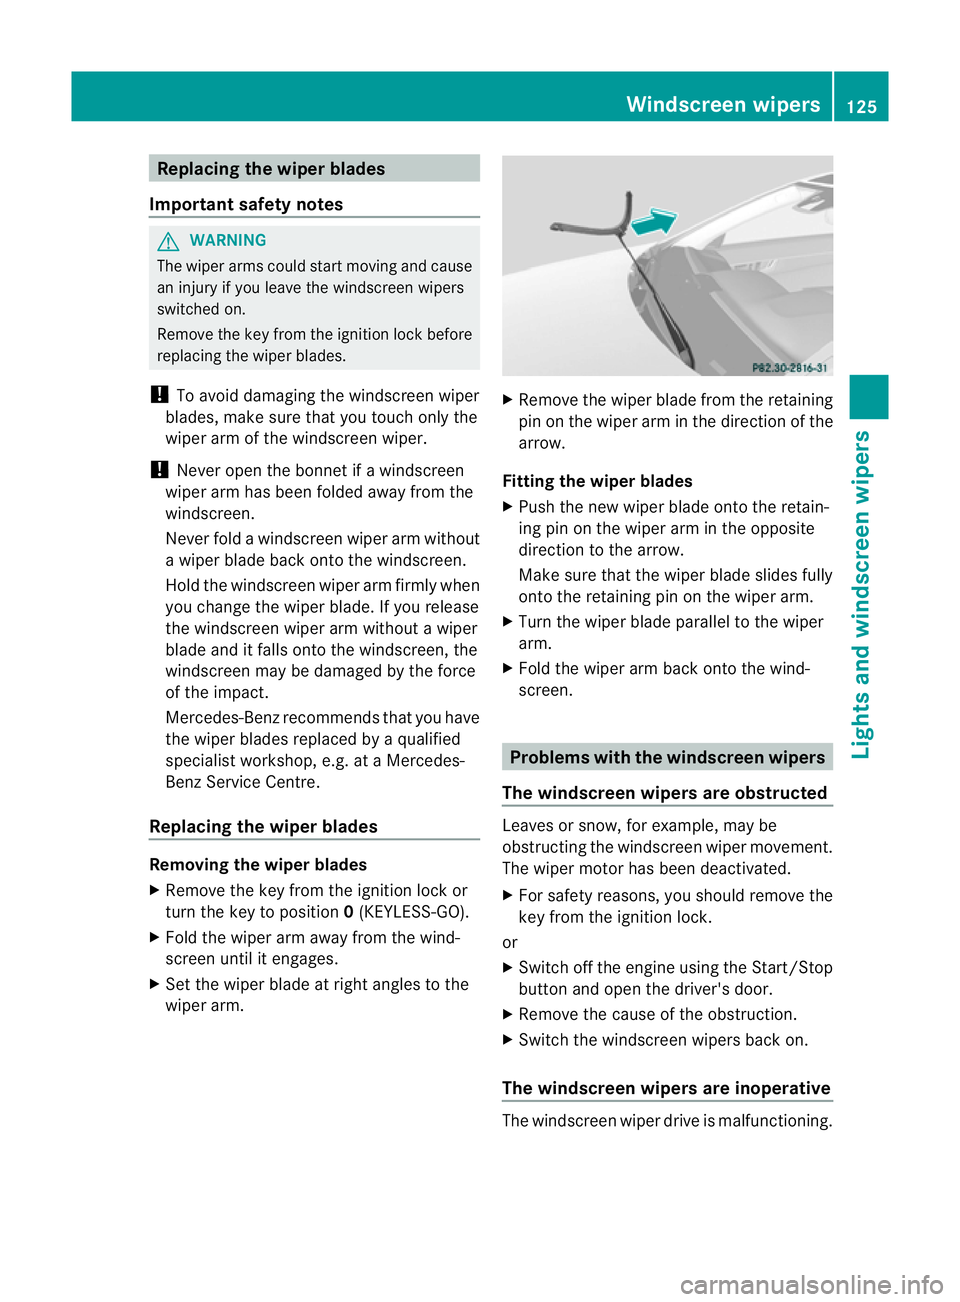
Replacin gthe wiper blades Removing th
ewiper blades
X Remove th ekeyfrom th eignition loc kor
tur nthe key to position 0(KEYLESS-GO).
X Fold the wiper arm away from the wind-
screen until it engages.
X Set the wiper blade at right angles to the
wiper arm. X
Remove the wiper blade from the retaining
pin on the wiper arm in the direction of the
arrow.
Fitting the wiper blades
X Push the new wiper blade onto the retain-
ing pin on the wiper arm in the opposite
direction to the arrow.
Make sure that the wiper blade slides fully
onto the retaining pin on the wiper arm.
X Turn the wiper blade parallel to the wiper
arm.
X Fold the wiper arm back onto the wind-
screen. Problems with the windscreen wipers
The windscreen wipers are obstructed Leaves or snow, for example, may be
obstructing the windscreen wiper movement.
The wiper motor has been deactivated.
X For safety reasons, you should remove the
key from the ignition lock.
or
X Switch off the engine using the Start/Stop
button and open the driver's door.
X Remove the cause of the obstruction.
X Switch the windscreen wipers back on.
The windscreen wipers are inoperative The windscreen wiper drive is malfunctioning. Windscreen wipers
125Lights and windscreen wipers Z
Page 150 of 353

Where possible, avoid spinning the drive
wheels when pulling away on slippery
roads. Otherwise, you could damage the
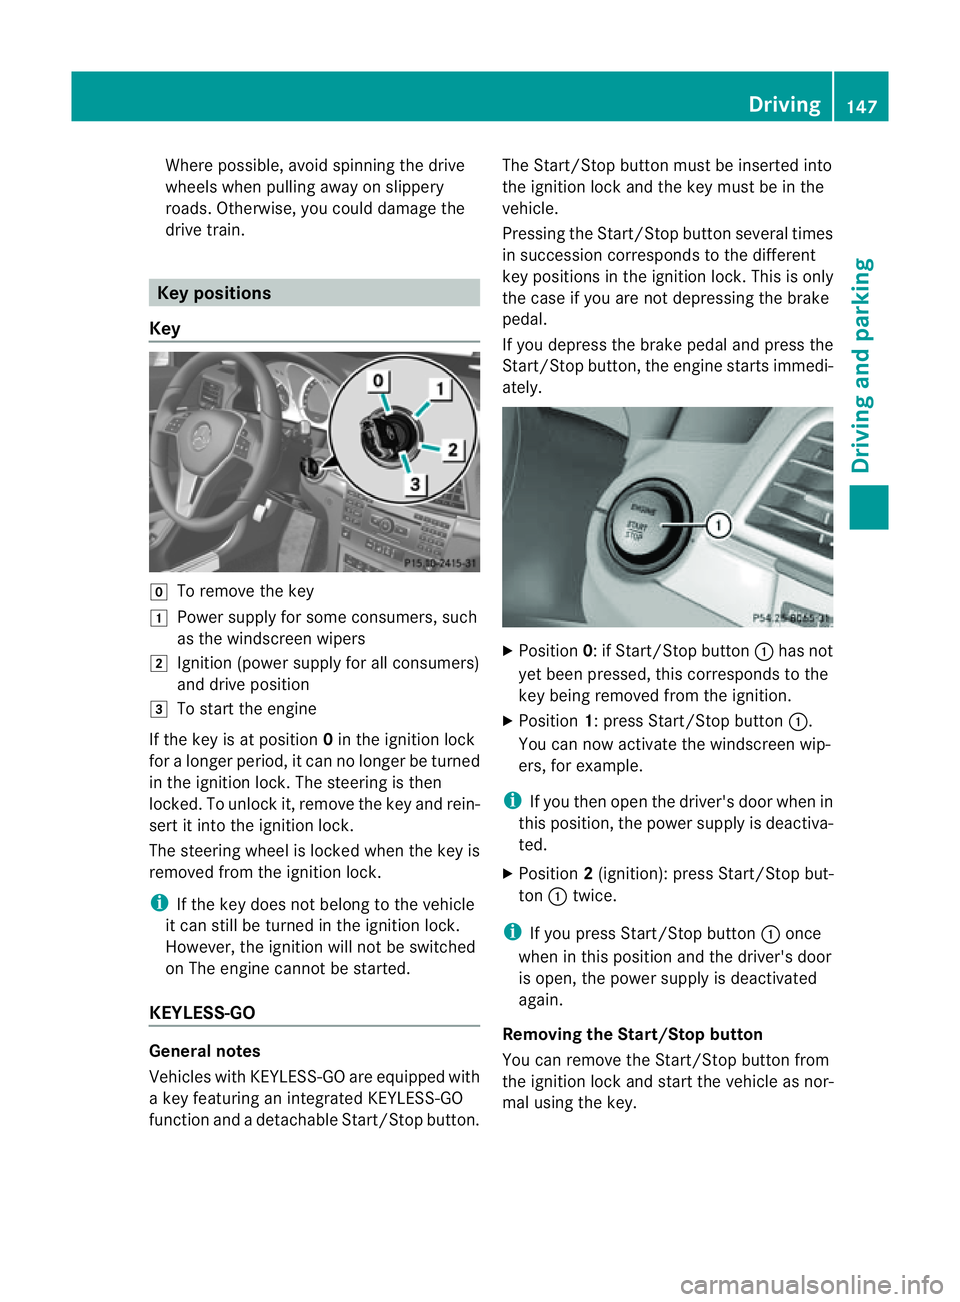
drive train. Key positions
Key g
To remove the key
1 Power supply for some consumers, such
as the windscreen wipers
2 Ignition (power supply for all consumers)
and drive position
3 To start the engine
If the key is at position 0in the ignition lock
for alonger period, it can no longer be turned
in the ignition lock. The steerin gisthen
locked. To unlock it, remove the key and rein-
sert it into the ignition lock.
The steerin gwheel is locked when the key is
removed from the ignition lock.
i If the key does not belong to the vehicle
it can still be turned in the ignition lock.
However, the ignition will not be switched
on The engine cannot be started.
KEYLESS-GO General notes
Vehicles with KEYLESS-GO are equipped with
ak ey featurin ganintegrated KEYLESS-GO
function and adetachable Start/Stop button. The Start/Stop button must be inserted into
the ignition lock and the key must be in the
vehicle.
Pressing the Start/Stop button several times
in succession corresponds to the different
key position
sinthe ignition lock. This is only
the case if you are not depressing the brake
pedal.
If you depress the brake pedal and press the
Start/Stop button ,the engine start simmedi-
ately. X
Position 0:ifStart/Stop button :has not
yet been pressed, this corresponds to the
key being removed from the ignition.
X Position 1:press Start/Stop button :.
You can now activat ethe windscreen wip-
ers, for example.
i If you then open the driver's door when in
this position ,the power supply is deactiva-
ted.
X Position 2(ignition): press Start/Stop but-
ton :twice.
i If you press Start/Stop button :once
when in this position and the driver's door
is open, the power supply is deactivated
again.
Removing the Start/Stop button
You can remove the Start/Stop button from
the ignition lock and start the vehicle as nor-
mal using the key. Driving
147Driving and parking Z
Page 151 of 353

i
You do not have to remove the Start/ Stop
button fro mthe ignition lock when you
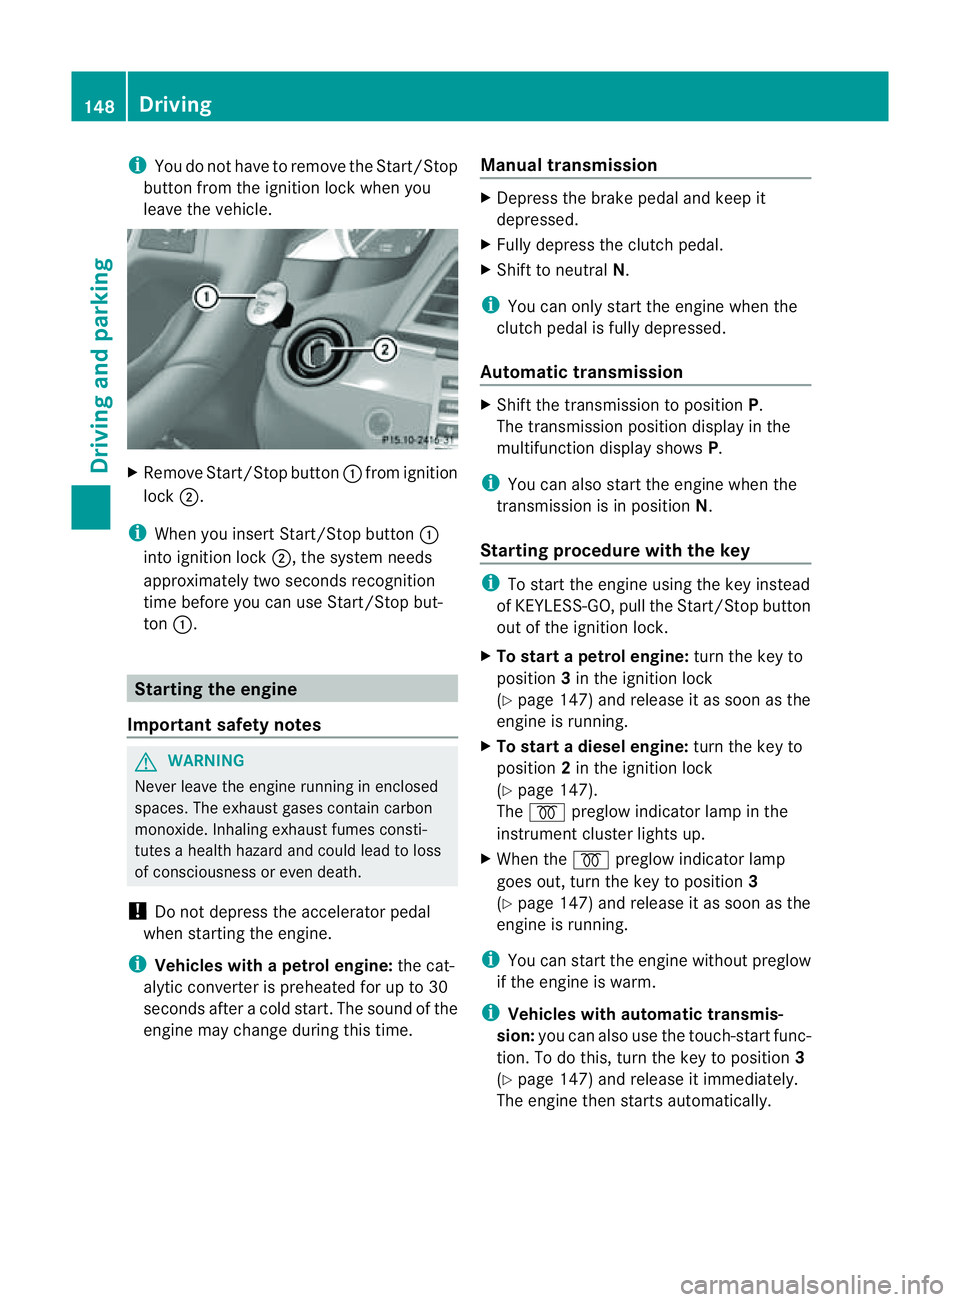
leave the vehicle. X
Remove Start/Stop button :fromi gnition
lock ;.
i When you insert Start/Stop button :
into ignition lock ;,the system needs
approximately two seconds recognition
time before you can use Start/Stop but-
ton :. Starting the engine
Important safety notes G
WARNING
Never leave the engine runnin ginenclosed
spaces. The exhaust gases contain carbon
monoxide. Inhaling exhaust fumes consti-
tutes ahealth hazard and could lead to loss
of consciousness or even death.
! Do not depress the accelerator pedal
when starting the engine.
i Vehicles with apetrol engine: thec at-
alytic converter is preheate dfor up to 30
second safter acold start .The sound of the
engine may change during this time. Manual transmission X
Depress the brake pedal and keep it
depressed.
X Fully depress the clutch pedal.
X Shift to neutral N.
i You can only start the engine when the
clutch pedal is fully depressed.
Automatic transmission X
Shift the transmission to position P.
The transmission position displayint he
multifunction displays howsP.
i You can also start the engine when the
transmission is in position N.
Starting procedurew ith the key i
To start the engine using the key instead
of KEYLESS-GO, pull the Start/Stop button
out of the ignition lock.
X To startap etrol engine: turn the key to
position 3in the ignition lock
(Y page 147) and release it as soon as the
engine is running.
X To startad iesel engine: turn the key to
position 2in the ignition lock
(Y page 147).
The % preglow indicator lamp in the
instrumen tcluster light sup.
X When the %preglo windicator lamp
goes out, tur nthe key to position 3
(Y page 147) and release it as soon as the
engine is running.
i You can start the engine without preglow
if the engine is warm.
i Vehicles with automatic transmis-
sion: you can also use the touch-start func-
tion. To do this, turn the key to position 3
(Y page 147) and release it immediately.
The engine then starts automatically. 148
DrivingDriving and parking