2011 MERCEDES-BENZ E-CLASS CABRIOLET change time
[x] Cancel search: change timePage 151 of 353
i
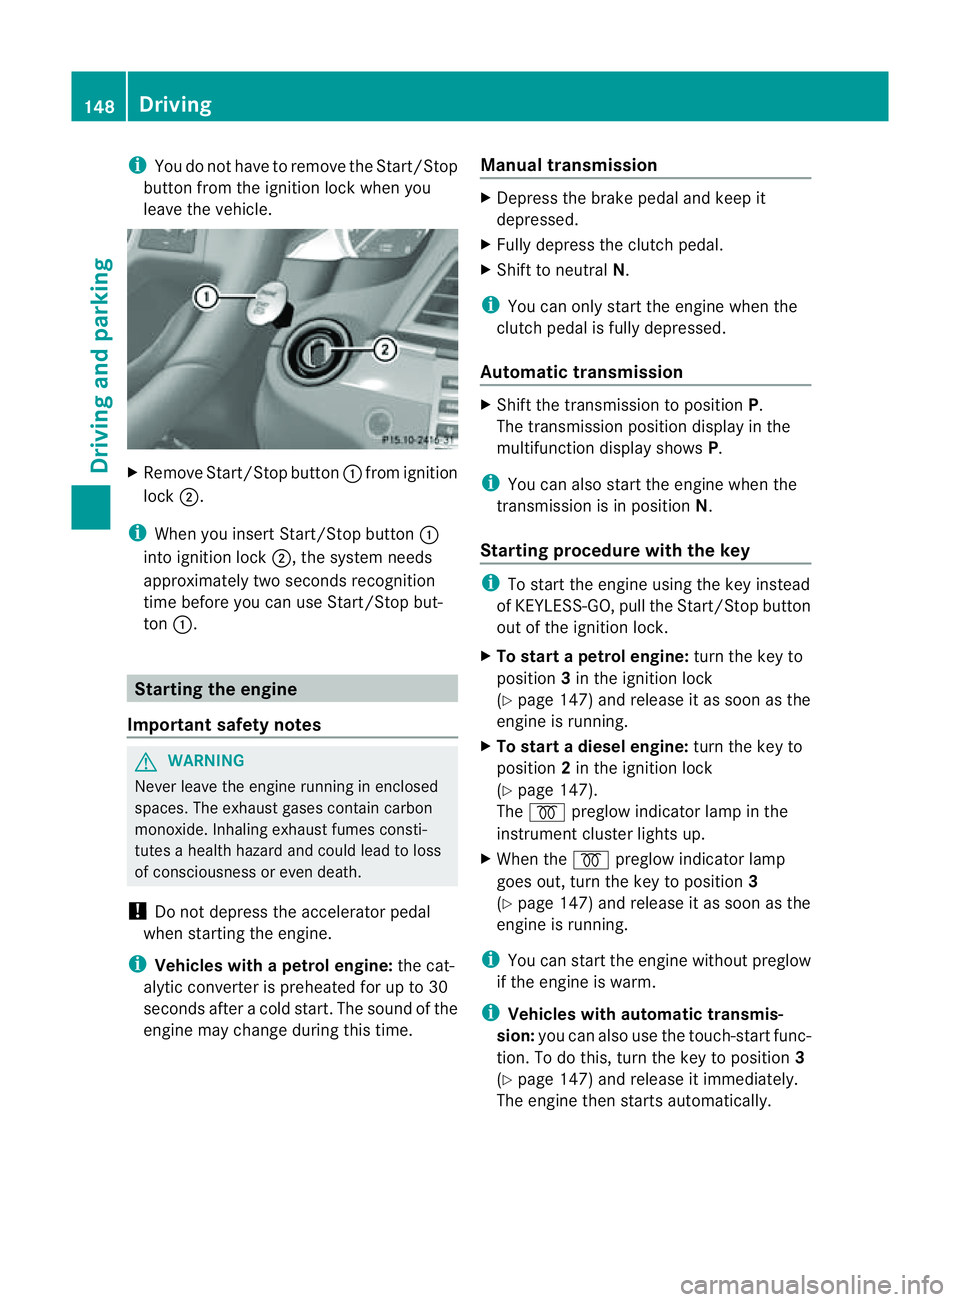
You do not have to remove the Start/ Stop
button fro mthe ignition lock when you
leave the vehicle. X
Remove Start/Stop button :fromi gnition
lock ;.
i When you insert Start/Stop button :
into ignition lock ;,the system needs
approximately two seconds recognition
time before you can use Start/Stop but-
ton :. Starting the engine
Important safety notes G
WARNING
Never leave the engine runnin ginenclosed
spaces. The exhaust gases contain carbon
monoxide. Inhaling exhaust fumes consti-
tutes ahealth hazard and could lead to loss
of consciousness or even death.
! Do not depress the accelerator pedal
when starting the engine.
i Vehicles with apetrol engine: thec at-
alytic converter is preheate dfor up to 30
second safter acold start .The sound of the
engine may change during this time. Manual transmission X
Depress the brake pedal and keep it
depressed.
X Fully depress the clutch pedal.
X Shift to neutral N.
i You can only start the engine when the
clutch pedal is fully depressed.
Automatic transmission X
Shift the transmission to position P.
The transmission position displayint he
multifunction displays howsP.
i You can also start the engine when the
transmission is in position N.
Starting procedurew ith the key i
To start the engine using the key instead
of KEYLESS-GO, pull the Start/Stop button
out of the ignition lock.
X To startap etrol engine: turn the key to
position 3in the ignition lock
(Y page 147) and release it as soon as the
engine is running.
X To startad iesel engine: turn the key to
position 2in the ignition lock
(Y page 147).
The % preglow indicator lamp in the
instrumen tcluster light sup.
X When the %preglo windicator lamp
goes out, tur nthe key to position 3
(Y page 147) and release it as soon as the
engine is running.
i You can start the engine without preglow
if the engine is warm.
i Vehicles with automatic transmis-
sion: you can also use the touch-start func-
tion. To do this, turn the key to position 3
(Y page 147) and release it immediately.
The engine then starts automatically. 148
DrivingDriving and parking
Page 152 of 353
Using KEYLESS-G
Otostart the engine G
WARNING
Your vehicle can be started using avalid KEY-
LESS-GO key. For this reason ,children should
neve rbel eft unsupervised in the vehicle.
Always take the key with you when leaving the
vehicle, even if you are only leaving it for a
short time.
i The Start/Stop button can be used to
start the vehicle manually without inserting
the key into the ignition lock. The key must
be in the vehicle and the Start/Stop button
must be inserted in the ignition lock. This
mode for starting the engine operates inde-
pendently of the ECO start/stop automatic
engine start function.
X Depress the brake pedal and keep it
depressed.
X To star tapetrol engine: pressthe Start/
Stop button (Y page 147) once.
The engine starts.
X To start adiesel engine: press the Start/
Stop button (Y page 147)once.
Preglow is activated and the engin estarts. Pulling away
Manual transmission X
Depress the brake pedal and keep it
depressed.
X Fully depress the clutch pedal.
X Shif ttoe itherfirst gear or reverse gear R.
X Release the parkin gbrake (Y page 166).
X Release the brake pedal.
X Slowly release the clutch pedal and gently
depress the accelerato rpedal.
! Change gear in good time and avoid spin-
ning the wheels. Otherwise, you could dam-
age the vehicle.
i Follow the shift recommendations in the
multifunction display for an economical
driving style (Y page 154). i
The vehicle locks centrally oncey ou have
pulled away. The lockin gknobs in the doors
drop down.
You can open the doors from the inside at
any time.
You can also deactivat ethe automatic lock-
ing feature (Y page 228).
Automatic transmission i
It is only possible to shift the transmission
from position Pto the desired position if
you depress the brake pedal. Only then is
the selector lever lock released.
X Depress the brake pedal and keep it
depressed.
X Shift the transmission to position Dor R.
X Release the parkin gbrake (Y page 166).
X Release the brake pedal.
X Carefully depress the accelerator pedal.
i The vehicle locks centrally oncey ou have
pulled away. The lockin gknobs in the doors
drop down.
You can open the doors from the inside at
any time.
You can also deactivat ethe automatic lock-
ing feature (Y page 228).
i Upshift stake place at higher engine
speeds after acold start .This helps the
catalytic converter to reach its operating
temperature more quickly.
Hill starta ssist Hill start assist helps you when pulling away
forwards or in reverse on an uphill gradient.
It holds the vehicle for
ashort time after you
have removed your foot from the brake pedal.
This gives you enough time to move your foot
from the brake pedal to the accelerator pedal
and depress it before the vehicle begins to
roll. Driving
149Driving and parking Z
Page 160 of 353
X
Press program selector button :repeat-
edly until the letter for the desired gearshift
program appears in the multifunction dis-
play.
i The automatic transmission switches to
automatic drive program Eeach time the
engine is started. Steering wheel gearshift paddles
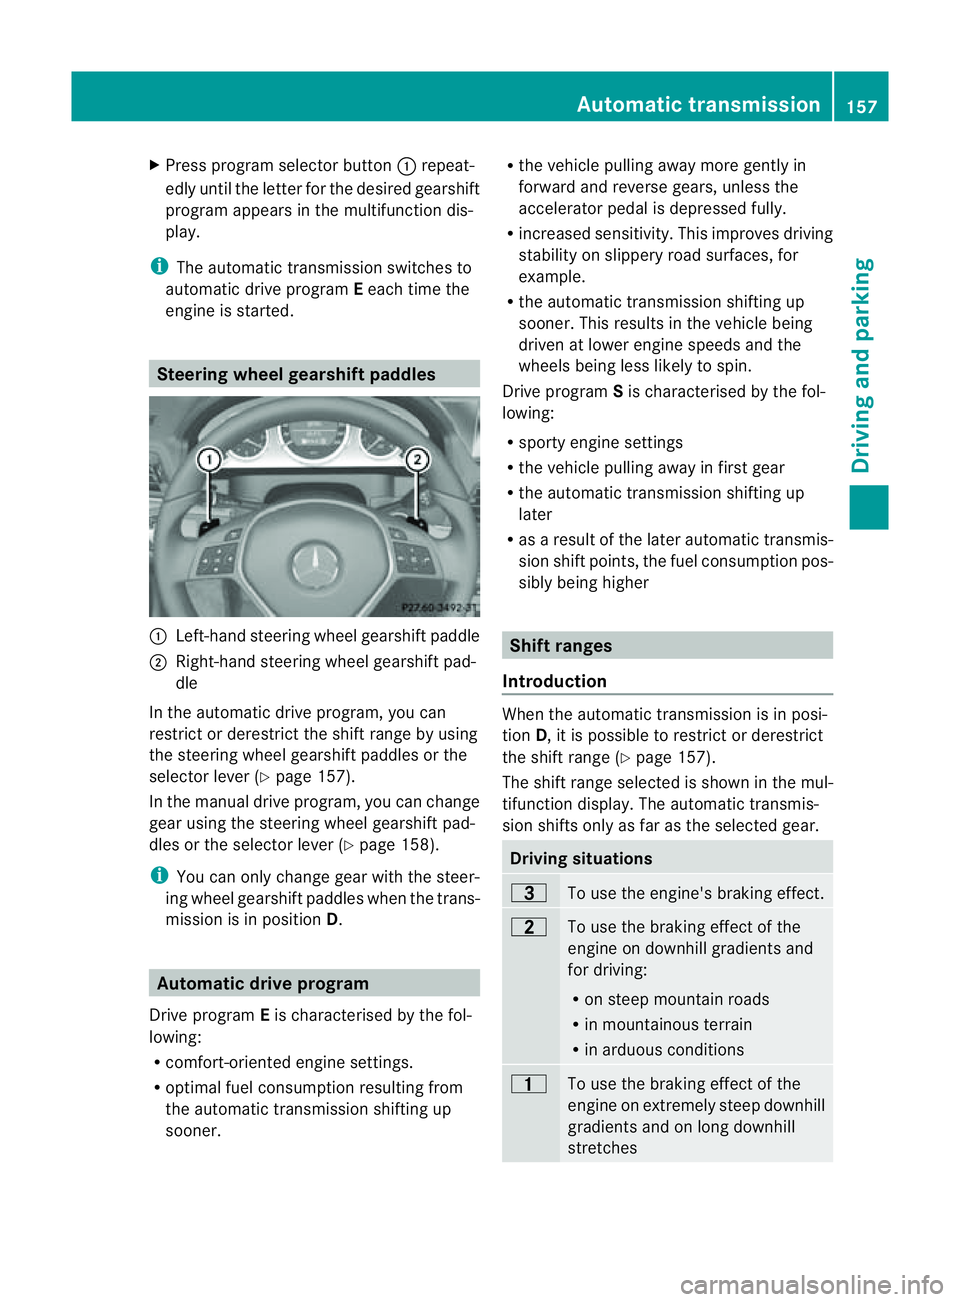
:
Left-hand steerin gwheel gearshift paddle
; Right-hand steerin gwheel gearshift pad-
dle
In the automatic drive program, you can
restrict or derestrict the shift range by using
the steerin gwheel gearshift paddles or the
selector lever (Y page 157).
In the manual drive program, you can change
gear using the steerin gwheel gearshift pad-
dles or the selector lever (Y page 158).
i You can only change gear with the steer-
ing wheel gearshift paddles when the trans-
mission is in position D.Automatic drive program
Drive program Eis characterised by the fol-
lowing:
R comfort-oriented engine settings.
R optimal fuel consumption resulting from
the automatic transmission shiftin gup
sooner. R
the vehicle pulling away more gently in
forward and reverse gears, unless the
accelerator pedal is depressed fully.
R increased sensitivity. This improves driving
stability on slippery road surfaces, for
example.
R the automatic transmission shiftin gup
sooner. This results in the vehicle being
driven at lower engine speeds and the
wheels being less likely to spin.
Drive program Sis characterised by the fol-
lowing:
R sporty engine settings
R the vehicle pulling away in first gear
R the automatic transmission shiftin gup
later
R as aresult of the later automatic transmis-
sion shift points, the fuel consumption pos-
sibly being higher Shift ranges
Introduction When the automatic transmission is in posi-
tion
D,itisp ossible to restrict or derestrict
the shift range (Y page 157).
The shift range selected is shown in the mul-
tifunction display. The automatic transmis-
sion shifts only as far as the selected gear. Driving situations
=
To use the engine's braking effect.
5
To use the braking effect of the
engine on downhill gradients and
for driving:
R
on steep mountain roads
R in mountainous terrain
R in arduous conditions 4
To use the braking effect of the
engine on extremely steep downhill
gradients and on long downhill
stretches Automatic transmission
157Driving and parking Z
Page 165 of 353
Diesel (EN 590)
Fuel grade !
Whe nrefuelling, only use diesel fuel that
conforms to the European standard EN 590
or is of equivalent quality. You can other-
wise impair engin eoutput or damage the
engine.
! Vehicles with diesel particle filters: in
countries outside the EU, only use low sul-
phur Euro diesel with asulphur contentof
under 50 ppm .Otherwise, the emission
control syste mcould be damaged.
! Vehicles without adiesel particle fil-
ter: in countries where only diesel fuels
with ahigher sulphur conten tare available,
the vehicle's oil change interval sare
shorter. More information about intervals
for changing the oil can be obtained from
any Mercedes-Benz Service Centre.
! Only use fuel that complies with the EN
590 European standard .Fuel that does not
comply wit hEN590can lead to increased
wear, engin edamag eand damag etothe
exhaust system.
Do not use the following:
R marine diesel
R heating oil
R bio-diesel
R vegetable oil
R petrol
R paraffin
R kerosene
Do not mix these fuels with diesel fuels and
do not use any special additives. Other-
wise, this can lead to damage to the engine.
This excludes flow improver; see "Low out-
side temperatures".
! Use afilter when adding fuel from afuel
can. Otherwise, the fuel lines and/or the
diesel injection system could be blocked by
particles from the fuel can. For further information on "Fuel", see
(Y
page 334).
Low outside temperatures Diesel fuel with improved cold flow qualities
is available during the winter months. In
Europe, various climate-dependent low-tem-
perature classes are defined in EN 590. Refu-
elling with diesel fuel which complies with the
climatic specification sofstandard EN 590
can help to prevent operating problems. At
exceptionally low temperatures, it is possible
that the flow properties of the fuel may be
inadequate. This also applies to fuel that has
not been adapted to suit the climatic condi-
tions, e.g. diesel fuel from warmer regions.
i Further information about country-spe-
cific fuel properties can be obtained from
oil companies, e.g. at filling stations.
Flow improver Flow improvers can be added to improve the
cold resistanc
eofdiesel fuel. The effective-
ness of aflow improver is not guaranteed with
every fuel.
Correct dosage and thorough mixing are deci-
sive factor sinensuring improvement in low-
temperature resistance. Under certain cir-
cumstances, an excessive dosage may
actually decrease low-temperature resist-
ance and should therefor ebeavoided. Follow
the manufacturer's dosing instructions.
Mix the additive with the diesel in good time,
before the flow properties of the diesel
become inadequate. Malfunction scan other-
wise only be rectified by heating the entire
fuel system, e.g. by parking the vehicle in a
heated garage.
Observe the information provided by the man-
ufacturer when using aflow improver. Only
use flow improvers that have been tested and
approved by Mercedes-Benz. You can obtain
further information from any Mercedes-Benz
Servic eCentre. 162
RefuellingDriving and parking
Page 170 of 353
Engine oil
! Vehicles with adiesel particle filter:
If the vehicle is mostly driven for short dis-
tances, it is possible that malfunctions may
occur during the automatic cleaning of the
diesel particle filter. This can lead to engine
damage. Therefore, if you frequently drive
short distances, make sure to drive on
motorways or countr yroads for 20 minutes
at least every 500 km. Brakes
Important safet ynotes G
WARNING
Do not change down for additional engine
brakin gonas lippery road surface. This could
cause the drive wheels to lose their grip and
the vehicle could skid. G
WARNING
Make sure that other road users are not
endangered by your braking.
Downhill gradients On long and steep downhill gradients, espe-
cially if the vehicle is laden or towin gatrailer,
you must shift to alower gear in good tim eor,
on vehicles with automatic transmission,
select shift range 1,2or 3.
i This also applies if you have activated
cruise control, SPEEDTRONIC or DIS-
TRONIC PLUS.
This will use the brakin geffect of the engine,
so less brakin gwill be required to maintain
the speed. This relieves the load on the brake
syste mand prevent sthe brake sfrom over-
heatin gand wearing too quickly. Heavy and light loads G
WARNING
Never depress the brake pedal continuously
while the vehicle is in motion, e.g. never cause
the brake storub by applying constan tslight
pedal pressure. This causes the brak esystem
to overheat, increases the braking distance
and can lead to the brakes failing completely.
If the brakes have been subjected to aheavy
load, do not sto pthe vehicle immediately, but
drive on for ashor twhile. This allowst he air-
flow to cool the brakes more quickly.
If the brakes have been used only moderately,
you should occasionally test their effective-
ness. To do this, brake more firmly from a
higher speed. This improves the grip of the
brakes.
Wet road surface If driving in heavy rain for
aprolonged period
of time without braking, there may be a
delayed reaction from the brakes when brak-
ing for the first time. This may also occur after
the vehicle has been washed.
You have to depress the brake pedal more
firmly. Maintain agreater distance from the
vehicle in front.
After driving on awet road or having the vehi-
cle washed, brake firmly while paying atten-
tion to the traffic conditions. This will warm
up the brake discs, thereby drying them more
quickly and protecting them against corro-
sion.
Limited braking performance on salt
treated roads G
WARNING
The layerofs alt on thebrake discs and the
brake pads/linings may caus eadelay in the
brakin geffect, resultin ginasignificantly lon-
ger brakin gdistance, which could lead to an
accident.
To avoid this danger, you should: Driving tips
167Driving and parking
Z
Page 172 of 353

sonous carbon monoxide (CO) may enter the
vehicle, resulting in loss of consciousness and
even death.
To assure sufficient fresh air ventilation, open
aw indow slightly on the side of the vehicle
not facing the wind.
At the onset of winter, have your vehicle win-
terproofed at aqualified specialist workshop,
e.g. at aMercedes-Benz Service Centre.
Observe the notes in the "Winter operation"
section (Y page 319).
Driving with summer tyres Observe the notes in the "Winter operation"
section (Y
page 319).
Slippery road surfaces G
WARNING
Do not shift down for additional engine brak-
ing on aslippery road surface. This could
cause the drive wheels to lose their grip and
the vehicle could skid.
You should drive particularlyc arefully on slip-
pery road surfaces. Avoid sudden accelera-
tion, steering and braking manoeuvres.
If the vehicle threatens to skid or cannot be
stopped when moving at low speed:
X Vehicles with manual transmission: engage
neutral.
X Vehicles with automatic transmission: shift
the transmission to position N.
X Try to bring the vehicle under control by
using corrective steering.
i For more information on driving with
snow chains, see (Y page 320). Driving systems
Cruise control
Important safety notes Cruise control maintains
aconstant road
speed for you. It brakes automaticallyino rder
to avoid exceeding the set speed. On long and
steep downhill gradients, especially if the
vehicle is laden or towing atrailer, you must
shift to alower gear in good time or select
shift range 1,2or 3on vehicles with auto-
matic transmission. By doing so, you will
make use of the braking effect of the engine,
which relieves the load on the brake system
and prevents the brakes from overheating
and wearing too quickly. G
WARNING
Do not change down for additional engine
braking on aslippery road surface. This could
cause the drive wheels to lose their grip and
the vehicle could skid.
Use cruise control only if road and traffic con-
ditions make it appropriate to maintain a
steady speed for aprolonged period. You can
store any road speed above 30 km/h. G
WARNING
Cruise control cannot take account of road
and traffic conditions.
Always pay attention to traffic conditions
even when cruise control is activated.
Cruise control is only an aid designed to assist
driving. You are responsible for the vehicle's
speed and for braking in good time. G
WARNING
Do not use cruise control
R in traffic conditions that do not allow you to
drive at aconstant speed (e.g. heavy traffic Driving systems
169Driving and parking
Z
Page 173 of 353

or winding roads). You may otherwise
cause an accident.
R on slippery roads. The drive wheels may
lose their grip when braking or accelerating
and the vehicle may skid.
R when there is low visibility, e.g. due to fog,
heavy rain or snow.
Cruise control lever You can operate cruise control and variable
SPEEDTRONIC with the cruise control lever.
The LIM indicator lamp on the cruise control
lever indicates which system you have selec-
ted:
R LIM indicator lamp off: cruise control is
selected.
R LIM indicator lamp on: variable SPEED-
TRONIC is selected. :
To store the current speed or ahigher
speed
; LIM indicator lamp
= To store the current speed or call up the
last stored speed
? To store the current speed or alower
speed
A To switch between cruise control and var-
iable SPEEDTRONIC
B To deactivate cruise control
When you activate cruise control, the stored
speed is shown in the multifunction display
for five seconds. In the multifunction display,
the segment sbetween the stored speed and
the maximum speed light up. Selecting cruise control X
Check whether LIM indicator lamp ;is off.
If it is off, cruise control is already selected.
If it is not,p ress the cruise control lever in
the direction of arrow A.
LIM indicator lamp ;in the cruise control
lever goes out. Cruise control is selected.
Storing and maintaining the current
speed You can store the current speed if you are
driving faster than 30 km/h.
X
Accelerate the vehicle to the desired
speed.
X Briefly press the cruise control lever
up : or down ?to the pressure point.
X Remove your foot from the accelerator
pedal.
Cruise control is activated. The vehicle
automatically maintains the stored speed.
i Cruise control may be unable to maintain
the stored speed on uphill gradients. The
stored speed is resumed when the gradient
evens out. Cruise control maintains the
stored speed on downhill gradients by
automatically applying the brakes.
i Vehicles with manual transmission:
R always drive at adequate, but not exces-
sive, engine speeds.
R change gear in good time.
R if possible, do not change down several
gears at atime.
Storing the current speed or calling up
the last stored speed G
WARNING
Only call up astored speed if you know what
that speed is and if it is suitable for the current
traffic and driving situation. You can other-
wise endanger yourself or others by uninten-
tionally triggerin gsudden acceleration or
braking. 170
Driving systemsDriving and parking
Page 175 of 353

On long and steep downhill gradients, espe-
cially if the vehicle is laden or towing atrailer,
you must select shift range 1,2or 3in good
time. By doing so, you will make use of the
braking effect of the engine, which relieves
the load on the brake system and prevents
the brakes from overheating and wearing too
quickly.
If as lower-moving vehicle is detected in front,
DISTRONIC PLUS causes your vehicle to
brake and maintain apreset distance to the
vehicle in front. G
WARNING
Do not change down for additional engine
braking on aslippery road surface. This could
cause the drive wheels to lose their grip and
the vehicle could skid. G
WARNING
DISTRONIC PLUS is only an aid designed to
assist driving. The driver remains fully respon-
sible for the vehicle's distance from other
vehicles, the vehicle's speed and for braking
in good time.
DISTRONIC PLUS does not react in particular
to:
R pedestrians
R stationary obstacles on the road, e.g. stop-
ped or parked vehicles
R oncoming and crossing traffic
DISTRONIC PLUS may not detect narrow vehi-
cles driving in front,e .g. motorcycles, or vehi-
cle sd riving on adifferent line. Therefore,
always pa yattention to traffic conditions even
when DISTRONIC PLU Sisactivated. Other-
wise, yo umay fai ltorecognis edanger sin
time ,cause an accident and injure yourself
and others. G
WARNING
DISTRONIC PLU Scanno ttake account of road
and traffic conditions .IfDISTRONIC doe snot
recognise or no longer recognises the vehicle
in front,don ot activate DISTRONIC or, if it is
already active, deactivate it. This is especially
the case:
R before corners
R on filter lanes
R when changing to alane with faster moving
traffic
R in complex driving situations or where lanes
are diverted, e.g. at roadworks on amotor-
way
DISTRONIC PLUS otherwise maintains the
current speed set by you or accelerates up to
the set speed.
DISTRONIC PLUS cannot take account of
weather conditions. Deactivate, or do not
activate, DISTRONIC PLUS:
R if the roads are slippery, snow-covered or
icy. The wheels could lose their grip when
braking or accelerating. The vehicle could
start to skid.
R if the sensors are dirty or there is poor vis-
ibility, e.g. due to snow, rain or fog. Dis-
tancec ontrol may be impaired.
Always pay attention to traffic conditions
even when DISTRONIC PLUS is activated.
Otherwise, you may fail to recognise dangers
in time, cause an accident and injure yourself
and others.
! You must deactivate the radar sensor sys-
tem in certain countries and near radio
telescope facilities. You will find further
information under "Radar sensor system"
in the index.
The radar sensor system is automatically
deactivated near radio telescope facilities
(Y page 345).
If you want DISTRONIC PLUS to assist you,
the radar sensor system must be activated
(Y page 229) and operational. 172
Driving systemsDriving and parking