2011 MERCEDES-BENZ E-CLASS CABRIOLET battery
[x] Cancel search: batteryPage 80 of 353

Problem Possible causes/consequences and
M Solutions
The key cannot be
turned in the ignition
lock. The key has been in position
0for aconsiderable time.
X Remove the key and reinsert it into the ignition lock.
X Check the starter battery and charge it if necessary
(Y page 305).
X Start the engine. The on-board voltage is too low.
X
Switch off non-essential consumers, e.g. seat heating or interior
lighting, and try to turn the key again.
If this does not work:
X Check the starter battery and charge it if necessary
(Y page 305).
or
X Jump-start the vehicle (Y page 309).
or
X Consult aqualified specialist workshop. Doors
Important safety notes
G
WARNING
Only for the United Kingdom: if the vehicle
has been locked with the key, the double lock
function is activated as standard. It is then not
possible to open the doors from inside the
vehicle.
Therefore, do not leave any people behind in
the vehicle, particularly children, elderly peo-
ple or people in need of special assistance if
the vehicle has been locked with the key. As
ar esult, they may not be able to free them-
selves in the event of an emergency. As a
result, they could be seriously or even fatally
injured by prolonged exposure to extremely
high or low temperatures, for example. In this
case, rescuing people from outside the vehi-
cle is difficult.
Deactivat ethe interior motion sensor before
you lock the vehicle with the key. The doors
can then be opened from the inside after the vehicle has been locked from the outside with
the key.
G
WARNING
If children are left unsupervised in the vehicle,
they could:
R open adoor from inside the vehicle at any
time, even if it has been locked
R start the vehicle using akey which has been
left in the vehicle
R release the parking brake
They could thereby endanger themselves and
others. Never leave children unsupervised in
the vehicle. Always take the key with you
when leaving the vehicle, even if you are only
leaving it for ashort time. Unlocking and opening the doors
from the inside
For all countries except the United King-
dom: you can open adoor from inside the
vehicle even if it has been locked. Doors
77Opening and closing Z
Page 109 of 353

Switching the seat heating on/off
Switching on/off G
WARNING
Repeatedly settingt he seat heating to level
3 may result in excessive seat temperatures.
The health of passengers that have limited
temperature sensitivity or alimited ability to
react to excessively high temperatures may
be affected or they may even suffer burn-like
injuries. Therefore, do not use seat heating
level 3repeatedly.
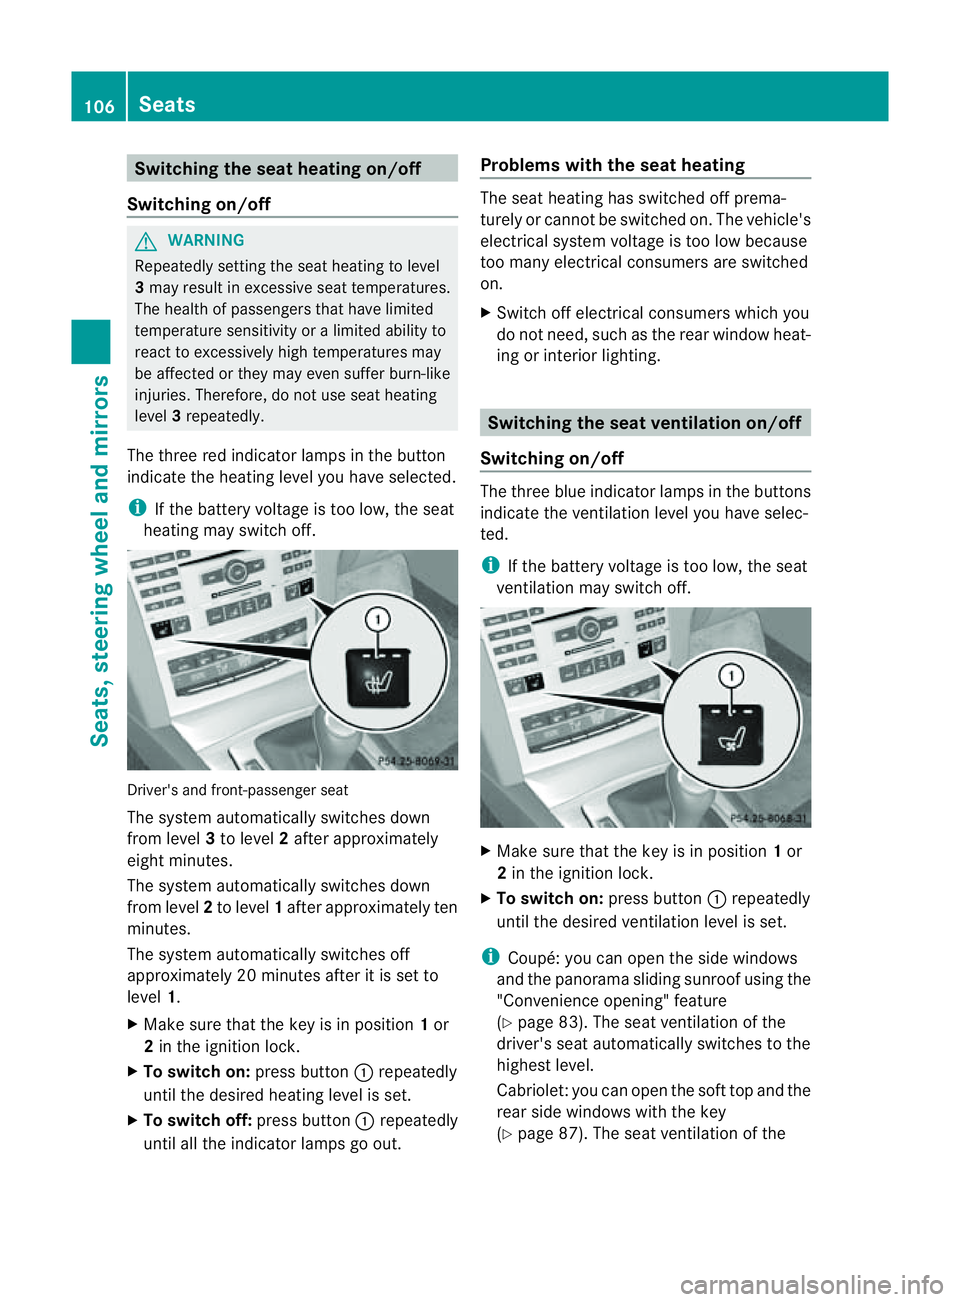
The three red indicator lamps in the button
indicate the heating level you have selected.
i If the battery voltage is too low, the seat
heating may switch off. Driver's and front-passenger seat
The system automatically switches down
from level 3to level 2after approximately
eight minutes.
The system automatically switches down
from level 2to level 1after approximately ten
minutes.
The system automatically switches off
approximately 20 minutes after it is set to
level 1.
X Make sure that the key is in position 1or
2 in the ignition lock.
X To switch on: press button:repeatedly
until the desired heating level is set.
X To switch off: press button:repeatedly
until all the indicator lamps go out. Problems with the seat heating The seat heating has switched off prema-
turely or cannot be switched on. The vehicle's
electrical system voltage is too low because
too many electrical consumers are switched
on.
X
Switch off electrical consumers which you
do not need, such as the rear window heat-
ing or interior lighting. Switching the seat ventilation on/off
Switching on/off The three blue indicator lamps in the buttons
indicate the ventilation level you have selec-
ted.
i
If the battery voltage is too low, the seat
ventilation may switch off. X
Make sure that the key is in position 1or
2 in the ignition lock.
X To switch on: press button:repeatedly
until the desired ventilation level is set.
i Coupé: you can open the side windows
and the panorama sliding sunroof using the
"Convenience opening" feature
(Y page 83). The seat ventilation of the
driver's seat automatically switches to the
highest level.
Cabriolet: you can open the soft top and the
rear side windows with the key
(Y page 87). The seat ventilation of the 106
SeatsSeats, steering wheela
nd mirrors
Page 110 of 353

driver'
sseat automatically switches to the
highest level.
X To switch off: press button:repeatedly
until all the indicator lamps go out.
Problems with the seat ventilation The seat ventilation has switched off prema-
turely or cannot be switched on. The vehicle's
electrical system voltage is too low because
too many electrical consumers are switched
on.
X Switc hoff electrical consumers which you
do not need, such as the rear window heat-
ing or interior lighting. AIRSCARF (Cabriolet)
Switching on/off G
WARNING
Very hot air can flow out of the AIRSCARF
vent sint he head restraint swhen AIRSCARF
is in operation .This can cause burns on unpro-
tected skin near the AIRSCARF vents.L ower
the heating output in good time, when neces-
sary.
The AIRSCARF function warms the head and
neck area of vehicle occupants with warm air.
The warm air flows out of the holes in the head
restraints.
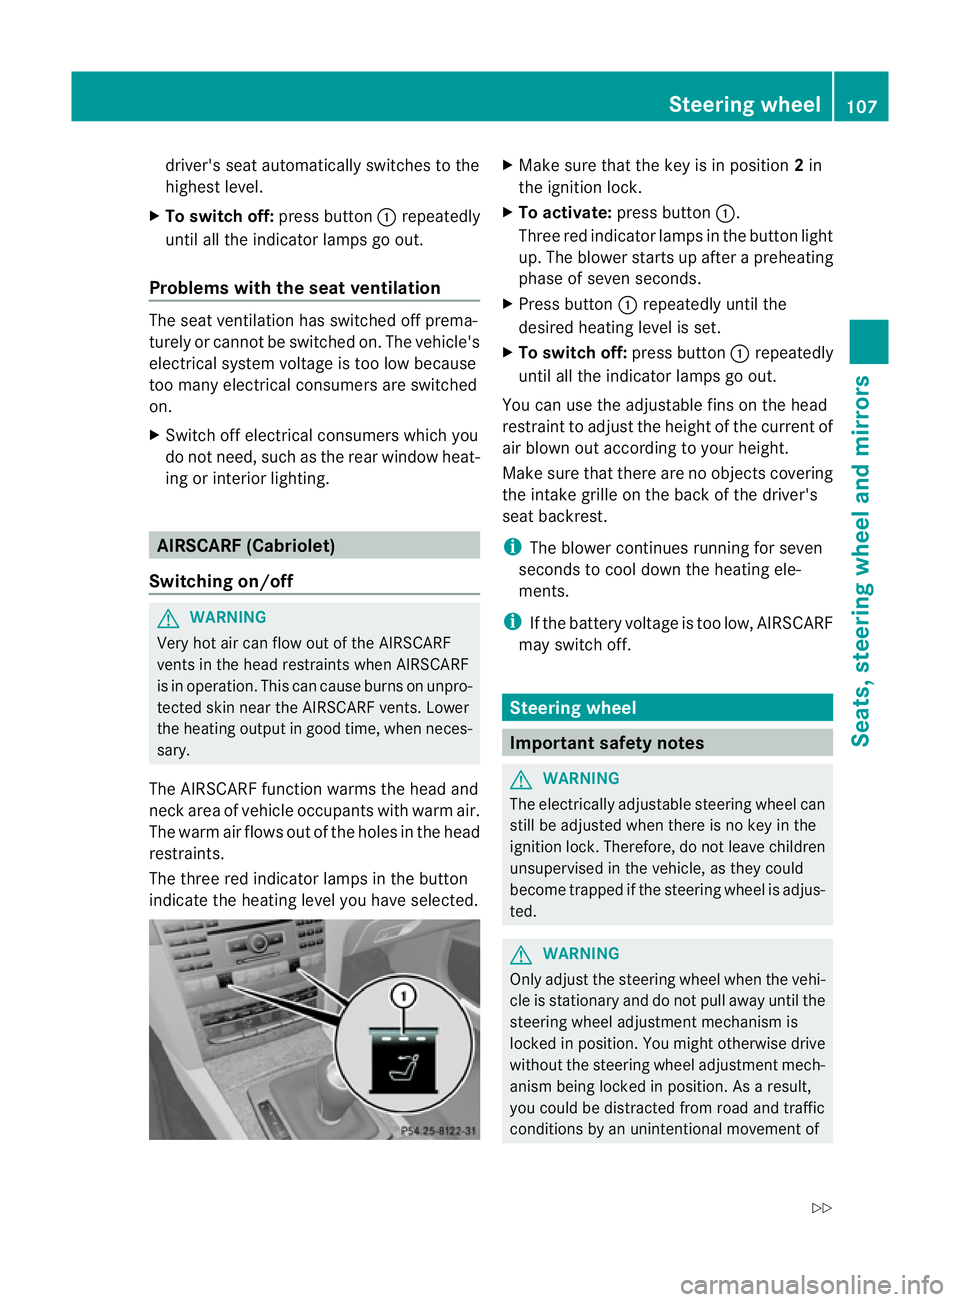
The three red indicator lamps in the button
indicate the heating level you have selected. X
Make sure that the key is in position 2in
the ignition lock.
X To activate: press button :.
Three red indicator lamps in the button light
up. The blower starts up after apreheating
phase of seven seconds.
X Press button :repeatedly until the
desired heating level is set.
X To switch off: press button:repeatedly
until all the indicator lamps go out.
You can use the adjustable fins on the head
restraint to adjust the height of the current of
air blown out according to your height.
Make sure that there are no objectsc overing
the intake grille on the back of the driver's
seat backrest.
i The blower continues running for seven
seconds to cool down the heating ele-
ments.
i If the battery voltage is too low, AIRSCARF
may switch off. Steering wheel
Important safety notes
G
WARNING
The electrically adjustable steering wheel can
still be adjusted when there is no key in the
ignition lock. Therefore, do not leave children
unsupervised in the vehicle, as they could
become trapped if the steering wheel is adjus-
ted. G
WARNING
Only adjust the steering wheel when the vehi-
cle is stationary and do not pull away until the
steering wheel adjustment mechanism is
locked in position. You might otherwise drive
without the steering wheel adjustment mech-
anism being locked in position. As aresult,
you could be distracted from road and traffic
conditions by an unintentional movement of Steering wheel
107Seats, steering wheela nd mirrors
Z
Page 113 of 353

X
Make sure that the key is in position 1or
2 in the ignition lock.
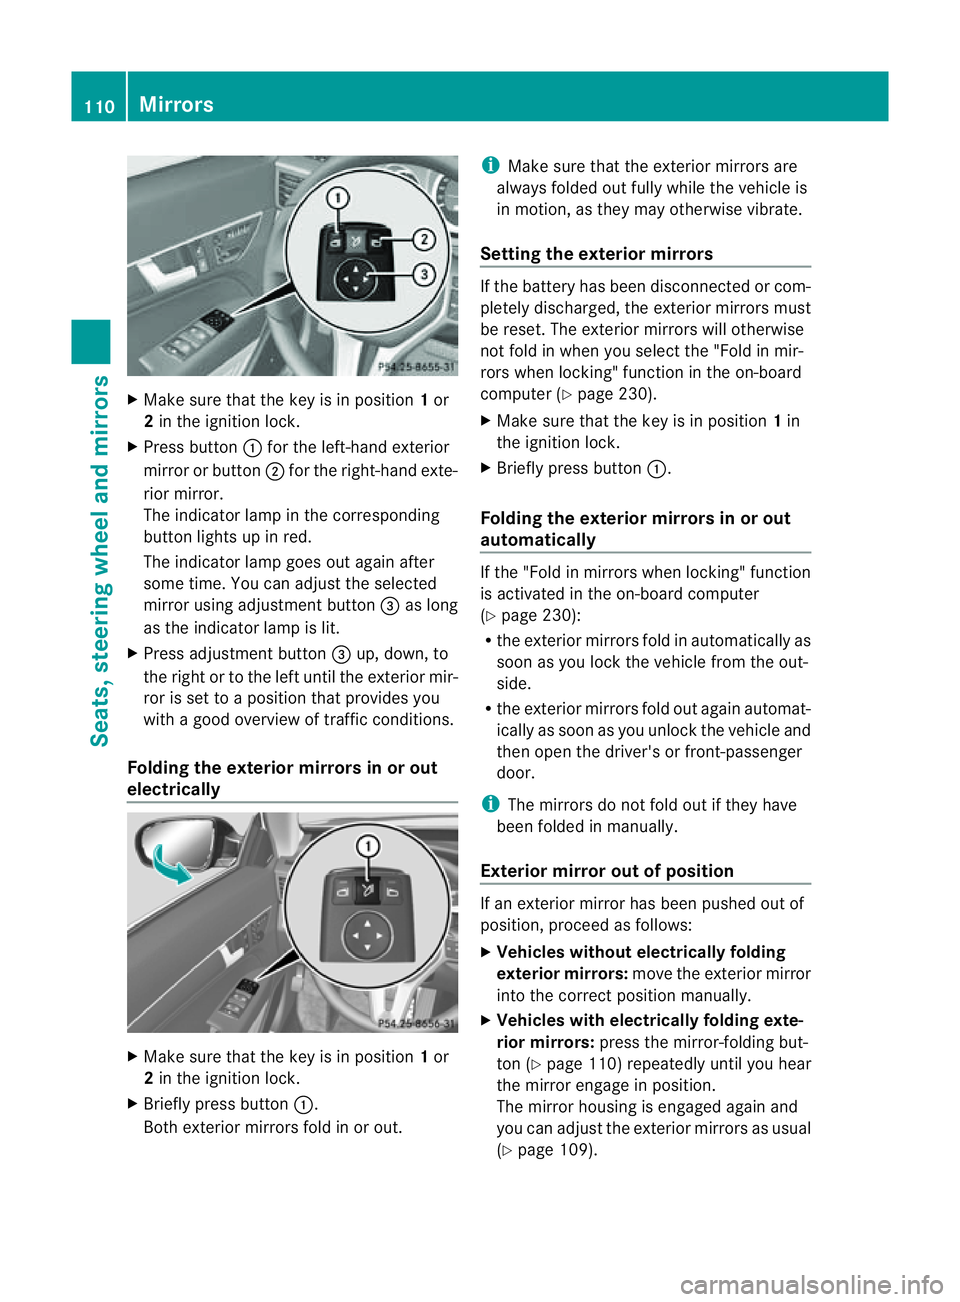
X Press button :for the left-hand exterior
mirror or button ;for the right-hand exte-
rior mirror.
The indicator lamp in the corresponding
button lights up in red.
The indicator lamp goes out again after
some time. You can adjust the selected
mirror using adjustment button =as long
as the indicator lamp is lit.
X Press adjustment button =up, down, to
the right or to the left until the exterior mir-
ror is set to aposition that provides you
with agood overview of traffic conditions.
Folding the exterior mirrors in or out
electrically X
Make sure that the key is in position 1or
2 in the ignition lock.
X Briefly press button :.
Both exterior mirrors fold in or out. i
Make sure that the exterior mirrors are
always folded out fully while the vehicle is
in motion, as they may otherwise vibrate.
Setting the exterior mirrors If the battery has been disconnected or com-
pletely discharged, the exterior mirrors must
be reset. The exterior mirrors will otherwise
not fold in when you select the "Fold in mir-
rors when locking" function in the on-board
computer (Y
page 230).
X Make sure that the key is in position 1in
the ignition lock.
X Briefly press button :.
Folding the exterior mirrors in or out
automatically If the "Fold in mirrors when locking" function
is activated in the on-board computer
(Y
page 230):
R the exterior mirrors fold in automatically as
soon as you lock the vehicle from the out-
side.
R the exterior mirrors fold out again automat-
ically as soon as you unlock the vehicle and
then open the driver's or front-passenger
door.
i The mirrors do not fold out if they have
been folded in manually.
Exterior mirror out of position If an exterior mirror has been pushed out of
position, proceed as follows:
X
Vehicles without electrically folding
exterior mirrors: move the exterior mirror
into the correct position manually.
X Vehicles with electrically folding exte-
rior mirrors: press the mirror-folding but-
ton (Y page 110) repeatedly until you hear
the mirror engage in position.
The mirror housing is engaged again and
you can adjust the exterior mirrors as usual
(Y page 109). 110
MirrorsSeats, steering wheela
nd mirrors
Page 123 of 353

The system may be impaired or deactivated:
R
if there is poor visibility, e.g. due to snow,
rain, fog or spray
R if the area of the windscreen around the
optical sensor is dirty, misted up or covered
up, e.g. by asticker
The system may not recognise the following
road users:
R road users that have no lighting, e.g. pedes-
trians
R road users that have poor lighting, e.g.
cyclists
R road users whose lighting is not clearly visi-
ble, e.g. road users behind acrash barrier
R on rare occasions :road users that have
lights that may be recognised too late or not
at all
The automatic main-beam headlamps will not
be deactivated, or they may be activated
despite road users travelling in front of or
approaching the vehicle.
Thus, you could cause an accident and injure
yourself and others. Always observe traffic
conditions and, if necessary, dip the lights
manually. Headlamps misted up inside
The headlamps may mist up on the inside if
there is high atmospheric humidity.
X Drive with the headlamps switched on.
The level of moisture diminishes, depend-
ing on the length of the journey and the
weather conditions (humidity and temper-
ature).
If the level of moisture does not diminish:
X Have the headlamps checked at aqualified
specialist workshop. Interior lighting
Overview of interior lighting
Overhead control panel (example: Coupé)
:
u To switch the rear interior lighting
on/off( Coupé only)
; | To switch th eautomatic interior
lighting control on/off
= p To switch th eright-hand reading
lamp on/off
? c To switch th efront interio rlighting
on/off
A p To switch th eleft-hand reading lamp
on/off Interior lightin
gcontrol
Important notes In order to preven
tthe vehicle's battery from
discharging, the interior lighting functions are
automatically deactivated after some time
except for when the key is in position 2in the
ignition lock.
Automatic interior lighting control X
To switch on/off: press the|button.
When the automatic interior lighting con-
trol is activated, the button is flush with the
overhead control panel. 120
Interior lightingLights and windscreen wipers
Page 138 of 353

X
Press the Ãbutton.
The indicator lamp above the ¬button
goes out. Airflow and air distribution are set
to automatic mode.
or
X THERMATIC automatic climate control:
press temperature button EorH up or
down (Y page 129).
THERMOTRONIC automatic climate
control: press temperature button For
J up or down (Y page 130).
or
X THERMATIC automatic climate control:
press button Gup or down (Y page 129).
THERMOTRONIC luxur yautomatic cli-
matec ontrol: press button Hup or down
(Y page 130). Demisting the windows
Windows misted up on the inside X
Activate the ¿cooling with air dehu-
midification function.
X Activate automatic mode Ã.
X If the windows continue to mist up, activate
the demisting function (Y page 134).
i You should only select this setting until
the windscreen is clear again.
Windows misted up on the outside X
Activate the windscreen wipers.
X THERMATIC automatic climate control:
press button Fup or down
(Y page 129)until the PorO symbol
appears in the display.
X THERMOTRONIC automatic climate
control: press button Iup or down
(Y page 130) until the PorO symbol
appears in the display.
i You should only select this setting until
the windscreen is clear again. Rear window heating
Activating/deactivating G
WARNING
Clear all windows of ice or snow before setting
off. Otherwise, impaired visibility could
endanger you and others.
The rear window heating has ahigh current
draw. You should therefore switc hitoff as
soon as the window is clear .asitonly
switches off automaticallya fter several
minutes.
If the battery voltage is too low, the rear win-
dow heating may switch off.
X Turn the key to position 2in the ignition
lock.
X Press the ¤button.
The indicator lamp above the ¤button
lights up or goes out.
Problems with the rear window heating The rear window heating has switched off
prematurely or cannot be activated.
X
Switch off any consumers that are not
required, e.g. reading lamps or interior
lighting.
When the battery is sufficiently charged,
the rear window heating is activated again
automatically. Activating/deactivating air-recircula-
tion mode
You can deactivate the flow of fresh air if
unpleasant odours are entering the vehicle
from outside. The air already inside the vehi-
cle will then be recirculated.
The operation of air-recirculation mode is the
same for all control panels. G
WARNING
Only switch over to air-recirculation mode
briefly at low outside temperatures. Other-
wise, the windows could mist up, thus impair- Operating the climatec
ontrol system
135Climatecontrol
Z
Page 140 of 353

It is possible to make use of the residual heat
of the engine to continue heating the station-
ary vehicle for up to 30 minutes after the
engine has been switched off. The heating
time depends on the temperature that has
been set.
Coupé: the residual heat function only works
optimally when the side window sand pano-
rama sliding sunroo fare closed.
Cabriolet: the residualh eatfunction only
work soptimally when th esoftt op is closed.
i The blower will run at alow speed regard-
less of the airflow setting.
i If you activate the residual heat function
at high temperatures, only the ventilation
will be activated. The blower runs at
medium speed.
i It is possible that the residual heat func-
tion may be activated automatically an hour
after the key is removed. The vehicle is then
ventilated for 30 minutes to dry the air-
conditioning system.
X Turn the key to position 0in the ignition
lock or remove it.
X To activate: press theÌbutton.
The indicator lamp above the Ìbutton
lights up.
X To switch off: press theÌbutton.
The indicator lamp above the Ìbutton
goes out.
i Residua lheat is deactivated automati-
cally:
R after about 30 minutes
R when the ignition is switched on
R if the battery voltage drops
R if the coolant temperature is too low Auxiliary heating
Important safety notes G
WARNING
Exhaust fumes are produced when the auxili-
ary heating is in operation. Inhaling these
exhaust fumes can be poisonous. You should
therefor eswitch off the auxiliary heating in
confined spaces without an extraction sys-
tem, e.g. agarage. G
WARNING
When operating the auxiliary heating, parts of
the vehicle may become very hot, and highly
inflammable material such as fuels could be
ignited. Operating the auxiliary heating is thus
prohibited at filling station sorwhen your vehi-
cle is being refuelled. You must therefore
switch off the auxiliary heating at filling sta-
tions.
! Operating the auxiliary heating/ventila-
tion draws on the vehicle battery. After you
have heated or ventilated the vehicle a
maximum of two times, drive for alonger
distance.
i Switch on the auxiliary heating regularly,
e.g. for about ten minutes every month.
The auxiliary heating heats the air in the vehi-
cle interior to the set temperature without
using the heat of the running engine. The aux-
iliary heating is operated directly using the
vehicle's fuel. For this reason, the tank con-
tent must be at least at reserve fuel level to
ensure that the auxiliary heating functions.
The auxiliary heating/ventilation automati-
cally adjusts to changes in temperature and
weather conditions. For this reason, the aux-
iliary heating could switch from ventilation
mode to heating mode or from heating mode
to ventilation mode.
The auxiliary heating switches off automati-
cally after 50 minutes. This time limit can be
altered. To do this, visit aqualified specialist
workshop, e.g. aMercedes-BenzS ervice
Centre. Operating thec
limatecontrol system
137Climatecontrol Z
Page 141 of 353

You cannot use the auxiliary ventilation to
cool the vehicle interior to atemperature
lower than the outsid etemperature.
Befor eswitchin gon X
Turn the key to position 2in the ignition
lock.
X Set the temperature.
The auxiliary heating/ventilation can be acti-
vated even when the climat econtrol is being
controlled manually. Optimum comfor tcan
be attained when the system is set to auto-
matic mode. Set the temperature to 22 †.
The auxiliary heating/ventilation can be acti-
vated or deactivate dusing the remote control
or the button on the centr econsole.
The on-board computer can be used to spec-
ify up to three departure times, one of which
may be preselected (Y page 229).
Switchin gthe auxiliar yheating/venti-
lation on/off usin gthe centr econsole
button Butto
nont hecentr econsole
The colours of th eindicator lamps on th ebut-
to nh ave th efollowin gmeanings:
Blue Auxiliary ventilatio nswitched on
Red Auxiliary heating switche don
Yellow Departure tim epreselected
(Y page 229) Switching on auxiliary heating/ventila-
tion
X
Pres sbutton :.
The red or blue indicator lamp in but-
ton :light sup.
Switching off auxiliary heating/ventila-
tion
X Pres sbutton :.
The red or blue indicator lamp in but-
ton :goes out.
Switching th eauxiliary heating/venti-
lation on/off using th eremote control Your vehicle comes with one remot
econtrol.
You may use two additional remot econtrols
for your vehicle. For further information, con-
sult aqualified specialist workshop ,e.g.a
Mercedes-Ben zService Centre.
The remote control has amaximum range of
approximately 300 metres. This range is
reduced by:
R sources of radio interference
R solid objectsb etween the remote control
and the vehicle
R the remote control being in an unfavoura-
ble position in relation to the vehicle
R transmitting from an enclosed space
i The optimum range can be achieved if you
hold the remote control vertically, pointing
upwards when you press one of the but-
tons.
i Abattery symbol appear sinthedisplay
when th ebattery in th eremot econtro lis
low. Replac ethe remot econtro lbattery
(Y page 140). 138
Operatin
gthe climat econtrol systemClimat econtrol