2011 MERCEDES-BENZ E-CLASS CABRIOLET audio
[x] Cancel search: audioPage 221 of 353

i
If the gearshift recommendation is shown
in the multifunction display,itisn ot shown
in the status bar.
For further information on gearshift recom-
mendations, see (Y page 154).
Resetting values You can reset the values of the following func-
tions:
R
trip meter
R trip computer "From start"
R trip computer "From reset"
X Press the =or; button on the steer-
ing wheeltos elect theTrip menu.
X Press the 9or: button to select the
function that you wish to reset.
X Press a. Resetting the trip computer "From start" (example)
X Press :to select Yes and press
a
to confirm. Navigation menu
Displaying navigatio ninstructions In the
Navi menu, the multifunction display
shows navigation instructions. For more
information, see the separate operating
instructions.
X Switch on the audio system or COMAND
APS (see the separate operating instruc-
tions).
X Press the =or; button on the steer-
ing wheeltos elect theNavi menu.Route guidance not active :
Direction of travel
; Current street
Activated route guidance No change of directio
nannounced :
Distance to the destination
; Distance to the next change of direction
= Current street
? Symbol for "follow the road's course"
Change of directio nannounced without a
lane recommendation :
Roadtow hich the change of direction
leads
; Distance to change of direction and visual
distance display
= Current street
? Change-of-direction icon
When achange of direction has been
announced, you wills ee visualdistancedis-
play ;nex ttot he symbol for change of 218
Menus and submenusOn-board computer and displays
Page 222 of 353

direction
?.This decreases in size as you
approach the announced change of direction.
Change of direction announced with a
lane recommendation
Lane recommendations are only displayed if
the relevant data is available on the digital
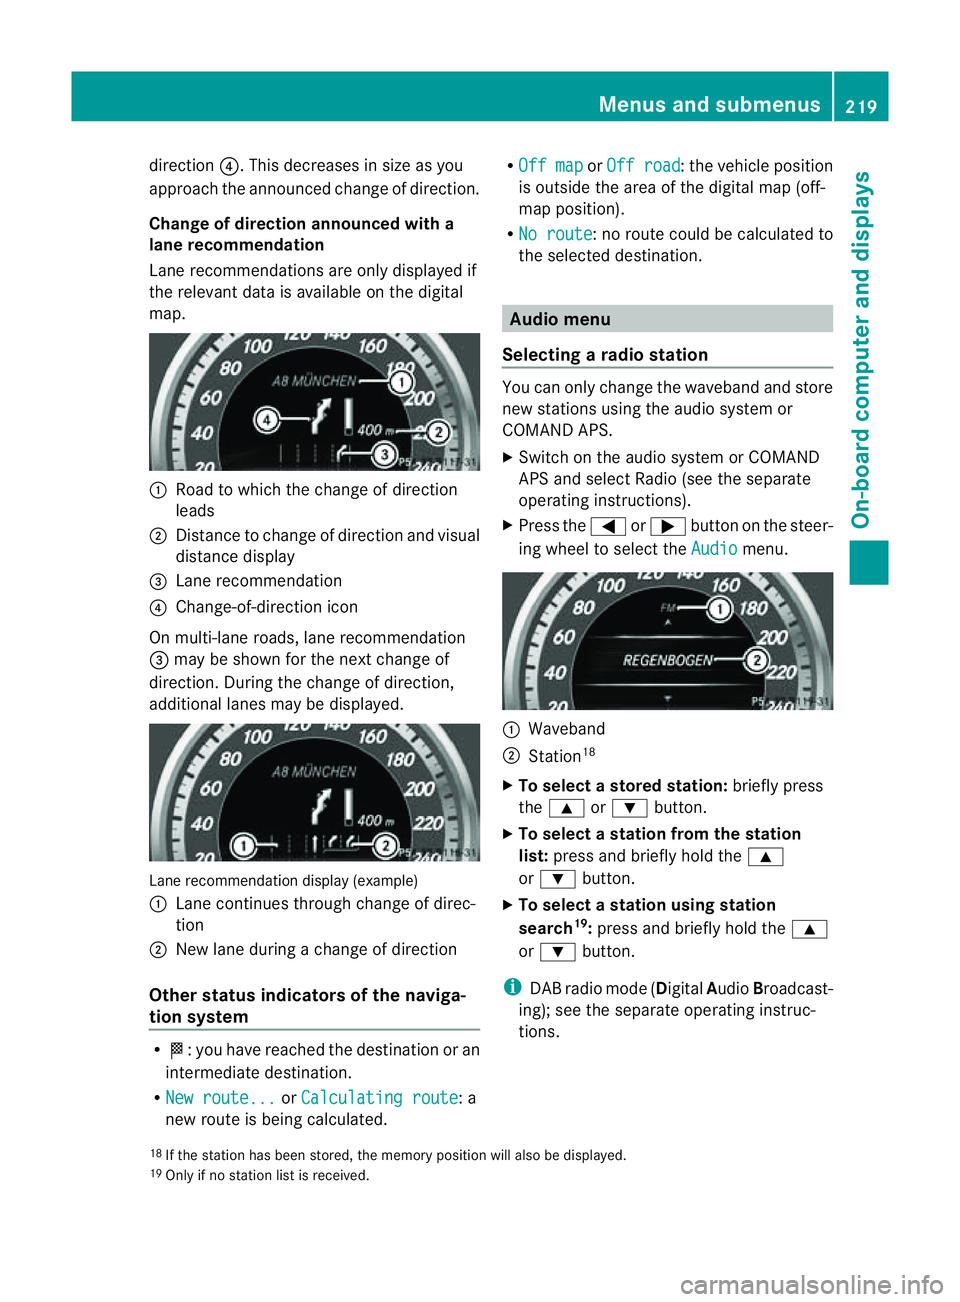
map. :
Road to which the change of direction
leads
; Distancetoc hange of direction and visual
distance display
= Lane recommendation
? Change-of-direction icon
On multi-lane roads, lane recommendation
= may be shown for the next change of
direction. During the change of direction,
additional lanes may be displayed. Lane recommendation display (example)
:
Lane continues through change of direc-
tion
; New lane during achange of direction
Other status indicators of the naviga-
tion system R
O:y ou have reached the destination or an
intermediate destination.
R New route... or
Calculating route :a
new route is being calculated. R
Off map or
Off road :t
he vehicle position
is outside the area of the digital map (off-
map position).
R No route :nor
oute could be calculated to
the selected destination. Audio menu
Selecting aradio station You can only change the waveband and store
new stations using the audio system or
COMAND APS.
X Switch on the audio system or COMAND
APS and select Radio (see the separate
operating instructions).
X Press the =or; button on the steer-
ing wheel to select the Audio menu.
:
Waveband
; Station 18
X To selectas toredstation: brieflypress
the 9 or: button.
X To select astation from the station
list: press and briefl yholdt he 9
or : button.
X To select astatio nusing station
search 19
:press and briefl yholdt he 9
or : button.
i DAB radi omode(Digit alAudio Broadcast-
ing); see the separate operating instruc-
tions.
18 If the statio nhas been stored ,the memory position will also be displayed.
19 Onl yifnos tatio nlist is received. Menus and submenus
219On-boardcomputer and displays Z
Page 223 of 353

Audio player or audio media operation
Audio dat
afromv arious audio device sor
media can be played, depending on th eequip-
men tfitte dint hevehicle.
X Switc hont heaudio system or COMAND
AP Sa nd select the audi odeviceorm edium
(see the separate operating instructions).
X Press the =or; button on the steer-
ing whee ltoselect the Audio menu.
CD change
rdisplay (example)
: Curren ttrack
X To select th enext/previou strack:
briefl ypress the 9or: button.
X To select atrac kfromt he trac klist
(rapid scrolling): press and hold the
9 or: button unti lthe desired track
ha sb eenr eached.
If yo upress and hold the 9or: but-
ton, the rapi dscrolling spee disincreased.
Not al laudio devices or media support this
function.
If track information is stored on the audio
device or medium, the multifunctio ndisplay
will show the number and name of the track.
The current track does not appear in audio
AUX mode (Aux iliary audio mode: external
audio sourc econnected).
TV operation i
Dependin gonthe digital TV broadcaster,
radio station scan also be received. The
multifunction display shows TV (Radio) .
For selectin garadio station ,see
(Y page 219). X
Switch on COMAND APS and selec tTV(see
the separate operating instructions).
X Press the =or; button on the steer-
ing wheel to select the Audio menu.
:
Current station
X To select astore dstation: brieflypress
the 9 or: button.
X To select astation from the station
list: press and briefl yholdt he 9
or : button.
Vide oDVD operation X
Switch on COMAND APS and select video
DVD (see the separate operating instruc-
tions).
X Press the =or; button on the steer-
ing whee ltoselect the Audio menu.
DVD change
rdisplay (example)
: Curren tscene
X To select th enext or previous scene:
briefly press the 9or: button.
X To select ascene from th escene list
(rapid scrolling): press and hold the
9 or: buttonuntil the desired
scene ha sbeenr eached. 220
Menus and submenusOn-board computer and displays
Page 224 of 353

Telephon
emenu
Introduction Functions and displays ar
edependen tonthe
optional equipment installed in your vehicle.
You can place your mobile phone in the
mobile phone bracket (Y page 273), or set
up aB luetooth ®
connection to the audios ys-
tem or COMAND APS (see the separate oper-
ating instructions).
i You can obtain further information about
suitable mobile phones and connecting
mobile phones via Bluetooth ®
:
R in any Mercedes Benz Service Centre
R on the Internet at http://
www.mercedes-benz.com/connect G
WARNING
Observe the legal requirements of the country
in which you are currently driving regarding
the use of mobile phones in the vehicle.
If it is permitted to use mobile phones while
the vehicle is in motion, you should only use
them when the road and traffic conditions
allow.O therwise, yo umaybe distracted from
the traffi cconditions ,cause an accident and
injure yourself and others.
X Switch on the mobil ephone and audi osys-
tem or COMAND APS (see the separate
operating instructions).
X Press the =or; button on the steer-
ing whee ltoselect theTel menu.
Yo uw ills ee one of the following displa ymes-
sage sint he multifunctio ndisplay:
R Please enter PIN :t
he mobile phone has
been placed in the mobile phone bracket
and the PIN has not been entered.
X Enter the PIN using the mobile phone, LIN-
GUATRONIC, the audios ystem or
COMAND APS.
The mobile phone will search for anetwork. R
Telephone ready or the name of the net-
work provider: the mobile phone has found
an etwork and is ready to receive.
R Telephone No Service :non
etwork is
available, or the mobile phone is searching
for anetwork.
Accepting acall If someone call
syou whe nyou are in the
Tel menu,
adisplay message appears in the
multifunction display ,for example: X
Press the 6button on the steering
wheel to accept an incomin gcall.
If you are not in the Tel menu, you can still
accept acall.
Rejecting or ending acall X
Press the ~button on the steering
wheel.
If you are not in the Tel menu, you can still
reject or end acall.
Dialling anumber from the phone book If you
rmobile phone is able to receive calls,
you can search for and dial anumber from the
phone book in the audio system or COMAND
APS at any time.
X Copy the telephone book of the mobile
phone into the audio system or to COMAND
APS (see the separate operating instruc-
tions).
X Press the =or; button on the steer-
ing wheel to select the Tel menu.
X Press the 9,:ora button to call
up the phone book. Menus and submenus
221On-board computer and displays Z
Page 228 of 353

R
changing the instrument cluster settings
R changing the time/date settings 20
R changing the light settings
R changing the vehicle settings
R changing the auxiliary heating settings
R changing the convenience settings
R restoring the factory settings
Instrumen tcluster Selecting th
eunit of measurement for dis-
tance
The Display unit Speed-/odometer: function allows you to choose whether cer-
tain displays appear in kilometres or miles.
The selected unit of measurement for dis-
tance applies to:
R the digital speedometer in the Trip menu
R the total distanc erecorder and the trip
meter
R the trip computer
R the current consumption and the range
R the navigation instruction in the Navi menu
R cruis econtrol
R SPEEDTRONIC
R DISTRONIC PLUS
R ASSYS TPLUS service interval display
X Press the =or; button on the steer-
ing wheel to selec tthe Settings menu.
X Press the :or9 button to select the
Inst. cluster submenu.
X Press the abutton to confirm.
X Press the :or9 button to select the
Display unit Speed-/odometer func-
tion.
You will see the selected setting: km or
miles .
X Press the abutton to save the setting. Switching the additional speedometer
on/off
Only vehicles with manual transmission have
this function.
i
Vehicles for the United Kingdom: this
function is not available.
The Dig. speedom [mph]: function allows
you to choose whether the status area in the
multifunction displaya lways shows the speed
in mph instead of the outside temperature.
X Press the =or; button on the steer-
ing wheel to select the Settings menu.
X Press the :or9 button to select the
Inst. cluster submenu.
X Press the abutton to confirm.
X Press :or9 to select the Dig. speedo [mph]: function.
You will see the selected setting: on or
off .
X Press the abutton to save the setting.
Selecting the permanent display function
Only vehicles with automatic transmission
have this function.
i Vehicles for the United Kingdom: this
function is not available.
The Permanent display: function allows
you to choose whether the multifunction dis-
play always shows the outside temperature
or the speed in mph.
X Press the =or; button on the steer-
ing wheel to select the Settings menu.
X Press the :or9 button to select the
Inst. cluster submenu.
X Press the abutton to confirm.
X Press :or9 to select the Perma‐ nent display function.
You will see the selected setting: outside temperature or
Dig. speedom [mph] .
X Press the abutton to save the setting.
20 This function is not available on vehicles with Audio 50 APS, Audio 55 APS or COMAND APS. Menus and submenus
225On-board computer and displays Z
Page 229 of 353

Time/date
Thi
ssubmenu is onl yavailable on vehicles
with Audio 20.
In the Time/date submenu, yo
ucan se tthe
time and date.
Your vehicle could have the following audio
equipment:
A: Audio 20
B: Audio 50 APS
C: COMAND APS
X Refer to the separate operating instruc-
tions to find out which audios ystem is fit-
ted in your vehicle.
Depending on the audios ystem, the time and
date are received from GPS satellites and
cannot be set using the on-board computer
(see the following table). A B C
Setting using the on-board com-
puter X
Automatic GPS satellite recep-
tion X X
Setting the time zone once; see
the separate operating instruc-
tions X X
X
Press the =or; button on the steer-
ing wheel to select the Settings menu.
X Press the :or9 button to select the
Time/Date submenu.
X Press the abutton to confirm.
X Press the :or9 button to select
Time: or
Date: .
The current time or date set is displayed.
X Press ato change the setting.
X Press the =or; button to select the
displayy ou want to change: hour, minute,
day, month, year.
X Press the :or9 button to set the
selected display.
X Press the abutton to store the entry. Lights Switching the daytime driving lights on/
off
If you have activated the
Day lights func-
tion and the light switch is set to Ã,the
daytime driving lights are automatically
switched on during daylight hours when the
engine is running. When it is dark, the side
lamps and the dipped-beamh eadlamps are
also switched on automatically.
X Switc hoff the engine.
X Press the =or; button on the steer-
ing wheel to select the Settings menu.
X Press the :or9 button to select the
Light submenu.
X Press the abutton to confirm.
X Press the :or9 button to select the
Day lights function.
If the Day lights have been switched on,
the coneofl ight and the Wsymbol in
the multifunction display are shown in red.
X Press the abutton to save the setting.
Activating/deactivating the Intelligent
Light System
If you activat ethe Intell. Light Sys. function
,you activat ethe following functions:
R motorway mode
R activ elight function
R cornering light function
R extended range foglamps
X Press the =or; button on the steer-
ing wheel to select the Settings menu.
X Press the :or9 button to select the
Light submenu.
X Press the abutton to confirm.
X Press :or9 to select the Intell. Light Sys. function.
If the Intell. Light Sys. function has
been switched on, the coneofl ight and the
L symbol in the multifunction display
are shown in red.
X Press the abutton to save the setting. 226
Menus and submenusOn-boar
dcomputer and displays
Page 268 of 353

Fron
tstowage compartments Glov
ecompartment
i The glov ecom partmen tcan be ventilated
(Y page 142). X
To open: pull handle :and open glove
compartmen tflap ;.
X To close: fold glovecom partmen tflap ;
upwards until it engages.
The glove compartmen tcan only be locked
and unlocked usin gthe emergenc ykey ele-
ment. X
To lock: insert theemergenc ykey element
int ot he locka nd tur nit90°clockwise to
position 2.
X To unlock: insert theemergenc ykey ele-
men tint ot he locka nd tur nit90°anti-
clockwise to position 1. Stowage compartment in th
ecentre con-
sole Example
:Coupé
X To open: slide cover :back.
Stowage compartment/telephone com-
partment under the armrest
i Asmall and alarg estowage compartment
are located under the armrest. The small
stowage compartment can be removed for
emptying. The mobil ephone bracket is
located in the larg estowage compartment.
i Depending on the vehicle's equipment, a
USB port and an AUX-IN jack or aMedia
Interface are installed in the stowage com-
partment. AMediaInterface is auniversal
interface for portable audio equipment, e.g.
for an iPod ®
or MP3 player (see the sepa-
rate Audio or COMAND APS operating
instructions). Example: Coupé
X
To open: press left-hand button ;or right-
hand button :.
The stowage compartment opens. Stowage areas
265Stowing and features Z
Page 277 of 353

Mercedes-Ben
zrecommends the use of an
approved exterior aerial. This ensures:
R optimal mobile phone reception quality in
the vehicle
R mutual influences between the vehicle
electronics and mobile phones are mini-
mised
An exterior aerial has the following advan-
tages:
R it conducts the electromagnetic fields gen-
erated by awireless device to the exterior.
R the field strengt hinthe vehicle interior is
lower than in avehicle that does not have
an exterior aerial.
i There are various mobile phone brackets
that may be fitted to your vehicle; in some
cases, these are country-specific.
i Even if your vehicle is equipped with con-
venience telephony, you can connecta
Bluetooth ®
capable mobil ephone to Audio
20 or COMAND Online via the Bluetooth ®
interface.
More information on suitabl emobilephones,
mobil ephone brackets and on connecting
Bluetooth ®
capable mobil ephones to Audio
20 or COMAND Online can be obtained:
R at your Mercedes-Benz Service Centre
R on the Internet at http://www.mercedes-
benz.com/connect
i The functions and service savailablew hen
you use the phone depend on yourm obile
phone model and service provider.
Inserting the mobile phone X
Open the telephone compartment
(Y page 265).
X Place the mobile phone bracket into the
pre-installed bracket (see the separate
mobile phone bracket installation instruc-
tions).
X Insert the mobile phone into the mobile
phone bracket (see the separate mobile
phone bracket installation instructions). If the mobile phone is inserted in the mobile
phone bracket
,you can speak to the person
you are calling using the hands-free system.
i On some mobile phone brackets, you first
have to connect the mobile phone via Blue-
tooth ®
to am obile phone bracket (see the
separate operating instructions for the
mobile phone bracket).
On these mobile phone brackets, the
mobile phone does not have to be inserted
into the bracket for you to be able to use
the telephone functions. In this case, the
charging function and aerial function are
not available.
Operating the mobile phone You can operate the telephone using the
6
and~ button sonthe multifunction
steerin gwheel. You can operate other mobile
phone functions via the on-board computer
(Y page 221).
If you take the key out of the ignition lock, the
mobile phone stays on but you can no longer
use the hands-free system.
If you are making acall and you would like to
take the key out of the ignition lock, first
remove the mobile phone from the bracket.
Otherwise, the call will be ended.
i When amobile phone bracket is used that
is connected to the mobile phone via Blue-
tooth ®
:ify ou want to continue acall in
"Private mode", you have to perform the
necessary steps on the mobile phone (see
the separate mobile phone operating
instructions).
You can fold the pre-installed bracket up to
improve access to the stowage space
beneath it. Dependin gonthe vehicle's equip-
ment,aU SB connection and an AUX-IN con-
nection/Media Interface are fitted in the
stowage compartment (Y page 265).274
FeaturesStowing and features