2011 MERCEDES-BENZ CL-Class navigation
[x] Cancel search: navigationPage 111 of 480

The COMAND controller can be:
Rpressed briefly or pressed and held W
Rturned clockwise or counter-clockwise
cVd
Rslid left or right XVY
Rslid forwards or back ZVÆ
Rslid diagonally aVb
In the instructions, operating sequences are
described as follows:
XPress the R button.
Audio mode is activated.
XSelect Audio by sliding VÆ and turning
cVd the COMAND controller and press
W to confirm.
The audio menu appears.
Back button
:Back buttonXTo exit the menu: press back button :
briefly.
COMAND changes to the next higher menu
level in the current operating mode.
iYou can also exit a menu by sliding the
COMAND controller XVY or ZVÆ.
XTo switch to the basic display: press and
hold back button :.
COMAND changes to the basic display of
the current operating mode.
Function buttons
The COMAND function buttons allow you to
select a main function directly.
:Function button for roller sunblind;Function button for radio and CD/DVD or
SD card
=Back button?Lumbar support/multicontour seatAFunction button for telephone and
navigation system
BTo switch COMAND on/offCVolume controlDProgrammable button (Y page 109)
Example:
XTo select the radio or CD menu
directly: press the R button ; once or
twice.
Assigning the programmable button
(favorites)
:Programmable buttonAt a glance109COMANDZ
Page 112 of 480

You can assign the following predefined
functions to the h programmable button:
RECO: you can activate or deactivate the ECO
start/stop function.
RMassage, driver's seat: you can switch
the massage function for the driver's seat
on and off.
RMassage, front-passenger's seat:
you can switch the massage function for
the front-passenger seat on and off.
RMassage, driver's and front
passenger seat: you can switch the
massage function for the driver's and front-
passenger seats on and off.
RDisplay off: you can switch the
COMAND display off or on.
RTow-away protection: you can arm or
deactivate tow-away protection.
RInterior motion sensor: you can arm or
deactivate the interior motion sensor.
RTow-away protection/interior
motion sensor: you can arm or deactivate
tow-away protection and the interior
motion sensor.
RRepeat navigation command: you can
have the most recent recommendation by
the navigation system repeated.
XTo assign the programmable button:
select Vehicle by sliding VÆ and turning
cVd the COMAND controller and press
W to confirm.
XSelect System and press W to confirm.XSelect Favorites Button and press W to
confirm.
The list of predefined functions appears.
The # dot in front of the list entry indicates
the current setting.
XTo change the setting: turn cVd the
COMAND controller and select the desired
function.
XTo store the setting and exit the menu:
press W the COMAND controller.
Telephone keypad:Telephone keypad;Folding cover110At a glanceCOMAND
Page 113 of 480

COMAND display
Display overview
The COMAND display shows the function currently selected and its associated menus. The
COMAND display is divided into several areas.
The radio display is shown in the example.
:Status bar;To call up the audio menu=Main function bar?Display/selection windowARadio menu barBAir conditioning function bar
Status bar : shows the current settings for radio and telephone operation.
The main functions navigation, audio, telephone and video feature additional menus. This is
indicated by triangle ;. The following table lists the available menu items.
Main function bar = allows you to call up the desired main function.
In the example, the Audio main function is set to radio mode and display/selection
window ? is active.
Radio menu bar A allows you to operate the radio functions.
The air-conditioning functions can be operated in air-conditioning function bar B.
Menu overview
The table lists the menus available after calling up the main navigation, audio, telephone, video
or system function in the main function bar.
At a glance111COMANDZ
Page 117 of 480

Avoid using alcoholic thinners, gasoline or
abrasive cleaning agents. These products can
damage the display surface. Do not apply
pressure to the display surface when cleaning
it as this could cause irreversible damage.
Remote control
Overview
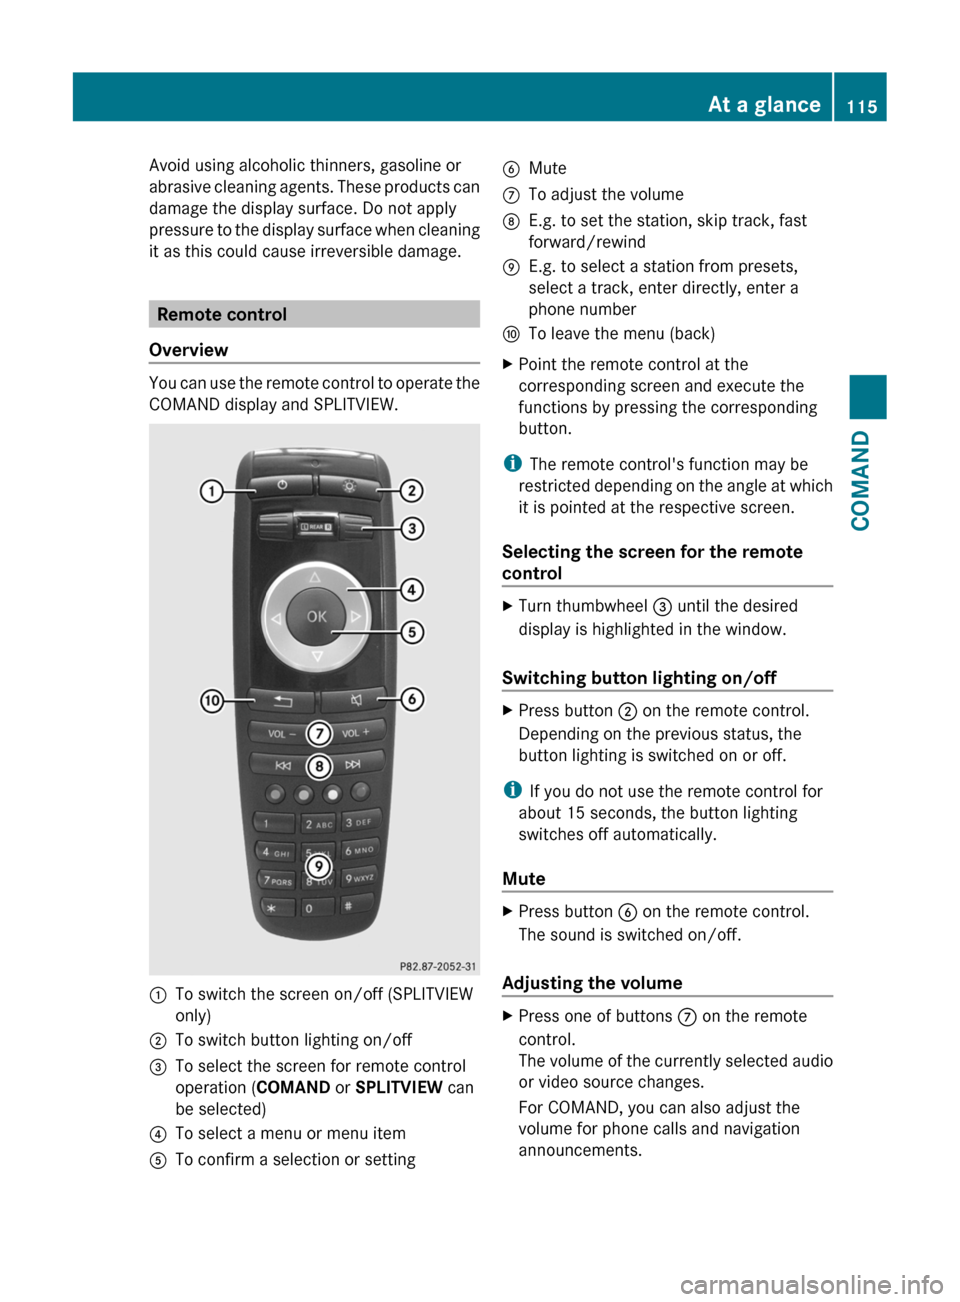
You can use the remote control to operate the
COMAND display and SPLITVIEW.
:To switch the screen on/off (SPLITVIEW
only)
;To switch button lighting on/off=To select the screen for remote control
operation (COMAND or SPLITVIEW can
be selected)
?To select a menu or menu itemATo confirm a selection or settingBMuteCTo adjust the volumeDE.g. to set the station, skip track, fast
forward/rewind
EE.g. to select a station from presets,
select a track, enter directly, enter a
phone number
FTo leave the menu (back)XPoint the remote control at the
corresponding screen and execute the
functions by pressing the corresponding
button.
iThe remote control's function may be
restricted depending on the angle at which
it is pointed at the respective screen.
Selecting the screen for the remote
control
XTurn thumbwheel = until the desired
display is highlighted in the window.
Switching button lighting on/off
XPress button ; on the remote control.
Depending on the previous status, the
button lighting is switched on or off.
iIf you do not use the remote control for
about 15 seconds, the button lighting
switches off automatically.
Mute
XPress button B on the remote control.
The sound is switched on/off.
Adjusting the volume
XPress one of buttons C on the remote
control.
The volume of the currently selected audio
or video source changes.
For COMAND, you can also adjust the
volume for phone calls and navigation
announcements.
At a glance115COMANDZ
Page 120 of 480

Calling up the menu of a main function:To call up the audio menu;Main function bar
If one of the main functions navigation, audio,
telephone or video is switched on,
triangle : appears next to the entry. You can
now select an associated menu.
The following example illustrates how to call
up the audio menu.
XPress the R function button.
or
XSelect Audio in the main function bar by
sliding ZV the COMAND controller and
press W to confirm.
The Audio menu appears.
:Current audio operating mode;Main function bar=Audio menu
The # dot indicates the current audio mode.
XSelect another audio mode, e.g. Radio, by
turning cVd the COMAND controller and
press W to confirm.
Selecting a menu item
The following example describes how to
select a station from the station presets in
radio mode.
XPress the R function button.XSelect Presets by sliding VÆ and turning
cVd the COMAND controller and press
W to confirm.
The station preset menu appears.
:Selection barXSelect a station by turning cVd the
COMAND controller and press W to
confirm.
The station is set.
Example of operation
Initial situation
You would like to switch from the vehicle
function to the radio function and select a
station from the station list, for example.
The following operating example describes
how to:
Rcall up the audio function
Rswitch on radio mode
Rset a station
118At a glanceCOMAND
Page 121 of 480

Calling up the audio function
XSelect Audio in the main function bar by
sliding ZV and turning cVd the COMAND
controller and press W to confirm.
The basic display of the current audio
operating mode, e.g. audio CD, appears.
Switching on radio mode
Option 1
XPress the R function button.
The radio display appears.
iRepeated pressing of this function button
switches between radio and the most
recently active audio source.
Option 2
XSelect Audio again by sliding ZV the
COMAND controller and press W to
confirm.
The Audio menu appears. Radio is
highlighted.
:Current audio operating mode;Main function bar=Audio menuXPress W the COMAND controller and
confirm Radio.
The radio basic display appears with the
waveband last selected.
XTo set a station: turn cVd or slide XVY
the COMAND controller while the display/
selection window in the radio display is
active.
Entering characters in navigation mode
(entering a city)
General information
The following section describes how to enter
characters using city input for NEW YORK as
an example.
If you want to use the address entry menu
(Y page 190) to enter a city, a street or a
house number, for example, COMAND
provides either a list with a character bar
(option 1) or a selection list (option 2).
At a glance119COMANDZ
Page 126 of 480

Mute
Switching audio and video sources on/off
XPress the 8 button on the multifunction
steering wheel.
The sound from the respective audio or
video source is switched on or muted.
iWhen the sound is off, the system
displays the , symbol in the status line.
When you change the audio or video
source, or adjust the volume, the sound
automatically switches on again.
iEven if the sound is switched off, you will
still hear traffic and navigation system
announcements.
Switching off Traffic program and
navigation announcements completely
XTraffic program: press and hold the
8 button until the . display
disappears from the status bar of the
display.
A confirmation tone sounds.
XNavigation announcements: during an
announcement, press the 8 button on
the multifunction steering wheel.
Switching Traffic program and navigation
announcements on again
XTraffic program: press and hold down the
8 button until the . display in the
status bar appears.
A confirmation tone sounds.
XNavigation announcements: press the
8 button again.
iThe navigation announcements are
activated again if you switch COMAND off
and on again or start a new route guidance.
Adjusting the volume
Adjusting the volume for the audio or
video source
XTo adjust: turn thumbwheel :.
or
XPress the W or X button on the
multifunction steering wheel.
The volume of the currently selected audio
or video source changes.
You can also adjust the volume for the
following:
Rtraffic announcements
Rnavigation announcements
Rphone calls
RVoice Control System voice control (see
the separate operating instructions)
Adjusting the volume of navigation
announcements
During a navigation announcement:
XTurn thumbwheel :.
or
XPress the W or X button on the
multifunction steering wheel.
Adjusting the volume for phone calls
You can adjust the volume for hands-free
mode during a telephone call.
XTurn thumbwheel :.
or
XPress the W or X button on the
multifunction steering wheel.
124At a glanceCOMAND
Page 131 of 480

Display design
Your COMAND display features optimized
designs for operation during daytime and
night-time hours. You can customize the
design to suit your personal preferences by
manually selecting day or night design or opt
for an automatic setting.
XSelect Vehicle by turning cVd the
COMAND controller and press W to
confirm.
XSelect System by turning cVd the
COMAND controller and press W to
confirm.
XSelect Display and press W to confirm.XSelect Day design, Night design or
Automatic by turning cVd the COMAND
controller and press W to confirm.
The # icon indicates the current setting.
DesignExplanationDay designThe display is set
permanently to day
design.
Night designThe display is set
permanently to night
design.
AutomaticThe display design
changes depending on
the brightness around
the vehicle.
iIn the Automatic setting, COMAND
evaluates the readings from the automatic
vehicle light sensor and switches between
the display designs automatically.
Time settings
General information
If COMAND is equipped with a navigation
system and has GPS reception, COMAND
automatically sets the time and date. You can
also adjust the time yourself in 30-minute
increments, but the date cannot be changed.
iIf you set the time in 30-minute
increments, any time zone settings and
settings for changing between summer and
standard time are lost (Y page 130).
iThe following navigation system functions
require the time, time zone and summer/
standard time to be set correctly in order
to work properly:
Rroute guidance on routes with time-
dependent traffic guidance
Rcalculation of expected time of arrival
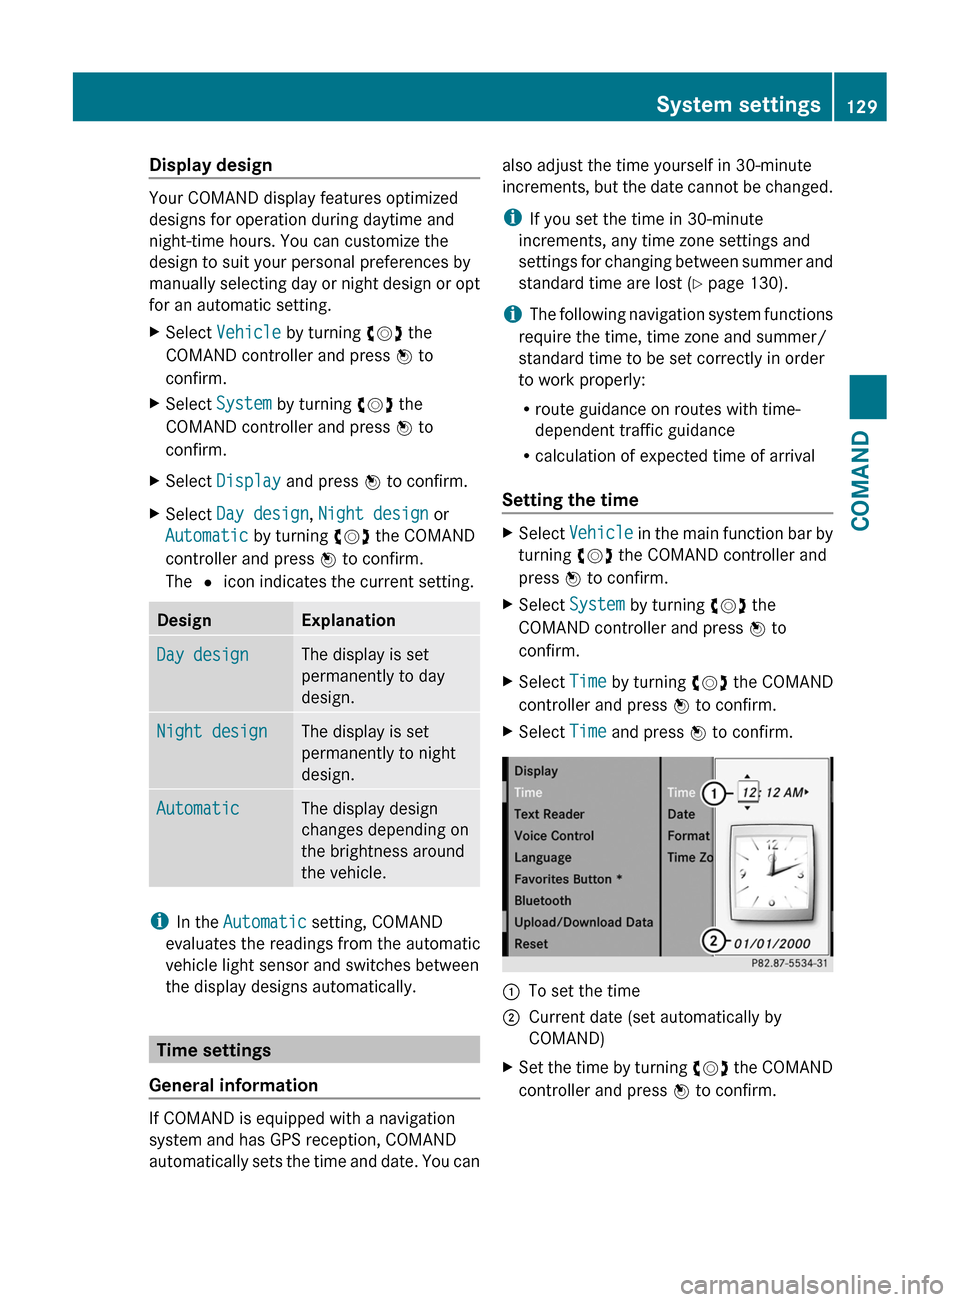
Setting the time
XSelect Vehicle in the main function bar by
turning cVd the COMAND controller and
press W to confirm.
XSelect System by turning cVd the
COMAND controller and press W to
confirm.
XSelect Time by turning cVd the COMAND
controller and press W to confirm.
XSelect Time and press W to confirm.:To set the time;Current date (set automatically by
COMAND)
XSet the time by turning cVd the COMAND
controller and press W to confirm.
System settings129COMANDZ