2011 MERCEDES-BENZ C-CLASS ESTATE ESP
[x] Cancel search: ESPPage 156 of 401
accelerate or brake suddenly. You will then
no tb e able to brake, declutch or accelerate
as intended. This could lead to accidents and
injury. G
WARNING
Do not change down for additional engine
braking on a slippery road surface. This could
cause the drive wheels to lose their grip and
the vehicle could skid. This could cause you
to lose control of your vehicle and cause an
accident.
! Warm up the engine quickly. Do not use
the engine's full performance until it has
reached operating temperature.
Only set the automatic transmission to the
respective drive positions when the vehicle
is stationary.
Where possible, avoid spinning the drive
wheels when pulling away on slippery
roads. Otherwise, you could damage the
drive train.
! AMG vehicles: at low engine oil tempera-
tures (below +20 †), the maximum engine
speed is restricted in order to protec tthe
engine. To protect the engine and maintain
smooth engine operation, avoid driving at
full throttle when the engine is cold. Key positions
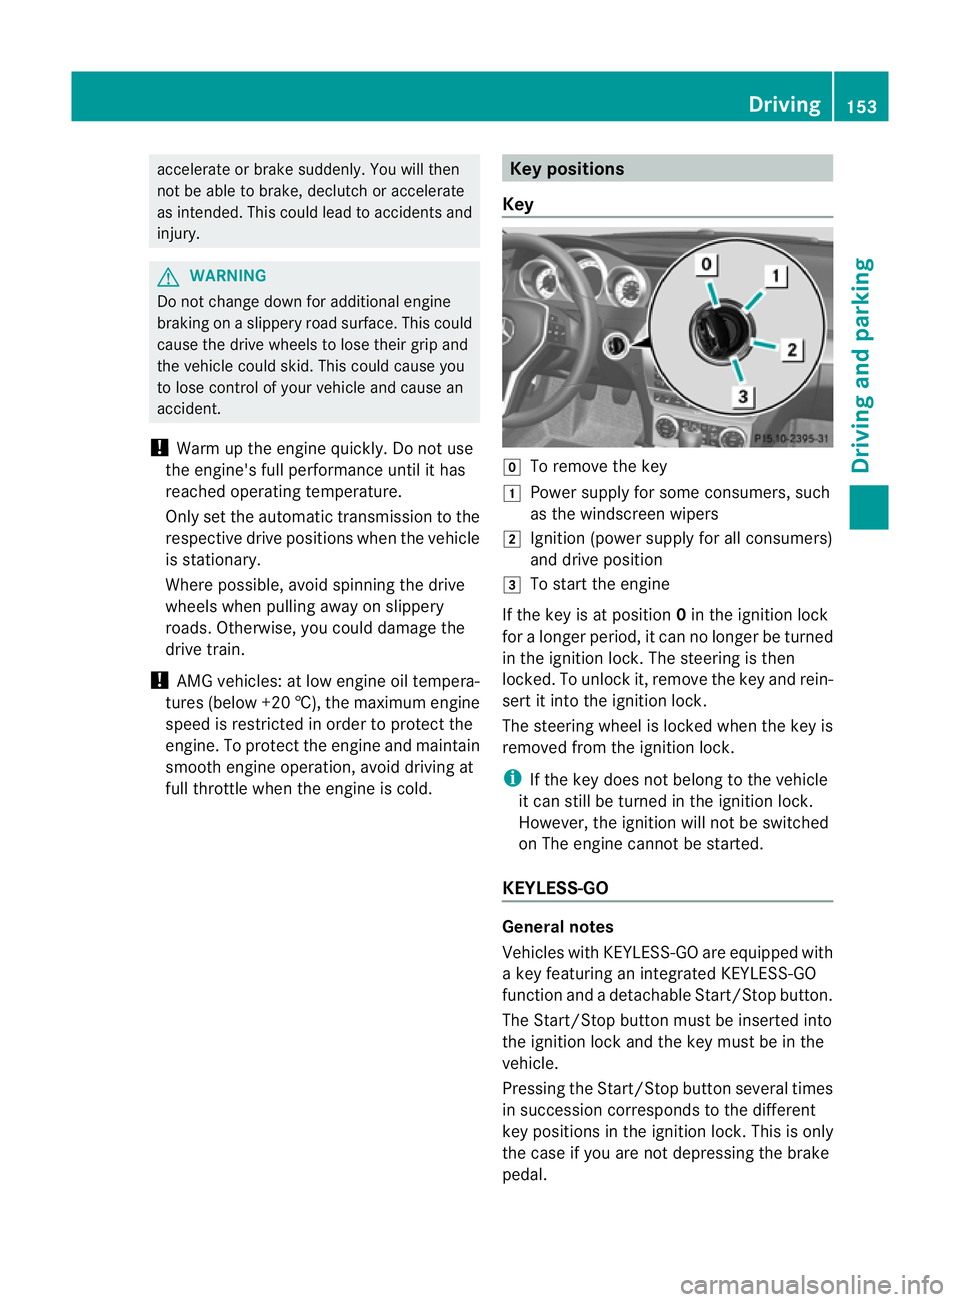
Key g
To remove the key
1 Power supply for some consumers, such
as the windscreen wipers
2 Ignition (power supply for all consumers)
and drive position
3 To start the engine
If the key is at position 0in the ignition lock
for a longer period, it can no longer be turned
in the ignition lock. The steering is then
locked. To unlock it, remove the key and rein-
sert it into the ignition lock.
The steering wheel is locked when the key is
removed from the ignition lock.
i If the key does not belong to the vehicle
it can still be turned in the ignition lock.
However, the ignition will not be switched
on The engine cannot be started.
KEYLESS-GO General notes
Vehicles with KEYLESS-GO are equipped with
a key featuring an integrated KEYLESS-GO
function and a detachable Start/Stop button.
The Start/Stop button must be inserted into
the ignition lock and the key must be in the
vehicle.
Pressing the Start/Stop button several times
in succession corresponds to the different
key positions in the ignition lock. This is only
the case if you are not depressing the brake
pedal. Driving
153Driving and parking Z
Page 157 of 401
If you depress the brake pedal and press the
Start/Stop button, the engine starts immedi-
ately.
X
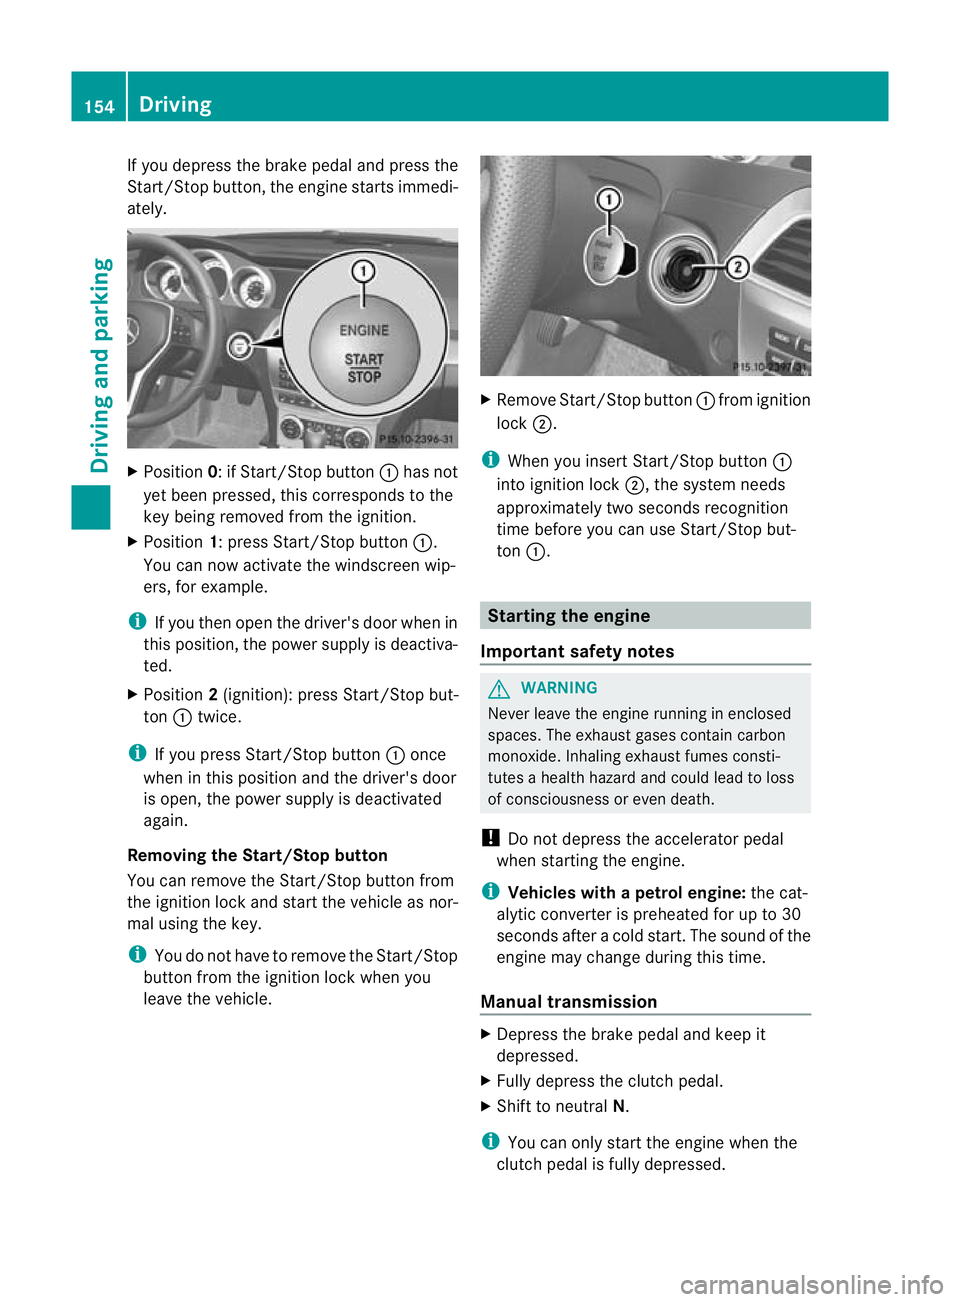
Position 0: if Start/Stop button :has not
yet been pressed, this corresponds to the
key being removed from the ignition.
X Position 1: press Start/Stop button :.
You can now activate the windscree nwip-
ers, for example.
i If you the nopen the driver's door when in
this position, the power supply is deactiva-
ted.
X Position 2(ignition): press Start/Stop but-
ton :twice.
i If you press Start/Stop button :once
when in this position and the driver's door
is open, the power supply is deactivated
again.
Removing the Start/Stop button
You can remove the Start/Stop button from
the ignition lock and start the vehicle as nor-
mal using the key.
i You do not have to remove the Start/Stop
button from the ignition lock when you
leave the vehicle. X
Remove Start/Stop button :from ignition
lock ;.
i When you insert Start/Stop button :
into ignition lock ;, the system needs
approximately two seconds recognition
time before you can use Start/Stop but-
ton :. Starting the engine
Important safety notes G
WARNING
Never leave the engine running in enclosed
spaces. The exhaust gases contain carbon
monoxide. Inhaling exhaust fumes consti-
tutes a health hazard and could lead to loss
of consciousness or even death.
! Do not depress the accelerator pedal
when starting the engine.
i Vehicles with apetrol engine: the cat-
alytic converter is preheated for up to 30
seconds after a cold start .The sound of the
engine may change during this time.
Manual transmission X
Depress the brake pedal and keep it
depressed.
X Fully depress the clutch pedal.
X Shift to neutral N.
i You can only start the engine when the
clutch pedal is fully depressed. 154
DrivingDriving and parking
Page 159 of 401
Automatic transmission
i
It is only possible to shif tthe transmission
from position Pto the desired position if
you depress the brake pedal. Only then is
the selector lever lock released.
X Depress the brake pedal and keep it
depressed.
X Shift the transmission to position Dor R.
X Release the parking brake (Y page 175).
X Release the brake pedal.
X Carefully depress the accelerator pedal.
i The vehicle locks centrally once you have
pulled away.T he locking knobs in the doors
drop down.
You can open the doors from the inside at
any time.
You can also deactivate the automatic lock-
ing feature (Y page 242).
i Upshifts take place at higher engine
speeds after a cold start. This helps the
catalytic converter to reach its operating
temperature more quickly.
Hill starta ssist Hill start assist helps you when pulling away
forwards or in reverse on an uphill gradient.
It holds the vehicle for a short time after you
have removed your foot from the brake pedal.
This gives you enough time to move your foot
from the brake pedal to the accelerator pedal
and depress it before the vehicle begins to
roll. G
WARNING
Never leave the vehicle when it is held by hill
start assist. After approximately one second,
hill start assist will no longer brake your vehi-
cle and it could roll away.
X Take your foot off the brake pedal.
i Once you have taken your foot off the
brake pedal, the vehicle is held for around
one second.
X Pull away. Hill start assist will not function if:
R
you are pulling away on a level road or a
downhill gradient.
R on vehicles with automatic transmission,
the transmission is in position N.
R the parking brake is applied.
R ESP ®
is malfunctioning. ECO start/stop function
General notes The ECO start/stop function switches the
engine off automatically if the vehicle stops
moving.
The engine starts automatically when you pull
away again. The ECO start/stop function
thereby helps you to reduce the fuel con-
sumption and emissions of your vehicle.
The ECO start/stop function is activated each
time the engine is switched on. If all condi-
tions for automatic engine switch-off are ful-
filled (Y
page 157), the ¤ECO symbol is
shown in green in the multifunction display.
If not all conditions are fulfilled, the ¤ECO
symbol is shown in yellow.
If the ECO start/stop function is deactivated
(Y page 158), ECO symbol ¤is not
shown. G
WARNING
If the engine is switched off and the ECO sym-
bol is shown in green in the multifunction dis-
play, the engine has been switched off auto-
matically. All of the vehicle's systems remain
active. If you open the door, unfasten your
seat belt or remove your foot from the brake
pedal, the engine will automatically start .The
vehicle may begin moving. You could suffer
serious or even fatal injury or cause an acci-
dent resulting in injury or death.
Never leave the vehicle while the ECO symbol
in the multifunction display is shown in green
or yellow. Always secure the vehicle against
rolling away before leaving it. 156
DrivingDriving and parking
Page 162 of 401
Problems with the engine
Problem Possible causes/consequences and
M Solutions
The engine does not
start. The HOLD function or DISTRONIC PLUS is activated.
X
Deactivate the HOLD function (Y page 193) or DISTRONIC
PLUS (Y page 183).
X Try to start the engine again. The engine does not
start. The starter motor
can be heard. R
There is a malfunction in the engine electronics.
R There is a malfunction in the fuel supply.
X Before attempting to start the engine again, turn the key in the
ignition back to position 0or press the Start/Stop button
repeatedly until all indicator lamps in the instrumen tcluster go
out.
X Try to start the engine again (Y page 154). Avoid excessively
long and frequent attempts to start the engine, as this will drain
the battery.
If the engine does not start after several attempts:
X Consult a qualified specialist workshop, e.g. a Mercedes-Benz
Service Centre. The engine does not
start
.The starter motor
can be heard. The
reserve fuel warning
lamp is lit and the fuel
gauge display shows 0. The fuel tank is empty.
X
Refuel the vehicle. The engine does not
start. You cannot hear
the starter motor. The on-board voltage is too low because the battery is too weak
or discharged.
X
Jump-start the vehicle (Y page 350).
If the engine does not start despite attempts to jump-start it:
X Consult a qualified specialist workshop, e.g. a Mercedes-Benz
Service Centre. The starter motor was exposed to a thermal load that was too high.
X Allow the starter motor to cool down for approximately two
minutes.
X Try to start the engine again.
If the engine still does not start:
X Consult a qualified specialist workshop, e.g. a Mercedes-Benz
Service Centre. Driving
159Driving and parking Z
Page 164 of 401
!
When shifting between 5thand 6thgear,
you should always push the gear lever all
the way to the right. Otherwise, you could
shift unintentionally into 3rdor4th gear
and damage the transmission.
If you shift down at too high a speed (trans-
mission braking), this can cause the engine
to overrev, leading to engine damage.
Do not use the clutch bite point to keep the
vehicle stationary on uphill gradients.
There is otherwise a risk of damaging the
clutch.
! On long and steep downhill gradients,
especially if the vehicle is ladenort owing
a trailer, you must shift into gear 1, 2or3
in good time. This uses the engine's braking
effect .This relieves the load on the brake
system and prevents the brakes from over-
heating and wearing too quickly. Shifting to neutral N
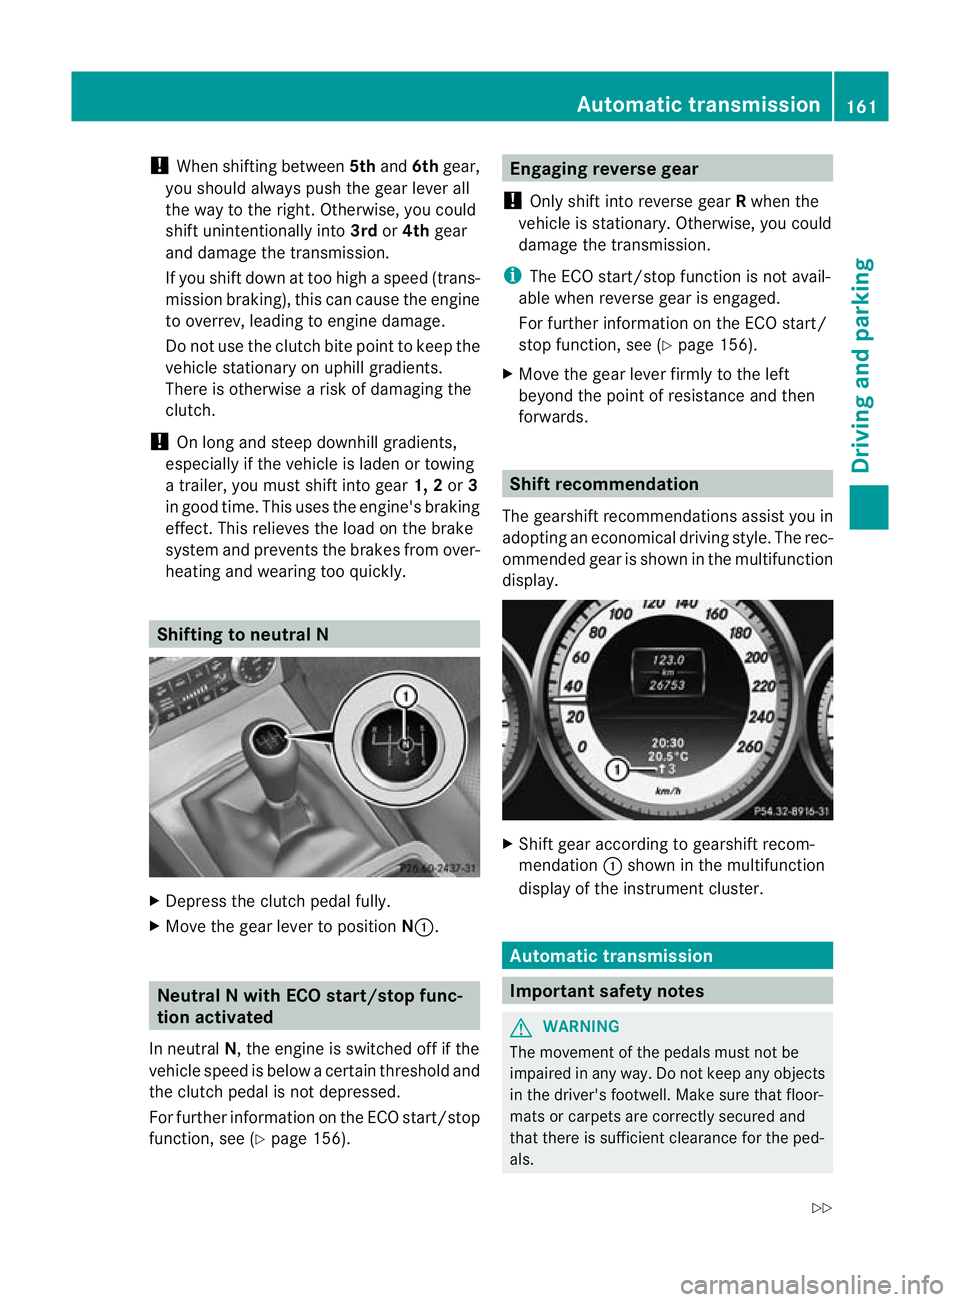
X
Depress the clutch pedal fully.
X Move the gear lever to position N:.Neutral N with ECO start/stop func-
tion activated
In neutral N, the engine is switched off if the
vehicle speed is below a certain threshold and
the clutch pedal is not depressed.
For further information on the ECO start/stop
function, see (Y page 156). Engaging reverse gear
! Only shift into reverse gear Rwhen the
vehicle is stationary. Otherwise, you could
damage the transmission.
i The ECO start/stop function is not avail-
able when reverse gear is engaged.
For further information on the ECO start/
stop function, see (Y page 156).
X Move the gear lever firmly to the left
beyond the point of resistance and then
forwards. Shift recommendation
The gearshift recommendations assist you in
adopting an economical driving style. The rec-
ommended gear is shown in the multifunction
display. X
Shift gear according to gearshift recom-
mendation :shown in the multifunction
display of the instrumentc luster. Automatic transmission
Important safety notes
G
WARNING
The movemen tofthe pedals must not be
impaired in any way.D o not keep any objects
in the driver's footwell. Make sure that floor-
mats or carpets are correctly secured and
that there is sufficient clearance for the ped-
als. Automatic transmission
161Driving and parking
Z
Page 166 of 401
A
Neutral
Do not shift the transmission to
N
while driving. Otherwise, the auto-
matic transmission could be dam-
aged.
Releasing the brakes will allow you
to move the vehicle freely, e.g .to
push it or tow it.
If ESP ®
is deactivated or faulty:
only shift the transmission to posi-
tion Nif the vehicle is in danger of
skidding, e.g. on icy roads.
! Rolling in neutral Ncan lead to
damage to the transmission. 7
Drive
The automatic transmission
changes gear automatically. All
forward gears are available.
Changing gear
The automatic transmission shifts to the indi-
vidual gears automatically when it is in trans-
mission position D.This automatic gearshift-
ing behaviouri s determined by:
R a shift range restriction, if selected
R the selected drive program (Y page 163)
R the position of the accelerator pedal
R the road speed Driving tips
Accelerator pedal position Your style of driving influences how the auto-
matic transmission shifts gear:
R little throttle: early upshifts
R more throttle: late upshifts
AMG vehicles When shifting down, the double-clutch func-
tion is active regardless of the currently selec-
ted drive program. The double-clutch function reduces load change reactions and is condu-
cive to a sporty driving style. The sound gen-
erated by the double-clutch function depends
on the drive program selected.
Kickdown
Use kickdown for maximum acceleration.
X
Depress the accelerator pedal beyond the
pressure point.
The transmission shifts to a lower gear
depending on the engine speed.
X Ease off the accelerator pedal once the
desired speed is reached.
The automatic transmission shifts back up.
Trailer towing X
Drive in the middle of the engine speed
range on uphill gradients.
X Shift down to shift range 3or
2(Y page 165) depending on the uphill or
downhill gradient, even if cruise control or
SPEEDTRONIC is activated. Program selector button
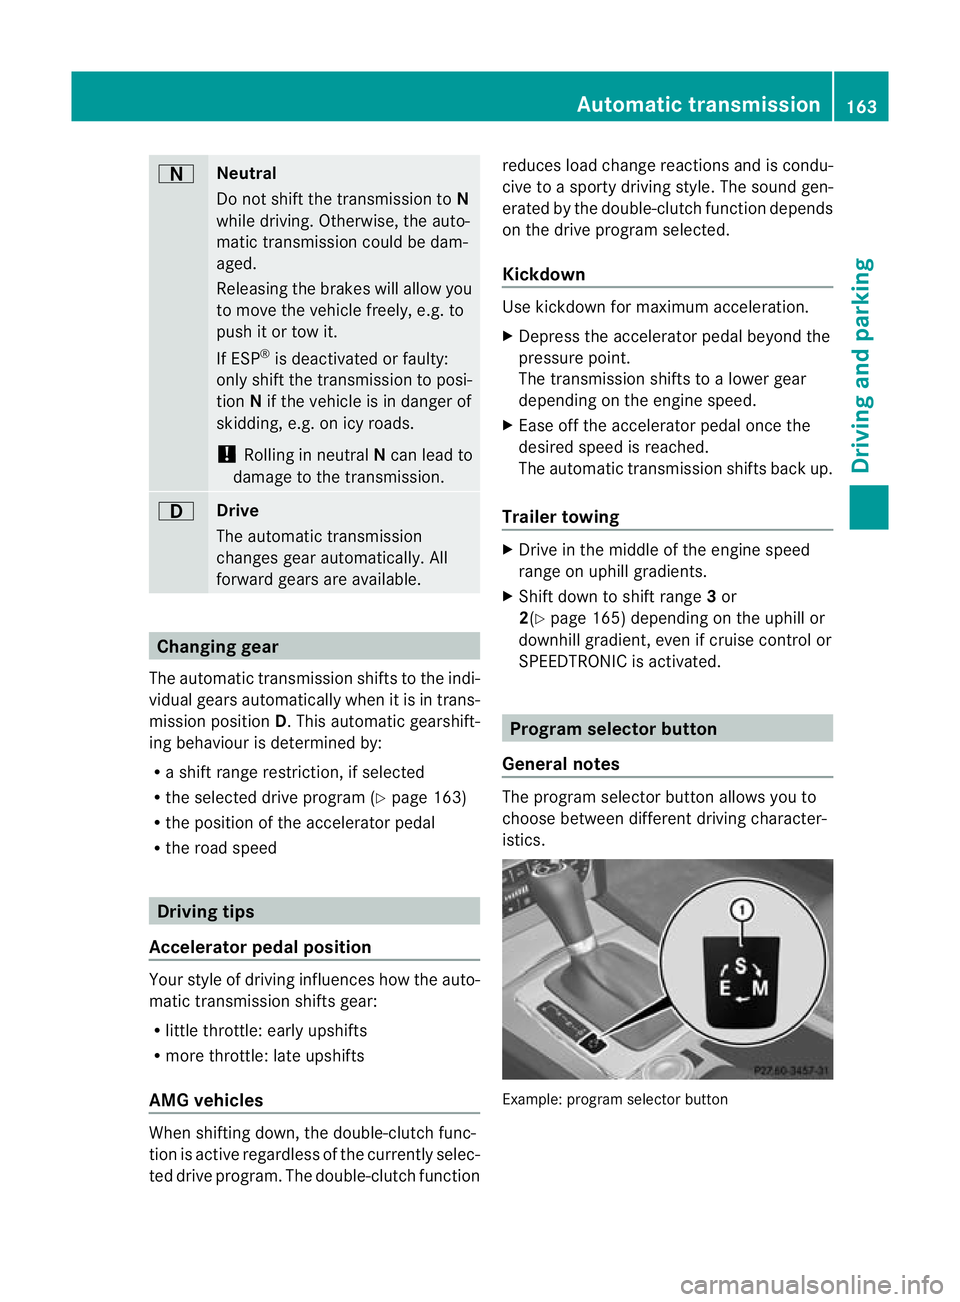
General notes The program selector button allows you to
choose between different driving character-
istics.
Example: program selector button Automatic transmission
163Driving and parking Z
Page 173 of 401
However, using this fuel results in consid-
erably higher petrol consumptio
nand sig-
nificantly reduced engine performance.
Avoid driving at full throttle.
If no fuel othe rthan regular petrol with
91 RON/82.5 MON or a lower grade is per-
manently available, you should have the
vehicle adapted to run on this fuel in a
qualified specialist workshop. Mercedes-
Benz recommends that you use a
Mercedes-Ben zService Centre for this pur-
pose.
C 350 BlueEFFICIENCY and C 350
4MATIC BlueEFFICIENCY !
Only refuel using unleaded, sulphur-free
premium-grade petrol with at least
95 RON/85 MON, which conforms to Euro-
pean standard EN 228 or an equivalent
specification.
You can otherwise impair engine output or
damage the emission control system.
i In some countries, the available petrol
may not be sufficiently low in sulphur. This
fuel can temporarily produce unpleasant
odours, especially on short journeys. As
soon as sulphur-free fuel (sulphur content
<10p pm) is used for refuelling, the odours
are reduced. Diesel (EN 590)
Fuel grade !
When refuelling, only use diesel fuel that
conform stothe European standard EN 590
or is of equivalent quality. You can other-
wise impair engine output or damage the
engine.
! Vehicles with diesel particle filters: in
countries outside the EU, only use low sul-
phur Euro diesel with a sulphurc ontent of
under 50 ppm. Otherwise, the emission
control system could be damaged. !
Vehicles without adiesel particle fil-
ter: in countries where only diesel fuels
with a higher sulphur conten tare available,
the vehicle's oil change intervals are
shorter. More information about intervals
for changing the oil can be obtained from
any Mercedes-Benz Service Centre.
! Only use fuel that complies with the EN
590 European standard .Fuel that does not
comply with EN 590 can lead to increased
wear, engine damage and damag eto the
exhaust system.
Do not use the following:
R marine diesel
R heating oil
R bio-diesel
R vegetable oil
R petrol
R paraffin
R kerosene
Do not mix these fuels with diesel fuels and
do not use any special additives. Other-
wise, this can lead to damage to the engine.
This excludes flow improver; see "Low out-
side temperatures".
! Use a filter when adding fuel from a fuel
can. Otherwise, the fuel lines and/or the
diesel injection system could be blocked by
particles from the fuel can.
For further information on "Fuel", see
(Y page 380).
Low outside temperatures Diesel fuel with improved cold flow qualities
is available during the winter months. In
Europe, various climate-dependent low-tem-
perature classes are defined in EN 590. Refu-
elling with diesel fuel which complies with the
climatic specifications of standard EN 590
can help to prevent operating problems. At
exceptionally low temperatures, it is possible
that the flow properties of the fuel may be
inadequate. This also applies to fuel that has 170
RefuellingDriving and parking
Page 174 of 401
not been adapted to suit the climatic condi-
tions, e.g .diesel fuel fro mwarmer regions.
i Further information about country-spe-
cific fuel properties can be obtained from
oil companies, e.g .atfilling stations.
Flow improver Flow improvers can be added to improve the
cold resistance of diesel fuel. The effective-
ness of a flow improver is not guaranteed with
every diesel fuel.
Correct dosage and thorough mixing are deci-
sive factors in ensuring improvement in low-
temperature resistance. Avoid excessive dos-
age. Excessive dosage may actually decrease
low-temperature resistance under certain cir-
cumstances. Follow the manufacturer's dos-
ing instructions.
Mix the additive with the diesel in good time,
before the flow properties of the diesel
become inadequate. Malfunctions can other-
wise only be rectified by heating the entire
fuel system, e.g. by parking the vehicle in a
heated garage.
Observe the information provided by the man-
ufacturer when using a flow improver. Only
use flow improvers that have been tested and
approved by Mercedes-Benz. You can obtain
further information from any Mercedes-Benz
Service Centre. Refuelling
Fuel filler flap The fuel filler flap is unlocked or locked auto-
matically when you open or close the vehicle
with the key or using KEYLESS-GO.
The position of the fuel filler cap is displayed
in the instrument cluster 8.The arrow
next to the filling pump indicates the side of
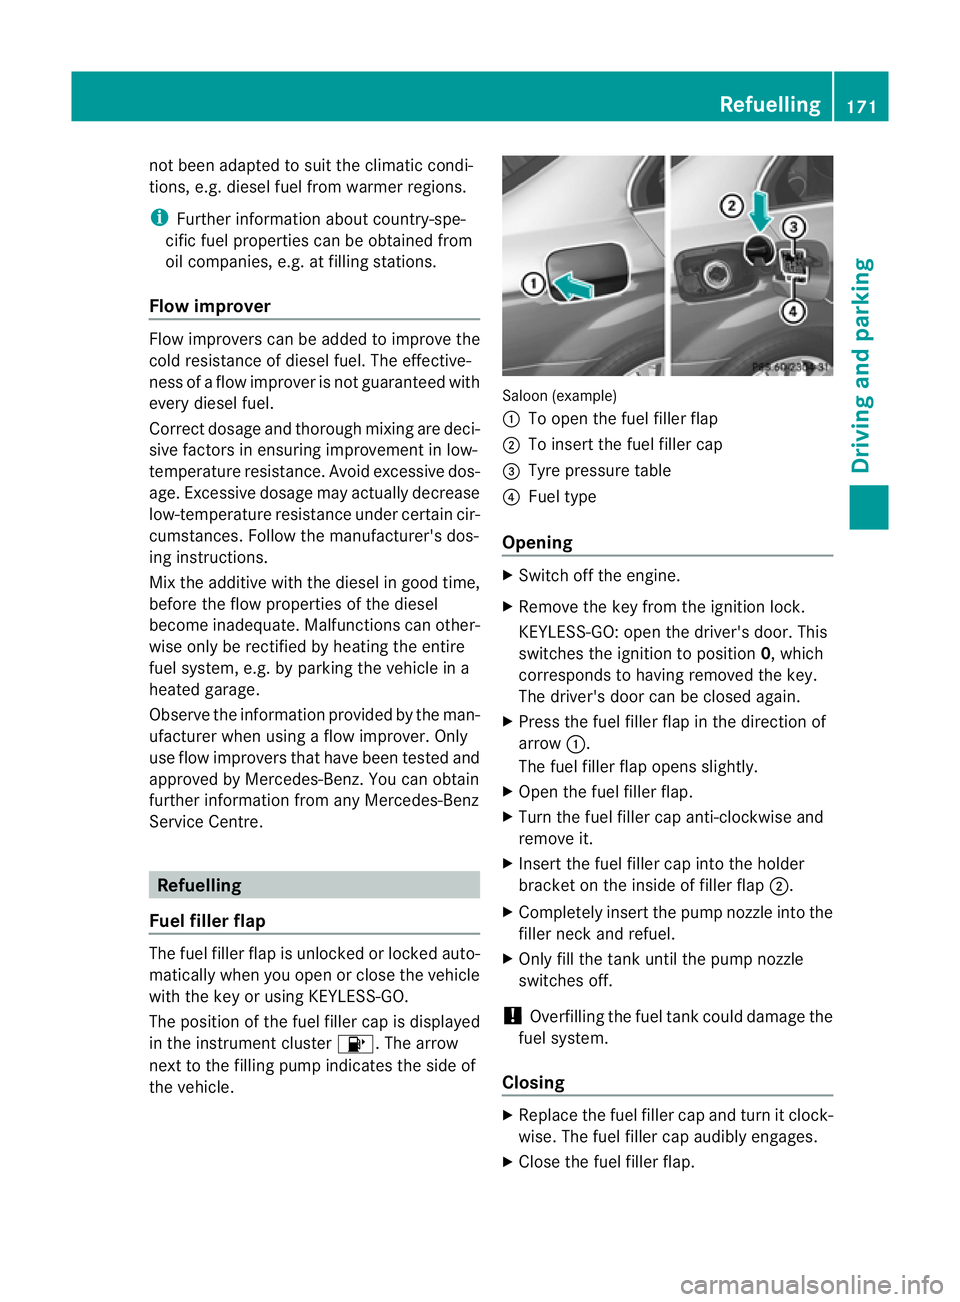
the vehicle. Saloon (example)
:
To open the fuel filler flap
; To insert the fuel filler cap
= Tyre pressure table
? Fuel type
Opening X
Switch off the engine.
X Remove the key from the ignition lock.
KEYLESS-GO: open the driver's door. This
switches the ignition to position 0, which
corresponds to having removed the key.
The driver's door can be closed again.
X Press the fuel filler flap in the direction of
arrow :.
The fuel filler flap opens slightly.
X Open the fuel filler flap.
X Turn the fuel filler cap anti-clockwise and
remove it.
X Insert the fuel filler cap into the holder
bracket on the inside of filler flap ;.
X Completely insert the pump nozzle into the
filler neck and refuel.
X Only fill the tank until the pump nozzle
switches off.
! Overfilling the fuel tank could damage the
fuel system.
Closing X
Replace the fuel filler cap and turn it clock-
wise. The fuel filler cap audibly engages.
X Close the fuel filler flap. Refuelling
171Driving and parking Z