2011 MERCEDES-BENZ C-CLASS ESTATE ESP
[x] Cancel search: ESPPage 82 of 401
If the driver and passengers have fastened
their seat belts, PRE-SAFE
®
Brake can also
can also perform the following at speeds of
above approximately 30 km/h:
R brake the vehicle automatically from a
speed of up to approximately 200 km/h
R trigger preventative passenger protection
measures (PRE-SAFE ®
) (Y page 51)
Due to the nature of the system, particularly
complicated driving conditions may cause
unnecessary warnings or the unnecessary
intervention of PRE-SAFE ®
Brake. To end this,
you can either depress the accelerator pedal
further, activate kickdown or release the
brake pedal.
The braking action of PRE-SAFE ®
Brake is
ended automatically if:
R you drive slower than approximately
15 km/h.
R you manoeuvre to avoid the obstacle.
R there is no longer any danger of a rear-end
collision.
R there is no longer an obstacle detected in
front of your vehicle.
With the help of the radars ensor system,
PRE-SAFE ®
Brake can detect obstacles that
are in front of your vehicle for an extended
period of time.
At speeds up to approximately 70 km/h,
PRE-SAFE ®
Brake may also detec tstationary
obstacles, for example stopped or parked
vehicles.
If you approach an obstacle and PRE-SAFE ®
Brake detects a risk of a collision, the system
will initially alert you both visually and acous-
tically. If you do not brake or take evasive
action, the syste mwill warn you by automat-
ically braking the vehicle gently. If there is an
increased risk of collision, preventative
passenger protection measures (PRE-SAFE ®
)
are activated (Y page 51). If the risk of colli-
sion remains and you do not brake, take eva-
sive action or accelerate significantly, the
vehicle may perform automatic emergency
braking. Automatic emergency braking is not performed until immediately prior to an acci-
dent that can no longer be avoided. G
WARNING
Even if PRE-SAFE ®
Brake slows the vehicle
before an imminent rear-end collision, the
system cannot avert a collision without the
intervention of the driver. There is a risk of an
accident. Brake according to the situation or
take evasive action. Delayed intervention by
the driver can lead to an accident. G
WARNING
PRE-SAFE ®
Brake cannot always clearly iden-
tify objects and complex traffic conditions.
In these cases, PRE-SAFE ®
Brake may:
R give an unnecessary warnin gand then
brake the vehicle
R not give a warning or intervene
There is a ris kofanaccident. Always pay par-
ticula rattention to the traffi csituation and be
ready to brake, especially if PRE-SAFE ®
Brake
warns you. Terminate the intervention in a
non-critical driving situation.
In particular, the detection of obstacles can
be impaired if there is:
R dirt on the sensors or anything else cover-
ing the sensors
R snow or heavy rain
R interference by other radar sources
R the possibility of strong radar reflections,
for example in multi-storey car parks
R a narrow vehicle travelling in front, e.g. a
motorbike
R a vehicle travelling in front on a different
line G
WARNING
PRE-SAFE ®
Brake does not react:
R to people or animals
R to oncoming vehicles
R to crossing traffic
R when cornering Driving safety systems
79Safety
Z
Page 89 of 401
The KEYLESS-GO function is changed as fol-
lows:
X
To unlock the driver's door: touch the
inner surface of the door handle on the
driver's door.
X To unlock centrally: touch the inner sur-
face of the door handle on the front-
passenger door or the rear door.
X To lock centrally: touch the outer sensor
surface on one of the door handles. Restoring the factory settings
X Press the %and& buttons simulta-
neously for approximately six seconds until
the battery check lamp flashes twice. Emergency key element
General notes If the vehicle can no longer be locked or
unlocked with the key, use the emergency
key element.
If you use the emergenc
ykey element to
unlock and open the driver's door or the boot
lid/tailgate, the anti-thef talarm system will
be triggered (Y page 80).
There are several ways to tur noff the alarm:
X To turn the alarm off with the key: press
the % or& button on the key.
or
X Insert the key into the ignition lock.
or
X To deactivate the alarm with KEYLESS-
GO: press the Start/Stop button in the igni-
tion lock. The key must be in the vehicle.
or
X Lock or unlock the vehicle using KEYLESS-
GO. The key must be outside the vehicle.
If you unlock the vehicle using the emergency
key element, the fuel filler flap will not be
unlocked automatically. X
To unlock the fuel filler flap: insert the
key in the ignition lock.
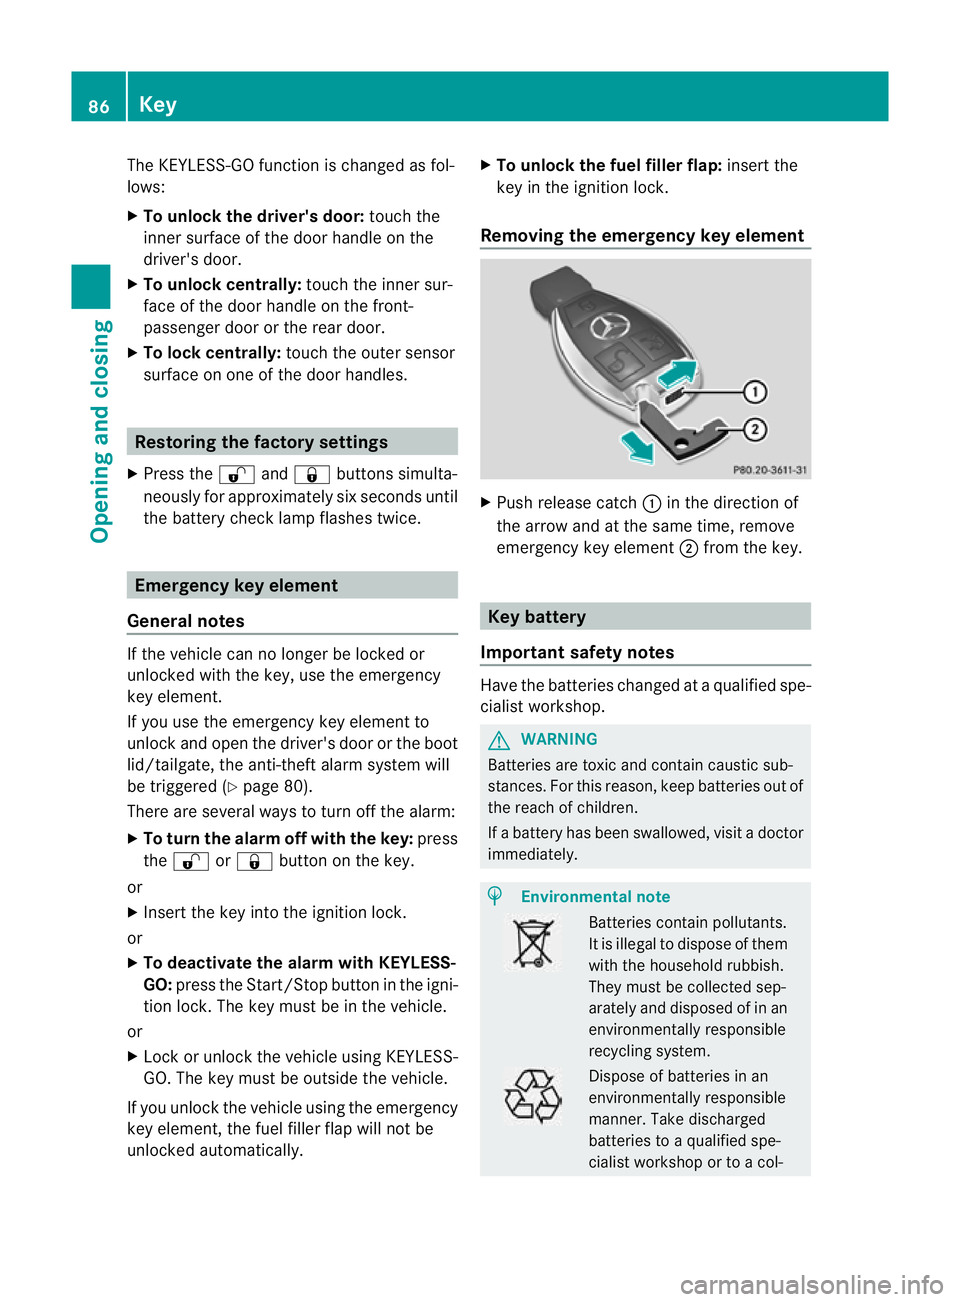
Removing the emergency key element X
Push release catch :in the direction of
the arrow and at the same time, remove
emergency key element ;from the key. Key battery
Important safety notes Have the batteries changed at a qualified spe-
cialist workshop. G
WARNING
Batteries are toxic and contain caustic sub-
stances. For this reason, keep batteries out of
the reach of children.
If a battery has been swallowed, visi tadoctor
immediately. H
Environmental note Batteries contain pollutants.
It is illegal to dispose of them
with the household rubbish.
They must be collected sep-
arately and disposed of in an
environmentally responsible
recycling system. Dispose of batteries in an
environmentally responsible
manner. Take discharged
batteries to a qualified spe-
cialist workshop or to a col-86
KeyOpening and closing
Page 100 of 401
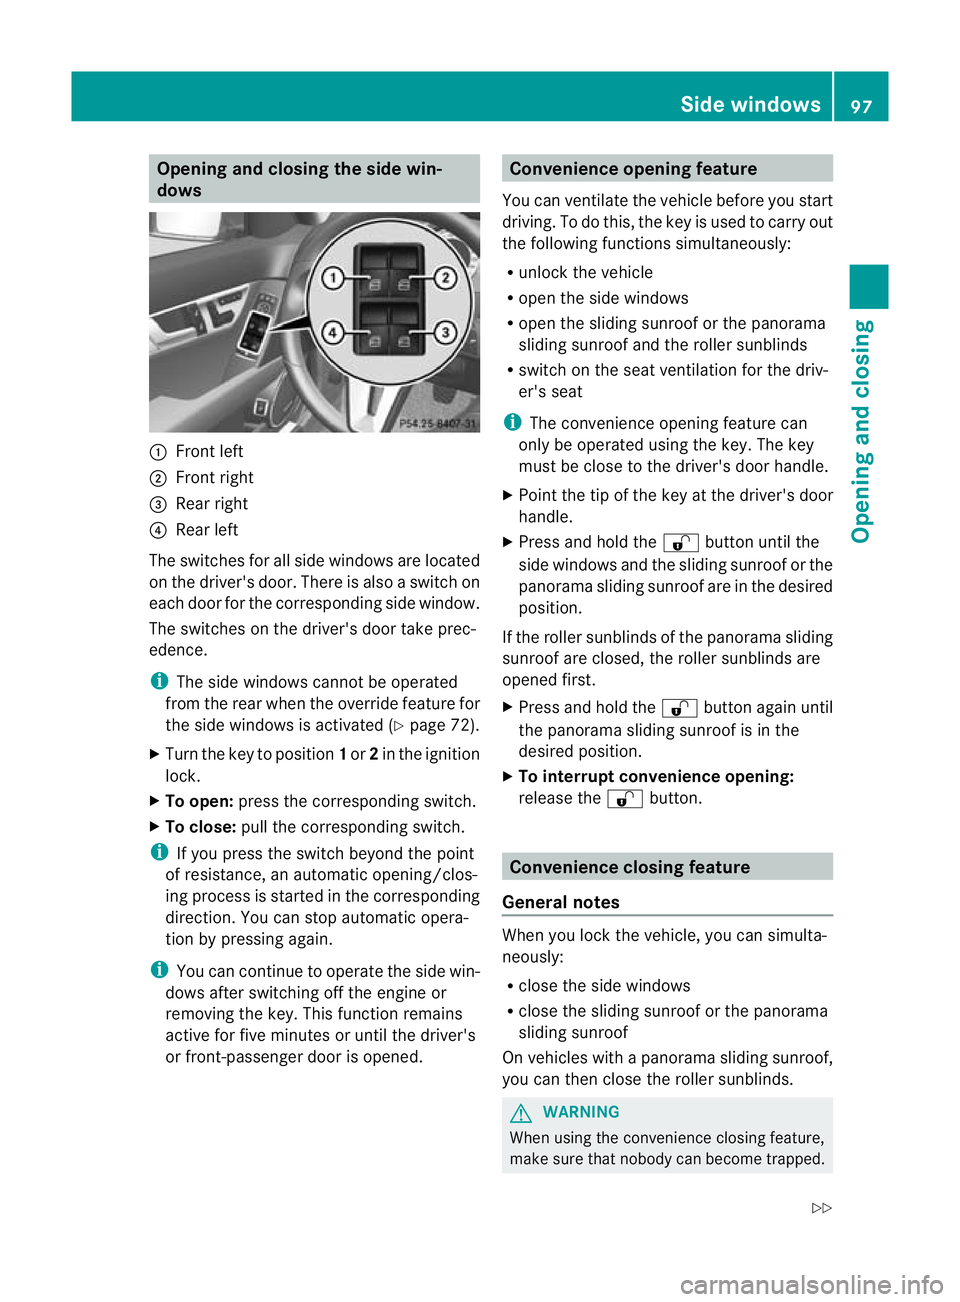
Opening and closing the side win-
dows :
Front left
; Front right
= Rear right
? Rear left
The switches for all side windows are located
on the driver's door. There is also a switch on
each door for the corresponding side window.
The switches on the driver's door take prec-
edence.
i The side windows cannot be operated
from the rear when the override feature for
the side windows is activated (Y page 72).
X Turn the key to position 1or 2in the ignition
lock.
X To open: press the corresponding switch.
X To close: pull the corresponding switch.
i If you press the switch beyond the point
of resistance, an automatic opening/clos-
ing process is started in the corresponding
direction. You can stop automatic opera-
tion by pressing again.
i You can continue to operate the side win-
dows after switching off the engine or
removing the key. This function remains
active for five minutes or until the driver's
or front-passenger door is opened. Convenience opening feature
You can ventilate the vehicle before you start
driving. To do this, the key is used to carry out
the following functions simultaneously:
R unlock the vehicle
R open the side windows
R open the sliding sunroof or the panorama
sliding sunroof and the roller sunblinds
R switch on the seat ventilation for the driv-
er's seat
i The convenience opening feature can
only be operated using the key. The key
must be close to the driver's door handle.
X Point the tip of the key at the driver's door
handle.
X Press and hold the %button until the
side windows and the sliding sunroof or the
panorama sliding sunroof are in the desired
position.
If the roller sunblinds of the panorama sliding
sunroof are closed, the roller sunblinds are
opened first.
X Press and hold the %button again until
the panorama sliding sunroof is in the
desired position.
X To interrupt convenience opening:
release the %button. Convenience closing feature
General notes When you lock the vehicle, you can simulta-
neously:
R
close the side windows
R close the sliding sunroof or the panorama
sliding sunroof
On vehicles with a panorama sliding sunroof,
you can then close the roller sunblinds. G
WARNING
When using the convenience closing feature,
make sure that nobody can become trapped. Side windows
97Opening and closing
Z
Page 101 of 401

Proceed as follows if there is a risk of entrap-
ment:
With the key:
R
release the &button.
R press and hold the %button until the
side windows and the sliding sunroof or the
panorama sliding sunroof open again.
With KEYLESS-GO:
R release the sensor surface on the door han-
dle.
R pull the door handle immediately and hold
it.
The side windows and the sliding sunroof
or the panorama sliding sunroof open.
Using the key i
The key must be close to the driver's door
handle.
X Point the tip of the key at the driver's door
handle.
X Press and hold the &button until the
side windows and the sliding sunroof or the
panorama sliding sunroof are fully closed.
X Make sure that all the side windows and the
sliding sunroof or panorama sliding sunroof
are closed.
On vehicles with a panorama sliding sunroof:
X Press and hold the &button again until
the roller sunblinds of the panorama sliding
sunroof close.
X To interrupt convenience closing:
release the &button.
Using KEYLESS-GO The KEYLESS-GO key must be outside the
vehicle. All the doors must be closed. X
Touch recessed sensor surface :on the
door handle until the side windows and the
sliding sunroof or the panorama sliding
sunroof are fully closed.
i Make sure you only touch recessed sen-
sor surface :.
X Make sure that all the side windows and the
sliding sunroof or panorama sliding sunroof
are closed.
On vehicles with a panorama sliding sunroof:
X Touch recessed sensor surface :on the
door handle again until the roller sunblinds
of the panorama sliding sunroof close.
X To interrupt convenience closing:
release recessed sensor surface :on the
door handle. Resetting the side windows
You must reset each side window if a side
window can no longer be closed fully.
X Close all the doors.
X Turn the key to position 1or 2in the ignition
lock.
X Pull the corresponding switch on the door
control panel until the side window is com-
pletely closed. (Y page 97).
X Hold the switch for an additional second. 98
Side windowsOpening and closing
Page 102 of 401
If the side window opens again slightly:
X Immediately pull the corresponding switch
on the door control panel until the side win-
dow is completely closed (Y page 97).
X Hold the switch for an additional second.
X If the corresponding side window remains
closed after the button has been released,
the side window has been reset correctly.
If this is not the case, repeatt he steps
above again. Problems with the side windows
Problem: aside window cannot be closed
because it is blocked by objects, e.g.
leaves in the window guide.
X Remove the objects.
X Close the side window.
Problem :aside window cannot be closed
and you cannot see the cause. G
WARNING
Closing the side windows with increased force
or without the anti-entrapment feature could
lead to serious or even fatal injury. Make sure
that nobody can become trapped when clos-
ing the side windows.
If a side window is obstructed during closing
and reopens again slightly:
X Immediately afte rthe window blocks, pull
the corresponding switch again until the
side window has closed.
The side window is closed with increased
force.
If a side window is obstructed again during
closing and reopens again slightly:
X Immediately after the window blocks, pull
the corresponding switch again until the
side window has closed.
The side window is closed without the anti-
entrapment feature. Sliding sunroof
Important safety notes
Your vehicle may be fitted with a sliding sun-
roof or a panorama sliding sunroof. In the fol-
lowing section, the term "sliding sunroof"
refers to both types of sliding sunroof. G
WARNING
Make sure that nobody can become trapped
when opening and closing the sliding sunroof.
If there is a risk of entrapment, release the
switch immediately. During automatic opera-
tion, push the switch briefly in any direction
to stop the sliding sunroof. G
WARNING
Children could injure themselves if they oper-
ate the sliding sunroof.
Never leave children unsupervised in the vehi-
cle. Always take the key with you when leaving
the vehicle, even if you are only leaving it for
a short time. G
WARNING
The glass in the panorama sunroof could
break in an accident. If you are not wearing a
seat belt, there is a risk that you could be
thrown through the opening in the event of the
vehicle overturning. Therefore, always wear a
seat belt to reduce the risk of injuries.
! Only open the panorama sliding sunroof
if it is free of snow and ice. Otherwise, mal-
functions may occur.
Do not allow anything to protrude from the
sliding sunroof. Otherwise, the seals could
be damaged.
i Resonance noises can occur in addition
to the usual airflow noises when the sliding
sunroof is open. They are caused by minor
pressure fluctuations in the vehicle interior.
Change the position of the sliding sunroof
or open a side window slightly to reduce or
eliminate these noises. Sliding sunroof
99Opening and closing Z
Page 115 of 401
Position of the steering wheel when the
EASY-ENTRY/EXIT featurei
s activeThe steering wheel tilts upwards if you:
R
remove the key from the ignition lock
R open the driver's door and KEYLESS-GO is
in position 1
R open the driver's door and the key is in
position 0or 1in the ignition lock
i The steering wheel only moves upwards if
it has not already reached the upper end
stop.
If you insert the key into the ignition lock with
the driver's door closed, the steering wheel is
automatically moved to the previously set
position.
Position of the steering wheel for driv-
ing The steering wheel is moved to the previously
set position if:
R
the driver's door is closed
R you insert the key into the ignition lock
or
R you press the Start/Stop button once on
vehicles with KEYLESS-GO.
If you close the driver's door with the key
inserted into the ignition lock, the steering
wheel is automatically moved to the previ-
ously set position.
The last position of the steering wheel is
stored after each manual setting or when you
store the setting with the memory function
(Y page 115).
Crash-responsive EASY-EXIT feature If the crash-responsive EASY-EXIT feature is
triggered in an accident, the steering column
will move upwards when the driver's door is
opened. This occurs irrespective of the posi-
tion of the key in the ignition lock. This makes
it easier to exit the vehicle and rescue the
occupants. The crash-responsive EASY-EXIT feature is
only operational if the EASY-EXIT/ENTRY fea-
ture is activated in the on-board computer. Mirrors
Rear-view mirror
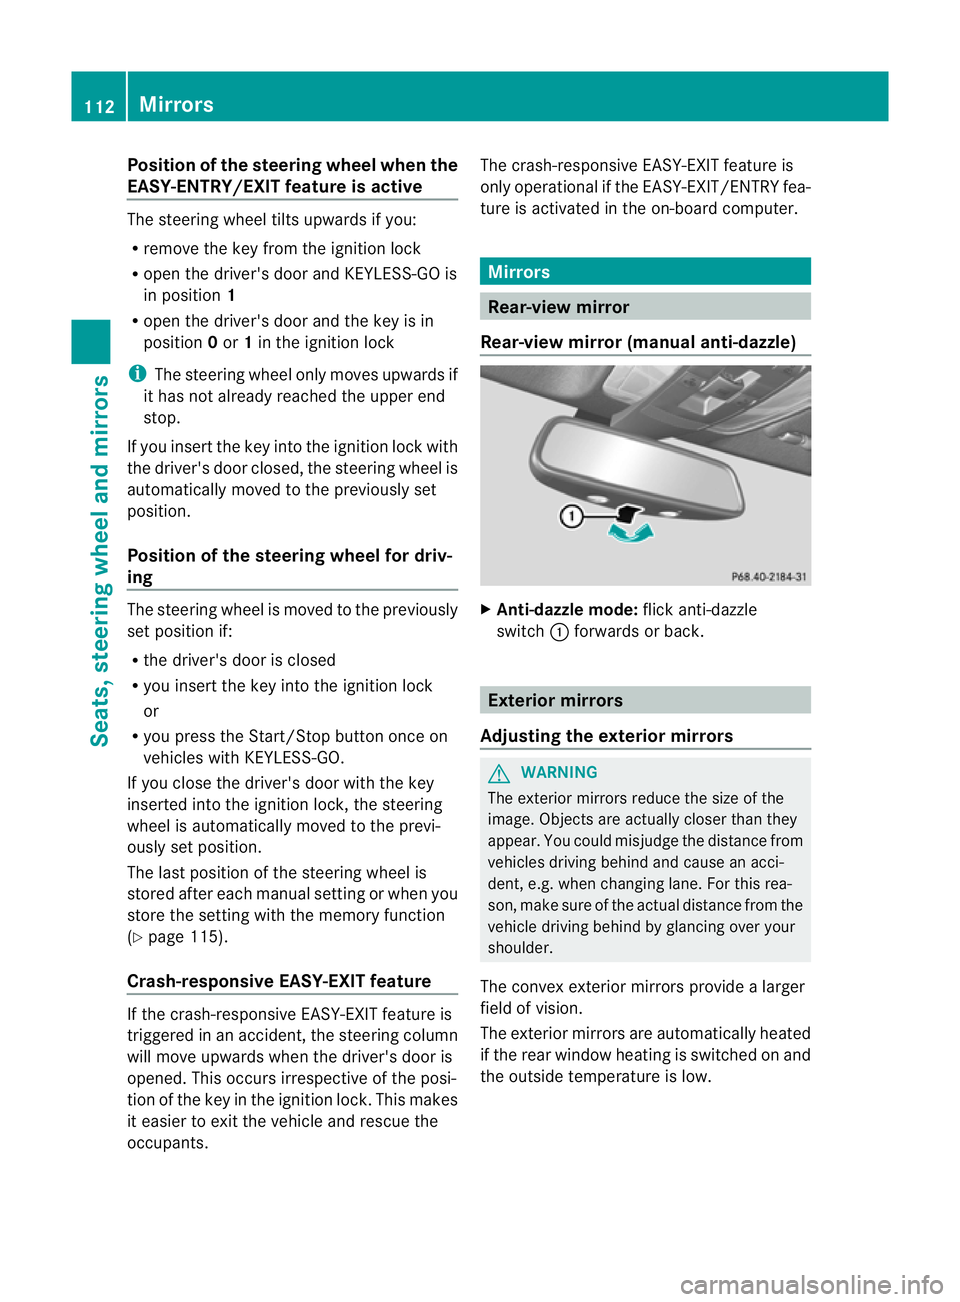
Rear-view mirror (manual anti-dazzle) X
Anti-dazzle mode: flick anti-dazzle
switch :forwards or back. Exterior mirrors
Adjusting the exterior mirrors G
WARNING
The exterior mirrors reduce the size of the
image. Objects are actually closer than they
appear. You could misjudge the distance from
vehicles driving behind and cause an acci-
dent, e.g. when changin glane. For this rea-
son, make sure of the actual distance from the
vehicle driving behind by glancing ove ryour
shoulder.
The convex exterior mirrors provide a larger
field of vision.
The exterior mirrors are automatically heated
if the rear window heating is switched on and
the outside temperature is low. 112
MirrorsSeats, steering wheel and mirrors
Page 116 of 401
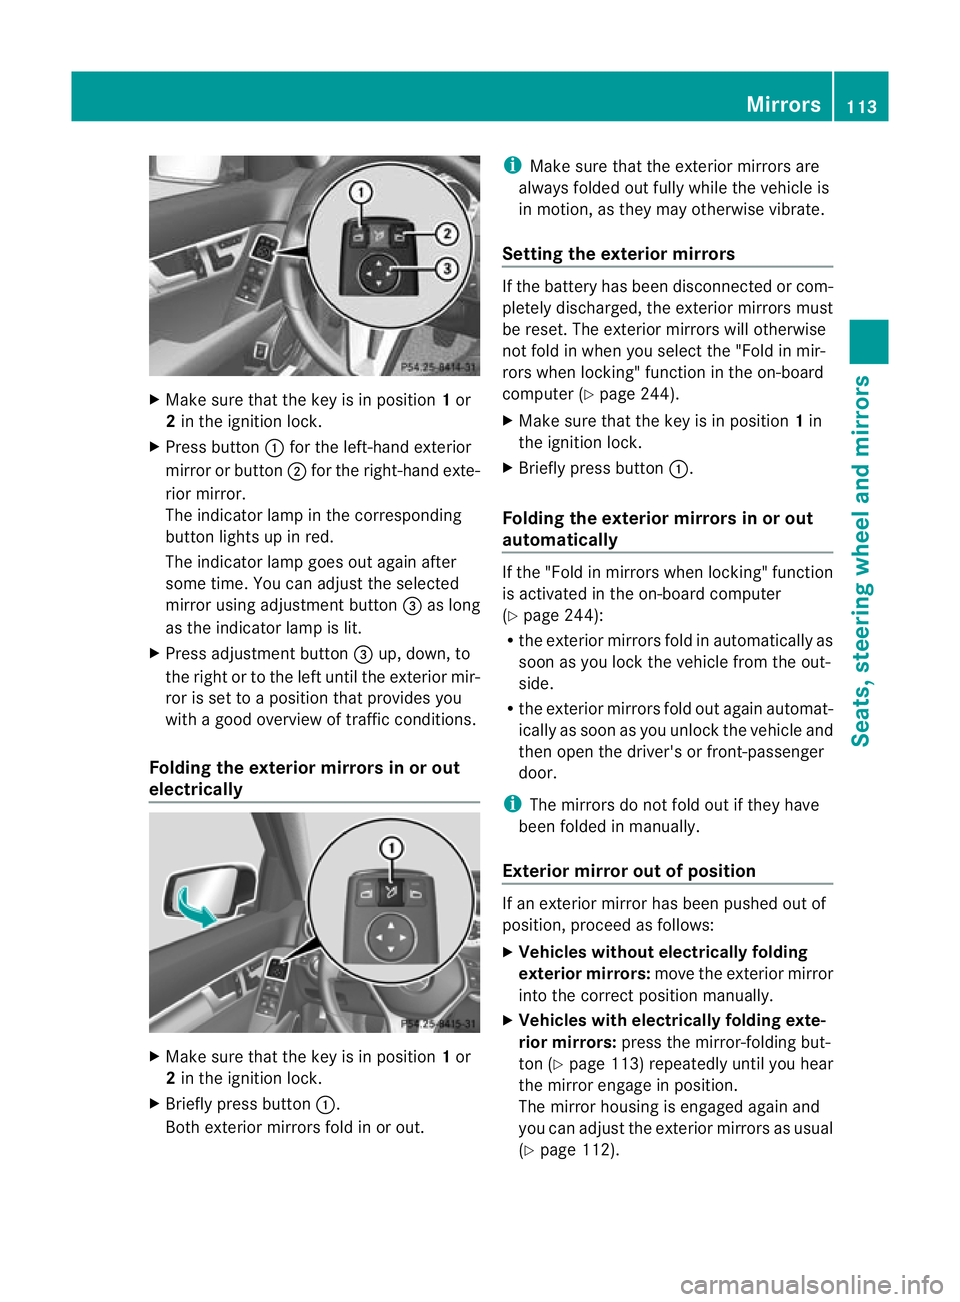
X
Make sure that the key is in position 1or
2 in the ignition lock.
X Press button :for the left-hand exterior
mirror or button ;for the right-hand exte-
rior mirror.
The indicator lamp in the corresponding
button lights up in red.
The indicator lamp goes out again after
some time. You can adjust the selected
mirror using adjustment button =as long
as the indicator lamp is lit.
X Press adjustment button =up, down, to
the right or to the left until the exterior mir-
ror is set to a position that provides you
with a good overview of traffic conditions.
Folding the exterior mirrors in or out
electrically X
Make sure that the key is in position 1or
2 in the ignition lock.
X Briefly press button :.
Both exterior mirrors fold in or out. i
Make sure that the exterior mirrors are
always folded out fully while the vehicle is
in motion, as they may otherwise vibrate.
Setting the exterior mirrors If the battery has been disconnected or com-
pletely discharged, the exterior mirrors must
be reset. The exterior mirrors will otherwise
not fold in when you select the "Fold in mir-
rors when locking" function in the on-board
computer (Y
page 244).
X Make sure that the key is in position 1in
the ignition lock.
X Briefly press button :.
Folding the exterior mirrors in or out
automatically If the "Fold in mirrors when locking" function
is activated in the on-board computer
(Y
page 244):
R the exterior mirrors fold in automatically as
soon as you lock the vehicle from the out-
side.
R the exterior mirrors fold out again automat-
ically as soon as you unlock the vehicle and
then open the driver's or front-passenger
door.
i The mirrors do not fold out if they have
been folded in manually.
Exterior mirror out of position If an exterior mirror has been pushed out of
position, proceed as follows:
X
Vehicles without electrically folding
exterior mirrors: move the exterior mirror
into the correct position manually.
X Vehicles with electrically folding exte-
rior mirrors: press the mirror-folding but-
ton (Y page 113) repeatedly until you hear
the mirror engage in position.
The mirror housing is engaged again and
you can adjust the exterior mirrors as usual
(Y page 112). Mirrors
113Seats, steering wheel and mirrors Z
Page 117 of 401
Automatic anti-dazzle mirrors
G
WARNING
If inciden tlight fro mheadlamps is prevented
from striking the sensor in the rear-view mir-
ror, for instance, by luggage piled too high in
the vehicle, the mirror's automatic anti-dazzle
function will not operate.
Incident light could then blind you. This may
distract you from the traffic conditions and,
as a result, you may cause an accident.
The rear-view mirror and the exterior mirror
on the driver's side automatically go into anti-
dazzle mode if the ignition is switched on and
inciden tlight fro mheadlamps strikes the sen-
sor in the rear-view mirror.
The mirrors do not go into anti-dazzle mode if
reverse gear is engaged or the interior lighting
is switched on. Parking position for the exterior mir-
ror on the front-passenger side
Setting and storing the parking position You can position the front-passenger side
exterior mirror in such a way that you can see
the rear wheel on that side as soon as you
engage reverse gear. You can store this posi-
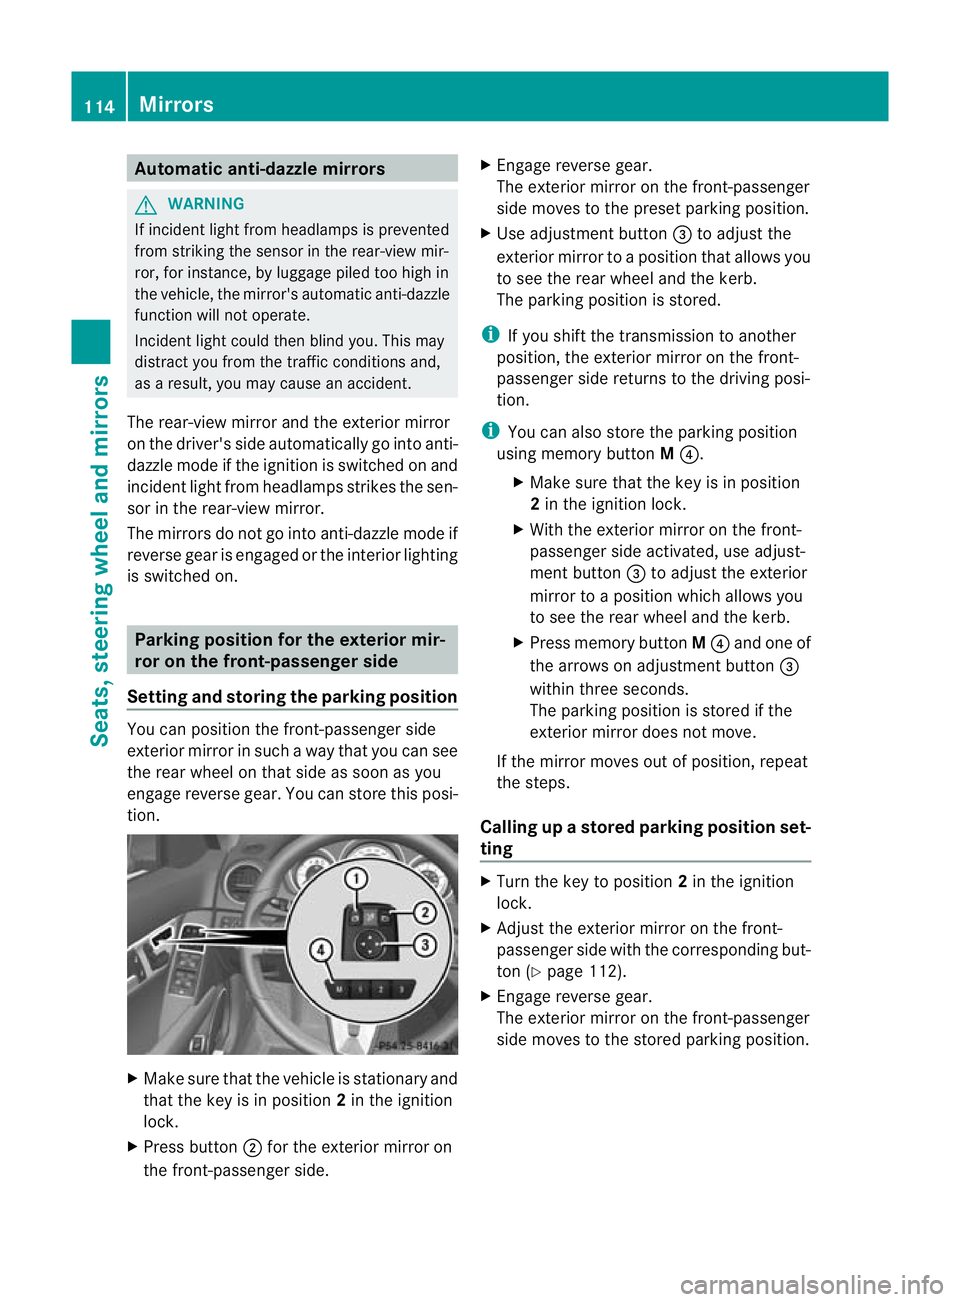
tion. X
Make sure that the vehicle is stationary and
that the key is in position 2in the ignition
lock.
X Press button ;for the exterior mirror on
the front-passenger side. X
Engage reverse gear.
The exterior mirror on the front-passenger
side moves to the preset parking position.
X Use adjustment button =to adjust the
exterior mirror to a position that allows you
to see the rear wheel and the kerb.
The parking position is stored.
i If you shift the transmission to another
position, the exterior mirror on the front-
passenger side returns to the driving posi-
tion.
i You can also store the parking position
using memory button M?.
X Make sure that the key is in position
2in the ignition lock.
X With the exterior mirror on the front-
passenger side activated, use adjust-
ment button =to adjust the exterior
mirror to a position which allows you
to see the rear wheel and the kerb.
X Press memory button M? and one of
the arrows on adjustment button =
within three seconds.
The parking position is stored if the
exterior mirror does not move.
If the mirror moves out of position, repeat
the steps.
Calling up astore dparking position set-
ting X
Tur nthe key to position 2in the ignition
lock.
X Adjust the exterior mirror on the front-
passenger side with the corresponding but-
ton (Y page 112).
X Engage reverse gear.
The exterior mirror on the front-passenger
side moves to the stored parking position. 114
MirrorsSeats, steering wheel and mirrors