2011 MERCEDES-BENZ C-CLASS ESTATE ESP
[x] Cancel search: ESPPage 122 of 401
If you hear a warning tone when you leave the
vehicle, the lights may still be switched on.
X Turn the lights witch toÃ.
Dipped-beam headlamps X
To switch on the dipped-beam head-
lamps: turn the key in the ignition lock to
position 2or start the engine.
X Turn the light switch to L.
The L indicator lamp in the instrument
cluster lights up.
Daytime driving lights You can activate or deactivate the daytime
driving lights function using the on-board
computer (Y page 239).
X To activate the daytime driving lights:
you can activate the daytime driving lights
function using the on-board computer
(vehicles with a 12-butto nmultifunction
steering wheel).
X Turn the light switch to Ã.
When the engine is on :depending on the
ambient light conditions, the daytime driv-
ing lights or the parking and dipped-beam
headlamps are switched on.
When the dipped-beam headlamps are
switched on, the Lindicator lamp in the
instrument cluster lights up.
Automatic headlamp mode X
To switch on automatic headlamp
mode: turn the light switch to Ã.
Key in position 1in the ignition lock: the
side lamps are switched on or off automat-
ically depending on the brightness of the
ambient light.
With the engine running: depending on the
brightness of the ambient light, the daytime
driving lights 9
or the dipped-beam head-
lamps are switched on or off automatically. When the dipped-beam headlamps are
switched on, the
Lindicator lamp in the
instrument cluster lights up. G
WARNING
If the light switch is set to Ã, the dipped-
beam headlamps will not come on automati-
cally if it is foggy. This could endanger you and
others. Therefore, turn the light switch to
L in fog.
The automatic headlamp feature is only an
aid. The driver is responsible for the vehicle's
lighting at all times.
Foglamps Only vehicles with fron
tfoglamps have the
"Foglamps" function. G
WARNING
If you suspect that driving conditions will be
foggy, turn the light switch to Lbefore you
start your journey. Otherwise, your vehicle
may not be visible and you could endanger
yourself and others.
X To switch on the foglamps: turn the key
in the ignition lock to position 2or start the
engine.
X Turn the light switch to T,Lor
Ã.
X Press the Nbutton.
The green Nindicator lamp in the instru-
ment cluster lights up.
X To switch off the front foglamps: press
the N button.
The green Nindicator lamp in the instru-
ment cluster goes out.
Rear foglamp X
To switch on the rear foglamp: turn the
key in the ignition lock to position 2or start
the engine.
X Turn the light switch to LorÃ.
9 Only if daytime driving lights have been activated via the on-board computer. Exterior lighting
119Lights and windscreen wipers Z
Page 123 of 401
X
Press the Rbutton.
The yellow Rindicator lamp in the
instrument cluster lights up.
X To switch off the rear foglamp: press the
R button.
The yellow Rindicator lamp in the
instrument cluster goes out.
Vehicles with frontf oglamps: when the light
switch is in the Tposition, the rear fog-
lamp can only be switched on if the foglamps
(without dipped-beam headlamps) are
switched on.
Adjusting the headlam prange (halogen
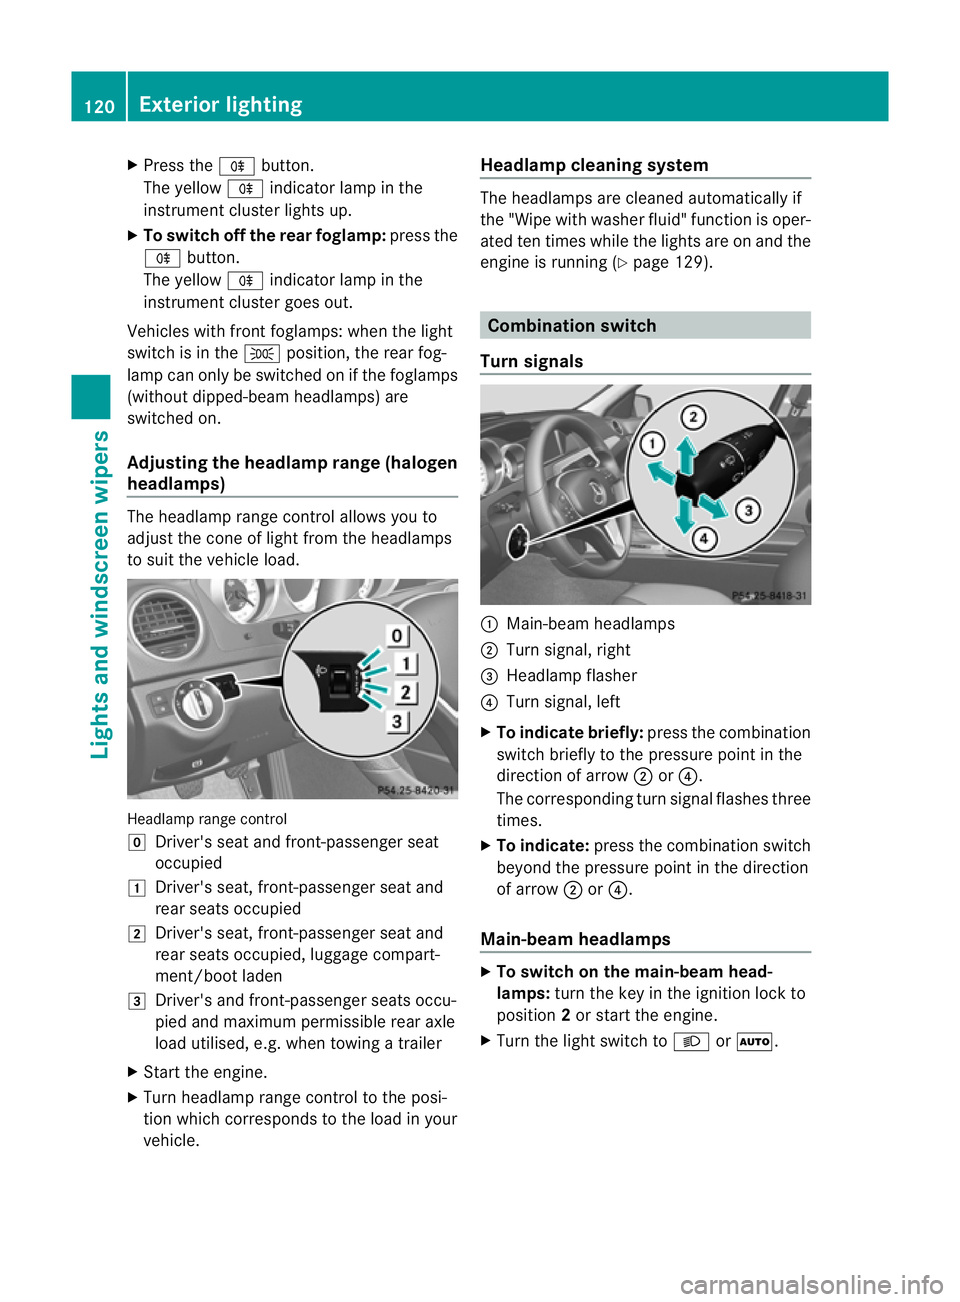
headlamps) The headlamp range control allows you to
adjust the cone of light from the headlamps
to sui tthe vehicle load. Headlamp range control
g
Driver's seat and front-passenger seat
occupied
1 Driver's seat, front-passenger seat and
rear seats occupied
2 Driver's seat, front-passenger seat and
rear seats occupied, luggage compart-
ment/boot laden
3 Driver's and front-passenger seats occu-
pied and maximum permissible rear axle
load utilised, e.g. when towing a trailer
X Start the engine.
X Turn headlamp range control to the posi-
tion which corresponds to the load in your
vehicle. Headlampc
leaning system The headlamps are cleaned automatically if
the "Wipe with washer fluid" function is oper-
ated ten times while the lights are on and the
engine is running (Y
page 129). Combination switch
Turn signals :
Main-beam headlamps
; Turn signal, right
= Headlamp flasher
? Turn signal, left
X To indicate briefly: press the combination
switch briefly to the pressure point in the
direction of arrow ;or?.
The corresponding turn signal flashes three
times.
X To indicate: press the combination switch
beyond the pressure point in the direction
of arrow ;or?.
Main-beam headlamps X
To switch on the main-beam head-
lamps: turn the key in the ignition lock to
position 2or start the engine.
X Turn the light switch to LorÃ. 120
Exterior lightingLights and windscreen wipers
Page 126 of 401
X
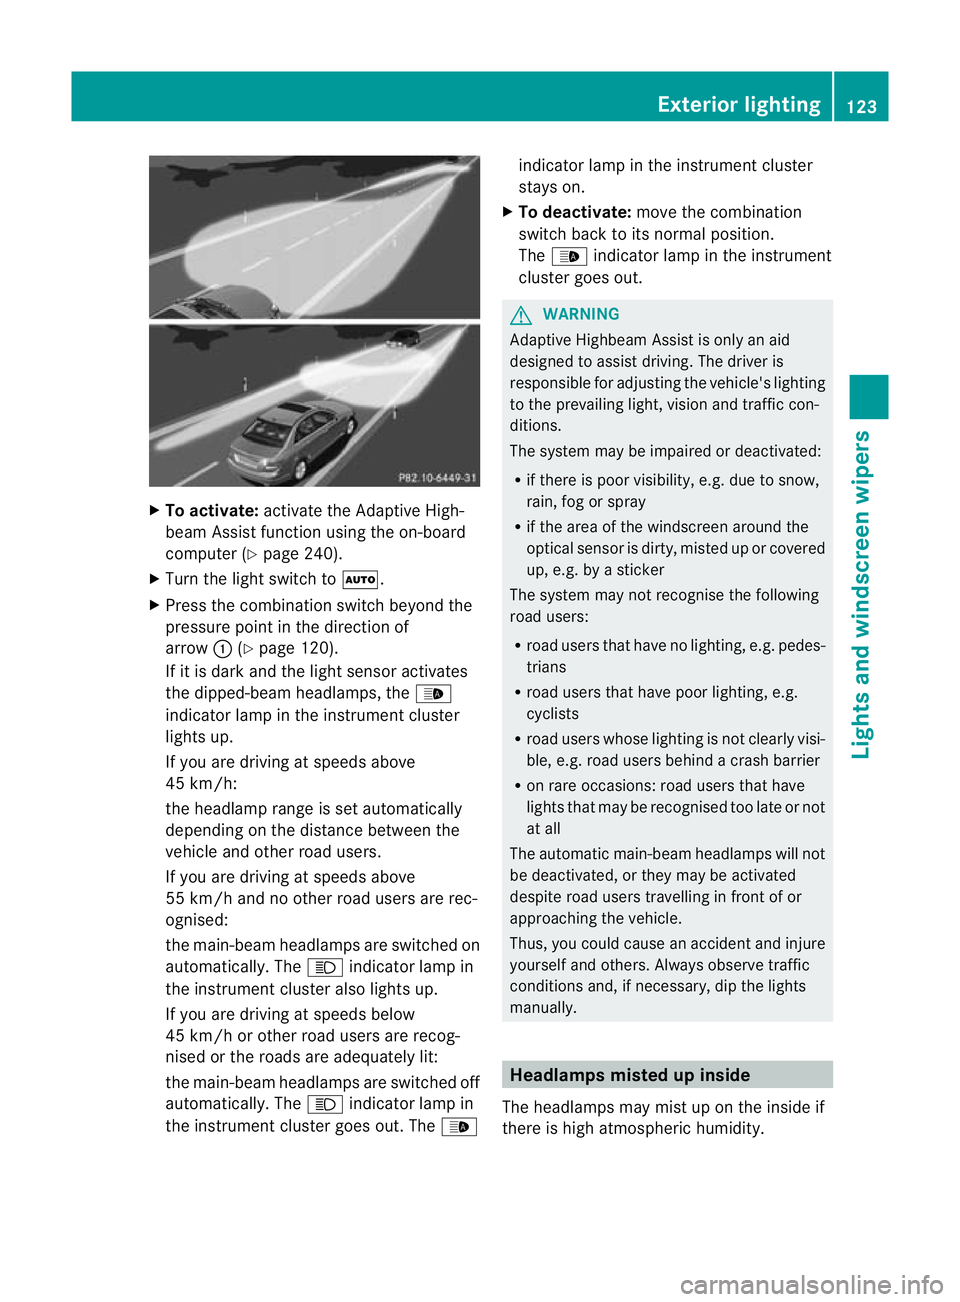
To activate: activate the Adaptive High-
beam Assist functio nusing the on-board
computer (Y page 240).
X Turn the light switch to Ã.
X Press the combination switch beyond the
pressure point in the direction of
arrow :(Ypage 120).
If it is dark and the light sensor activates
the dipped-beam headlamps, the _
indicator lamp in the instrument cluster
lights up.
If you are driving at speeds above
45 km/h:
the headlamp range is set automatically
depending on the distance between the
vehicle and other road users.
If you are driving at speeds above
55 km/h and no other road users are rec-
ognised:
the main-beam headlamps are switched on
automatically. The Kindicator lamp in
the instrument cluster also lights up.
If you are driving at speeds below
45 km/h or other road users are recog-
nised or the roads are adequately lit:
the main-beam headlamps are switched off
automatically. The Kindicator lamp in
the instrument cluster goes out. The _indicator lamp in the instrument cluster
stays on.
X To deactivate: move the combination
switch back to its normal position.
The _ indicator lamp in the instrument
cluster goes out. G
WARNING
Adaptive Highbeam Assist is only an aid
designed to assist driving. The driver is
responsible for adjusting the vehicle's lighting
to the prevailing light, vision and traffic con-
ditions.
The system may be impaired or deactivated:
R if there is poor visibility, e.g. due to snow,
rain, fog or spray
R if the area of the windscreen around the
optical sensor is dirty, misted up or covered
up, e.g. by a sticker
The system may not recognise the following
road users:
R road users that have no lighting, e.g. pedes-
trians
R road users that have poor lighting, e.g.
cyclists
R road users whose lighting is not clearly visi-
ble, e.g. road users behind a crash barrier
R on rare occasions: road users that have
lights that may be recognised too late or not
at all
The automatic main-beam headlamps will not
be deactivated, or they may be activated
despite road users travelling in front of or
approaching the vehicle.
Thus, you could cause an accident and injure
yourselfa nd others. Alway sobserve traffic
conditions and, if necessary, dip the lights
manually. Headlamps misted up inside
The headlamps may mist up on the inside if
there is high atmospheric humidity. Exterior lighting
123Lights and windscreen wipers Z
Page 128 of 401
Manual interior lighting control
X
To switch the front interior lighting on/
off: press the cbutton.
X To switch the rear interior lighting on/
off: press the ubutton.
X To switch the reading lamps on/off:
press the pbutton. Crash-responsive emergency lighting
The interior lighting is activated automatically
if the vehicle is involved in an accident.
X To switch off the crash-responsive
emergency lighting: press the hazard
warning lamp button.
or
X Lock and then unlock the vehicle using the
key. Changing bulbs
Important safety notes
Xenon bulbs If yourv
ehicle is equipped with xenon bulbs,
you can recognise this by the following: the
cone of light from the xenon bulbs moves
from the top to the bottom and back again
when you start the engine. For this to be
observed, the lights must be switched on
before starting the engine. G
DANGER
Xenon bulbs carry a high voltage. You could
get an electric shock and be seriously or even
fatally injured if you touch the electric con-
tacts on xenon bulbs. Therefore, never
remove the cover from xenon bulbs.
Do not change xenon bulbs yourself, but have
them replaced at a qualified specialist work-
shop which has the necessary specialist
knowledge and tools to carry out the work
required. Mercedes-Benz recommends that you use a
Mercedes-Benz Service Centre for this pur-
pose. In particular, work relevant to safety or
on safety-related systems must be carried out
at a qualified specialist workshop.
Bulbs and lamps are an important aspect of
vehicle safety. You must therefore make sure
that these function correctly at all times.
Have the headlamp setting checked regularly.
Other bulbs There are bulbs other than the xenon bulbs
that you cannot replace. Replace only the
bulbs listed (Y
page 126). Have the bulbs that
you cannot replace yourself changed at a
qualified specialist workshop.
Mercedes-Benzr ecommends that you use a
Mercedes-Benz Service Centre for this pur-
pose. In particular, work relevant to safety or
on safety-related systems must be carried out
at a qualified specialist workshop.
If you require assistance changing bulbs, con-
sult a qualified specialist workshop.
Do not touch the glass tube of new bulbs with
your bare hands. Even minor contamination
can burn into the glass surface and reduce
the service life of the bulbs. Always use a lint-
free cloth or only touch the base of the bulb
when fitting.
Only use bulbs of the correct type.
If the new bulb still does not light up, consult
a qualified specialist workshop.
Bulbs and lamps are an important aspect of
vehicle safety. You must therefore make sure
that these function correctly at all times.
Have the headlamp setting checked regularly. G
WARNING
Bulbs and lights can become very hot. For this
reason, allow them to cool down before
changing them. Otherwise, you could burn
yourself when you touch them.
Keep bulbs out of the reach of children .Oth-
erwise, they could damage them, for example,
and injure themselves. Changing bulbs
125Lights andwindscreen wipers
Z
Page 129 of 401
Never use a bulb which has been dropped.
Such a bulb may explode and injure you.
Halogenb ulbs are pressurised and could
explode when you change them, especially if
they are very hot .You should therefore wear
eye protection and gloves when you are
changing them. Overview of bulb replacement
–bulbs
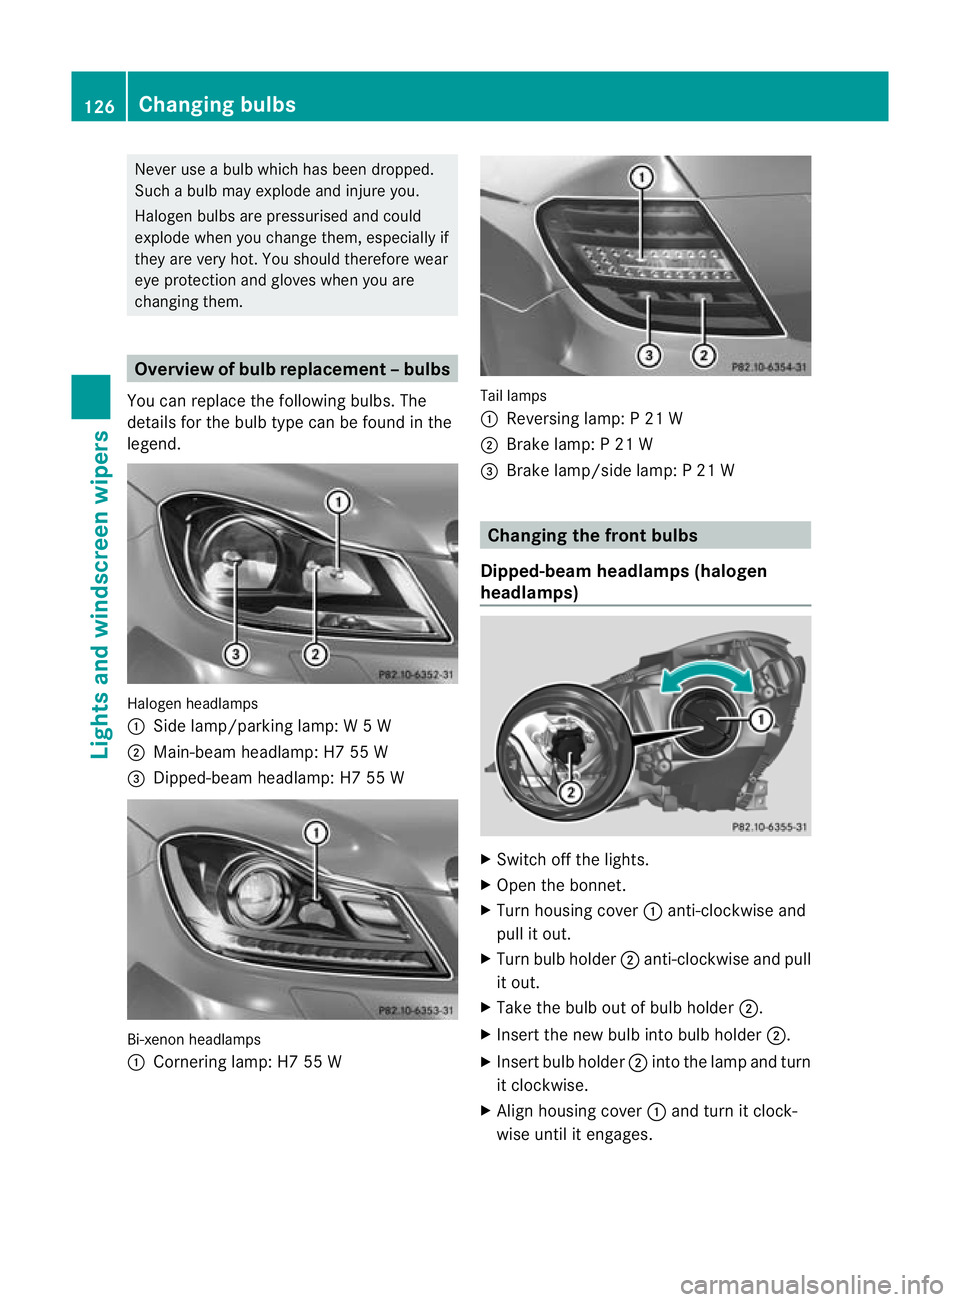
You can replace the following bulbs. The
details for the bulb type can be found in the
legend. Halogen headlamps
:
Side lamp/parking lamp: W5W
; Main-beam headlamp: H7 55 W
= Dipped-beam headlamp: H7 55 W Bi-xenon headlamps
:
Cornering lamp: H7 55 W Tail lamps
:
Reversing lamp: P 21 W
; Brake lamp: P 21 W
= Brake lamp/side lamp: P 21 W Changing the front bulbs
Dipped-beam headlamps (halogen
headlamps) X
Switch off the lights.
X Open the bonnet.
X Turn housing cover :anti-clockwise and
pull it out.
X Turn bulb holder ;anti-clockwise and pull
it out.
X Take the bulb out of bulb holder ;.
X Insert the new bulb into bulb holder ;.
X Insert bulb holder ;into the lamp and turn
it clockwise.
X Align housing cover :and turn it clock-
wise until it engages. 126
Changing bulbsLights and windscreen wipers
Page 132 of 401
X
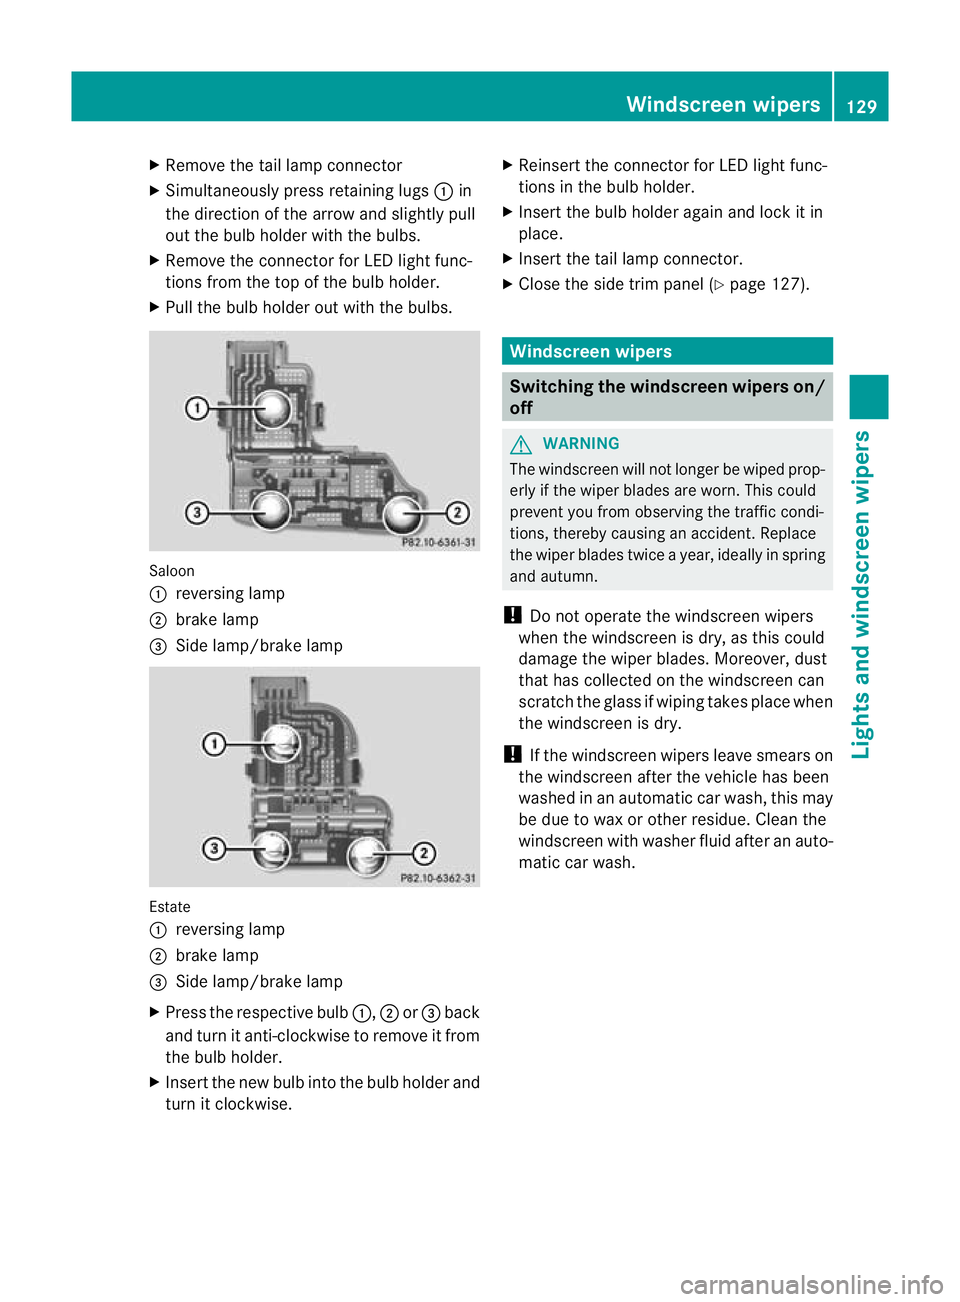
Remove the tail lamp connector
X Simultaneously press retainin glugs :in
the direction of the arrow and slightly pull
out the bulb holder with th ebulbs.
X Remove the connector for LED light func-
tions from the top of the bulb holder.
X Pull the bulb holder out with the bulbs. Saloon
:
reversing lamp
; brake lamp
= Side lamp/brake lamp Estate
:
reversing lamp
; brake lamp
= Side lamp/brake lamp
X Press the respective bulb :,;or= back
and tur nitanti-clockwise to remove it from
the bulb holder.
X Insert the new bulb into the bulb holde rand
turn it clockwise. X
Reinsert the connector for LED light func-
tions in the bulb holder.
X Insert the bulb holde ragain and lock it in
place.
X Insert the tail lamp connector.
X Close the side trim panel (Y page 127). Windscreen wipers
Switching the windscreen wipers on/
off
G
WARNING
The windscreen will not longer be wiped prop-
erly if the wiper blades are worn. This could
prevent you from observing the traffic condi-
tions, thereby causing an accident .Replace
the wiper blades twice a year, ideally in spring
and autumn.
! Do not operate the windscreen wipers
when the windscreen is dry, as this could
damage the wiper blades. Moreover, dust
that has collected on the windscreen can
scratch the glass if wiping takes place when
the windscreen is dry.
! If the windscreen wipers leave smears on
the windscreen after the vehicle has been
washed in an automatic car wash, this may
be due to wax or other residue. Clean the
windscreen with washer fluid after an auto-
matic car wash. Windscreen wipers
129Lights and windscreen wipers Z
Page 133 of 401
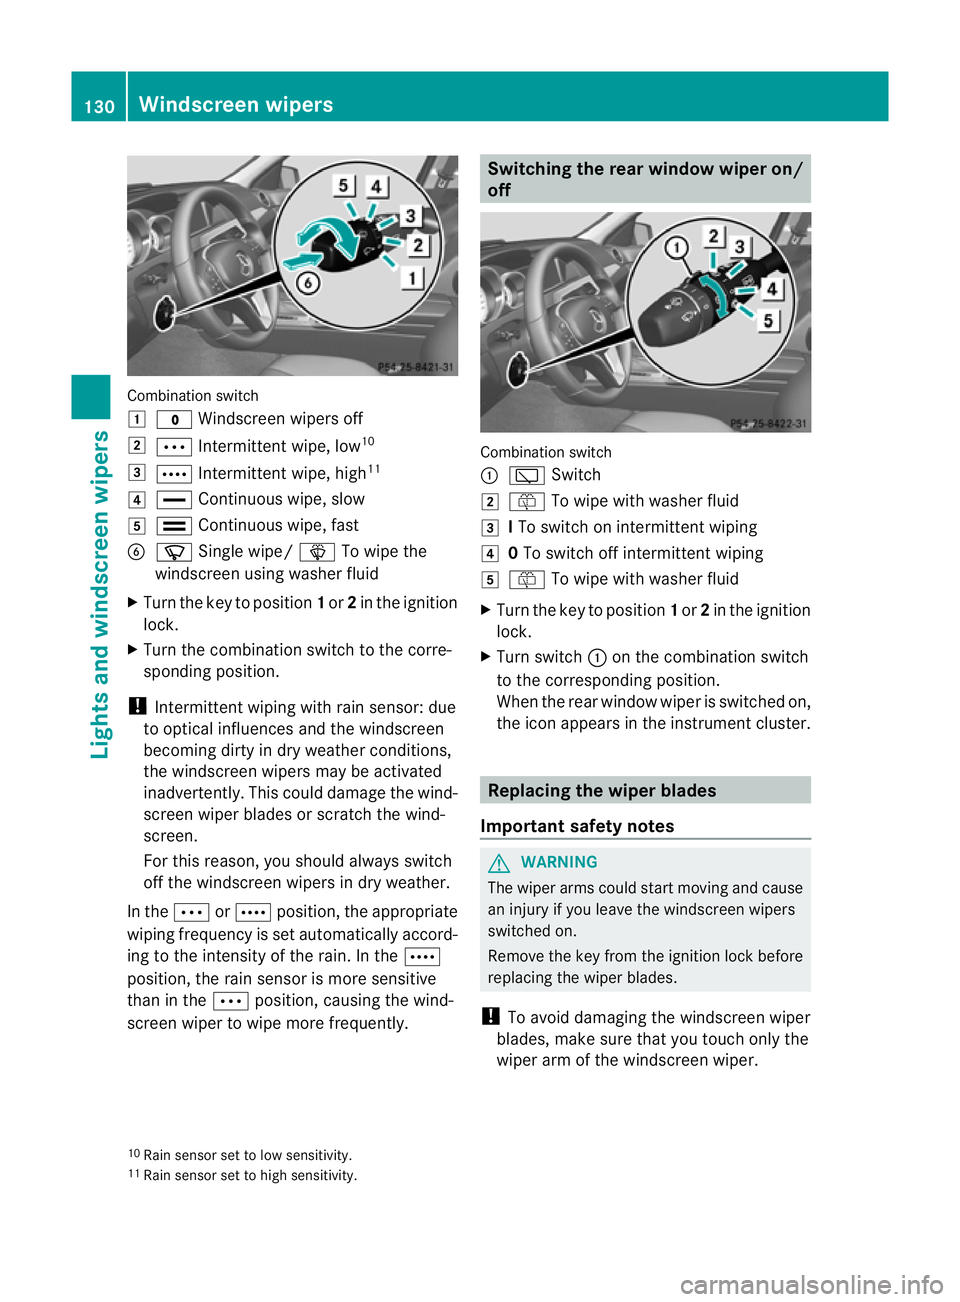
Combination switch
1
$ Windscreen wipers off
2 Ä Intermittent wipe, low 10
3 Å Intermittent wipe, high 11
4 ° Continuous wipe, slow
5 ¯ Continuous wipe, fast
B í Single wipe/ îTo wipe the
windscreen using washer fluid
X Turn the key to position 1or 2in the ignition
lock.
X Turn the combination switch to the corre-
sponding position.
! Intermittent wiping with rain sensor: due
to optical influences and the windscreen
becoming dirty in dry weather conditions,
the windscreen wipers may be activated
inadvertently. This could damage the wind-
screen wiper blades or scratch the wind-
screen.
For this reason, you shoul dalways switch
off the windscreen wipers in dry weather.
In the ÄorÅ position, the appropriate
wiping frequency is set automatically accord-
ing to the intensity of the rain. In the Å
position, the rain sensor is more sensitive
than in the Äposition, causing the wind-
screen wiper to wipe more frequently. Switching the rea
rwindow wiper on/
off Combination switch
:
è Switch
2 ô To wipe with washer fluid
3 ITo switch on intermittent wiping
4 0To switch off intermittent wiping
5 ô To wipe with washer fluid
X Turn the key to position 1or 2in the ignition
lock.
X Turn switch :on the combination switch
to the corresponding position.
When the rear window wiper is switched on,
the icon appears in the instrumen tcluster. Replacing the wiper blades
Important safety notes G
WARNING
The wiper arms could star tmoving and cause
an injury if you leave the windscreen wipers
switched on.
Remove the key from the ignition lock before
replacing the wiper blades.
! To avoid damaging the windscreen wiper
blades, make sure that you touch only the
wiper arm of the windscreen wiper.
10 Rain sensor set to low sensitivity.
11 Rain sensor set to high sensitivity. 130
Windscreen wipersLights and windscreen wipers
Page 141 of 401
Activating/deactivating
X
To activate: press the¿button.
The indicator lamp in the ¿buttonlights
up.
X To switch off: press the¿button.
The indicator lamp in the ¿button goes
out. The cooling with air dehumidification
function has a delayed switch-off feature.
Problems with the cooling with air
dehumidification function When you press the
¿button, the indica-
tor lamp in the button flashes three times or
remains off .You can no longer switch on the
cooling with air dehumidification function.
X Consult a qualified specialist workshop. Setting climate control to automatic
mode
In automatic mode, the set temperature is
maintained automatically at a constant level.
The system automatically regulates the tem-
perature of the dispensed air, the airflow and
the air distribution.
Automatic mode will achieve optimal opera-
tion if cooling with air dehumidification is also
activated. If desired, cooling with air dehu-
midification can be deactivated.
X Turn the key to position 2in the ignition
lock.
X Set the desired temperature.
X To activate: press theÃbutton.
The indicator lamp in the Ãbutton lights
up. Automatic air distribution and airflow
are activated.
i THERMOTRONIC automatic climate con-
trol: when automatic mode is activated, you
can select a climate mode setting
(Y page 138). X
To switch off: press the_button.
or
X Press the KorI button.
The indicator lamp in the Ãbutton goes
out. Automatic air distribution and airflow
are deactivated. Setting the climate mode
This function is only available with the
THERMOTRONIC automatic climate control.
The climate control settings are especially
effective at high temperatures.
You can select the following climate control
settings in automatic mode:
FOCUS high airflow that is set slightly cooler
MEDIUM medium airflow, standard setting
DIFFUSE low airflow that is set slightly warmer and with a lower rate of
airflow
X Turn the key to position 2in the ignition
lock.
X Press the Ãbutton.
X Press the ñbutton repeatedly until the
desired climate mode appears in the dis-
play. Setting the temperature
THERMATIC automatic climate control Different temperatures can be set for the
driver's and front-passenger sides.
X Turn the key to position 2in the ignition
lock.
X To increase/reduce: turn controls:and
B clockwise or anti-clockwise
(Y page 135).
Only change the temperature setting in
small increments. Start at 22 †. 138
Operating the climate control systemClimate control