2011 MERCEDES-BENZ C-CLASS ESTATE battery
[x] Cancel search: batteryPage 145 of 401
i
Air-recirculatio nmode deactivates auto-
matically:
R after approximately five minutes at out-
side temperatures below approximately
5 †
R after approximately five minutes if cool-
ing with air dehumidification is deactiva-
ted
R after approximately 30 minutes at out-
side temperatures above approximately
5 † Convenience opening/closing using
the air-recirculation button
G
WARNING
Make sure that nobody can become trapped
between the side window and the door frame
as the side windows are opened and closed.
Make sure that all object sand body parts are
clear of the side windows when they are being
opened or closed .You or the objects could be
drawn in or become trapped between the side
window and the door frame as the window
moves. If there is arisk of entrapment, oper-
ate the Wswitch to move the side window
in the opposite direction.
Make sure that nobody can become trapped
as the sliding sunroof/panorama sliding sun-
roof is opened and closed. If there is a risk of
entrapment, operate the 3switch to move
the sliding sunroof/panorama sliding sunroof
in the opposite direction.
X Convenience closing feature: press and
hold the gbutton until the side win-
dows and the sliding sunroof/panorama
sliding sunroof are closed.
The indicator lamp in the gbutton lights
up. Air-recirculation mode is activated.
X Convenience opening feature: press and
hold the gbutton until the side win-
dows and the sliding sunroof/panorama
sliding sunroof are opened. The side win-
dows and the sliding sunroof/panorama sliding sunroof move back to their original
position.
The indicator lamp in the
gbutton goes
out. Air-recirculation mode is deactivated.
i If you open the side windows or the sliding
sunroof/panorama sliding sunroof man-
ually after closing the mwith the conveni-
ence closing feature, they will remain in this
position when opened using the conveni-
ence opening feature. Activating/deactivating the residual
heat function
The residual heat function is only available
with THERMOTRONIC automatic climate con-
trol.
It is possible to make use of the residual heat
of the engine to continue heating the station-
ary vehicle for up to 30 minutes after the
engine has been switched off .The heating
time depends on the temperature that has
been set.
i The blower will run at a low speed regard-
less of the airflow setting.
i If you activate the residual heat function
at high temperatures, only the ventilation
will be activated. The blower runs at
medium speed.
X Turn the key to position 0in the ignition
lock or remove it.
X To activate: press theÌbutton.
The indicator lamp in the Ìbutton lights
up.
X To switch off: press theÌbutton.
The indicator lamp in the Ìbutton goes
out.
i Residual heat is deactivated automati-
cally:
R after about 30 minutes
R when the ignition is switched on
R if the battery voltage drops
R if the coolant temperature is too low 142
Operating the climate control systemClimate control
Page 146 of 401
Auxiliary heating
Important safety notes G
WARNING
Exhaust fumes are produced when the auxili-
ary heating is in operation .Inhaling these
exhaus tfumes can be poisonous. You should
therefore switch off the auxiliary heating in
confined spaces without an extraction sys-
tem, e.g .agarage. G
WARNING
When operating the auxiliary heating, parts of
the vehicle may become very hot, and highly
inflammable material such as fuels could be
ignited. Operating the auxiliary heating is thus
prohibited at filling station sorwhen your vehi-
cle is being refuelled. You must therefore
switch off the auxiliary heating at filling sta-
tions.
! Operating the auxiliary heating/ventila-
tion draws on the vehicle battery. After you
have heated or ventilated the vehicle a
maximum of two times, drive for a longer
distance.
i Switch on the auxiliary heating regularly,
e.g. for about ten minutes every month.
The auxiliary heating heats the air in the vehi-
cle interior to the set temperature without
using the heat of the running engine. The aux-
iliary heating is operated directly using the
vehicle's fuel. For this reason, the tank con-
tent must be at least at reserve fuel level to
ensure that the auxiliary heating functions.
The auxiliary heating/ventilation automati-
cally adjusts to changes in temperature and
weather conditions. For this reason, the aux-
iliary heating could switch from ventilation
mode to heating mode or from heating mode
to ventilation mode.
The auxiliary heating switches off automati-
cally after 50 minutes. This time limit can be
altered. To do this, visit a qualified specialist
workshop, e.g. a Mercedes-Ben zService
Centre. You cannot use the auxiliary ventilation to
cool the vehicle interior to a temperature
lower than the outside temperature.
Before switching on X
Turn the key to position 2in the ignition
lock.
X Set the temperature.
The auxiliary heating/ventilation can be acti-
vated even when the climate control is being
controlled manually. Optimum comfort can
be attained when the system is set to auto-
matic mode. Set the temperature to 22 †.
The auxiliary heating/ventilation can be acti-
vated or deactivated using the remote control
or the button on the centre console.
The on-board computer can be used to spec-
ify up to three departure times, one of which
may be preselected (Y page 242).
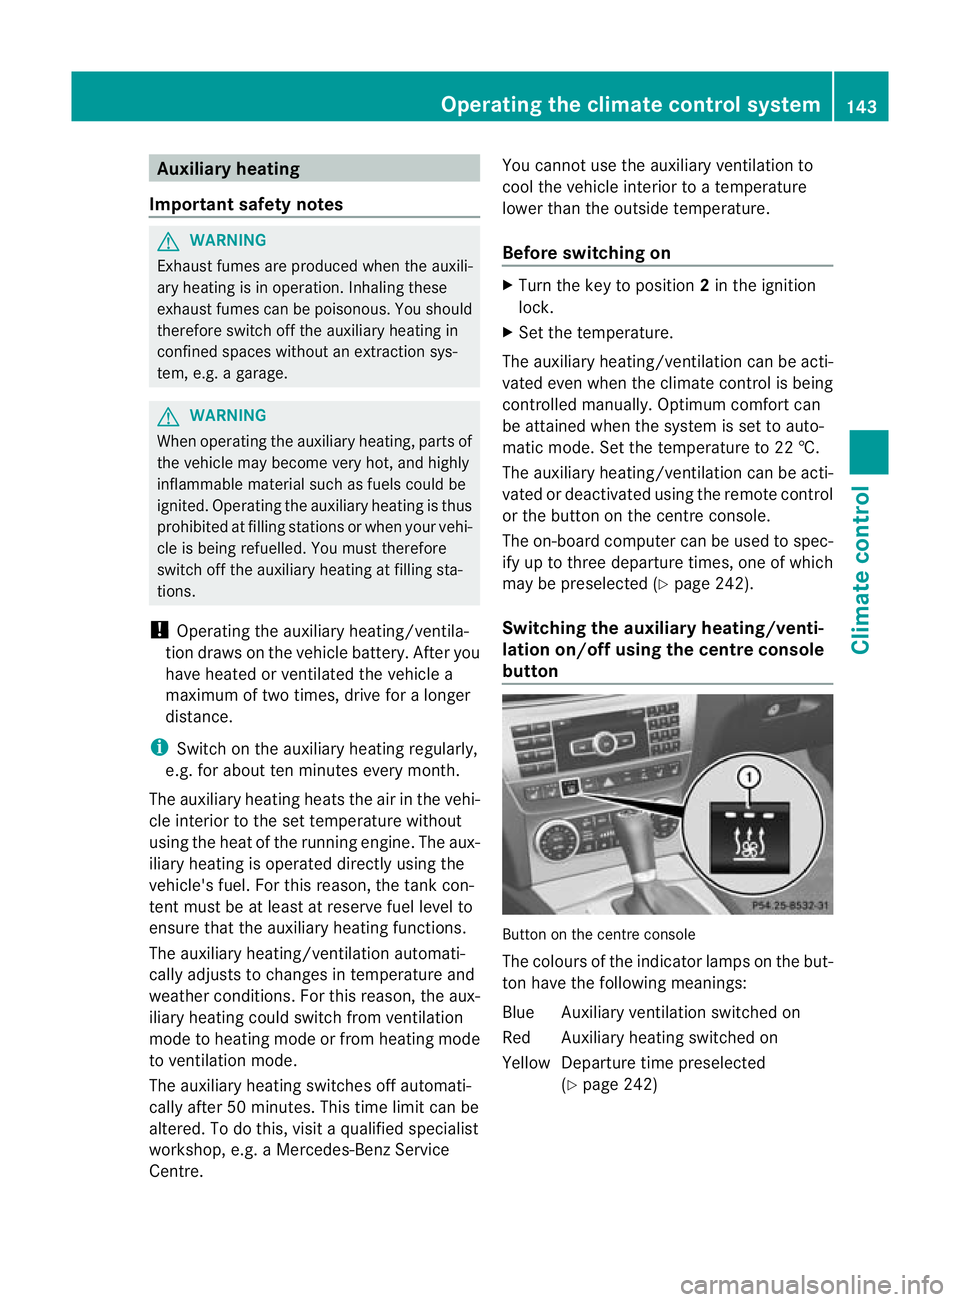
Switching the auxiliar yheating/venti-
lation on/off using the centre console
button Button on the centre console
The colours of the indicator lamps on the but-
to
nh ave the following meanings:
Blue Auxiliary ventilatio nswitched on
Red Auxiliary heating switched on
Yellow Departure time preselected (Ypage 242) Operating the climate control system
143Climate control Z
Page 147 of 401
Switching on auxiliary heating/ventila-
tion
X
Press button :.
The red or blue indicator lamp in but-
ton :lights up.
Switching off auxiliary heating/ventila-
tion
X Press button :.
The red or blue indicator lamp in but-
ton :goes out.
Switching the auxiliary heating/venti-
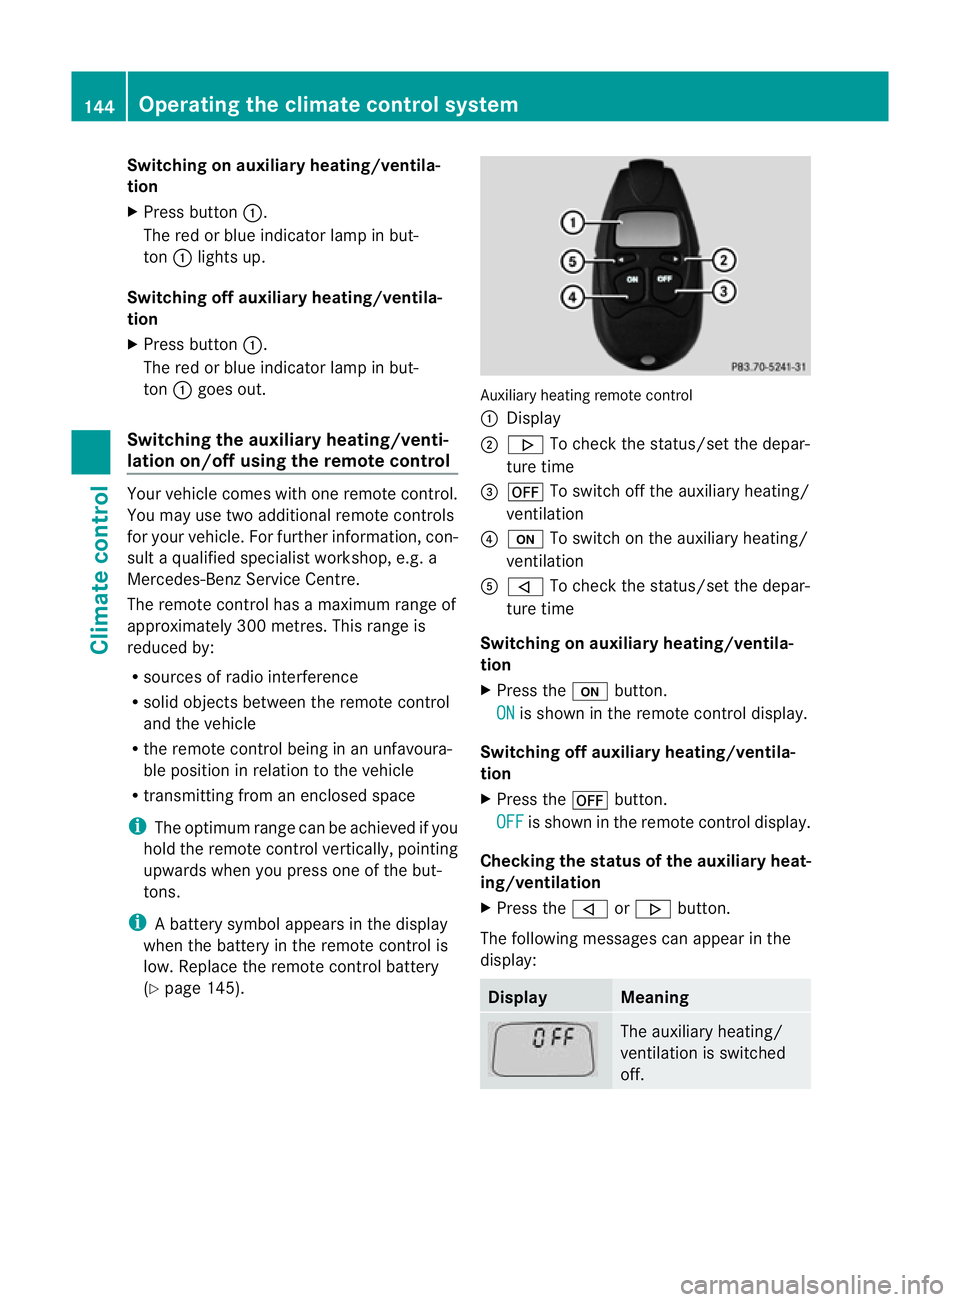
lation on/off using the remote control Your vehicle comes with one remote control.
You may use two additional remote controls
for your vehicle. For further information, con-
sult a qualified specialist workshop, e.g. a
Mercedes-Benz Service Centre.
The remote control has a maximum range of
approximately 300 metres. This range is
reduced by:
R sources of radio interference
R solid objects between the remote control
and the vehicle
R the remote control being in an unfavoura-
ble position in relation to the vehicle
R transmitting from an enclosed space
i The optimum range can be achieved if you
hold the remote control vertically, pointing
upwards when you press one of the but-
tons.
i Abattery symbol appears in the display
when the battery in the remote control is
low. Replace the remote control battery
(Y page 145). Auxiliary heating remote control
: Display
; . To check the status/set the depar-
ture time
= ^ To switch off the auxiliary heating/
ventilation
? u To switch on the auxiliary heating/
ventilation
A , To check the status/set the depar-
ture time
Switching on auxiliary heating/ventila-
tion
X Press the ubutton.
ON is shown in the remote control display.
Switching off auxiliary heating/ventila-
tion
X Press the ^button.
OFF is shown in the remote control display.
Checking th estatus of the auxiliary heat-
ing/ventilation
X Press the ,or. button.
The following messages can appear in the
display: Display Meaning
The auxiliary heating/
ventilatio
nis switched
off. 144
Operating the climate control systemClimate control
Page 148 of 401
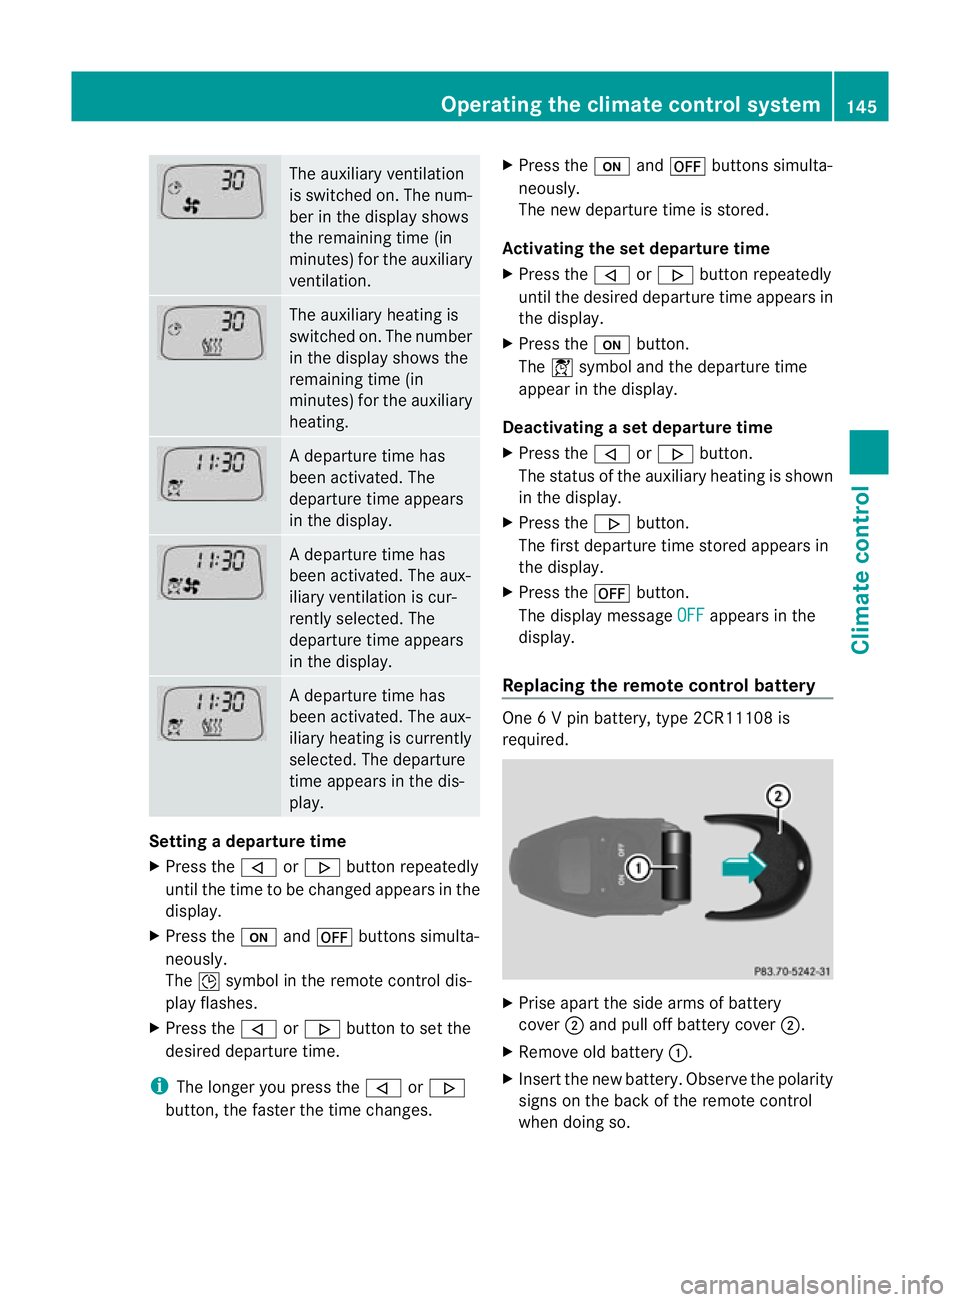
The auxiliary ventilation
is switched on. The num-
ber in the display shows
the remaining time (in
minutes) for the auxiliary
ventilation. The auxiliary heating is
switched on. The number
in the display shows the
remaining time (in
minutes) for the auxiliary
heating. Ad
eparture time has
been activated. The
departure time appears
in the display. Ad
eparture time has
been activated. The aux-
iliary ventilation is cur-
rently selected. The
departure time appears
in the display. Ad
eparture time has
been activated. The aux-
iliary heating is currently
selected. The departure
time appears in the dis-
play. Setting a departure time
X
Press the ,or. button repeatedly
until the time to be changed appears in the
display.
X Press the uand^ buttons simulta-
neously.
The Îsymbol in the remote control dis-
play flashes.
X Press the ,or. button to set the
desired departure time.
i The longer you press the ,or.
button, the faster the time changes. X
Press the uand^ buttons simulta-
neously.
The new departure time is stored.
Activating the set departure time
X Press the ,or. button repeatedly
until the desired departure time appears in
the display.
X Press the ubutton.
The Ísymbol and the departure time
appear in the display.
Deactivating a set departure time
X Press the ,or. button.
The status of the auxiliary heating is shown
in the display.
X Press the .button.
The first departure time stored appears in
the display.
X Press the ^button.
The display message OFF appears in the
display.
Replacing the remote control battery One 6 V pin battery, type 2CR11108 is
required.
X
Prise apart the side arms of battery
cover ;and pull off battery cover ;.
X Remove old battery :.
X Inser tthe new battery. Observe the polarity
signs on the back of the remote control
when doing so. Operating the climate control system
145Climate control Z
Page 149 of 401
X
Slide battery cover ;back onto the
remote control.
X Use the remote control to check the vehi-
cle's auxiliary heating functions. 146
Operating the climate control systemClimate control
Page 150 of 401

Problems with the auxiliary heating/ventilation
Display messages Possible causes/consequences and
M Solutions
FAIL The starter battery is not charged sufficiently or the system is
faulty.
X
Charge the starter battery.
X Make another attempt to switch on the auxiliary heating using
the remote control.
X Have the auxiliary heating checked at a qualified specialist
workshop. $
FAIL The signal transmission between the transmitter and the vehicle
is faulty.
X
Change your position in relation to the vehicle, moving closer if
necessary.
X Make another attempt to switch the auxiliary heating on or off
using the remote control. ©
FAIL There is not enough fuel in the fuel tank, or the auxiliary heating
is faulty.
X
Refuel at the nearest filling station.
X Make another attempt to switch on the auxiliary heating using
the remote control.
X Have the auxiliary heating checked at a qualified specialist
workshop. Adjusting the air vents
Important safety notes
G
WARNING
Very hot or very cold air can flow from the air
vents. This could cause burns or frostbite to
bare skin in the immediate vicinity of the
vents. Keep bare skin away from these air
outlets. If necessary, direct the airflow away
to a different area of the vehicle interior. In order to ensure the direct flow of fresh air
through the air vents into the vehicle interior,
please observe the following notes:
R
keep the air inlet between the windscreen
and the bonnet free of blockages, such as
ice, snow or leaves
R never cover the vents or air inlets in the
vehicle interior.
i For virtually draught-free ventilation,
adjust the sliders of the air vents to the
centre position. Adjusting the air vents
147Climate control Z
Page 160 of 401
!
Always switch the ignition off and take the
key with you when leaving the vehicle.
Automatic engine switch-off The engine is only switched off if:
R
the outside temperature is within the range
that is suitable for the system.
R the engine is at normal operating temper-
ature.
R the set temperature for the vehicle interior
has been reached.
R the battery is sufficiently charged.
R the system detects that the windscreen is
not misted up when the air-conditioning
system is switched on.
R the bonnet is closed.
R the vehicle is not being steered.
R the driver's door is closed and the seat belt
is fastened.
i The engine can be switched off automat-
ically a maximum of four times (first stop
and three subsequent stops) in succession.
The ¤ ECO symbol is shown in yellow in
the multifunction display after the engine
has been started automaticallyf or the
fourth time. The engine can only be
switched off automatically again when the
¤ ECO symbol is shown in green in the
multifunction display.
i During automatic engine switch-off, the
climate control system only operates at a
reduced capacity. If you require full climate
control capacity, the ECO start/stop func-
tion can be deactivated by pressing the
ECO button (Y page 158). Vehicles with manual transmission The ECO start/stop function switches off the
engine automatically at low speeds.
X
Brake the vehicle until it comes to a stand-
still.
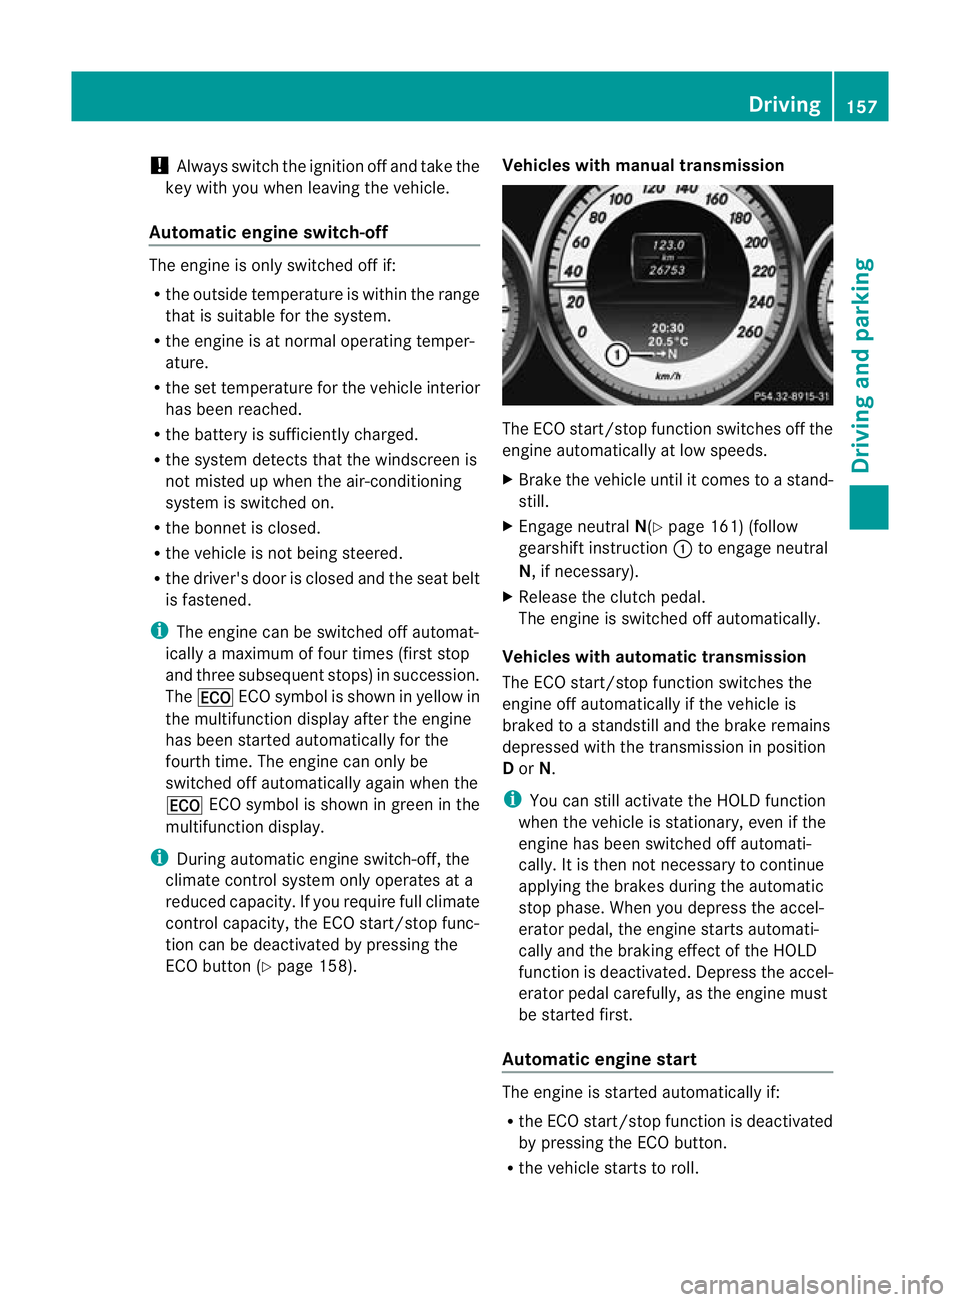
X Engage neutral N(Ypage 161) (follow
gearshift instruction :to engage neutral
N, if necessary).
X Release the clutch pedal.
The engine is switched off automatically.
Vehicles with automatic transmission
The ECO start/stop function switches the
engine off automatically if the vehicle is
braked to a standstill and the brake remains
depressed with the transmission in position
D or N.
i You can still activate the HOLD function
when the vehicle is stationary, even if the
engine has been switched off automati-
cally. It is then not necessary to continue
applying the brakes during the automatic
stop phase. When you depress the accel-
erator pedal, the engine starts automati-
cally and the braking effect of the HOLD
function is deactivated. Depress the accel-
erator pedal carefully, as the engine must
be started first.
Automatic engine start The engine is started automatically if:
R
the ECO start/stop function is deactivated
by pressing the ECO button.
R the vehicle starts to roll. Driving
157Driving and parking Z
Page 161 of 401
R
the brake syste mrequires this.
R the battery's charge status is too low.
R the driver's seat belt is removed or the driv-
er's door is opened.
R the bonnet is opened.
R you shift the transmission from position D
to R.
R you steer the vehicle.
Vehicles with manual transmission
The engine is started automatically if you:
R depress the clutch pedal
R depress the accelerator pedal
! Only engage gear when the clutch pedal
is depressed.
Vehicles with automatic transmission
The engine is started automatically if you:
R release the brakes when in transmission
position Dor N, unless the HOLD function
is activated or
R engage reverse gear Ror
R depress the accelerator pedal
i Shifting the transmission to position P
does not start the engine.
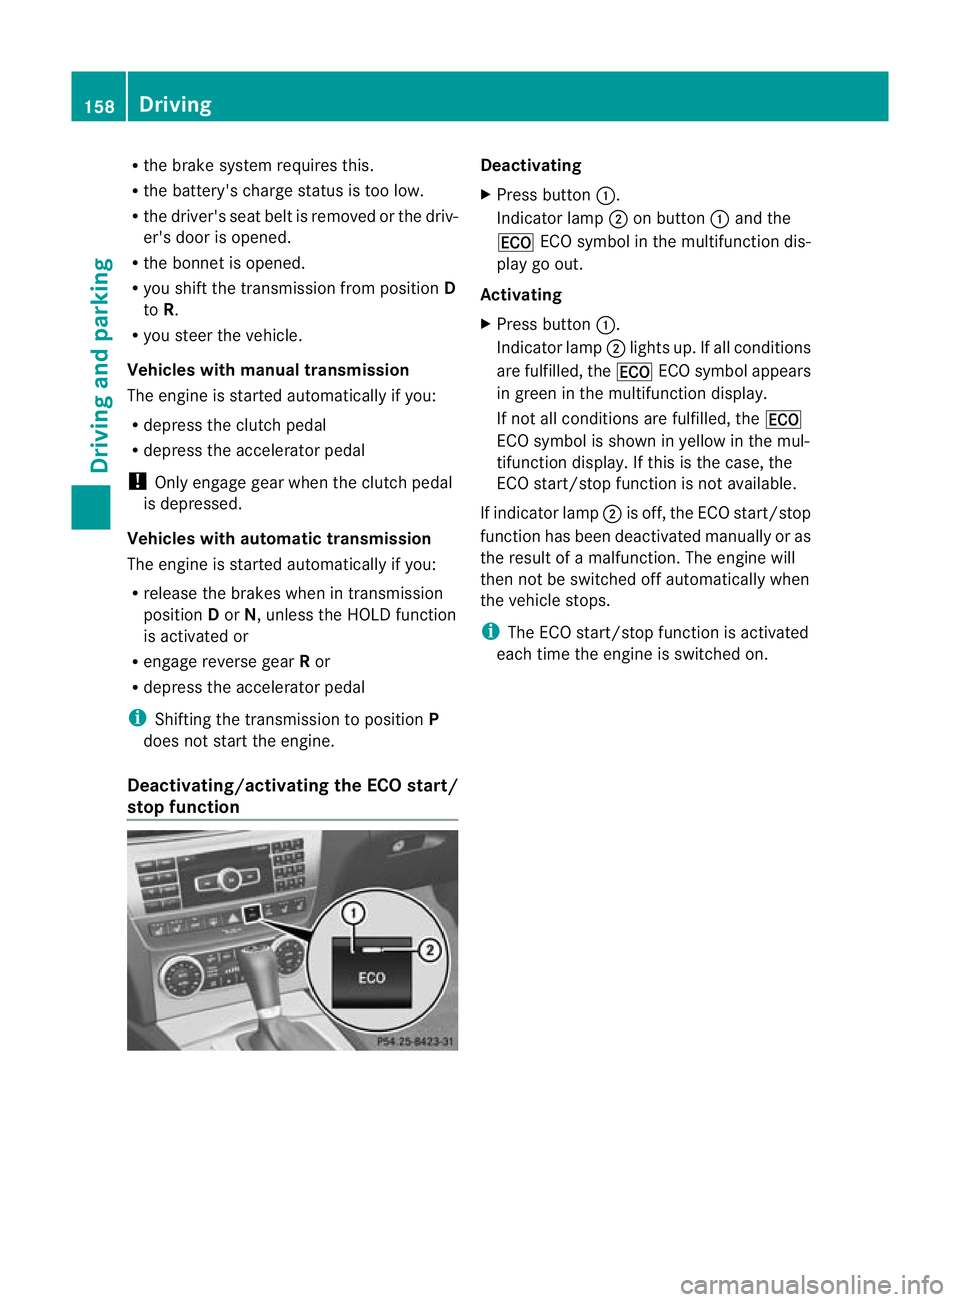
Deactivating/activating the ECO start/
stop function Deactivating
X
Press button :.
Indicator lamp ;on button :and the
¤ ECO symbol in the multifunction dis-
play go out.
Activating
X Press button :.
Indicator lamp ;lights up. If all conditions
are fulfilled, the ¤ECO symbol appears
in green in the multifunction display.
If not all conditions are fulfilled, the ¤
ECO symbol is shown in yellow in the mul-
tifunction display. If this is the case, the
ECO start/stop function is not available.
If indicator lamp ;is off, the ECO start/stop
function has been deactivated manually or as
the result of a malfunction. The engine will
then not be switched off automatically when
the vehicle stops.
i The ECO start/stop function is activated
each time the engine is switched on. 158
DrivingDriving and parking