2011 MERCEDES-BENZ C-CLASS COUPE wheel size
[x] Cancel search: wheel sizePage 25 of 373

Couplin
gupatrailer...................... 202
Decoupling atrailer ....................... 202
Driving tips .................................... 199
ESP ®
................................................ 70
Folding in the ball coupling ............202
Folding out the ball coupling ..........201
Important safety notes ..................199
Mounting dimensions ....................361
Parking Guidance ........................... 186
Parktroni c...................................... 182
Power supply ................................. 203
Shift range ..................................... 147
Trailer loads ................................... 362
Transmission
see Automatic transmission
see Manual transmission
Transporting the vehicle ..................332
Trim pieces (cleaning instructions) .311
Trip computer On-board computer (12-button
multifunctio nsteering wheel) ........215
On-board computer (4-button
multifunctio nsteering wheel) ........210
Trip meter
Displaying/resetting (4-button
multifunctio nsteering wheel) ........209
Displaying (12-button multifunc-
tion steering wheel) .......................215
Resetting (12-button multifunc-
tion steering wheel) .......................216
Trip odometer
see Trip meter
Turn signal
Display message (12-button mul-
tifunctio nsteering wheel) ..............248
Display message (4-button multi-
function steering wheel) ................245
Turn signals
Switching on/off ........................... 110
Two-way radio
Frequencies ................................... 351
Installatio n..................................... 351
Transmission output (maximum) .... 351
Type identification plate
see Vehicle identification plate Tyre pressure
Calling up (on-board computer) .....342
Display message (12-button mul-
tifunctio nsteering wheel) ..............263
Display message (4-button multi-
function steering wheel) ................262
Not reached (TIREFIT) ....................319
Pressure loss warning ....................340
Reached (TIREFIT) ..........................320
Recommended ............................... 339
Tyre pressure monitor
Function/notes ............................. 342
Restarting ...................................... 343
Warning lamp ................................. 282
Tyres
Checking ........................................ 336
Direction of rotatio n...................... 344
Display message (12-button mul-
tifunctio nsteering wheel) ..............263
Display message (4-button multi-
function steering wheel) ................262
Grip ................................................ 161
Important safety notes ..................336
Replacing ....................................... 344
Service life ..................................... 337
Storing ........................................... 344
Tyr esize (data) .............................. 345
Tyr etread ...................................... 337
see Flat tyre U
Unladen weight see Technical data
Unlocking
Emergency unlocking .......................85
From inside the vehicle (central
unlocking button) ............................. 84 V
Vanity mirror (in sun visor) ..............290
Vehicle Correct use ...................................... 27
Data acquisition ............................... 27
Electronics ..................................... 351
Equipment ....................................... 25
Implied warranty .............................. 27
Individua lsettings .......................... 22322
Index
Page 26 of 373

Leaving parked up
.........................159
Locking (in an emergency) ...............85
Locking (key )................................... 78
Lowering ........................................ 324
Pulling away ................................... 139
Raising ........................................... 322
Registration ..................................... 26
Towing away .................................. 330
Tow-starting ................................... 330
Transporting .................................. 332
Unlocking (in an emergency) ...........85
Unlocking (key )................................ 78
Vehicle battery
see Battery (vehicle)
Vehicle data
see Technical data
Vehicle dimensions
see Technical data
Vehicle emergency locking ................85
Vehicle identification number see VIN
Vehicle identification plate ..............352
Vehicle tool kit .................................. 315
Vehicle weights see Technical data
Vents
see Air vents
Video (DVD) ........................................ 218
Video DVD (12-button multifunc-
tion steering wheel) ..........................218
VIN ...................................................... 352W
Warning and indicator lamps ABS ................................................ 275
Brakes ........................................... 275
Distance warning signa l................. 282
ESP ®
.............................................. 277
ESP ®
OFF ....................................... 277
LIM (cruise control) ........................ 162
LIM (DISTRONIC PLUS) ..................166
LIM (variable SPEEDTRONIC) .........174
PASSENGER AIRBAG OFF ................57
Reserve fuel ................................... 280
Seat bel t........................................ 273SRS ................................................ 279
Tyr ep ressure monitor ...................282
Warning triangle ................................ 314
Washer fluid Display message (4-button multi-
function steering wheel) ................267
see Windscreen washer system
Weight
see Technical data
Wheel bol ttightening torque ...........324
Wheel chock ...................................... 321
Wheels Changing/replacing .......................344
Changing awheel .......................... 321
Checking ........................................ 336
Cleaning ......................................... 307
Fitting awheel ............................... 323
Important safety notes ..................336
Removing awheel .......................... 323
Storing ........................................... 344
Tightening torque ........................... 324
Whee lsize/tyre size ...................... 345
Windowbag
Display message (12-button mul-
tifunctio nsteering wheel) ..............244
Display message (4-button multi-
function steering wheel) ................237
Operation ........................................ .49
Windows
Cleaning ......................................... 308
see Side windows
Windscreen
Demisting ...................................... 126
Windscreen washe rfluid
Display message (12-button mul-
tifunction steering wheel) ..............269
Windscreen washe rsystem ............. 304
Windscreen wipers Problem (malfunction) ...................120
Replacing the wiper blades ............119
Switching on/off ........................... 118
Winter operation
Important safety notes ..................337
Slippery road surfaces ...................162
Snow chains .................................. 338 Index
23
Page 68 of 373

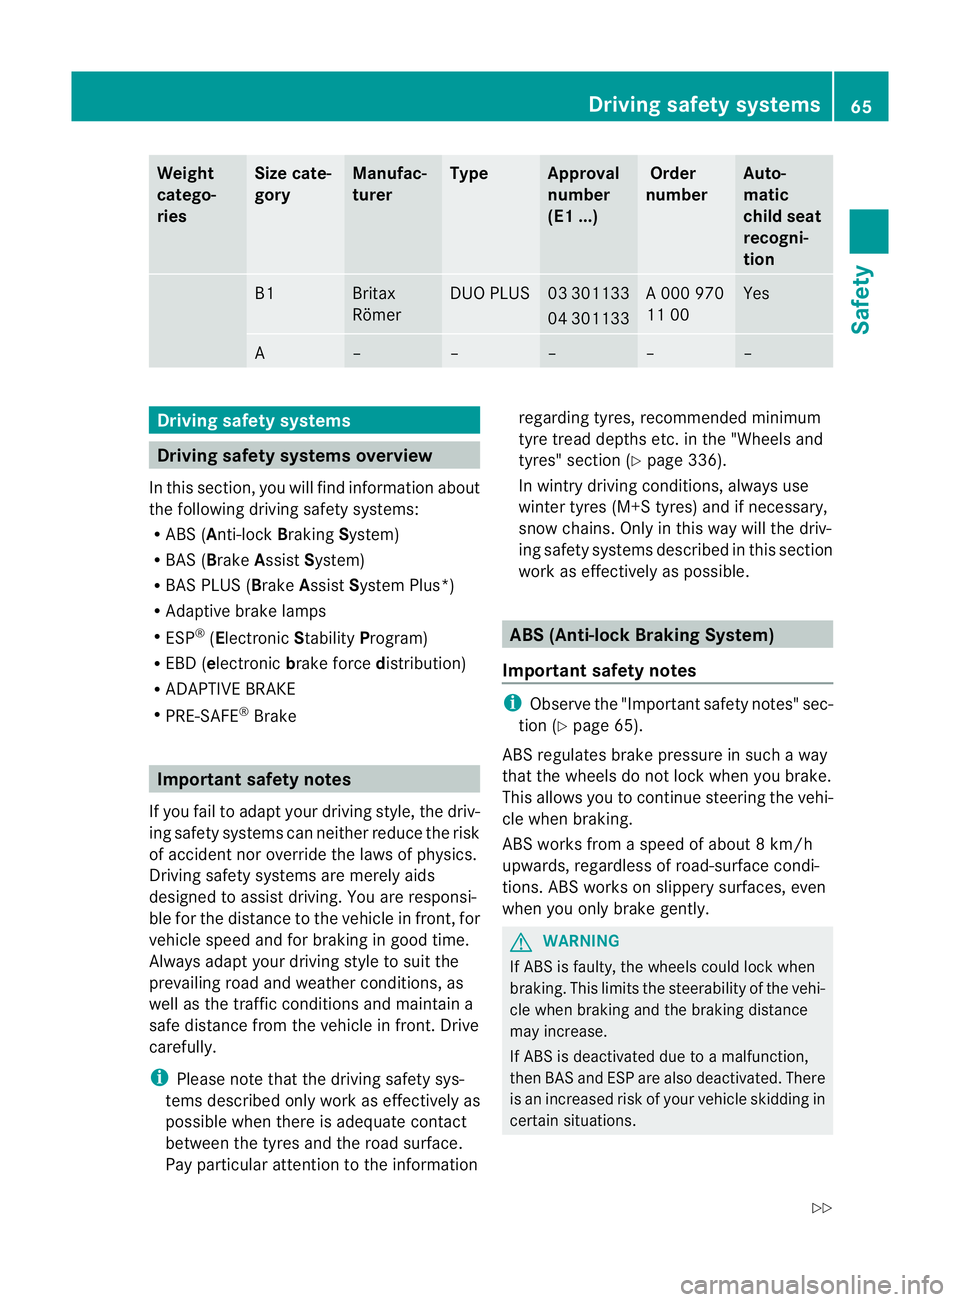
Weight
catego-
ries Size cate-
gory Manufac-
turer Type Approval
number
(E1 ...) Order
number Auto-
matic
chil
dseat
recogni-
tion B1 Britax
Römer DUO PLUS 03 301133
04 301133 A 000 970
11 00 Yes
A – – – – –
Driving safety systems
Driving safety systems overview
In this section, you will find informatio nabout
the following driving safety systems:
R ABS (Anti-lock BrakingSystem)
R BAS (Brake AssistSystem)
R BAS PLUS ( BrakeAssist System Plus*)
R Adaptive brake lamps
R ESP ®
(Electronic StabilityProgram)
R EBD ( electronic brake force distribution)
R ADAPTIVE BRAKE
R PRE-SAFE ®
Brake Important safety notes
If you fail to adapt your driving style, the driv-
ing safety systems can neither reduce the risk
of acciden tnor override the laws of physics.
Driving safety systems are merely aids
designed to assist driving. You are responsi-
ble for the distance to the vehicle in front, for
vehicle speed and for braking in good time.
Always adapt your driving style to suit the
prevailing road and weather conditions, as
well as the traffic conditions and maintain a
safe distance from the vehicle in front. Drive
carefully.
i Please note that the driving safety sys-
tems described only work as effectively as
possible when there is adequate contact
between the tyres and the road surface.
Pay particular attention to the information regarding tyres, recommended minimum
tyre tread depths etc. in the "Wheels and
tyres" section (Y
page 336).
In wintry driving conditions, always use
winter tyres (M+S tyres) and if necessary,
snow chains. Only in this way will the driv-
ing safety systems described in this section
work as effectively as possible. ABS (Anti-lock Braking System)
Important safety notes i
Observe the "Important safety notes" sec-
tion (Y page 65).
ABS regulates brake pressure in such a way
that the wheels do not lock when you brake.
This allows you to continue steering the vehi-
cle when braking.
ABS works from a speed of about 8 km/h
upwards, regardless of road-surface condi-
tions. ABS works on slippery surfaces, even
when you only brake gently. G
WARNING
If ABS is faulty, the wheels could lock when
braking. This limits the steerability of the vehi-
cle when braking and the braking distance
may increase.
If ABS is deactivated due to a malfunction,
then BAS and ESP are also deactivated. There
is an increased risk of your vehicle skidding in
certain situations. Driving safety systems
65Safety
Z
Page 71 of 373

If ESP
®
intervenes, the ÷ESP®
warning
lamp flashes in the instrument cluster. G
WARNING
If the ÷ warning lamp in the instrument
cluster flashes, proceed as follows:
R do not deactivate ESP ®
under any circum-
stances.
R only depress the accelerator pedal as far as
necessary when pulling away.
R adapt yourd riving style to suitt he prevail-
ing road and weather conditions.
Otherwise, the vehicle could go into a skid.
ESP ®
cannot reduce the risk of an accident if
you drive too fast. ESP ®
cannot override the
laws of physics.
! Switch the ignition off when:
R the parking brake is being tested using a
dynamometer
R the vehicle is being towed with the front/
rear axle raised
Application of the brakes by ESP ®
may oth-
erwise destroy the brake system.
i Only use wheels with the recommended
tyre sizes. Only then will ESP ®
function
properly.
ETS (Electronic Traction Support) Traction control is part of ESP
®
.
Traction control brakes the drive wheels indi-
vidually if they spin. This enables you to pull
away and accelerate on slippery surfaces, for
example if the road surface is slippery on one
side.
Traction control remains active if you deacti-
vate ESP ®
. G
WARNING
Traction control cannot reduce the risk of an
accident if you drive too fast. Traction control
cannot override the laws of physics. Deactivating/activating ESP
®
(except
AMG vehicles) You cannot activate and deactivate ESP
®
on
vehicles with a 4-button multifunction steer-
ing wheel.
ESP ®
is activated automatically when the
engine is started.
i Vehicles with ECO start/stop function:
the ECO start/stop function switches the
engine off automatically when the vehicle
comes to a stop. The engine starts auto-
matically when the driver wants to pull
away again. ESP ®
remains in its previously
selected status. Example: if ESP ®
was
deactivated before the engine was
switched off, ESP ®
remains deactivated
when the engine is switched on again.
It may be best to deactivate ESP ®
in the fol-
lowing situations:
R when using snow chains
R in deep snow
R on sand or gravel G
WARNING
Activate ESP ®
as soon as the situations
described above no longer apply.E SP®
will
otherwise not be able to stabilise the vehicle
if the vehicle starts to skid or a wheel starts
to spin.
If you deactivate ESP ®
:
R ESP ®
no longer improves driving stability.
R the engine's torque is no longer limited and
the drive wheels can spin. The spinning of
the wheels results in a cutting action, which
provides bette rgrip.
R traction control is still activated.
R ESP ®
still provides support when you
brake.
If ESP ®
is deactivated and one or more wheels
start to spin, the ÷ESP®
warning lamp in
the instrument cluster flashes. In such situa-
tions, ESP ®
will not stabilise the vehicle. 68
Driving safety systemsSafety
Page 106 of 373

Mirrors
Rear-view mirror
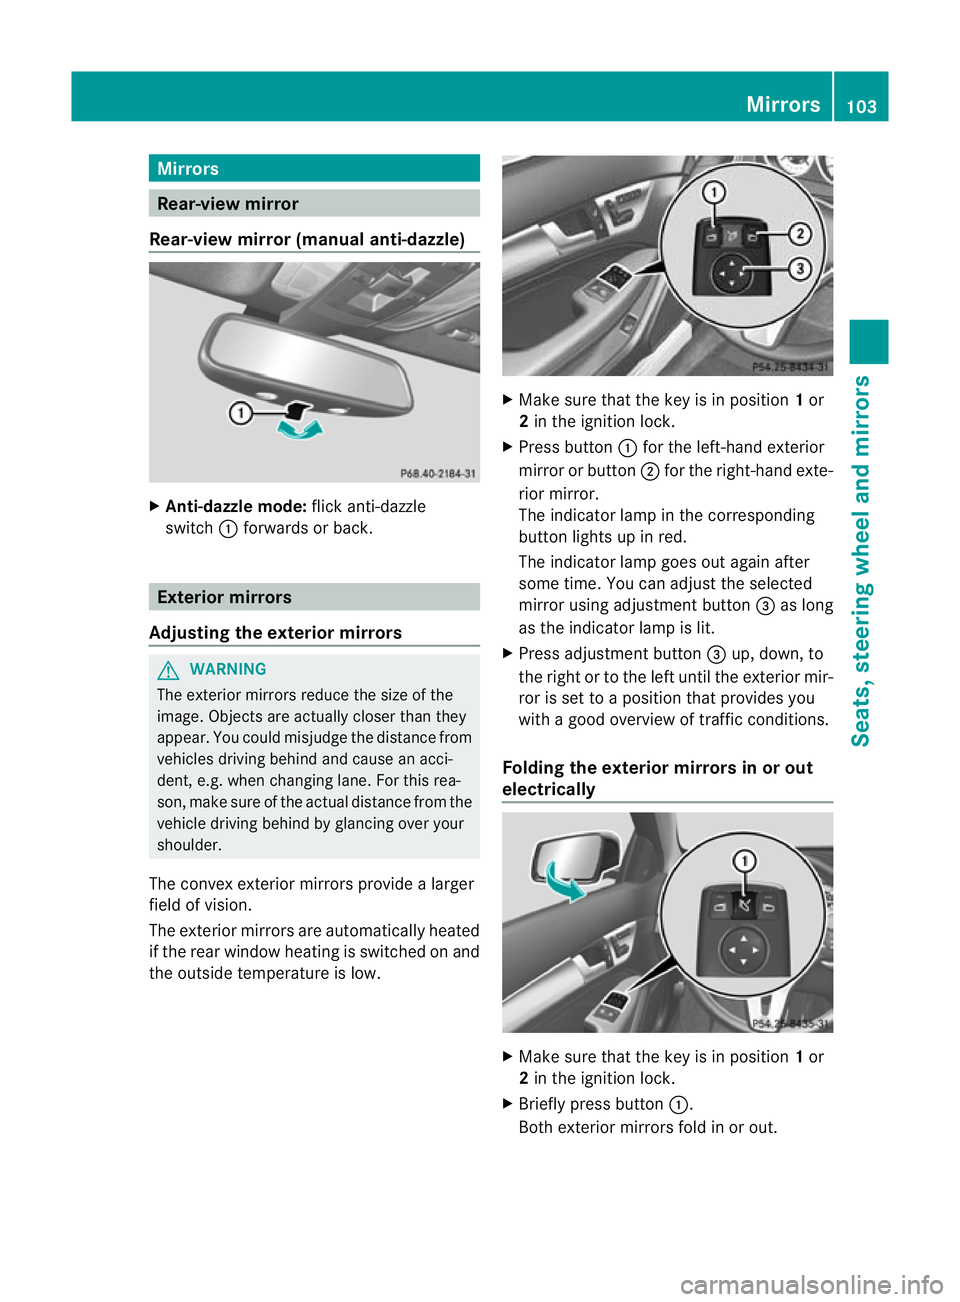
Rear-view mirror (manual anti-dazzle) X
Anti-dazzle mode: flick anti-dazzle
switch :forwards or back. Exterior mirrors
Adjusting the exterior mirrors G
WARNING
The exterior mirrors reduce the size of the
image. Objects are actually closer than they
appear. You could misjudge the distance from
vehicles driving behind and cause an acci-
dent, e.g. when changing lane .For this rea-
son, make sure of the actual distance from the
vehicle driving behind by glancing over your
shoulder.
The convex exterior mirrors provide a larger
field of vision.
The exterior mirrors are automatically heated
if the rear window heating is switched on and
the outside temperature is low. X
Make sure that the key is in position 1or
2 in the ignition lock.
X Press button :for the left-hand exterior
mirror or button ;for the right-hand exte-
rior mirror.
The indicator lamp in the corresponding
button lights up in red.
The indicator lamp goes out again after
some time. You can adjust the selected
mirror using adjustment button =as long
as the indicator lamp is lit.
X Press adjustmen tbutton =up, down, to
the right or to the left until the exterio rmir-
ror is set to a position that provides you
with a good overview of traffic conditions.
Folding the exterior mirrors in or out
electrically X
Make sure that the key is in position 1or
2 in the ignition lock.
X Briefly press button :.
Both exterior mirrors fold in or out. Mirrors
103Seats, steering wheel and mirrors Z
Page 220 of 373

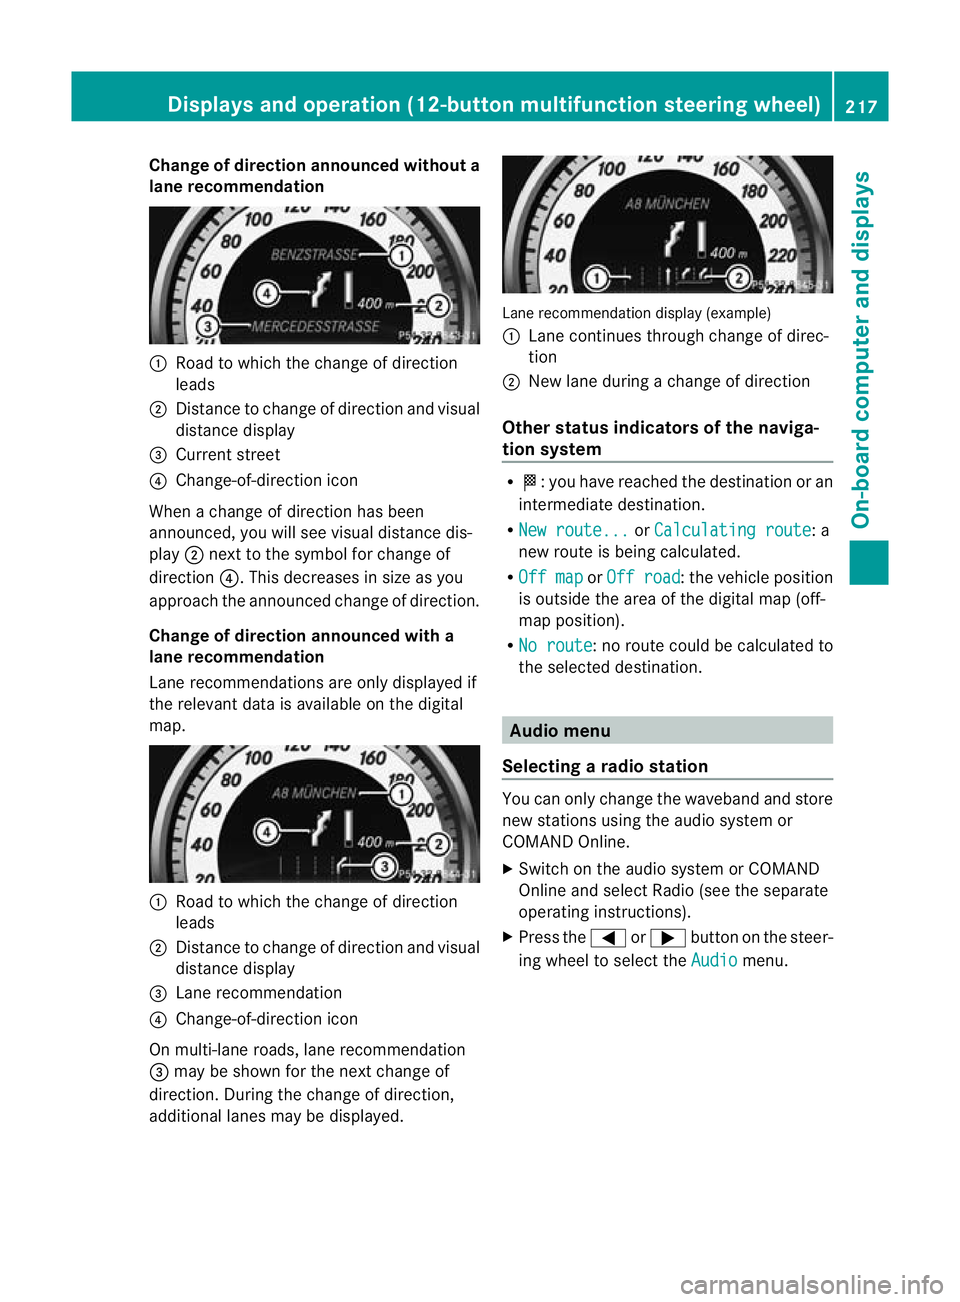
Change of direction announced without a
lane recommendation :
Road to which the change of direction
leads
; Distance to change of direction and visual
distance display
= Current street
? Change-of-direction icon
When a change of direction has been
announced, you will see visual distance dis-
play ;next to the symbol for change of
direction ?.This decreases in size as you
approach the announced change of direction.
Change of direction announced with a
lane recommendation
Lane recommendations are only displayed if
the relevant data is available on the digital
map. :
Road to which the change of direction
leads
; Distance to change of direction and visual
distance display
= Lane recommendation
? Change-of-direction icon
On multi-lane roads, lane recommendation
= may be shown for the next change of
direction. During the change of direction,
additional lanes may be displayed. Lane recommendation display (example)
:
Lane continues through change of direc-
tion
; New lane during a change of direction
Other status indicators of the naviga-
tion system R
O:y ou have reached the destination or an
intermediate destination.
R New route... or
Calculating route : a
new route is being calculated.
R Off map or
Off road :t
he vehicle position
is outside the area of the digital map (off-
map position).
R No route :n
o route could be calculated to
the selected destination. Audio menu
Selecting aradio station You can only change the waveband and store
new stations using the audio system or
COMAND Online.
X
Switch on the audio system or COMAND
Online and select Radio (see the separate
operating instructions).
X Press the =or; button on the steer-
ing wheel to select the Audio menu.Displays and operation (12-button multifunction steering wheel)
217On-board computer and displays Z
Page 324 of 373

The filler hose remains attached to the tyre
sealant bottle.
X Stow the tyre sealant bottle, the tyre infla-
tion compressor and the warning triangle.
X Drive to the nearest workshop and have the
tyre changed there.
X Have the tyre sealant bottle and the filler
hose replaced as soon as possible at a
qualified specialist workshop, e.g. at a
Mercedes-Benz Service Centre. H
Environmental note
Have the used tyre sealant bottle disposed of
professionally, e.g. at aMercedes-Benz
Service Centre.
X Have the tyre sealant bottle replaced every
four years at a qualified specialist work-
shop, e.g. a Mercedes-Benz Service
Centre. Changing
awheel and fitting the spare
wheel
Preparing the vehicle G
WARNING
The wheel and tyre size of the emergency
spare wheel/spare wheel may diffe rto that of
the damaged wheel. When using an emer-
gency spare wheel/spare wheel the handling
characteristics of the vehicle may change.
Adapt your style of driving accordingly.
Never operate the vehicle with more than one
emergency spare wheel/spare wheel that dif-
fers in size.
Only use an emergency spare wheel/spare
wheel of a differing size briefly and do not
switch off ESP ®
.
When using an emergency spare wheel you
must not exceed the maximum speed of
80 km/h. G
WARNING
Have the emergency spare wheel/spare
wheel replaced with a new wheel as soon as
possible at a qualified specialist workshop
which has the necessary specialist knowledge
and tools to carry out the work required.
Mercedes-Benz recommends that you use a
Mercedes-Benz Service Centre for this pur-
pose. In particular, work relevant to safety or
on safety-related systems must be carried out
at a qualified specialist workshop.
i Vehicles without an emergency spare
wheel/spare wheel are not equipped with
wheel-changing tools at the factory. For
more information on which tools are
required to perform a wheel change on your
vehicle, e.g. wheel chock, wheel wrench or
centring pin, consult a Mercedes-Benz
Service Centre.
X Prepare the vehicle as described
(Y page 316).
X If a trailer is coupled to the vehicle, uncou-
ple it.
X Remove the following items (depending on
the vehicle's equipment) from the stowage
well under the boot floor:
R
the emergency spare wheel or spare
wheel
R the folding wheel chock
R the wheel wrench
R the jack
X Secure the vehicle to prevent it from rolling
away.
Securing the vehicle to prevent it from
rolling away If your vehicle is equipped with a wheel chock,
it can be found in the vehicle tool kit
(Y
page 315).
The folding wheel chock is an additional
securing measure to prevent the vehicle from
rolling away, for example when changing a
wheel. Flat tyre
321Breakdown assistance Z
Page 327 of 373

Do not tighte
nthe wheel bolts completely
while the vehicle is still jacked up. The vehicle
could topple off the jack.
X Cleant he wheel and wheel hub contact
surfaces. X
Slide the emergency spare wheel/spare
wheel onto the wheel hub and push it on.
X Tighten the wheel bolts until they are fin-
ger-tight.
Lowering the vehicle X
Turn the crank of the jack anti-clockwise
until the vehicle is once again standing
firmly on the ground.
X Place the jack to one side. X
Tighten the wheel bolts evenly in a cross-
wise pattern in the sequence indicated
(: toA ). The tightening torque must be
130 Nm. G
WARNING
Have the tightening torque checked immedi-
ately after a wheel is changed. The wheels
could work loose if they are not tightened to
a torque of 130 Nm.
X Turn the jack back to its initial position and
store it together with the rest of the vehicle
tool kit in the stowage well under the boot
floor.
X Transport the faulty wheel in the boot.
or
X Depending on the size of the wheel, you
may also be able to secure the faulty wheel
in the spare wheel well. In this case, you
will have to remove the stowage tray from
the spare wheel well and stow it securely
in the boot.
i When you are driving with the emergency
spare wheel fitted, the tyre pressure loss
warning system cannot function reliably.
Only restart the tyre pressure loss warning
system when the defective wheel has been
replaced with a new wheel. MOExtended tyres (tyres with run-flat
characteristics)
MOExtended tyres (tyres with run-flat char-
acteristics) allow you to continue driving the
vehicle even when one or more tyres lose all
air pressure.
MOExtended tyres may only be used in con-
junction with the activated tyre pressure loss
warning system or with the tyre pressure
monitor.
The maximum permissible distance which
can be driven in run-flat mode depends on the
load in the vehicle. It is 80 km if the vehicle
is partially laden and 30 km if fully laden.
The maximum permissible distance which
can be driven in run-flat mode is counted from
the moment the tyre pressure loss warning
appears in the multifunction display. 324
Flat tyreBreakdown assistance