2011 MERCEDES-BENZ C-CLASS COUPE boot
[x] Cancel search: bootPage 189 of 373
X
To reverse into the parking space: main-
tai nt he steering wheel angle and reverse
carefully.
X Stop as soon as you hear a warning tone,
at the latest when PARKTRONIC sounds the
continuous warning tone.
The Parking Guidance finished mes-
sage appears in the multifunction display
and a warning tone sounds. You may be
asked to steer in adifferent direction and
the nchange gear. In this case, further dis-
plays in the multifunction display will direct
you to the final position.
X Manoeuvre if necessary.
X Always observe the warning messages dis-
played by PARKTRONIC (Y page 181).
Cancelling Parking Guidance X
Press the PARKTRONIC button on the
centre console (Y page 182).
Parking Guidance is cancelled immediately
and PARKTRONIC is deactivated.
Parking Guidance is cancelled automatically
if it is no longer possible to guide you into the
parking space, or if a malfunction occurs.
The parking space symbol goes out and a
warning tone sounds. The Parking Guid‐ance cancelled message appears in the
multifunction display.
Trailer towing For vehicles with a trailer tow hitch, the min-
imum length for parking spaces is slightly
increased.
If you have attached a trailer to your vehicle,
you should not use Parking Guidance. When
the electrical connection is established
between your vehicle and the trailer, Parking
Guidance ceases to be available. PARK-
TRONIC is deactivated for the rear area. Reversing camera
Important safety notes The reversing camera is an optical parking
aid. It shows the area behind your vehicle in
the COMAND Online display.
G
WARNING
Make sure that no persons or animals are in
the manoeuvring range. Otherwise, they
could be injured.
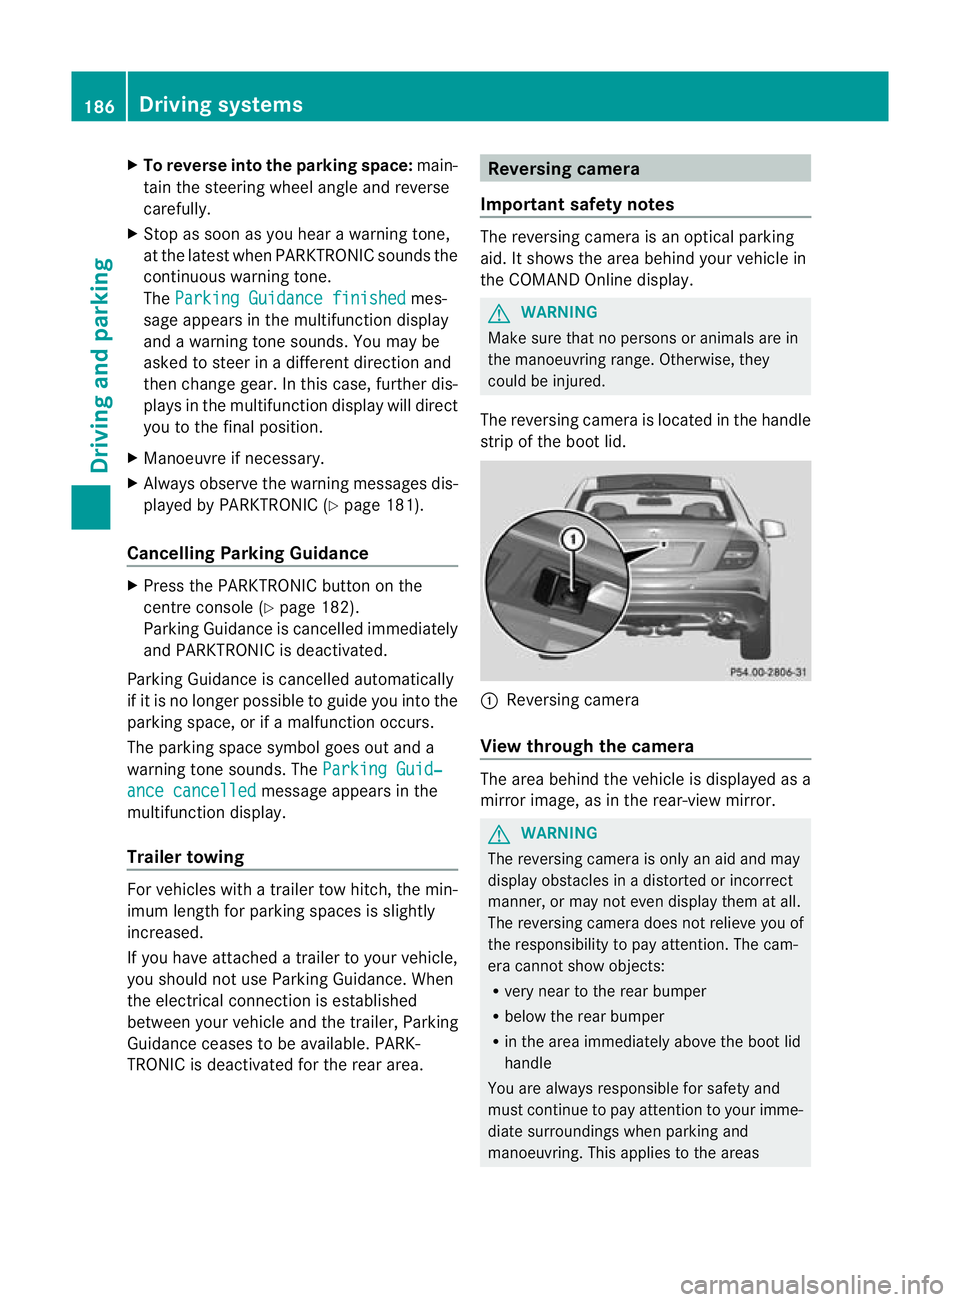
The reversing camera is located in the handle
strip of the boot lid. :
Reversing camera
View through the camera The area behind the vehicle is displayed as a
mirror image, as in the rear-view mirror.
G
WARNING
The reversing camera is only an aid and may
display obstacles in a distorted or incorrect
manner, or may not even display them at all.
The reversing camera does not relieve you of
the responsibility to pay attention. The cam-
era cannot show objects:
R very near to the rear bumper
R below the rear bumper
R in the area immediately above the boot lid
handle
You are always responsible for safety and
must continue to pay attention to your imme-
diate surroundings when parking and
manoeuvring. This applies to the areas 186
Driving systemsDriving and parking
Page 190 of 373
behind, in fron
tofand next to the vehicle. You
could otherwise endanger yoursel fand oth-
ers. G
WARNING
Unde rthe following circumstances, the
reversing camera will not function, or will
function in a limited manner:
R if the boot lid is open
R in heavy rain, snow or fog
R at night or in very dark places
R if the camera is exposed to very bright light
R if the area is lit by fluorescent light (the dis-
play may flicker)
R if there is a sudden change in temperature,
e.g. when driving into a heated garage in
winter
R if the camera lens is dirty or obstructed
R if the rear of your vehicle is damaged. In this
event, have the camera position and setting
checked at a qualified specialist workshop.
Mercedes-Ben zrecommends that you use
a Mercedes-Benz Service Centre for this
purpose.
Do not use the reversing camera in these
types of situation .You could otherwise injure
others or damage objects and your vehicle
while you are parking.
Activating the reversing camera X
Make sure that the key is in position 2in
the ignition lock.
X Make sure that the "Reversing camera"
function is selected in COMAND Online
(see the separate operating instructions for
COMAND Online).
X Engage reverse gear.
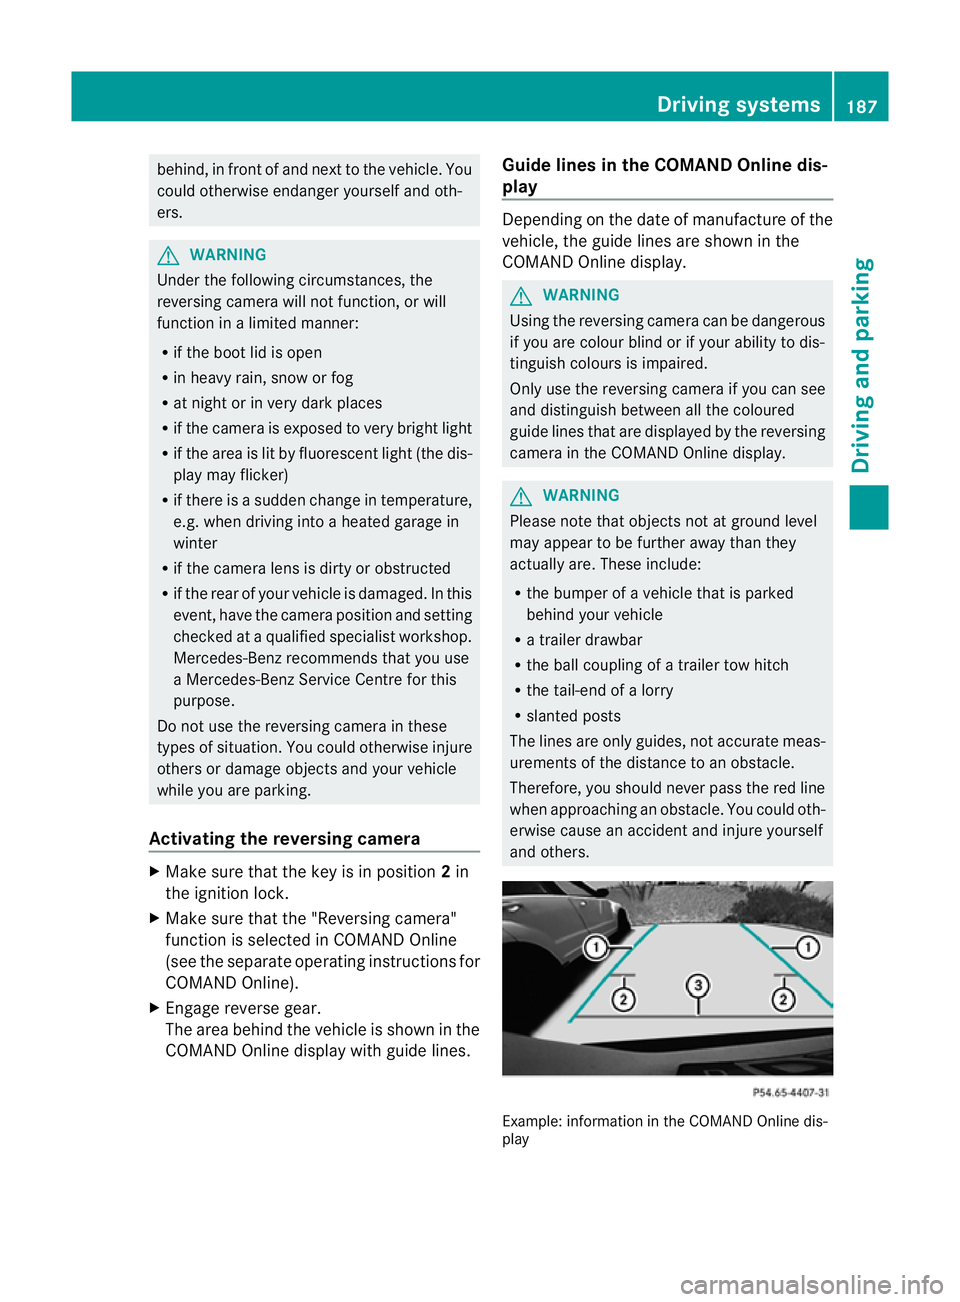
The area behind the vehicle is shown in the
COMAND Online display with guide lines. Guide lines in the COMAND Online dis-
play Depending on the date of manufacture of the
vehicle, the guide lines are shown in the
COMAND Online display.
G
WARNING
Using the reversing camera can be dangerous
if you are colour blind or if your ability to dis-
tinguish colours is impaired.
Only use the reversing camera if you can see
and distinguish between all the coloured
guide lines that are displayed by the reversing
camera in the COMAND Online display. G
WARNING
Please note that objects not at ground level
may appear to be further away than they
actually are. These include:
R the bumper of a vehicle that is parked
behind your vehicle
R a trailer drawbar
R the ball coupling of a trailer tow hitch
R the tail-end of a lorry
R slanted posts
The lines are only guides, not accurate meas-
urements of the distance to an obstacle.
Therefore, you should never pass the red line
when approaching an obstacle. You could oth-
erwise cause an accident and injure yourself
and others. Example: information in the COMAND Online dis-
play Driving systems
187Driving and parking Z
Page 204 of 373
R
is affected more by strong crosswinds
R demands more sensitive steering
R consumes more fuel
On long and steep downhill gradients, you
must shift to a lower gear in good time, or on
vehicles with automatic transmission, select
the shift range 1,2or 3.
i This also applies if you have activated
cruise control, SPEEDTRONIC or DIS-
TRONIC PLUS.
This will use the braking effect of the engine,
so less braking will be required to maintain
the speed. This relieves the load on the brake
system and prevents the brakes from over-
heating and wearing too quickly. If you need
additional braking, depress the brake pedal
repeatedly rather than continuously.
Driving tips R
Maintain a greater distanc efrom the vehi-
cle in front than when driving without a
trailer.
R Avoid braking abruptly .Ifpossible, brake
gently at first to allow the trailer to run on.
Then, increase the braking force rapidly.
R The values given for gradient-climbing
capabilities from a standstill refer to sea
level. When driving in mountainous areas,
note that the power output of the engine,
and consequently the vehicle's gradient-
climbing capability, decrease with increas-
ing altitude.
If the trailer swings from side to side:
X Do not accelerate.
X Do not counter-steer.
X Brake if necessary. Folding out the ball coupling
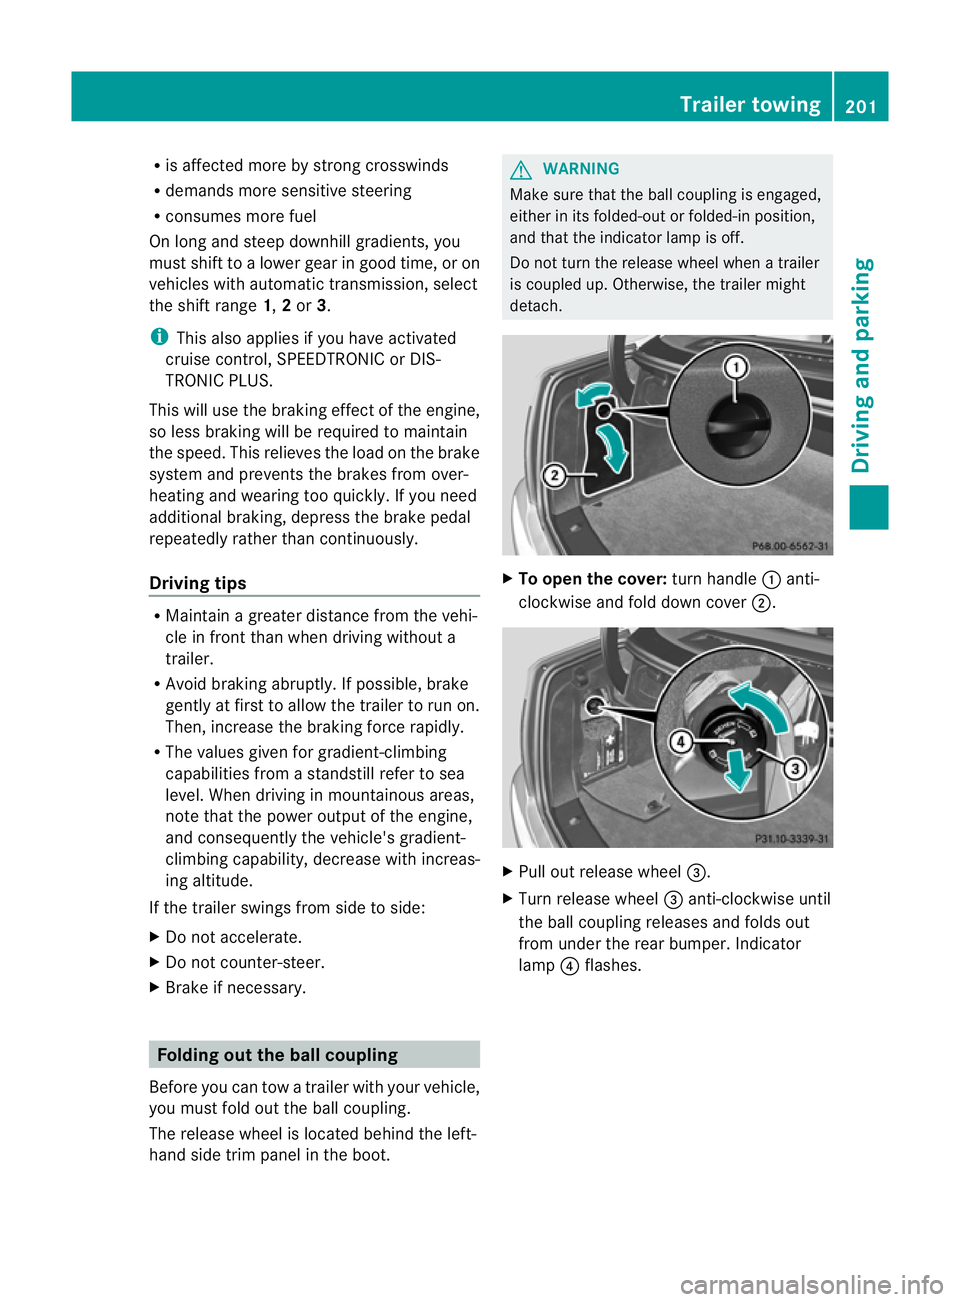
Before you can tow a trailer with your vehicle,
you must fold out the ball coupling.
The release wheel is located behind the left-
hand side trim panel in the boot. G
WARNING
Make sure that the ball coupling is engaged,
either in its folded-out or folded-in position,
and that the indicator lamp is off.
Do not turn the release wheel when a trailer
is coupled up. Otherwise, the trailer might
detach. X
To open the cover: turn handle:anti-
clockwise and fold down cover ;. X
Pull out release wheel =.
X Turn release wheel =anti-clockwise until
the ball coupling releases and folds out
from under the rear bumper. Indicator
lamp ?flashes. Trailer towing
201Driving and parking Z
Page 206 of 373

X
Place the protective cap on the ball cou-
pling.
The release wheel is located behind the left-
hand side trim panel in the boot. Coupé
X
To open the cover: turn handle:anti-
clockwise and fold down cover ;.X
Pull out release wheel =.
X Turn release wheel =anti-clockwise.
The ball coupling unlocks and lowers. Indi-
cator lamp ?flashes. X
Press the ball coupling in the direction of
the arrow until it engages behind the
bumper.
Indicator lamp ?goes out and the mes-
sage in the multifunction display disap-
pears. Trailer power supply
When it leaves the factory, your vehicle's
trailer socket is equipped with a permanent
power supply and a power supply that is
switched on via the ignition lock.
The permanen tpower supply is supplied via
trailer socket pin 9.
The power supply that is switched on via the
ignition lock is supplied via trailer socket pin
10.
! You can connect consumers with a power
rating of up to 240 W to the permanent
power supply and up to 180 W to the power
supply that is switched on via the ignition
lock.
You must not charge a trailer battery using
the power supply.
The trailer's permanent power supply is
switched off in the event of low vehicle supply
voltage and after six hours at the latest.
You can obtain further information about
installing the trailer electrics from a qualified
specialist workshop, e.g. aMercedes-Benz
Service Centre.
X To switch the connected power supply
on or off: turn the key in the ignition lock
to position 2or 0respectively. Bulb failure indicator for LED lamps
i If LED lamps are fitted in the trailer, an
error message may appear in the multi-
function display even if there is no fault. The
reason for the error message may be that
the curren thas falle nbelow the minimum
of 50 milliamperes (mA). Trailer towing
203Driving and parking Z
Page 269 of 373

Display messages Possible causes/consequences and
M Solutions
With the Hold function activated, you have either:
R
opened the driver's doo rand released the sea tbelt or
R switched off the engine or
R opened the bonnet
At one may also sound at regular intervals. The tone becomes
louder if you attempt to lock the vehicle.
You cannot start the engine.
X Shift the transmission to position P.
You can restart the engine. N The boot lid is open.
X
Close the boot lid. M G
Risk of accident
Vehicles with an anti-theft alarm system: the bonnet is open. A
warning tone also sounds.
X Pull over and stop the vehicle safely as soon as possible, paying
attention to road and traffic conditions.
X Apply the parking brake.
X Close the bonnet. C At least one door is open.
Awarning tone also sounds.
X Close all doors. _
Front left seat
backr. not locked
or
Front right seat backr. not
locked The driver's or front-passenger seat backres
tis not engaged. A
warning tone also sounds.
X Push the backrest back until it engages. Check trailer
hitch lock G
Risk of accident
Vehicles with a retractable trailer coupling:
The trailer tow hitch is not correctly engaged.
Aw arning tone also sounds.
X Stop the vehicle immediately, paying attentio ntoroad and traf-
fic conditions, and switch off the engine.
X Apply the parking brake.
X Allow the trailer tow hitch ball coupling to engage in the end
position (Y page 201).266
Display messagesOn-board computer and displays
Page 271 of 373

Display messages Possible causes/consequences and
M Solutions
N The boo
tlid is open.
X Close the boot lid. M G
Risk of accident
The bonnet is open .Awarning tone also sounds.
X Pull ove rand stop the vehicle safely as soo nas possible, paying
attention to road and traffic conditions.
X Apply the parking brake.
X Close the bonnet.
If the active bonnet (pedestrian protection) has been triggered:
X Reset the bonnet (Y page 300).
X Close the bonnet. Active bonnet
malfunction See
Owner's Manual The active bonnet (pedestrian protection) is not active due to a
malfunction.
X
Visit a qualified specialist workshop. C At least one door is open.
Awarning tone also sounds.
X Close all doors. _
Front left seat
backrest not locked
or
Front right seat backrest not
locked The driver's or front-passenger seat backres
tis not engaged. A
warning tone also sounds.
X Push the backrest back until it engages. j
Check trailer
hitch lock G
Risk of accident
The trailer tow hitch is not correctly engaged.
Aw arning tone also sounds.
X Stop the vehicle immediately, paying attentio ntoroad and traf-
fic conditions, and switch off the engine.
X Apply the parking brake.
X Allow the trailer tow hitch ball coupling to engage in the end
position (Y page 201).268
Display messagesOn-board computer and displays
Page 287 of 373
Useful information
i This Owner's Manual describes all models
and all standard and optional equipment
available to your vehicle at the time of pub-
lication of the Owner's Manual. Country-
specific deviations are possible. Please
note that your vehicle may not be equipped
with all features described. This also
applies to safety-relevan tsystems and
functions.
i Please read the information on qualified
specialist workshops (Y page 26).Loading guidelines
G
WARNING
Secure and position the load as described in
the loading guidelines.
Otherwise, vehicle occupants could
be injured by the load being throw naround in
the event of sharp braking, a sudden change
in direction or an accident.
You will find further informatio ninthe "Secur-
ing a load" section.
Even if you follow all the loading guidelines,
the load will increase the risk of injury in the
event of an accident. G
WARNING
Keep the boot lid closed while the vehicle is
in operation. Otherwise, you could be pois-
oned by exhaust fumes entering the vehicle.
The handling characteristics of a laden vehi-
cle are dependent on the distribution of the
load within the vehicle. For this reason, you
should observe the following notes when
transporting a load:
R when transporting a load, never exceed the
maximum permissible gross vehicle weight or the permissible axle loads for the vehicle
(including occupants).
R position heavy loads as far forwards as pos-
sible and as low down in the boot as pos-
sible.
R the load must not protrude above the upper
edge of the seat backrests.
R always place the load against the rear or
front seat backrests. Make sure that the
seat backrests are securely locked into
place.
R always place the load behind unoccupied
seats if possible.
R secure the load with sufficiently strong and
wear-resistant lashing material. pad sharp
edges for protection.
i Load restraints are available at any quali-
fied specialist workshop, e.g. a Mercedes-
Benz Service Centre. Stowage areas
Stowage compartments
Important safety notes G
WARNING
The stowage compartments must be closed
when items are stored in them. Luggage nets
are not designed to secure heavy items of
luggage.
You or other vehicle occupants could be
injured by objects being thrown around if you:
R brake sharply
R change direction suddenly
R are involved in an accident
Sharp-edged and fragile objects must not be
placed in the luggage net.
Do not place hard objects in the map pockets.
Objects must not protrude from the map
pockets. 284
Stowage areasStowing and features
Page 289 of 373
not secure the objects sufficiently in the event
of an accident.
Luggage nets are located in the front-
passenger footwell and on the left-hand side
of the boot. Through-loading facility in the rear
benc
hseat
Important safety notes G
WARNING
Do not carry heavy or hard objects inside the
vehicle or in the boot unless they are secured.
Otherwise, you and other vehicle occupants
could be injured by object sbeing thrown
around the vehicle in the event of sharp brak-
ing, a sudden change in direction or an acci-
dent. G
WARNING
Always drive with the boot lid closed. Exhaust
fumes could otherwise enter the vehicle inte-
rior.
The left-hand and right-hand rear seat backr-
ests can be folded down separately to
increase the boot capacity.
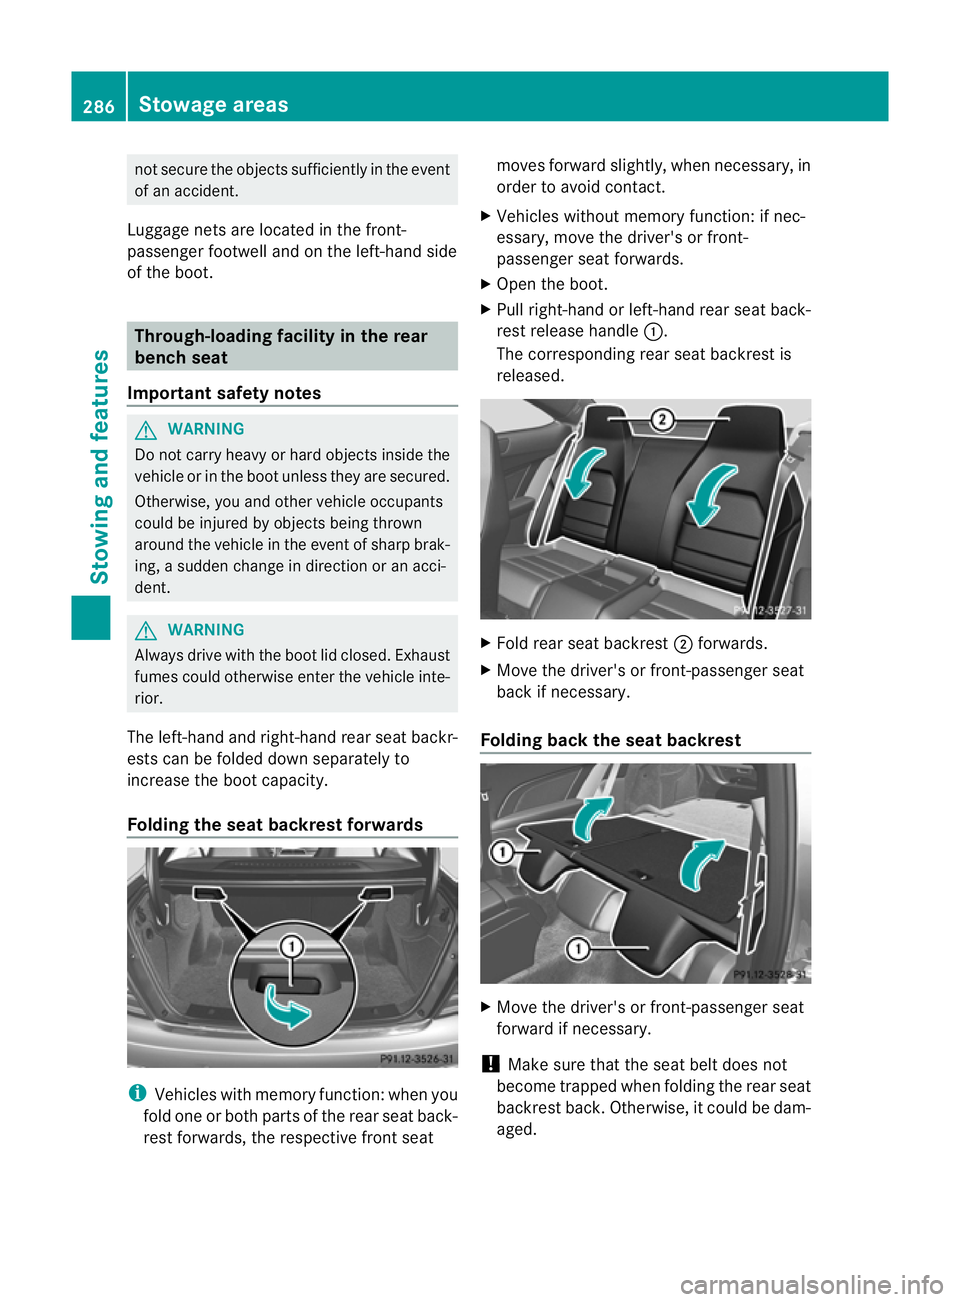
Folding the seat backrest forwards i
Vehicles with memory function :when you
fold one or both parts of the rear seat back-
rest forwards, the respective front seat moves forward slightly, when necessary, in
order to avoid contact.
X Vehicles without memory function: if nec-
essary, move the driver's or front-
passenger seat forwards.
X Open the boot.
X Pull right-hand or left-hand rear seat back-
rest release handle :.
The corresponding rear seat backrest is
released. X
Fold rear seat backrest ;forwards.
X Move the driver's or front-passenger seat
back if necessary.
Folding back the seat backrest X
Move the driver's or front-passenger seat
forward if necessary.
! Make sure that the seat belt does not
become trapped when folding the rear seat
backrest back. Otherwise, it could be dam-
aged. 286
Stowage areasStowing and features