2011 MERCEDES-BENZ C-CLASS COUPE display
[x] Cancel search: displayPage 203 of 373

G
WARNING
If the Check trailer hitch locking mechanism message appears in the multi-
function display while the vehicle is in motion,
pull over immediately and check whethe rthe
ball coupling is correctly engaged. G
WARNING
Always observe the maximum speed permit-
ted in Germany for vehicle/trailer combina-
tions, even in countries where higher speeds
are permitted. This lowers the risk of an acci-
dent. G
WARNING
Never depress the brake pedal continuously
while the vehicle is in motion, e.g. never cause
the brakes to rub by applying constant slight
pedal pressure. This causes the brake system
to overheat, increases the braking distance
and can lead to the brakes failing completely. G
WARNING
On no account should you attempt to draw the
vehicle/trailer combination out by increasing
speed.
General information i
When towing a trailer, set the tyre pres-
sure on the rear axle of the towing vehicle
for a maximum load; see the tyre pressure
table in the fuel filler flap (Y page 339).
You will find installation dimensions and loads
in the "Technical data" section
(Y page 361).
The maximum permissible trailer drawbar
noseweight on the ball coupling is 75 kg.
However, the actual noseweight must not
exceed the value given on the trailer tow hitch
and trailer identification plates. The lowest
weight applies.
! Use a noseweight as close as possible to
the maximum permissible noseweight. Do
not use a noseweight of less than 50 kg,
otherwise the trailer may come loose. Bear in mind that the payload and the rear
axle load are reduced by the actual nose-
weight.
Please note that when towing a trailer, PARK-
TRONIC (Y page 179), parking guidance
(Y page 183) and Blind Spot Assist
(Y page 190) are only available with limita-
tions, or not at all.
i The height of the ball coupling changes
with the load of the vehicle. If necessary,
use a trailer with a height-adjustable draw-
bar.
Driving tips i
Observe the notes on ESP ®
trailer stabi-
lisation (Y page 70).
In Germany, the maximum permissible speed
for vehicle/trailer combinations depends on
the type of trailer, and is either 80 km/h or
100 km/h. In some countries, higher maxi-
mum speeds are permissible for vehicle/
trailer combinations. Before beginning the
journey, check the trailer's documents to see
what the maximum permitted speed is.
For certain Mercedes-Ben zvehicles, the max-
imum permissible rear axle load is increased
when towing a trailer. Refer to the "Technical
data" section to find out whether this applies
to your vehicle. If you utilise any of the added
maximum rear axle load when towing a trailer,
the vehicle/trailer combination may not
exceed a maximum speed of 100 km/h for
reasons concerning the operating permit.
This also applies in countries in which the
permissible maximum speed for vehicle/
trailer combinations is above 100 km/h.
When towing a trailer, your vehicle's handling
characteristics will be differen tincomparison
to when driving without a trailer.
The vehicle/trailer combination:
R is heavier
R is restricted in its acceleration and gradi-
ent-climbing capability
R has an increased braking distance 200
Trailer towingDriving and parking
Page 205 of 373
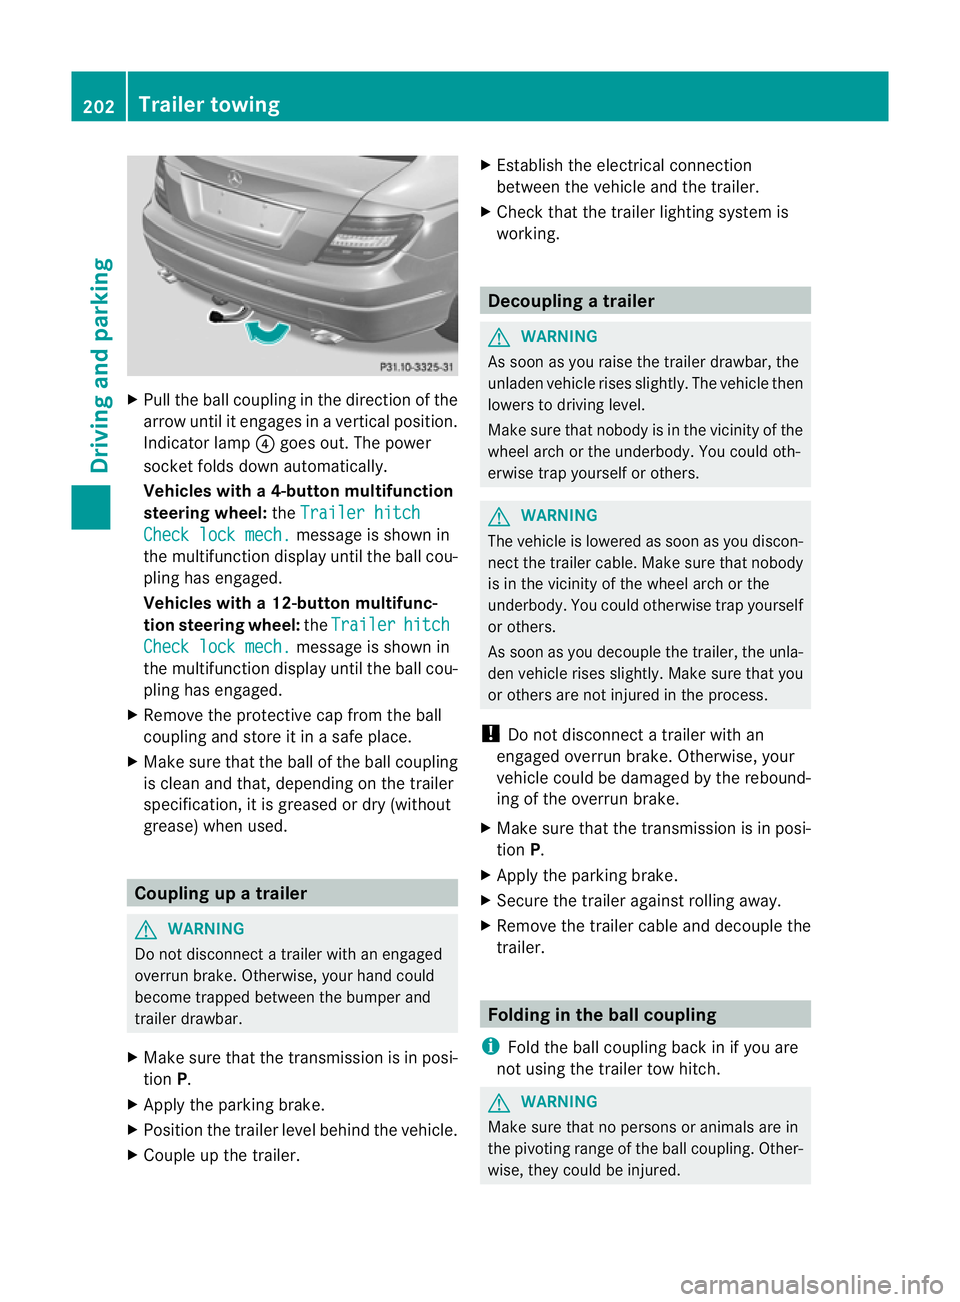
X
Pull the ball coupling in the direction of the
arrow until it engages in a vertical position.
Indicator lamp ?goes out. The power
socket folds down automatically.
Vehicles with a4-button multifunction
steering wheel: theTrailer hitch Check lock mech. message is show
nin
the multifunctio ndisplay until the ball cou-
pling has engaged.
Vehicles with a 12-button multifunc-
tion steering wheel: theTrailer hitch
Check lock mech. message is shown in
the multifunction display until the ball cou-
pling has engaged.
X Remove the protective cap fro mthe ball
coupling and store it in a safe place.
X Make sure that the ball of the ball coupling
is clean and that, depending on the trailer
specification, it is greased or dry (without
grease) when used. Coupling up a trailer
G
WARNING
Do not disconnect a trailer with an engaged
overrun brake. Otherwise, your hand could
become trapped between the bumper and
trailer drawbar.
X Make sure that the transmission is in posi-
tion P.
X Apply the parking brake.
X Position the trailer level behind the vehicle.
X Couple up the trailer. X
Establish the electrical connection
between the vehicle and the trailer.
X Check that the trailer lighting system is
working. Decoupling
atrailer G
WARNING
As soon as you raise the trailer drawbar, the
unladen vehicle rises slightly. The vehicle then
lowers to driving level.
Make sure tha tnobody is in the vicinity of the
wheel arch or the underbody. You could oth-
erwise trap yourself or others. G
WARNING
The vehicle is lowered as soon as you discon-
nect the trailer cable. Make sure that nobody
is in the vicinity of the wheel arch or the
underbody. You could otherwise trap yourself
or others.
As soon as you decouple the trailer, the unla-
den vehicle rises slightly. Make sure that you
or others are not injured in the process.
! Do not disconnect a trailer with an
engaged overrun brake. Otherwise, your
vehicle could be damaged by the rebound-
ing of the overrun brake.
X Make sure that the transmission is in posi-
tion P.
X Apply the parking brake.
X Secure the trailer against rolling away.
X Remove the trailer cable and decouple the
trailer. Folding in the ball coupling
i Fold the ball coupling back in if you are
not using the trailer tow hitch. G
WARNING
Make sure that no persons or animals are in
the pivoting range of the ball coupling. Other-
wise, they could be injured. 202
Trailer towingDriving and parking
Page 206 of 373

X
Place the protective cap on the ball cou-
pling.
The release wheel is located behind the left-
hand side trim panel in the boot. Coupé
X
To open the cover: turn handle:anti-
clockwise and fold down cover ;.X
Pull out release wheel =.
X Turn release wheel =anti-clockwise.
The ball coupling unlocks and lowers. Indi-
cator lamp ?flashes. X
Press the ball coupling in the direction of
the arrow until it engages behind the
bumper.
Indicator lamp ?goes out and the mes-
sage in the multifunction display disap-
pears. Trailer power supply
When it leaves the factory, your vehicle's
trailer socket is equipped with a permanent
power supply and a power supply that is
switched on via the ignition lock.
The permanen tpower supply is supplied via
trailer socket pin 9.
The power supply that is switched on via the
ignition lock is supplied via trailer socket pin
10.
! You can connect consumers with a power
rating of up to 240 W to the permanent
power supply and up to 180 W to the power
supply that is switched on via the ignition
lock.
You must not charge a trailer battery using
the power supply.
The trailer's permanent power supply is
switched off in the event of low vehicle supply
voltage and after six hours at the latest.
You can obtain further information about
installing the trailer electrics from a qualified
specialist workshop, e.g. aMercedes-Benz
Service Centre.
X To switch the connected power supply
on or off: turn the key in the ignition lock
to position 2or 0respectively. Bulb failure indicator for LED lamps
i If LED lamps are fitted in the trailer, an
error message may appear in the multi-
function display even if there is no fault. The
reason for the error message may be that
the curren thas falle nbelow the minimum
of 50 milliamperes (mA). Trailer towing
203Driving and parking Z
Page 208 of 373
Useful information
............................206
Important safety notes ....................206
Displays and operation (4-button
multifunction steering wheel) .........206
Displays and operation (12-button
multifunction steering wheel) .........210
Display messages ............................. 232
Warning and indicator lamps in the
instrument cluster ............................273 205On-board computer and displays
Page 209 of 373

Useful information
i This Owner's Manual describes all models
and all standard and optional equipment
available to your vehicle at the time of pub-
lication of the Owner's Manual. Country-
specific deviations are possible. Please
note that your vehicle may not be equipped
with all features described. This also
applies to safety-relevan tsystems and
functions.
i Please read the information on qualified
specialist workshops (Y page 26).Important safety notes
You will find an illustration of the instrument
cluster in the "At a glance" section
(Y page 32). G
WARNING
Only use the on-board computer when road
and traffic conditions permit .You would oth-
erwise be distracted and unable to concen-
trate properly on driving, and could cause an
accident. G
WARNING
If the instrument cluster or multifunction dis-
play fails, no messages can be displayed.
This means that you will not see information
about the driving situation, such as the speed,
outside temperature, warning/indicator
lamps, display messages or system failures.
Handling characteristics may be affected.
Adapt your driving style and speed accord-
ingly.
Immediately consult a qualified specialist
workshop which has the necessary specialist
knowledge and tools to carry out the work
required. Mercedes-Benz recommends that
you use a Mercedes-Benz Service Centre for
this purpose. In particular, work relevant to
safety or on safety-related systems must be
carried out at a qualified specialist workshop. G
WARNING
The on-board computer only records and dis-
plays malfunctions and warnings from certain
systems. For this reason, you should always
make sure that your vehicle is safe to use. You
could otherwise cause an accident by driving
an unsafe vehicle. G
WARNING
The operating safety of your vehicle could be
jeopardised if maintenance work is carried
out incorrectly. As aresult, you could lose
control of the vehicle and cause an accident.
In addition, the safety systems may no longer
be able to protec tyou or others as they are
designed to do.
Always have maintenance work carried out at
a qualified specialist workshop. The qualified
specialist workshop must have the necessary
specialist knowledge and tools to carry out
the work required. Mercedes-Benz recom-
mends that you use a Mercedes-Benz Service
Centre for this purpose. In particular, work
relevant to safety or on safety-related sys-
tems must be carried out at a qualified spe-
cialist workshop. Displays and operation (4-button mul-
tifunction steering wheel)
Coolant temperature gauge
The coolant temperature gauge is in the
instrument cluster on the left-hand side.
Under normal operating conditions and with
the specified coolant level, the coolant tem-
perature may rise to 120 †.
The coolant temperature may rise to the top
end of the scale at high outside temperatures
and on long uphill stretches. Rev counter
The red band in the rev counter indicates the
engine's overrevving range. 206
Displays and operation (4-button multifunction steering wheel)On-board computer and displays
Page 210 of 373
!
Do not drive in the overrevving range.
Doing so will damage the engine.
The fuel supply is interrupted to protect the
engine when the red band is reached. Outside temperature display
The outside temperature display is in the
instrument cluster (Y page 32).G
WARNING
At temperatures just above freezing point, the
street may be icy, especially in wooded areas
or on bridges. If you do not adapty our driving
style to the conditions, the vehicle could skid.
For this reason, adapt your driving style and
speed to the weather conditions.
Changes in the outside temperature are dis-
played after a short delay. Operating the on-board computer
The on-board computer is activated as soon
as you turn the key to position 1in the ignition
lock. You can use the on-board computer to
call up information relating to your vehicle
and to make and adjust settings.
i You can have certain functions set at a
qualified specialist workshop, e.g. a
Mercedes-Benz Service Centre.
Example:
R automatic door lock
R speed limit for winter tyres
You can obtain information about this at
any Mercedes-Benz Service Centre.
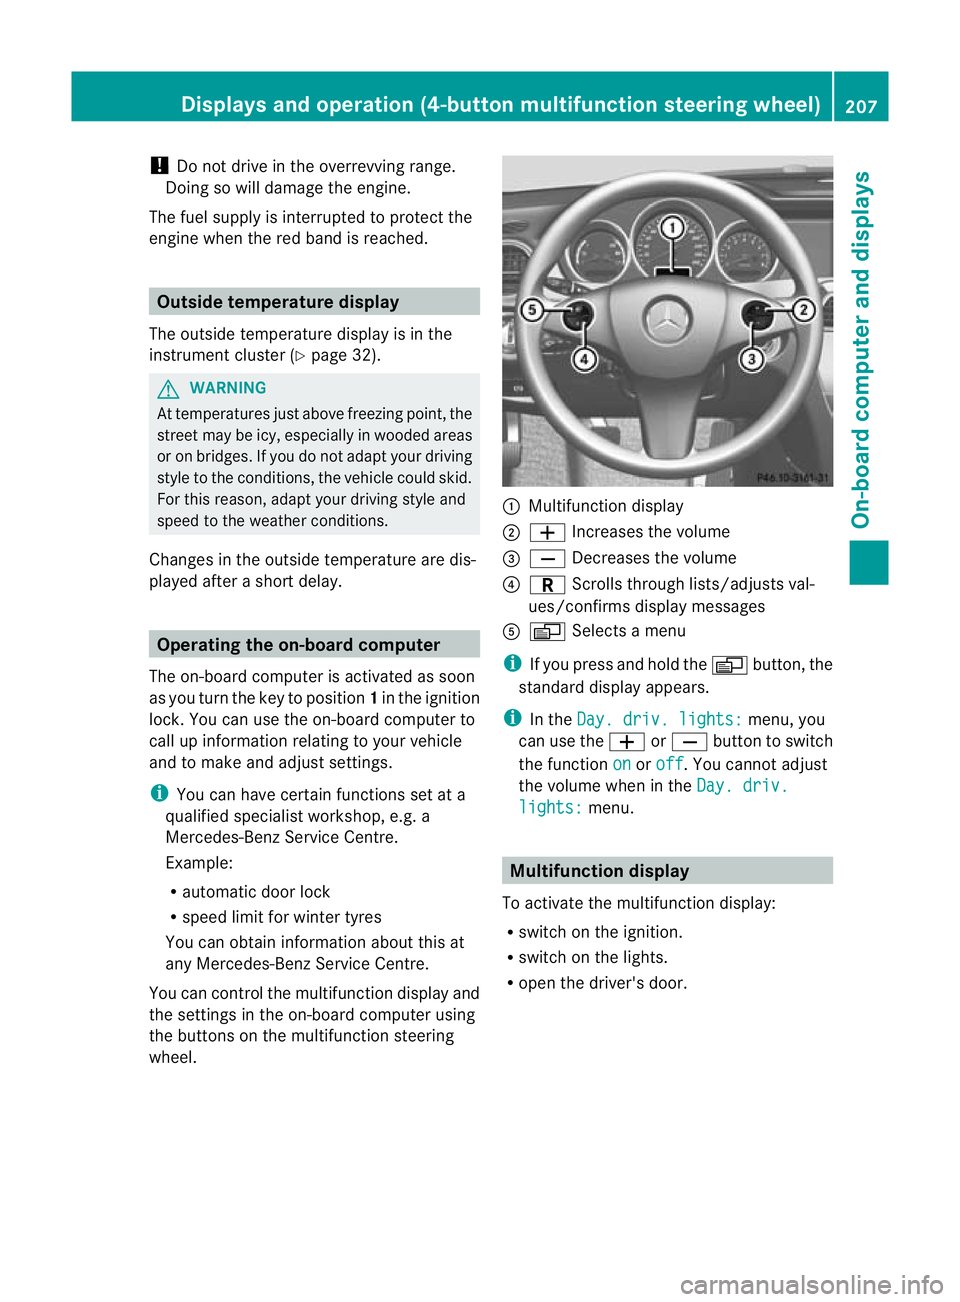
You can control the multifunction display and
the settings in the on-board computer using
the buttons on the multifunction steering
wheel. :
Multifunction display
; W Increases the volume
= X Decreases the volume
? C Scrolls through lists/adjusts val-
ues/confirms display messages
A V Selects a menu
i If you press and hold the Vbutton, the
standard display appears.
i In the Day. driv. lights: menu, you
can use the WorX button to switch
the function on or
off .Y
ou cannot adjust
the volume when in the Day. driv. lights: menu.
Multifunction display
To activate the multifunction display:
R switch on the ignition.
R switch on the lights.
R open the driver's door. Displays and operation (4-button multifunction steering wheel)
207On-board computer and displays Z
Page 211 of 373
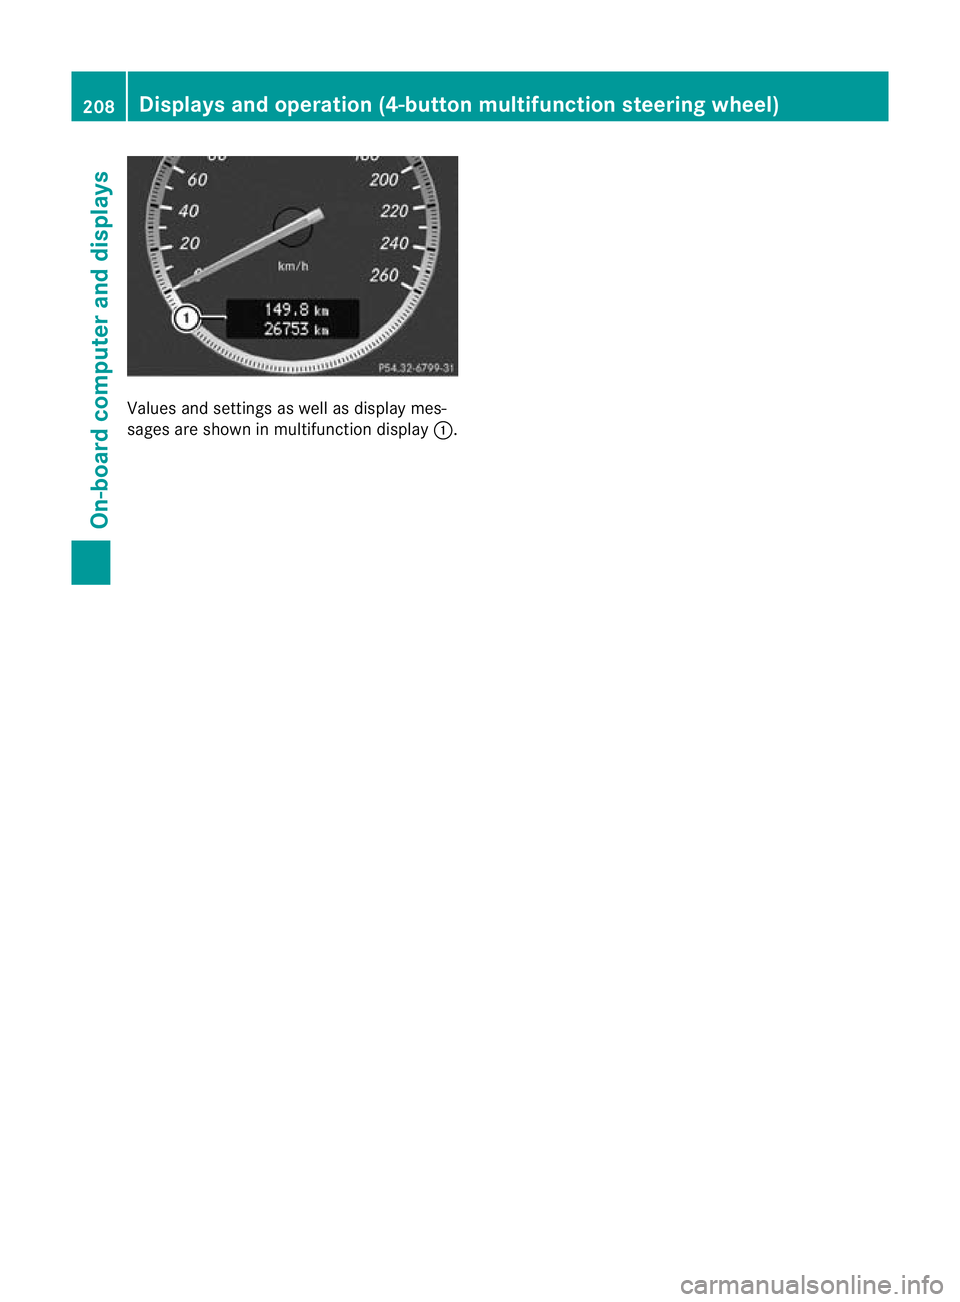
Values and settings as well as display mes-
sages are shown in multifunction display :.208
Displays and operation (4-button multifunction steering wheel)On-board computer and displays
Page 212 of 373
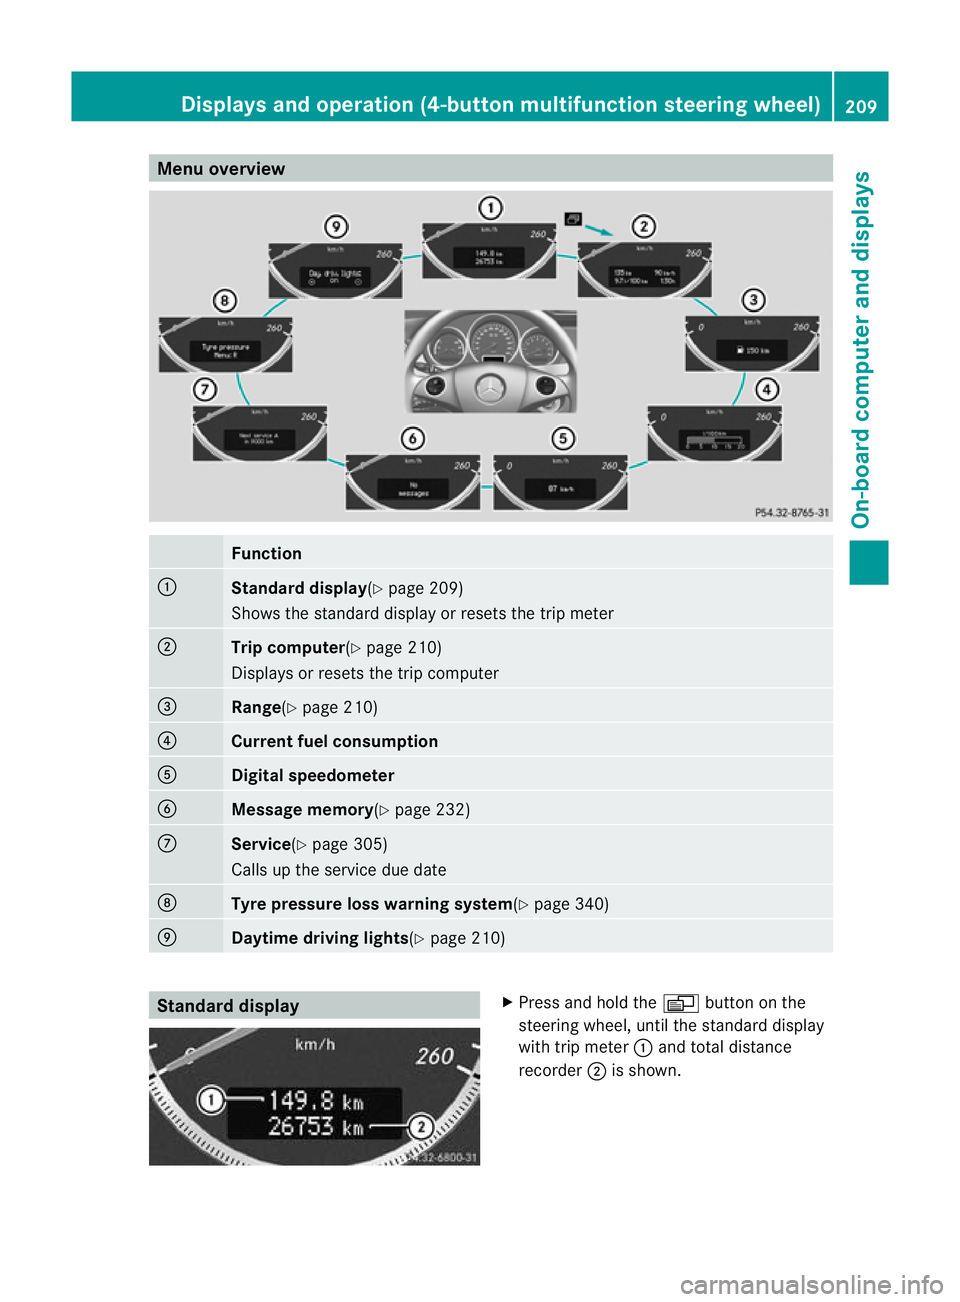
Menu overview
Function
:
Standard display
(Ypage 209)
Shows the standard display or resets the trip meter ;
Trip computer
(Ypage 210)
Displays or resets the trip computer =
Range(Y
page 210) ?
Current fuel consumption
A
Digital speedometer
B
Message memory(Y
page 232)C
Service(Y
page 305)
Calls up the service due date D
Tyre pressure loss warnin
gsystem(Y page 340) E
Daytime driving lights(Y
page 210)Standard display X
Press and hold the Vbutton on the
steering wheel, until the standard display
with trip meter :and total distance
recorder ;is shown. Displays and operation (4-button multifunction steering wheel)
209On-board computer and displays Z