Page 65 of 94

■Bluetooth® phone pairing
Compatible Bluetooth®-equipped phones can be connected to the vehicle, enabling
hands-free operation.")
65
Hands-free System For Cellular Phone
(without navigation system)
■Bluetooth® phone pairing
Compatible Bluetooth®-equipped phones can be connected to the vehicle, enabling
hands-free operation. Please refer to the cellular phone manufacturer's user guide for pair-
ing procedures, or go to“www.lexus.com/bluetooth” for more phone information.
To use a Bluetooth
® phone, it is necessary
to first register it in the system.
Press or .
Press and say “Pair phone”.
Press and say a name*.
*: This name will be used to identify
your phone in the case that more than
one phone has been registered to the
system.
Press and say “Confirm” to
display the passkey.
Enter the passkey shown on the display
into the phone.
Refer to the cellular phone user's manual
for cellular phone operation.
Once the voice guidance for registration
completion is finished, press .
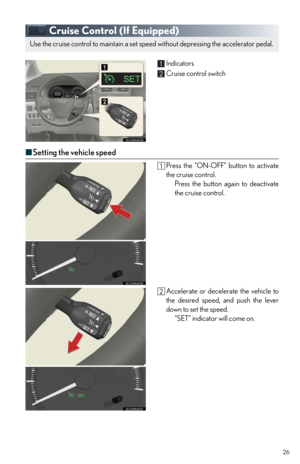
■Calling by number
Press and say “Dial by num-
ber”.
Press and say the phone num-
ber.
Dialing
a. Press .
b. Press and say “Dial”.
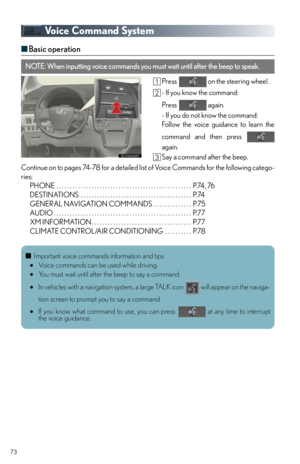
: Pressing this switch turns the voice command system on. Say a command
after the beep.
Page 66 of 94
66
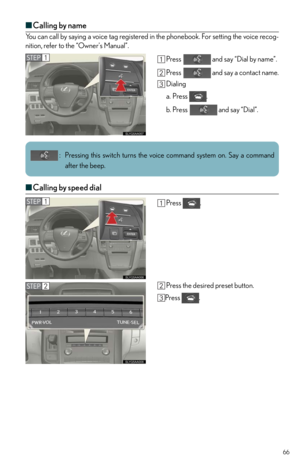
■Calling by name
You can call by saying a voice tag registered in the phonebook. For setting the voice recog-
nition, refer to the “Owner's Manual”.
Press and say “Dial by name”.
Press and say a contact name.
Dialing
a. Press .
b. Press and say “Dial”.
■Calling by speed dial
Press .
Press the desired preset button.
Press .
: Pressing this switch turns the voice command system on. Say a command
after the beep.
Page 67 of 94
67
■Phonebook transfer
Press .
Press and say “Phone book”.
Press and say “Add entry”.
Press and say “By phone”.
Press and say “Confirm”.
Transfer the phonebook data to the sys-
tem using the cellular phone.
Refer to the cellular phone user’s manual
for cellular phone operation.
Press and say “Previous” or
“Next” until the desired data is displayed.
Press and say “Confirm”.
Press and say the desired
name.
Press and say “Confirm”.
Press and say “Confirm”
again.
Phonebook transfer may not be possible depending on phone model.
: Pressing this switch turns the voice command system on. Say a command
after the beep.
Page 68 of 94
68
■Changing the registered name
Press .
Press and say “Phone book”.
Press and say “Change name”.
Press and say the desired
name.
Press and say “Confirm”.
Press and say the new name.
Press and say “Confirm”.
■Registering a speed dial
Press .
Press and say “Phone book”.
Press and say “Set speed
dial”.
Select the data to be registered.
Press and say the desired
name.
Press and say “Confirm”.
Press the desired preset button.
Press and say “Confirm”.
: Pressing this switch turns the voice command system on. Say a command
after the beep.
: Pressing this switch turns the voice command system on. Say a command
after the beep.
Page 69 of 94
69
Audio System (without navigation system)
■Basic operation Po w e r/ Vo l u m e
Audio sources
AM
FM: AM radio/FM radio
SAT: Satellite radio
CD•AUX:CD player/Auxiliary
audio device/USB mem-
ory/iPod/Bluetooth
audio
Sound quality modes
■Radio
Te x t m e s s a g e s
Station presets
Traffic information
Radio tune
RDS genre select
Scanning radio stations
Seek
■Entering station presets
Select the desired station by using the tune, the seek or the scan function.
Press and hold one of the preset buttons (1-6) until you hear a beep, indicating that the
station is set.
Page 70 of 94
70
■CD player
■
Playing an audio CD
Eject
Text information
Random playback
Repeat play
Pause/Playback
Disc load
Disc select
Search playback
Track select/rewind/fast-forward
■Playing a CD with MP3/WMA files
Eject
Text information
Random playback
Repeat play
Pause/Playback
Folder select
Disc load
File select
Disc select
Search playback
File select/rewind/fast-forwarding
■Loading a CD
Press the “LOAD” button.
“WAIT” is shown on the display.
Insert a CD when the indicators on the slot turn from amber to green.
The display changes from “WAIT” to “LOAD”.
11
Page 71 of 94

71
■Loading multiple CDs
Press and hold the “LOAD” button until you hear a beep.
“WAIT” is shown on the display.
Insert a CD when the indicators on the slot turn from amber to green.
The display changes from “WAIT” to “LOAD”.
The indicators on the slot turn to amber when the CD is inserted.
Insert the next CD when the indicators on the slot turn from amber to green again.
Repeat the procedure for the remaining CDs.
To cancel the operation, press the “LOAD” button. If you do not insert a CD within 15
seconds, loading will cancelled automatically.
■Operating an iPod
Te x t i n f o r m a t i o n
Random play
Repeat play
Pause/Playback
Go back
Menu/Track select
Playback
Track select/rewind/fast-forward
■Remote control (steering wheel switches)
The audio system can be operated using the remote control located on the steering wheel.
Vo l u m e
Power on/change mode: press
Po w e r o f f : p r e s s a n d h o l d
Radio mode: radio tuner
CD mode: disc/track/file (MP3/WMA)
select
iPod mode (if equipped): track select
Page 72 of 94
72
Air Conditioning System
(without navigation system)
■Using the automatic mode
Press to turn on the airflow and to adjust the temperature.
■Adjusting the temperature
■To simultaneously adjust the driver’s side and passenger’s side temperature settings
Press to turn the “DUAL” indicator off and then press .
■To individually adjust the driver’s side and passenger’s side temperature settings
Press or to turn the “DUAL” indicator on and then press or .Passenger side temperature display
Dual mode button
Passenger side temperature control
Windshield defogger
Outside air/recirculated air mode
button
Air outlet selector buttonFan speed control button
“OFF” button
Automatic mode button
Driver side temperature control
Cooling and dehumidification function
on/off button
Driver side temperature display
11


■Basic operation Po w e r/ Vo l u m e
Audio sources
AM
FM: AM radio/FM radio
SAT: Satellite radio
CD•AUX:CD player/Auxiliary
audio device/USB mem-")


■Using the automatic mode
Press to turn on the airflow and to adjust the temperature.
■Adjusting the temperature
■To simultaneously a")