Page 9 of 46

224
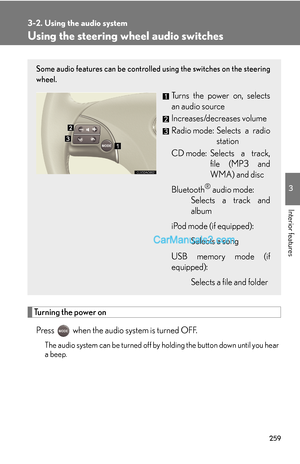
3-2. Using the audio system
■If the satellite radio does not operate normally
If a problem occurs with the XM
® tuner, a message will appear on the display. Refer
to the table below to identify the problem, and take the suggested corrective action.
“ANTENNA”
The XM® antenna is not connected. Check whether
the XM® antenna cable is attached securely.
There is a short-circuit in the antenna or the surround-
ing antenna cable. See a Lexus certified dealer.
“UNAUTH”
You have not subscribed to the XM® Satellite Radio.
The radio is being updated with the latest encryption
code. Contact the XM
® Satellite Radio for subscrip-
tion information. When a contract is canceled, you can
choose the “CH000” and all free-to-air channels.
The premium channel you selected is not authorized.
Wait for about 2 seconds until the radio returns to the
previous channel or “CH001”. If it does not change
automatically, select another channel. If you want to lis-
ten to the premium channel, contact the XM
® Satellite
Radio.
“NO SIGNAL”
The XM® signal is too weak at the current location.
Wait until your vehicle reaches a location with a stron-
ger signal.
“LOADING”The unit is acquiring audio or program information.
Wait until the unit has received the information.
“OFF AIR”The channel you selected is not broadcasting any pro-
gramming. Select another channel.
“-----”
There is no song/program title or artist name/feature
associated with the channel at that time. No action
needed.
Page 10 of 46

225
3-2. Using the audio system
3
Interior features
Contact the XM® Listener Care Center at 1-877-515-3987.
■Certifications for the radio tuner
This equipment has been tested and found to comply with the limits for a class B
digital device, pursuant to Part 15 of the FCC Rules. These limits are designed to
provide reasonable protection against harmful interference in a residential installa-
tion. This equipment generates, uses and can radiate radio frequency energy and, if
not installed and used in accordance with the instructions, may cause harmful inter-
ference to radio communications. However, there is no guarantee that interference
will not occur in a particular installation.
If this equipment does cause harmful interference to radio or television reception,
which can be determined by turning the equipment off and on, the user is encour-
aged to try to correct the interference by trying one or more of the following:
●Reorienting or relocate the receiving antenna.
●Increasing the separation between the equipment and receiver.
●Connecting the equipment into an outlet on a circuit different from that to which
the receiver is connected.
●Consulting the dealer or an experienced radio/TV technician for help.
“CH UNAVL”
The channel you selected is no longer available. Wait
for about 2 seconds until the radio returns to the previ-
ous channel or “CH001”. If it does not change auto-
matically, select another channel.
Page 11 of 46
226
3-2. Using the audio system
Using the CD player
Loading CDs
■Loading a CD
Press .
“WAIT” is shown on the display.
When the indicator on the slot turns from amber to green, insert a
CD.
The display changes from “WAIT” to “LOAD”.
■Loading multiple CDs
Press and hold until you hear a beep.
“WAIT” is shown on the display.
When the indicator on the slot turns from amber to green, insert a
CD.
The display changes from “WAIT” to “LOAD”.
The indicator on the slot turns to amber when the CD is being inserted.
Po w e r Vo l u m e
Repeat play button
“PWR⋅VOL” knob
Eject buttonPlayback button
Random playback
buttonTe x t b u t t o nPlayback/Pause button
Load button
Search
playback
button
Track selector button
CD selector button
STEP1
STEP2
STEP1
STEP2
Page 12 of 46
227
3-2. Using the audio system
3
Interior features
When the indicator on the slot turns from amber to green, insert
the next CD.
Repeat the procedure for the remaining CDs.
To cancel the operation, press . If you do not insert a disc within
15 seconds, loading will be canceled automatically.
Ejecting CDs
■Ejecting a CD
To select the CD to be ejected,
press “∧” or “∨” on .
The selected disc number is shown
on the display.
Press and remove the CD.
■Ejecting all the CDs
Press and hold until you hear a beep, and then remove the CDs.
Selecting, fast-forwarding, rewinding, and scanning tracks
■Selecting a track
Press “∧” to move up and “∨” to move down using until
the desired track number is displayed.
■Fast-forwarding and reversing tracks
To fast-forward or reverse, press and hold “∧” or “∨” on
until you hear a beep.
STEP3
STEP1
STEP2
Page 13 of 46
228
3-2. Using the audio system
■Scanning tracks
Press .
To cancel, press again.
Press the button again when the desired track is reached.
Selecting a CD
■To select a CD to play
To select the desired CD, press “∧” or “∨” on .
■Scanning loaded CDs
Press and hold until you hear a beep.
The first ten seconds of the first track on each CD will be played.
To cancel, press again.
Press the button again when the desired CD is reached.
Playing and pausing tracks
To play or pause a track, press ( ).
STEP1
STEP2
STEP1
STEP2
Page 14 of 46
229
3-2. Using the audio system
3
Interior features
Random playback
■Current CD
Press
(RAND).
Tracks are played in random order.
To cancel, press (RAND) again.
■All CDs
Press and hold
(RAND) until you hear a beep.
Tracks on all loaded CDs are played in random order.
To cancel, press (RAND) again.
Repeat play
■To repeat a track
Press (RPT).
To cancel, press (RPT) again.
■To repeat all of the tracks on a CD
Press and hold (RPT) until you hear a beep.
To cancel, press (RPT) again.
Switching the display
Press .
Each time the button is pressed, the display changes in the following order:
Elapsed time → CD title → Track title
Page 15 of 46

230
3-2. Using the audio system
■CD player protection feature
To protect the internal components, playback is automatically stopped when a
problem is detected.
■Display
Up to 12 characters can be displayed at a time.
If there are 13 or more characters, pressing and holding until you hear a beep
enables to display the remaining characters.
A maximum of 24 characters can be displayed.
If is pressed until you hear a beep again or has not been operated for more
than 6 seconds, the display will return to the first 12 characters.
Depending on the contents recorded, the characters may not be displayed prop-
erly or may not be displayed at all.
■When “ERROR” or “WAIT” is shown on the display
“ERROR”: This indicates is a trouble either in the CD or inside the player. The CD
may be dirty, damaged, or inserted up-side down.
“WAIT”: Operation is stopped due to a high temperature inside the player. Wait
for a while and then press . Contact your Lexus dealer if the
CD still cannot be played back.
■Discs that can be used
Discs with the marks shown below can be used.
Playback may not be possible depending on recording format or disc features, or
due to scratches, dirt or deterioration.
CDs with copy-protect features may not be used.
■Lens cleaners
Do not use lens cleaners. Doing so may damage the CD player.
■If discs are left inside the CD player or in the ejected position for extended peri-
ods
CDs may be damaged and may not play properly.
Page 16 of 46
231
3-2. Using the audio system
3
Interior features
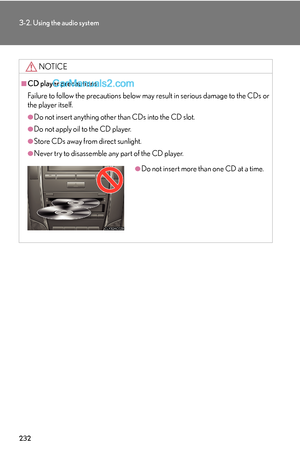
NOTICE
■CDs and adapters that cannot be used
Do not use the following types of CDs, 3 in. (8 cm) CD adapters or Dual Disc.
Doing so may damage the CD player and/or the CD insert/eject function.
●CDs that have a diameter that is not 4.7 in.
(12 cm)
●Low-quality and deformed CDs
●CDs with a transparent or translucent
recording area
●CDs that have had tape, stickers or CD-R
labels attached to them, or that have had
the label peeled off


.
Tracks are played in random order.
To cancel, press (RAND) again.
■All CDs
Press and hold
(RAND)")
 CD adapters or Dual Disc.
Doing so may damage the")