2011 KIA Sportage Screen
[x] Cancel search: ScreenPage 133 of 385
Features of your vehicle
52
4
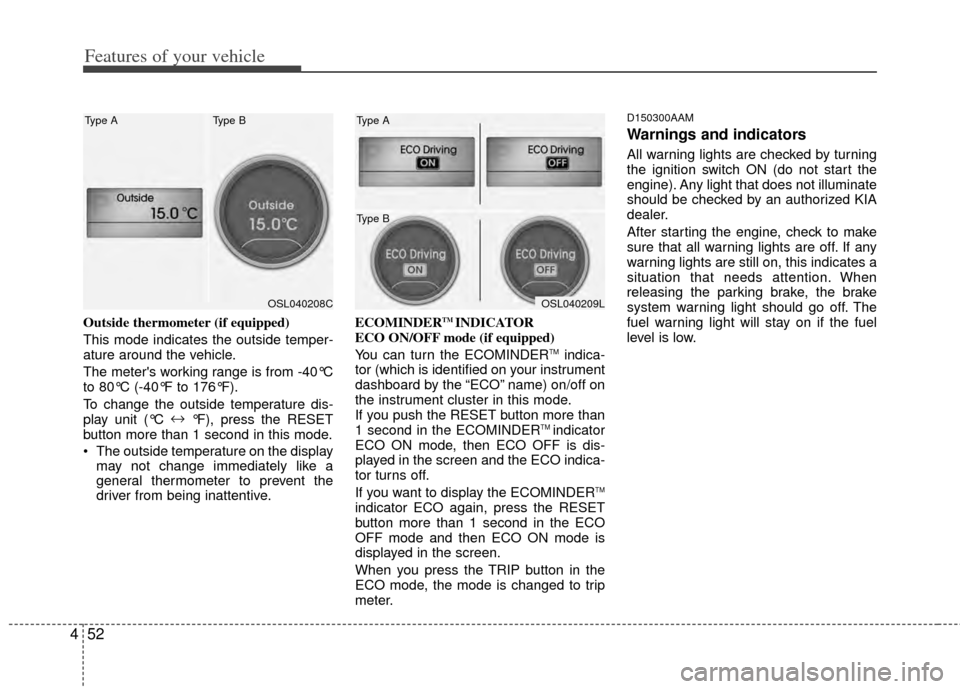
Outside thermometer (if equipped)
This mode indicates the outside temper-
ature around the vehicle.
The meter's working range is from -40°C
to 80°C (-40°F to 176°F).
To change the outside temperature dis-
play unit (°C ↔
°F), press the RESET
button more than 1 second in this mode.
The outside temperature on the display may not change immediately like a
general thermometer to prevent the
driver from being inattentive. ECOMINDERTM INDICATOR
ECO ON/OFF mode (if equipped)
You can turn the ECOMINDER
TMindica-
tor (which is identified on your instrument
dashboard by the “ECO” name) on/off on
the instrument cluster in this mode.
If you push the RESET button more than
1 second in the ECOMINDER
TM indicator
ECO ON mode, then ECO OFF is dis-
played in the screen and the ECO indica-
tor turns off.
If you want to display the ECOMINDER
TM
indicator ECO again, press the RESET
button more than 1 second in the ECO
OFF mode and then ECO ON mode is
displayed in the screen.
When you press the TRIP button in the
ECO mode, the mode is changed to trip
meter.
D150300AAM
Warnings and indicators
All warning lights are checked by turning
the ignition switch ON (do not start the
engine). Any light that does not illuminate
should be checked by an authorized KIA
dealer.
After starting the engine, check to make
sure that all warning lights are off. If any
warning lights are still on, this indicates a
situation that needs attention. When
releasing the parking brake, the brake
system warning light should go off. The
fuel warning light will stay on if the fuel
level is low.
OSL040208C
Type A Type BOSL040209L
Type A
Type B
Page 186 of 385
4105
Features of your vehicle
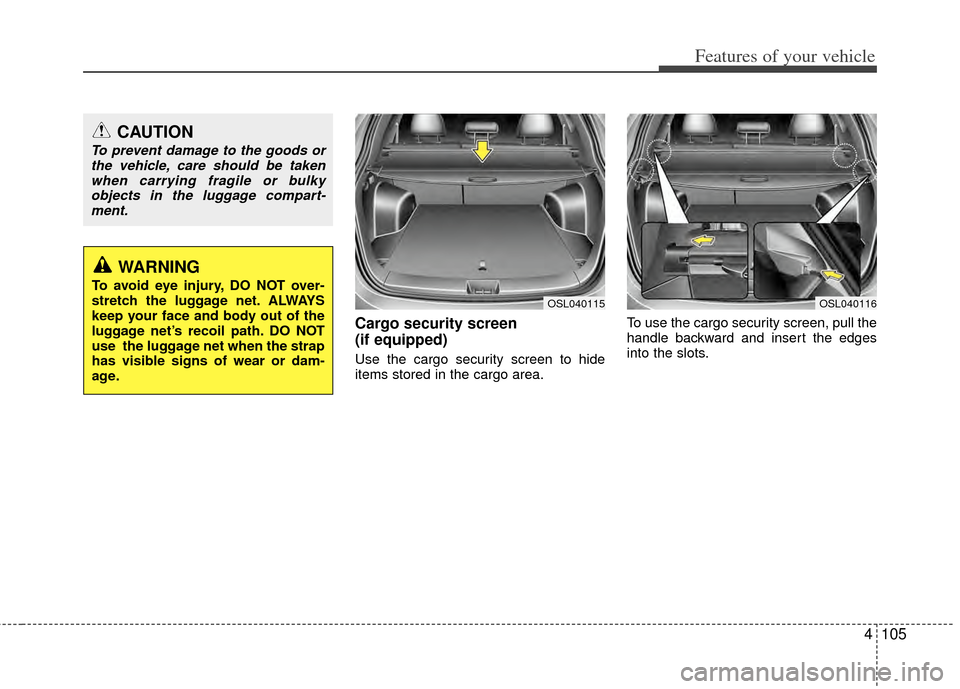
Cargo security screen
(if equipped)
Use the cargo security screen to hide
items stored in the cargo area.To use the cargo security screen, pull the
handle backward and insert the edges
into the slots.
CAUTION
To prevent damage to the goods or
the vehicle, care should be takenwhen carrying fragile or bulkyobjects in the luggage compart-ment.
WARNING
To avoid eye injury, DO NOT over-
stretch the luggage net. ALWAYS
keep your face and body out of the
luggage net’s recoil path. DO NOT
use the luggage net when the strap
has visible signs of wear or dam-
age.
OSL040116OSL040115
Page 187 of 385
Features of your vehicle
106
4
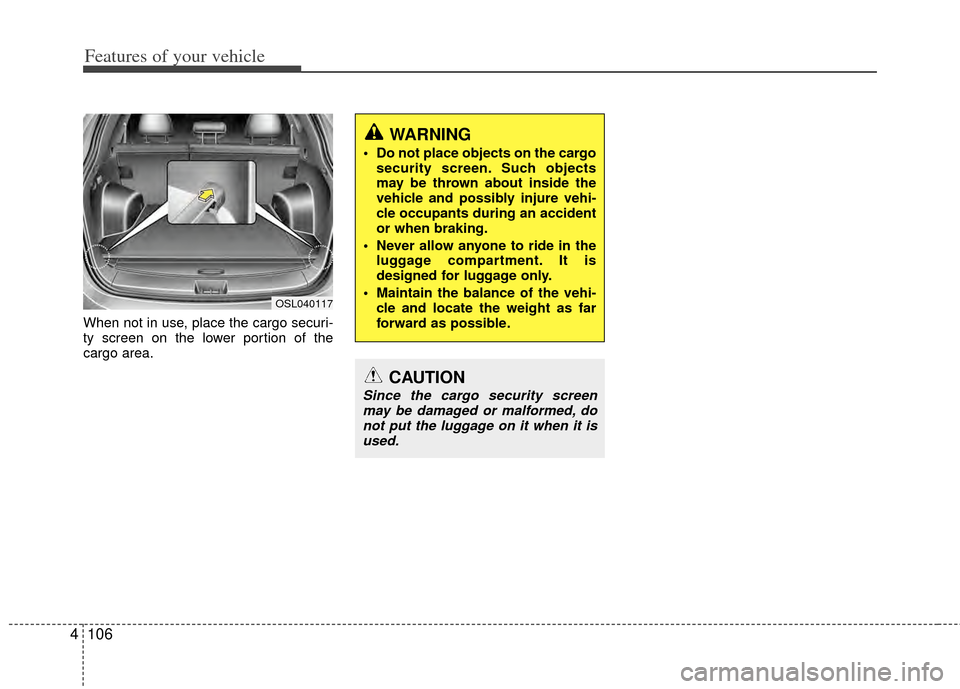
When not in use, place the cargo securi-
ty screen on the lower portion of the
cargo area.
WARNING
Do not place objects on the cargo
security screen. Such objects
may be thrown about inside the
vehicle and possibly injure vehi-
cle occupants during an accident
or when braking.
Never allow anyone to ride in the luggage compartment. It is
designed for luggage only.
Maintain the balance of the vehi- cle and locate the weight as far
forward as possible.
CAUTION
Since the cargo security screenmay be damaged or malformed, donot put the luggage on it when it isused.
OSL040117
Page 197 of 385
Features of your vehicle
116
4
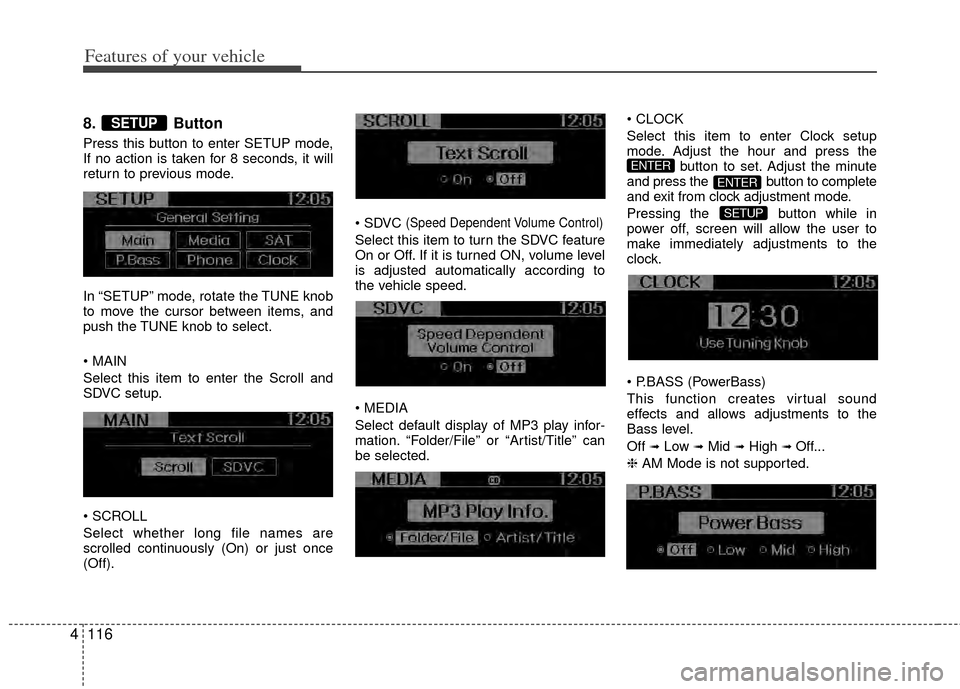
8. Button
Press this button to enter SETUP mode,
If no action is taken for 8 seconds, it will
return to previous mode.
In “SETUP” mode, rotate the TUNE knob
to move the cursor between items, and
push the TUNE knob to select.
Select this item to enter the Scroll and
SDVC setup.
Select whether long file names are
scrolled continuously (On) or just once
(Off).
(Speed Dependent Volume Control)
Select this item to turn the SDVC feature
On or Off. If it is turned ON, volume level
is adjusted automatically according to
the vehicle speed.
Select default display of MP3 play infor-
mation. “Folder/File” or “Artist/Title” can
be selected.
Select this item to enter Clock setup
mode. Adjust the hour and press the
button to set. Adjust the minute
and press the button to complete
and exit from clock adjustment mode.
Pressing the button while in
power off, screen will allow the user to
make immediately adjustments to the
clock.
(PowerBass)
This function creates virtual sound
effects and allows adjustments to the
Bass level.
Off
➟Low ➟Mid ➟High ➟ Off...
❈ AM Mode is not supported.
SETUP
ENTER
ENTER
SETUP
Page 210 of 385
4129
Features of your vehicle
Using SIRIUS Satellite Radio
Your Kia vehicle is equipped with a 3
month complimentary period of SIRIUS
Satellite Radio so you have access to
over 130 channels of music, information,
and entertainment programming.
Activation
In order to extend or reactivate your sub-
scription to SIRIUS Satellite Radio, you
will need to contact SIRIUS Customer
Care at 1-888-539-7474. Have your 12
digit SID (Sirius Identification Number)/ESN
(Electronic Serial Number) ready. To retrieve
the SID/ESN, turn on the radio, press the
[SAT] button, and tune to channel zero. Please note that the vehicle will need to
be turned on, in Sirius mode, and have
an unobstructed view of the sky in order
for the radio to receive the activation sig-
nal.
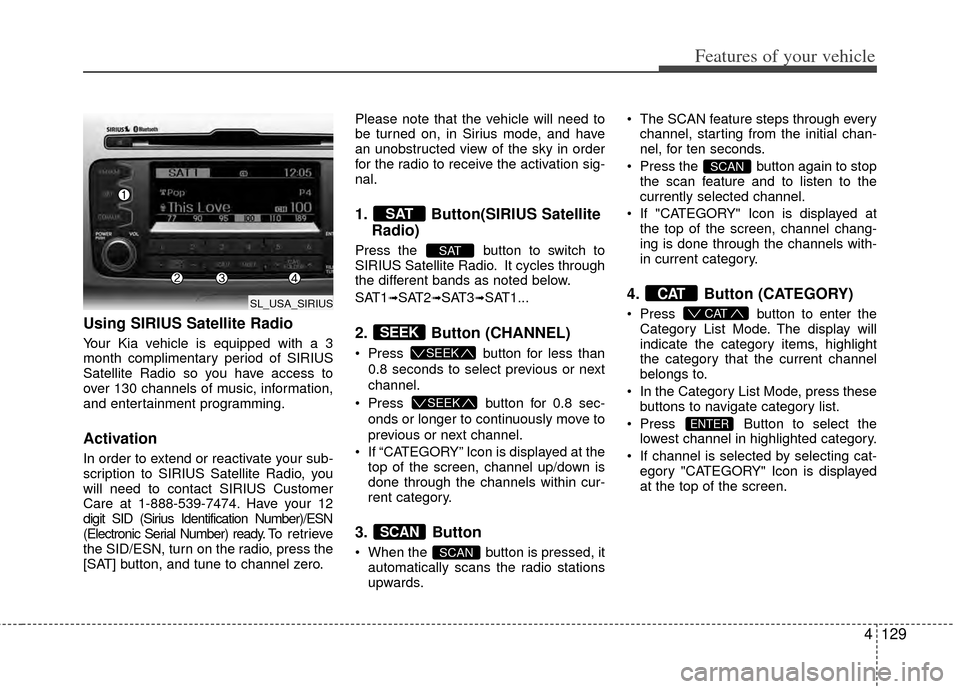
1. Button(SIRIUS Satellite
Radio)
Press the button to switch to
SIRIUS Satellite Radio. It cycles through
the different bands as noted below.
SAT1
➟SAT2➟SAT3➟SAT1...
2. Button (CHANNEL)
Press button for less than
0.8 seconds to select previous or next
channel.
Press button for 0.8 sec-
onds or longer to continuously move to
previous or next channel.
If “CATEGORY” Icon is displayed at the top of the screen, channel up/down is
done through the channels within cur-
rent category.
3. Button
When the button is pressed, itautomatically scans the radio stations
upwards. The SCAN feature steps through every
channel, starting from the initial chan-
nel, for ten seconds.
Press the button again to stop the scan feature and to listen to the
currently selected channel.
If "CATEGORY" Icon is displayed at the top of the screen, channel chang-
ing is done through the channels with-
in current category.
4. Button (CATEGORY)
Press button to enter the
Category List Mode. The display will
indicate the category items, highlight
the category that the current channel
belongs to.
In the Category List Mode, press these buttons to navigate category list.
Press Button to select the lowest channel in highlighted category.
If channel is selected by selecting cat- egory "CATEGORY" Icon is displayed
at the top of the screen.
ENTER
CAT
CAT
SCAN
SCAN
SCAN
SEEK
SEEK
SEEK
SAT
SAT
SL_USA_SIRIUS
Page 219 of 385
Features of your vehicle
138
4
✽
✽
NOTICE
- The system can recognize single digits
from zero to nine. Numbers that are
ten or greater cannot be recognized.
- You can enter each digit individually or group digits together in preferred
string lengths.
- To speed up input, it is a good idea to group all digits into a continuous
string.
- Recommend to enter the numbers constituted an grouping within all
digit numbers to dial 995 / 734 / 0000
- The display corresponding to each operation appears on the screen as fol-
lows:
Input operation example: 1. Say: “Nine, nine, five”
➟ Display: “995”
2. And say: “Seven, three, four”
➟ Display: “995734”
1. Press button.
2. Say “Phonebook”.
3. Say “Add Entry” after prompt.
4. Say “By Phone” to proceed.
5. Say “Yes” to confirm.
6. Your phone will start to transfer phone/contact list to the audio system.
This process may take over 10 minutes
depending on the phone model and
number of entries
7. Wait till the audio displays “Transfer Complete” message.
Changing Name
The registered names can be modified.
1. Press button.
2. Say “Phonebook”.
3. Say “Change Name” after prompt.
4. Say the name of the entry (voice tag).
5. Say “Yes” to confirm.
6. Say new desired name.
Deleting Name
The registered names can be deleted.
1. Press button.
2. Say “Phonebook”.
3. Say “Delete Name” after prompt.
4. Say the name of the entry (voice tag).
5. Say “Yes” to confirm.
■Making a Phone Call
A phone call can be made by speaking
names registered in the audio system.
1. Press button.
2. Say “Call”.
3. Say “Name” when prompted.
4. Say desired name (voice tag).
5. Say desired location (phone number type). Only stored locations can be
selected.
6. Say “Yes” to confirm and make a call.
✽ ✽ Tip
A shortcut to each of the following func-
tions is available:
1. Say “Call Name”
2. Say “Call
3. Say “Call
Page 379 of 385
I3
Index
Cargo security screen ··················\
··················\
················4-105
Cargo weight ··················\
··················\
··················\
·············5-68
Center console storage ··················\
··················\
················4-98
Central door lock switch ··················\
··················\
·············4-17
Changing tires ··················\
··················\
··················\
·············6-8
Checking tire inflation pressure ··················\
··················\
··7-30
Child restraint system ··················\
··················\
·················3-33\
Auto lock mode ··················\
··················\
··················\
··3-36
Lower anchor system ··················\
··················\
···········3-39
Tether anchor system··················\
··················\
·············3-38
Child-protector rear door lock ··················\
··················\
···4-19
Climate control system (Automatic) ··················\
···········4-88 Air conditioning ··················\
··················\
··················\
·4-94
Automatic heating and air conditioning ·········\
··········4-89
Manual heating and air conditioning ··················\
·····4-90
Climate control system (Manual) ··················\
················4-80 Air conditioning ··················\
··················\
··················\
·4-84
Climate control air filter ··················\
··················\
·······4-87
Heating and air conditioning ··················\
··················\
·4-80
Climate control air filter ··················\
··················\
····4-87, 7-21
Clock (Digital) ··················\
··················\
··················\
·······4-103
Clothes hanger ··················\
··················\
··················\
·······4-103
Combined instrument, see instrument cluster ···············4-45
Compact spare tire ··················\
··················\
··················\
···6-13
Compact spare tire replacement ··················\
··················\
7-34
Cooling fluid, see engine coolant ··················\
················7-14
Crankcase emission control system ··················\
·············7-57
Cruise control system ··················\
··················\
················5-40 Cup holder ··················\
··················\
··················\
·············4-101
Curtain air bag ··················\
··················\
··················\
·········3-60
Dashboard, see instrument cluster ··················\
···············4-45
Dashboard illumination, see instrument panel illumination ··4-46
Defogging (Windshield) ··················\
··················\
············4-95
Defogging logic (Windshield) ··················\
··················\
···4-97
Defroster (Rear window) ··················\
··················\
···········4-79
Defrosting (Windshield) ··················\
··················\
············4-95
Digital clock ··················\
··················\
··················\
···········4-103
Dimensions ················\
··················\
··················\
··················\
8-2
Displays, see instrument cluster ··················\
··················\
4-45
Display illumination, see instrument panel illumination ···4-46
Door locks ··················\
··················\
··················\
·················4-15\
Central door lock switch ··················\
··················\
······4-17
Child-protector rear door lock ··················\
···············4-19
Downhill brake control (DBC) ··················\
··················\
··5-36
Drinks holders, see cup holders ··················\
·················4-10\
1
Driver's air bag ··················\
··················\
··················\
·········3-54
Driving at night ··················\
··················\
··················\
········5-48
Driving in flooded areas ··················\
··················\
············5-49
Driving in the rain ··················\
··················\
··················\
····5-49
D
Page 381 of 385
I5
Index
GaugeEngine temperature gauge ··················\
··················\
·····4-47
Fuel gauge ··················\
··················\
··················\
··········4-48
Glassroof, see panoramic sunroof ··················\
················4-31
Glove box ··················\
··················\
··················\
·················4-98\
Hazard warning flasher ··················\
··················\
··············4-66
Hazardous driving conditions ··················\
··················\
····5-46
Headrest ················\
··················\
··················\
··············3-7, 3-15
Heating and air conditioning ··················\
··················\
·····4-80
Highway driving ··················\
··················\
··················\
······5-50
Hill-start assist control (HAC) ··················\
··················\
····5-36
Hood ·················\
··················\
··················\
··················\
········4-26
Horn ·················\
··················\
··················\
··················\
········4-36
How to use this manual ··················\
··················\
···············1-2
Ignition key interlock system ··················\
··················\
····5-19
Immobilizer system··················\
··················\
··················\
·····4-3
Indicators and warnings ··················\
··················\
·············4-52
Indicator symbols on the instrument cluster ··················\
··1-6 Instrument cluster ··················\
··················\
··················\
····4-45
Engine temperature gauge ··················\
··················\
····4-47
Fuel gauge ··················\
··················\
··················\
··········4-48
Instrument panel illumination ··················\
················4-46
Odometer ················\
··················\
··················\
··············4-49
Speedometer ···············\
··················\
··················\
··········4-46
Tachometer ················\
··················\
··················\
···········4-46
Trip computer ··················\
··················\
··················\
·····4-48
Warning and indicators ··················\
··················\
········4-52
Instrument panel illumination ··················\
··················\
····4-46
Instrument panel overview ··················\
··················\
···········2-3
Interior care ··················\
··················\
··················\
··············7-56
Interior features ··················\
··················\
··················\
······4-101 Cargo security screen ··················\
··················\
·········4-105
Clothes hanger ··················\
··················\
··················\
··4-103
Cup holder ··················\
··················\
··················\
········4-101
Digital clock ··················\
··················\
··················\
·····4-103
Floor mat anchor(s) ··················\
··················\
·············4-104
Luggage net holder··················\
··················\
··············4-104
Power outlet ··················\
··················\
··················\
·····4-102
Sunvisor ·················\
··················\
··················\
·············4-101
Interior light ··················\
··················\
··················\
·············4-76
Interior overview ··················\
··················\
··················\
········2-2
Interlock system ··················\
··················\
··················\
·······5-19
G
H
I