2011 KIA Sportage light
[x] Cancel search: lightPage 175 of 385
Features of your vehicle
94
4
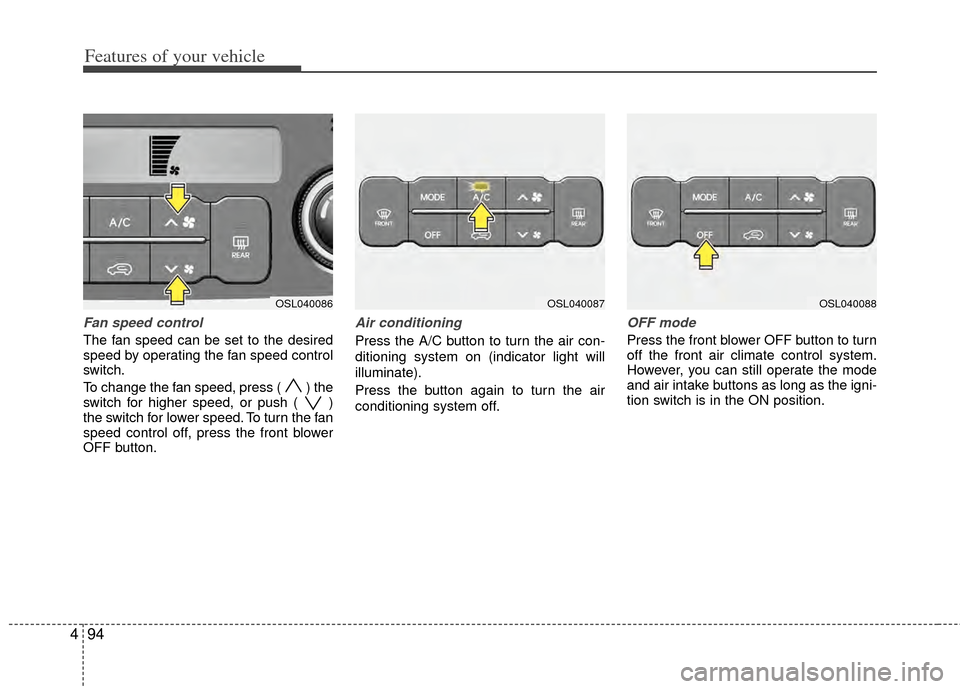
Fan speed control
The fan speed can be set to the desired
speed by operating the fan speed control
switch.
To change the fan speed, press ( ) the
switch for higher speed, or push ( )
the switch for lower speed. To turn the fan
speed control off, press the front blower
OFF button.
Air conditioning
Press the A/C button to turn the air con-
ditioning system on (indicator light will
illuminate).
Press the button again to turn the air
conditioning system off.
OFF mode
Press the front blower OFF button to turn
off the front air climate control system.
However, you can still operate the mode
and air intake buttons as long as the igni-
tion switch is in the ON position.
OSL040087OSL040088OSL040086
Page 178 of 385
497
Features of your vehicle
Defogging logic
To reduce the possibility of fogging up
the inside of the windshield, the air intake
or air conditioning is controlled automati-
cally according to certain conditions such
as or position. To cancel or
return to the defogging logic, do the fol-
lowing.
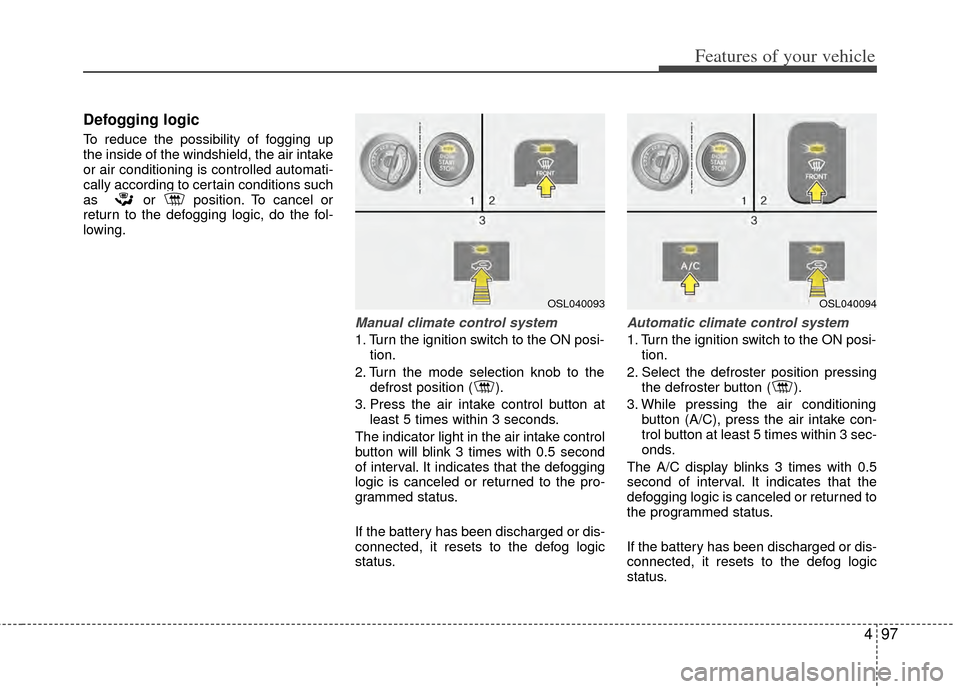
Manual climate control system
1. Turn the ignition switch to the ON posi-tion.
2. Turn the mode selection knob to the defrost position ( ).
3. Press the air intake control button at least 5 times within 3 seconds.
The indicator light in the air intake control
button will blink 3 times with 0.5 second
of interval. It indicates that the defogging
logic is canceled or returned to the pro-
grammed status.
If the battery has been discharged or dis-
connected, it resets to the defog logic
status.
Automatic climate control system
1. Turn the ignition switch to the ON posi- tion.
2. Select the defroster position pressing the defroster button ( ).
3. While pressing the air conditioning button (A/C), press the air intake con-
trol button at least 5 times within 3 sec-
onds.
The A/C display blinks 3 times with 0.5
second of interval. It indicates that the
defogging logic is canceled or returned to
the programmed status.
If the battery has been discharged or dis-
connected, it resets to the defog logic
status.
OSL040093OSL040094
Page 179 of 385
Features of your vehicle
98
4
D270000AHM
These compartments can be used to
store small items.
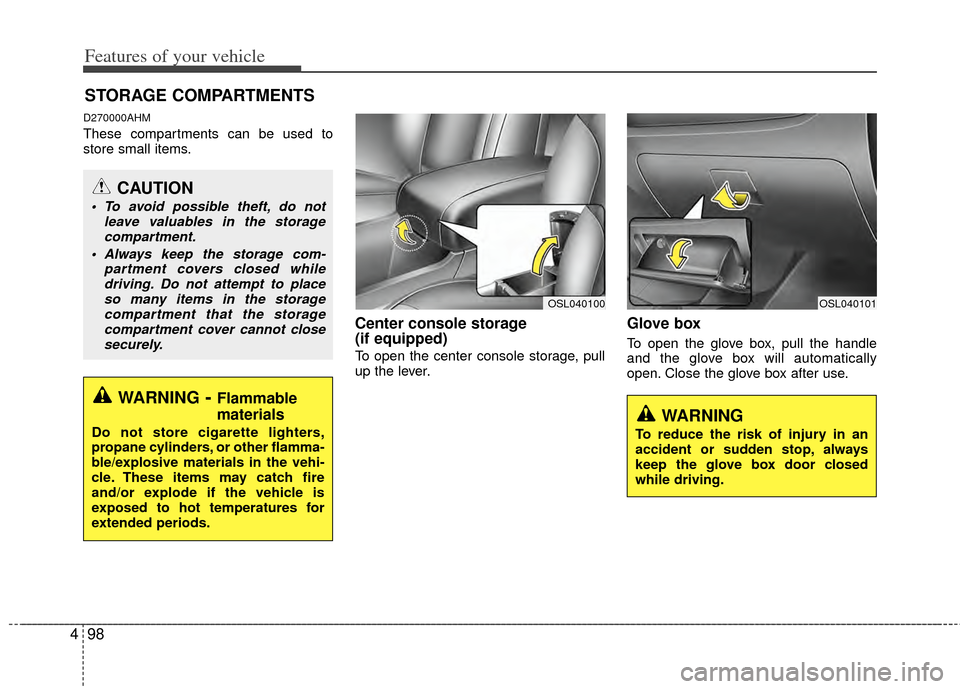
Center console storage
(if equipped)
To open the center console storage, pull
up the lever.
Glove box
To open the glove box, pull the handle
and the glove box will automatically
open. Close the glove box after use.
STORAGE COMPARTMENTS
WARNING- Flammable
materials
Do not store cigarette lighters,
propane cylinders, or other flamma-
ble/explosive materials in the vehi-
cle. These items may catch fire
and/or explode if the vehicle is
exposed to hot temperatures for
extended periods.
CAUTION
To avoid possible theft, do not
leave valuables in the storagecompartment.
Always keep the storage com- partment covers closed whiledriving. Do not attempt to placeso many items in the storage compartment that the storagecompartment cover cannot closesecurely.
WARNING
To reduce the risk of injury in an
accident or sudden stop, always
keep the glove box door closed
while driving.
OSL040101OSL040100
Page 182 of 385
4101
Features of your vehicle
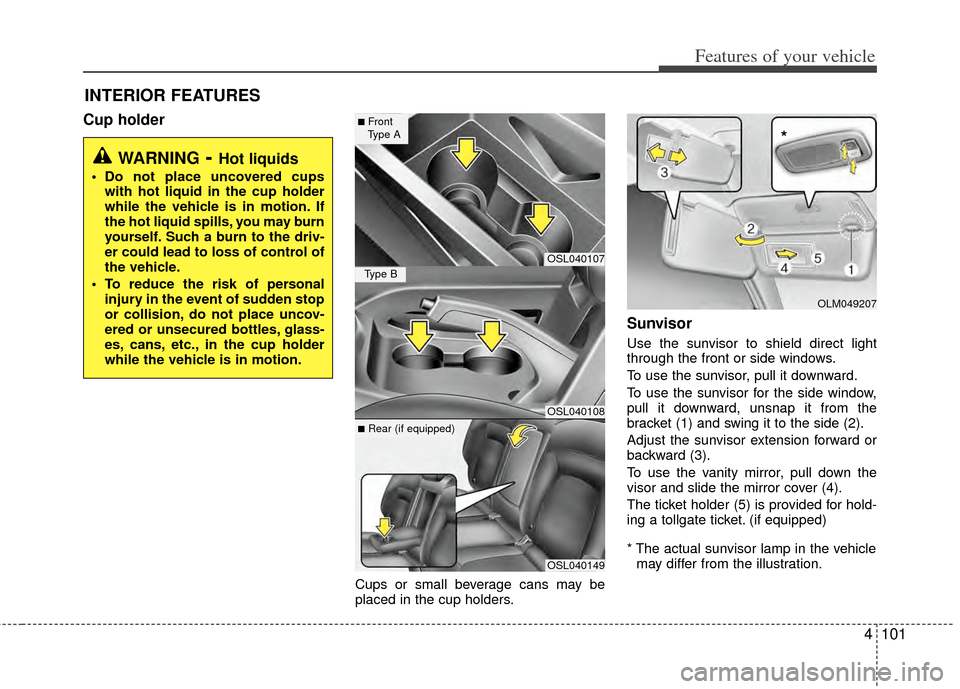
Cup holder
Cups or small beverage cans may be
placed in the cup holders.
Sunvisor
Use the sunvisor to shield direct light
through the front or side windows.
To use the sunvisor, pull it downward.
To use the sunvisor for the side window,
pull it downward, unsnap it from the
bracket (1) and swing it to the side (2).
Adjust the sunvisor extension forward or
backward (3).
To use the vanity mirror, pull down the
visor and slide the mirror cover (4).
The ticket holder (5) is provided for hold-
ing a tollgate ticket. (if equipped)
* The actual sunvisor lamp in the vehiclemay differ from the illustration.
INTERIOR FEATURES
WARNING- Hot liquids
Do not place uncovered cups with hot liquid in the cup holder
while the vehicle is in motion. If
the hot liquid spills, you may burn
yourself. Such a burn to the driv-
er could lead to loss of control of
the vehicle.
To reduce the risk of personal injury in the event of sudden stop
or collision, do not place uncov-
ered or unsecured bottles, glass-
es, cans, etc., in the cup holder
while the vehicle is in motion.
OSL040107
OSL040108
OSL040149
■Front
Type A
Type B
■Rear (if equipped)
OLM049207
*
Page 196 of 385
4115
Features of your vehicle
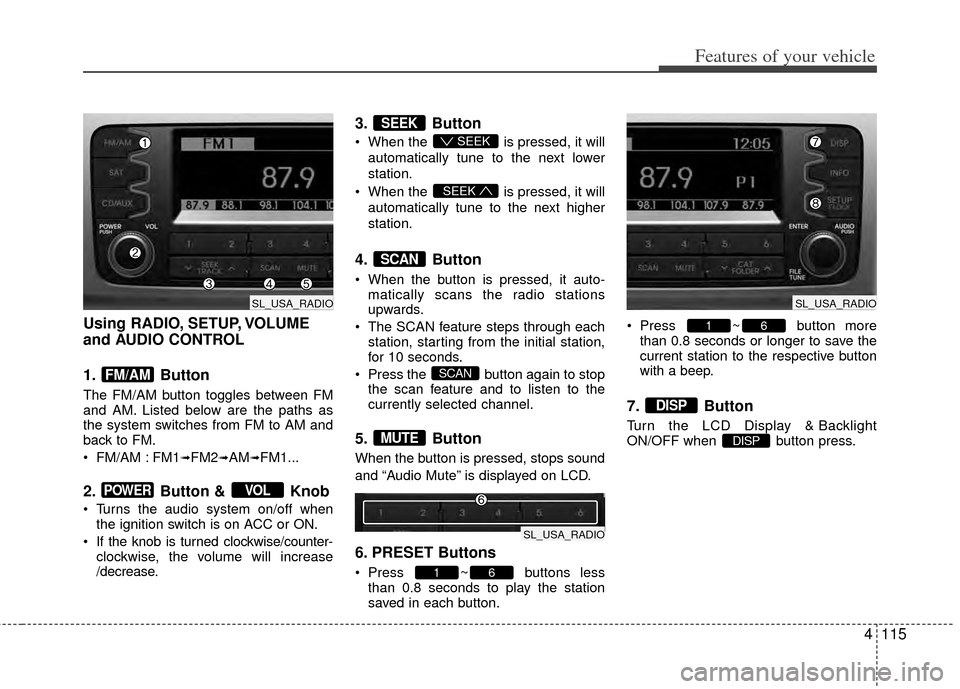
Using RADIO, SETUP, VOLUME
and AUDIO CONTROL
1. Button
The FM/AM button toggles between FM
and AM. Listed below are the paths as
the system switches from FM to AM and
back to FM.
FM/AM : FM1
➟FM2➟AM➟FM1...
2. Button & Knob
Turns the audio system on/off whenthe ignition switch is on ACC or ON.
If the knob is turned clockwise/counter- clockwise, the volume will increase
/decrease.
3. Button
When the is pressed, it will
automatically tune to the next lower
station.
When the is pressed, it will
automatically tune to the next higher
station.
4. Button
When the button is pressed, it auto- matically scans the radio stations
upwards.
The SCAN feature steps through each station, starting from the initial station,
for 10 seconds.
Press the button again to stop the scan feature and to listen to the
currently selected channel.
5. Button
When the button is pressed, stops sound
and “Audio Mute” is displayed on LCD.
6. PRESET Buttons
Press ~ buttons lessthan 0.8 seconds to play the station
saved in each button. Press ~ button more
than 0.8 seconds or longer to save the
current station to the respective button
with a beep.
7. Button
Turn the LCD Display & Backlight
ON/OFF when button press.DISP
DISP
61
61
MUTE
SCAN
SCAN
SEEK
SEEK
SEEK
VOLPOWER
FM/AM
SL_USA_RADIO
SL_USA_RADIO
SL_USA_RADIO
Page 210 of 385
4129
Features of your vehicle
Using SIRIUS Satellite Radio
Your Kia vehicle is equipped with a 3
month complimentary period of SIRIUS
Satellite Radio so you have access to
over 130 channels of music, information,
and entertainment programming.
Activation
In order to extend or reactivate your sub-
scription to SIRIUS Satellite Radio, you
will need to contact SIRIUS Customer
Care at 1-888-539-7474. Have your 12
digit SID (Sirius Identification Number)/ESN
(Electronic Serial Number) ready. To retrieve
the SID/ESN, turn on the radio, press the
[SAT] button, and tune to channel zero. Please note that the vehicle will need to
be turned on, in Sirius mode, and have
an unobstructed view of the sky in order
for the radio to receive the activation sig-
nal.
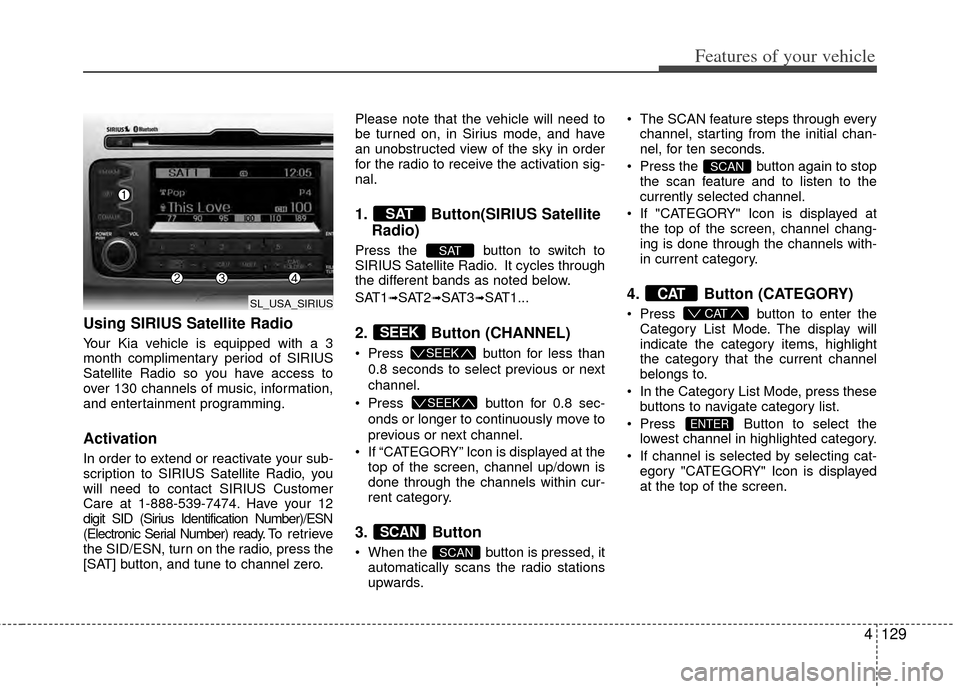
1. Button(SIRIUS Satellite
Radio)
Press the button to switch to
SIRIUS Satellite Radio. It cycles through
the different bands as noted below.
SAT1
➟SAT2➟SAT3➟SAT1...
2. Button (CHANNEL)
Press button for less than
0.8 seconds to select previous or next
channel.
Press button for 0.8 sec-
onds or longer to continuously move to
previous or next channel.
If “CATEGORY” Icon is displayed at the top of the screen, channel up/down is
done through the channels within cur-
rent category.
3. Button
When the button is pressed, itautomatically scans the radio stations
upwards. The SCAN feature steps through every
channel, starting from the initial chan-
nel, for ten seconds.
Press the button again to stop the scan feature and to listen to the
currently selected channel.
If "CATEGORY" Icon is displayed at the top of the screen, channel chang-
ing is done through the channels with-
in current category.
4. Button (CATEGORY)
Press button to enter the
Category List Mode. The display will
indicate the category items, highlight
the category that the current channel
belongs to.
In the Category List Mode, press these buttons to navigate category list.
Press Button to select the lowest channel in highlighted category.
If channel is selected by selecting cat- egory "CATEGORY" Icon is displayed
at the top of the screen.
ENTER
CAT
CAT
SCAN
SCAN
SCAN
SEEK
SEEK
SEEK
SAT
SAT
SL_USA_SIRIUS
Page 225 of 385
53
Driving your vehicle
E020100AUN
Before entering vehicle
• Be sure that all windows, outside mir-ror(s), and outside lights are clean.
Check the condition of the tires.
Check under the vehicle for any sign of leaks.
Be sure there are no obstacles behind you if you intend to back up.
E020200AUN
Necessary inspections
Fluid levels, such as engine oil, engine
coolant, brake fluid, and washer fluid
should be checked on a regular basis, at
the exact interval depending on the fluid.
Further details are provided in section 7,
“Maintenance”.
E020300AHM
Before starting
Close and lock all doors.
Position the seat so that all controls areeasily reached.
Adjust the inside and outside rearview mirrors. Be sure that all lights work.
Check all gauges.
Check the operation of warning lights
when the ignition switch is turned to
the ON position.
Release the parking brake and make sure the brake warning light goes out.
For safe operation, be sure you are famil-
iar with your vehicle and its equipment.
BEFORE DRIVING
WARNING
All passengers must be properly
belted whenever the vehicle is mov-
ing. Refer to “Seat belts” in section
3 for more information on their
proper use.
WARNING
Always check the surrounding
areas near your vehicle for people,
especially children, before putting a
car into D (Drive) or R (Reverse).
WARNING- Driving under
the influence of alcohol or
drugs
Drinking and driving is dangerous.
Drunk driving is the number one
contributor to the highway death
toll each year. Even a small amount
of alcohol will affect your reflexes,
perceptions and judgment. Driving
while under the influence of drugs
is as dangerous or more dangerous
than driving drunk.
You are much more likely to have a
serious accident if you drink or
take drugs and drive.
If you are drinking or taking drugs,
don’t drive. Do not ride with a driv-
er who has been drinking or taking
drugs. Choose a designated driver
or call a cab.
WARNING
When you intend to park or stop the
vehicle with the engine on, be care-
ful not to depress the accelerator
pedal for a long period of time. It
may overheat the engine or exhaust
system and ignite a fire.
Page 226 of 385
Driving your vehicle
45
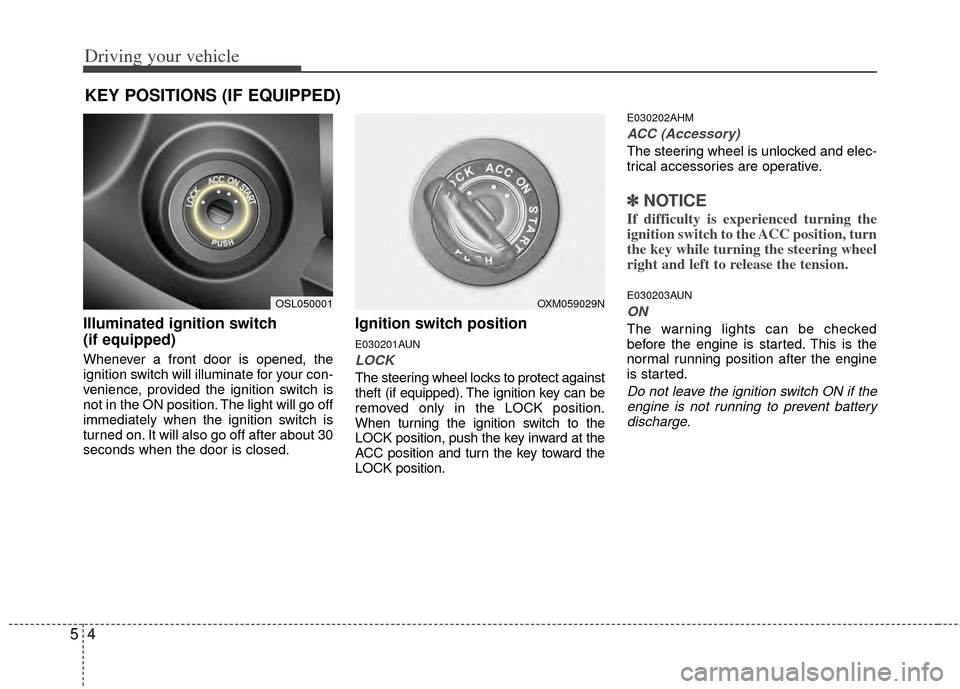
Illuminated ignition switch
(if equipped)
Whenever a front door is opened, the
ignition switch will illuminate for your con-
venience, provided the ignition switch is
not in the ON position. The light will go off
immediately when the ignition switch is
turned on. It will also go off after about 30
seconds when the door is closed.
Ignition switch position
E030201AUN
LOCK
The steering wheel locks to protect against
theft (if equipped). The ignition key can be
removed only in the LOCK position.
When turning the ignition switch to the
LOCK position, push the key inward at the
ACC position and turn the key toward the
LOCK position.
E030202AHM
ACC (Accessory)
The steering wheel is unlocked and elec-
trical accessories are operative.
✽ ✽NOTICE
If difficulty is experienced turning the
ignition switch to the ACC position, turn
the key while turning the steering wheel
right and left to release the tension.
E030203AUN
ON
The warning lights can be checked
before the engine is started. This is the
normal running position after the engine
is started.
Do not leave the ignition switch ON if the
engine is not running to prevent batterydischarge.
KEY POSITIONS (IF EQUIPPED)
OXM059029NOSL050001