Page 159 of 370

Features of your vehicle
142
3
To sound the horn, press the horn sym-
bol on your steering wheel.
Check the horn regularly to be sure it
operates properly.
The defroster heats the window to
remove frost, fog and thin ice from the
interior and exterior of the rear window,
while engine is running.To activate the rear window defroster,
press the rear window defroster button
located in the center console switch
panel. The indicator on the rear window
defroster button illuminates when the
defroster is ON.
If there is heavy accumulation of snow on
the rear window, brush it off before oper-
ating the rear defroster.
The rear window defroster automatically
turns off after 20 minutes or when the
ignition switch is turned off. To turn off the
defroster, press the rear window
defroster button again.
HORN
CAUTION
To sound the horn, press the area
indicated by the horn symbol onyour steering wheel (see illustra-tion). The horn will operate only when this area is pressed.
Do not strike the horn severely to operate it, or hit it with your fist.Do not press on the horn with asharp-pointed object.
OVQ036055N
DEFROSTER
OVQ049343
OVQ049344
Type A
Type B
CAUTION
To prevent damage to the con- ductors bonded to the inside sur-face of the rear window, never use sharp instruments or windowcleaners containing abrasives to clean the window.
If you want to defrost and defog on the front windshield, refer to“Windshield Defrosting andDefogging” in this section.
Page 160 of 370

3143
Features of your vehicle
Outside mirror defroster
(if equipped)
If your vehicle is equipped with the out-
side mirror defroster, it will be operating
at the same time when you operate the
rear window defroster.
Front windshield deicer
(if equipped)
The engine must be running to enable
this feature. To activate the front wind-
shield deicer, press the front windshield
deicer button. The indicator on the button
illuminates when the deicer is ON. The
front windshield deicer automatically
turns off after 20 minutes or when the
ignition switch is turned off. To turn off the
deicer, press the front windshield deicer
button again.The hazard warning flasher causes the
front and rear turn signal lights to flash
on and off, which serves as a warning to
other drivers to exercise caution when
approaching or passing your vehicle.
To activate the flasher, depress the haz-
ard warning flasher switch. This switch
operates in any ignition switch position.
To turn the flashers off, depress the
switch again.
HAZARD WARNING FLASHER
OVQ049031
OVQ049032
Type A
Type B
❈
The location of the front windshield deicer
button may be different depending on your
model.
OVQ041030L
Page 162 of 370
3145
Features of your vehicle
Front fan speed control knob
The ignition switch must be in the ON
position for fan operation.
The fan speed control knob allows you to
control the fan speed of the air flowing
from the ventilation system. To change
the fan speed, turn the knob to the right
for higher speed or left for lower speed.
To turn off the fan, turn the knob to the
OFF (0) position.
Temperature control knob
The temperature control knob allows you
to control the temperature of the air flow-
ing from the ventilation system. To
change the air temperature in the pas-
senger compartment, turn the knob to
the WARM (red) position for warm and
hot air or COOL (blue) position for cool-
er air.
Mode selection knob
The mode selection knob controls the
direction of the air flow through the venti-
lation system.
OVQ049306OVQ049307OVQ049308
Page 180 of 370
3163
Features of your vehicle
Instrument panel vents
If air flow control is not satisfactory, check
the instrument panel vents. The outlet
port (B, E) can be opened or closed sep-
arately using the horizontal thumbwheel.
To close the vent, rotate it left to the max-
imum position. To open the vent, rotate it
right to the desired position.
Also, you can adjust the direction of air
delivery from these vents using the vent
control lever as shown.
Air conditioning button
Push the A/C button to turn the air condi-
tioning system on (indicator light will illu-
minate).
Push the button again to turn the air con-
ditioning system off.
OFF button
Push the OFF button to turn off the air cli-
mate control system. However you can
still operate the mode and air intake but-
tons as long as the ignition switch is ON.
1VQA2148OVQ049329OVQ049330
Page 189 of 370

Features of your vehicle
172
3
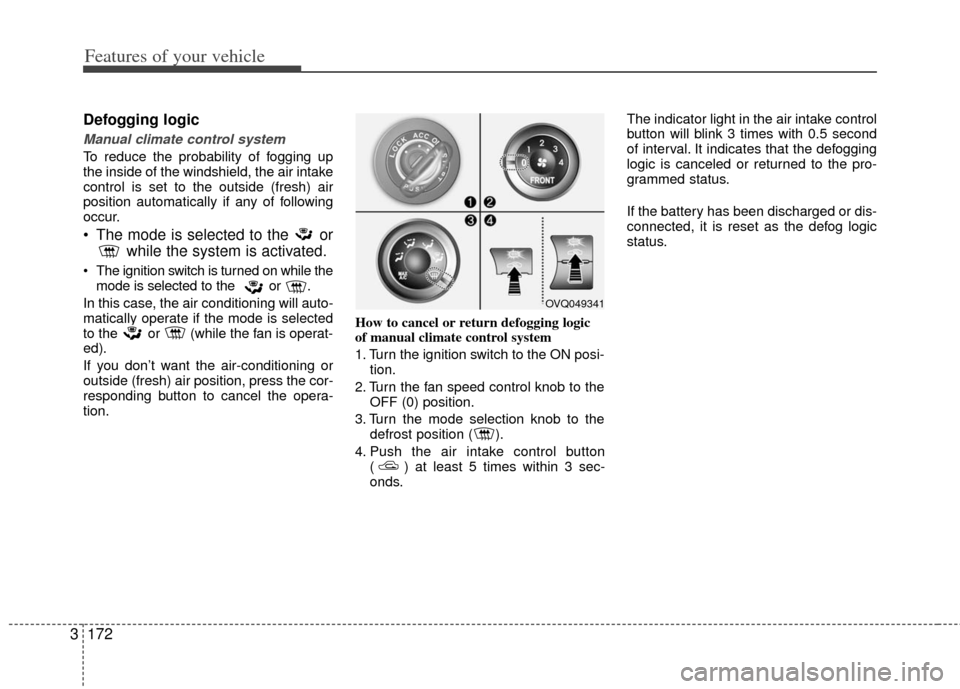
Defogging logic
Manual climate control system
To reduce the probability of fogging up
the inside of the windshield, the air intake
control is set to the outside (fresh) air
position automatically if any of following
occur.
The mode is selected to the or
while the system is activated.
The ignition switch is turned on while the
mode is selected to the or .
In this case, the air conditioning will auto-
matically operate if the mode is selected
to the or (while the fan is operat-
ed).
If you don’t want the air-conditioning or
outside (fresh) air position, press the cor-
responding button to cancel the opera-
tion. How to cancel or return defogging logic
of manual climate control system
1. Turn the ignition switch to the ON posi-
tion.
2. Turn the fan speed control knob to the OFF (0) position.
3. Turn the mode selection knob to the defrost position ( ).
4. Push the air intake control button ( ) at least 5 times within 3 sec-
onds. The indicator light in the air intake control
button will blink 3 times with 0.5 second
of interval. It indicates that the defogging
logic is canceled or returned to the pro-
grammed status.
If the battery has been discharged or dis-
connected, it is reset as the defog logic
status.
OVQ049341
Page 190 of 370

3173
Features of your vehicle
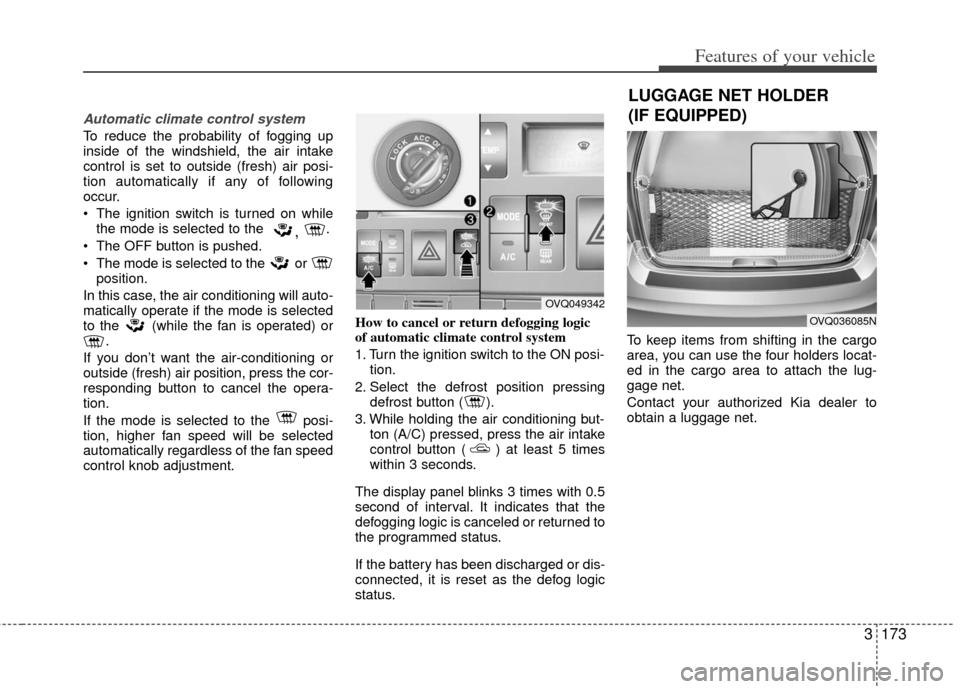
Automatic climate control system
To reduce the probability of fogging up
inside of the windshield, the air intake
control is set to outside (fresh) air posi-
tion automatically if any of following
occur.
The ignition switch is turned on whilethe mode is selected to the
, .
The OFF button is pushed.
The mode is selected to the or position.
In this case, the air conditioning will auto-
matically operate if the mode is selected
to the (while the fan is operated) or .
If you don’t want the air-conditioning or
outside (fresh) air position, press the cor-
responding button to cancel the opera-
tion.
If the mode is selected to the posi-
tion, higher fan speed will be selected
automatically regardless of the fan speed
control knob adjustment. How to cancel or return defogging logic
of automatic climate control system
1. Turn the ignition switch to the ON posi-
tion.
2. Select the defrost position pressing defrost button ( ).
3. While holding the air conditioning but- ton (A/C) pressed, press the air intake
control button ( ) at least 5 times
within 3 seconds.
The display panel blinks 3 times with 0.5
second of interval. It indicates that the
defogging logic is canceled or returned to
the programmed status.
If the battery has been discharged or dis-
connected, it is reset as the defog logic
status. To keep items from shifting in the cargo
area, you can use the four holders locat-
ed in the cargo area to attach the lug-
gage net.
Contact your authorized Kia dealer to
obtain a luggage net.
OVQ049342
OVQ036085N
LUGGAGE NET HOLDER
(IF EQUIPPED)
Page 192 of 370

3175
Features of your vehicle
Your new mirror comes with an integrat-
ed HomeLink Universal Transceiver,
which allows you to program the mirror to
activate your garage door(s), estate gate,
home lighting, etc. The mirror actually
learns the codes from your various exist-
ing transmitters.
Programming
Your vehicle may require the ignition
switch to be turned to the ACC position
for programming and/or operation of
HomeLink. It is also recommended that a
new battery be replaced in the hand-held
transmitter of the device being pro-
grammed to HomeLink for quicker train-
ing and accurate transmission of the
radio-frequency.
Follow these steps to train your
HomeLink mirror:
HOMELINK® WIRELESS CONTROL SYSTEM (IF EQUIPPED)
WARNING
When programming theHomeLink® Wireless Control
System, you may be operating a
garage door or gate operator.
Make sure that people and objects
are out of the way of the moving
door or gate to prevent potential
harm or damage.
(Continued)
(Continued)
Do not use HomeLink with anygarage door opener that lacks the
safety stop and reverse feature as
required by federal safety stan-
dards. (This includes any garage
door opener model manufactured
before April 1, 1982.) A garage
door opener which cannot detect
an object, signaling the door to
stop and reverse, does not meet
current federal safety standards.
Using a garage door opener with-
out these features increases risk
of serious injury or death. For
more information, call 1-800-355-
3515 or on the internet at
www.homelink.com.
Retain the original transmitter for future programming procedures
(i.e., new vehicle purchase). It is
also suggested that upon the sale
of the vehicle, the programmed
HomeLink buttons be erased for
security purposes (follow step 1
in the “Programming” portion of
this text).
OVQ036305N
Glare detection sensor
Indicator light
Homelink buttons
Page 196 of 370

3179
Features of your vehicle
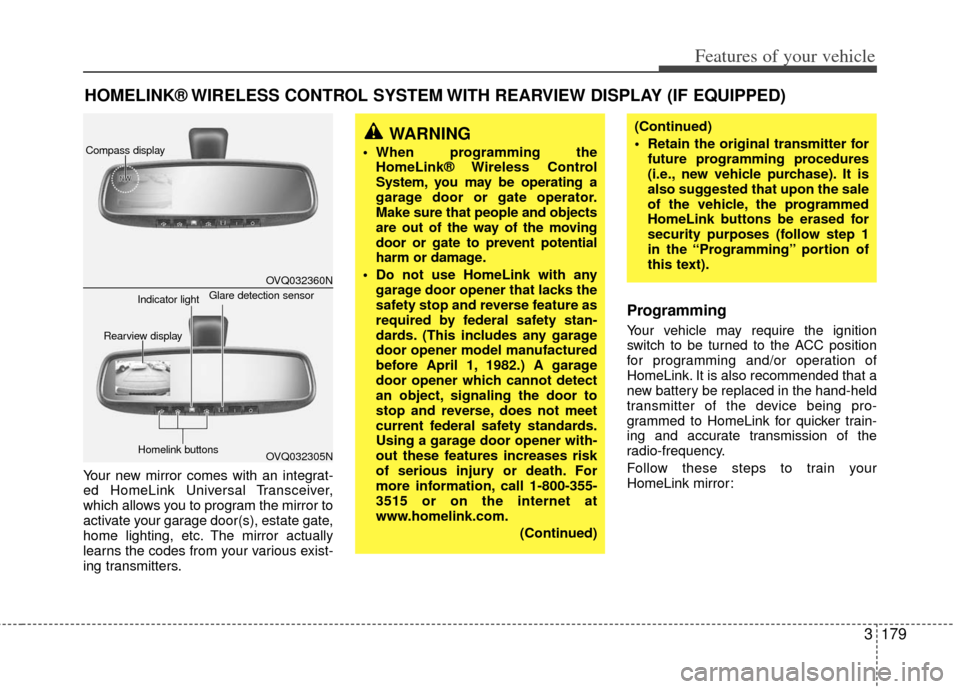
Your new mirror comes with an integrat-
ed HomeLink Universal Transceiver,
which allows you to program the mirror to
activate your garage door(s), estate gate,
home lighting, etc. The mirror actually
learns the codes from your various exist-
ing transmitters.
Programming
Your vehicle may require the ignition
switch to be turned to the ACC position
for programming and/or operation of
HomeLink. It is also recommended that a
new battery be replaced in the hand-held
transmitter of the device being pro-
grammed to HomeLink for quicker train-
ing and accurate transmission of the
radio-frequency.
Follow these steps to train your
HomeLink mirror:
HOMELINK® WIRELESS CONTROL SYSTEM WITH REARVIEW DISPLAY (IF EQUIPPED)
WARNING
When programming theHomeLink® Wireless Control
System, you may be operating a
garage door or gate operator.
Make sure that people and objects
are out of the way of the moving
door or gate to prevent potential
harm or damage.
Do not use HomeLink with any garage door opener that lacks the
safety stop and reverse feature as
required by federal safety stan-
dards. (This includes any garage
door opener model manufactured
before April 1, 1982.) A garage
door opener which cannot detect
an object, signaling the door to
stop and reverse, does not meet
current federal safety standards.
Using a garage door opener with-
out these features increases risk
of serious injury or death. For
more information, call 1-800-355-
3515 or on the internet at
www.homelink.com.
(Continued)
(Continued)
Retain the original transmitter forfuture programming procedures
(i.e., new vehicle purchase). It is
also suggested that upon the sale
of the vehicle, the programmed
HomeLink buttons be erased for
security purposes (follow step 1
in the “Programming” portion of
this text).
OVQ032360N
OVQ032305N
Glare detection sensor
Indicator light
Rearview display
Homelink buttons
Compass display