2011 KIA Sedona ignition
[x] Cancel search: ignitionPage 202 of 370

3185
Features of your vehicle
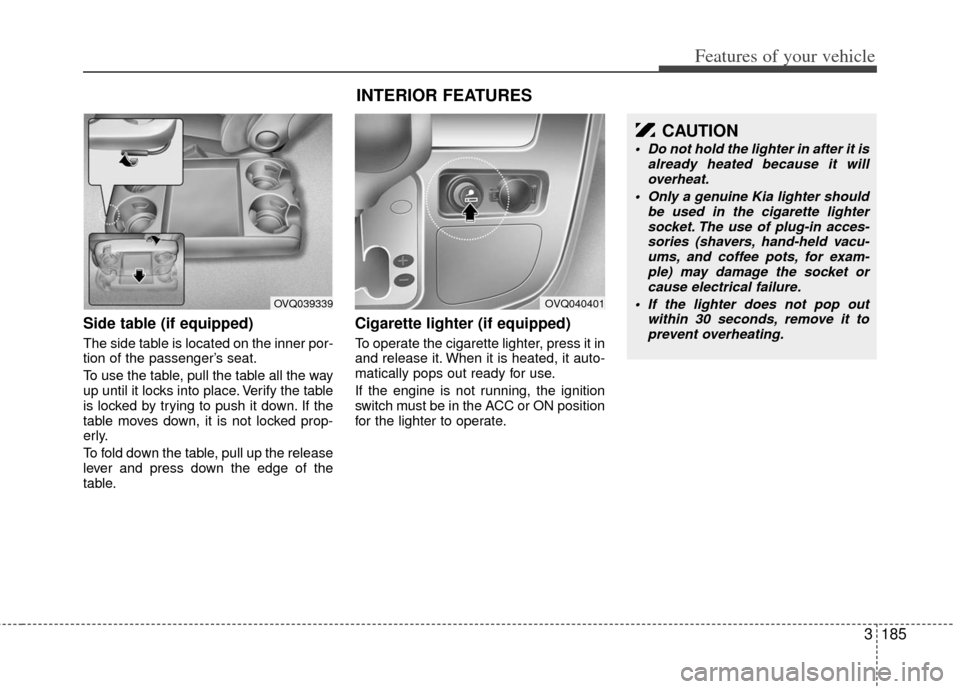
Side table (if equipped)
The side table is located on the inner por-
tion of the passenger’s seat.
To use the table, pull the table all the way
up until it locks into place. Verify the table
is locked by trying to push it down. If the
table moves down, it is not locked prop-
erly.
To fold down the table, pull up the release
lever and press down the edge of the
table.
Cigarette lighter (if equipped)
To operate the cigarette lighter, press it in
and release it. When it is heated, it auto-
matically pops out ready for use.
If the engine is not running, the ignition
switch must be in the ACC or ON position
for the lighter to operate.
OVQ039339
INTERIOR FEATURES
OVQ040401
CAUTION
Do not hold the lighter in after it isalready heated because it willoverheat.
Only a genuine Kia lighter should be used in the cigarette lightersocket. The use of plug-in acces- sories (shavers, hand-held vacu-ums, and coffee pots, for exam- ple) may damage the socket orcause electrical failure.
If the lighter does not pop out within 30 seconds, remove it toprevent overheating.
Page 206 of 370

3189
Features of your vehicle
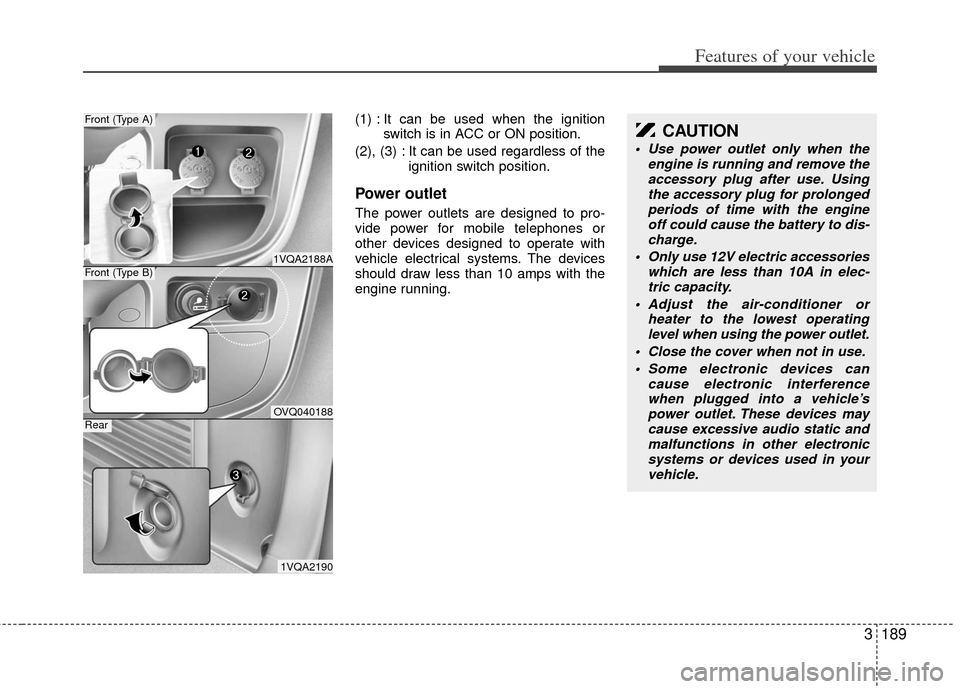
(1) : It can be used when the ignitionswitch is in ACC or ON position.
(2), (3) : It can be used regardless of the ignition switch position.
Power outlet
The power outlets are designed to pro-
vide power for mobile telephones or
other devices designed to operate with
vehicle electrical systems. The devices
should draw less than 10 amps with the
engine running.
1VQA2188A
Front (Type A)
OVQ040188
Front (Type B)
1VQA2190
Rear
CAUTION
Use power outlet only when theengine is running and remove theaccessory plug after use. Using the accessory plug for prolongedperiods of time with the engine off could cause the battery to dis-charge.
Only use 12V electric accessories which are less than 10A in elec-tric capacity.
Adjust the air-conditioner or heater to the lowest operatinglevel when using the power outlet.
Close the cover when not in use. Some electronic devices can cause electronic interferencewhen plugged into a vehicle’spower outlet. These devices maycause excessive audio static and malfunctions in other electronicsystems or devices used in your vehicle.
Page 207 of 370

Features of your vehicle
190
3
Digital clock
Whenever the battery terminals, related
fuses are disconnected, you must reset
the time.
When the ignition switch is in the ACC or
ON position, the clock buttons operate as
follows:
HOUR:
Pressing the “H” button with your fin-
ger, a pencil or similar object will
advance the time displayed by one
hour.
MINUTE:
Pressing the “M” button with your fin-
ger, a pencil or similar object will
advance the time displayed by one
minute.
To change the 12 hour format to the 24
hour format, press the “H” and “M” but-
tons for more than 3 seconds.
For example, if the “H” and “M” buttons is
pressed for more than 3 seconds while
the time is 10:15 p.m., the display will be
changed to 22:15.
Floor mat anchor(s) (if equipped)
When using a floor mat on the front floor
carpet, make sure it attaches to the floor
mat anchor(s) in your vehicle. This keeps
the floor mat from sliding forward.
OVQ038092NOXM049228
■Type A■Type B
Page 215 of 370

Features of your vehicle
198
3
Using RADIO, SETUP, VOLUME
and AUDIO CONTROL
1. FM/AM Button
The FM/AM button toggles between FM
and AM. Listed below are the paths as
the system switches from FM to AM and
back to FM.
FM/AM : FM1
➟FM2➟AM➟FM1...
2. SEEK Button
When the [SEEK ] is pressed, it will
automatically tune to the next lower
station.
When the [SEEK ] is pressed, it will automatically tune to the next higher
station.
3.POWER Button & VOLUMEKnob
Turns the audio system on/off whenthe IGNITION SWITCH is on ACC or
ON.
If the knob is turned clockwise/counte clockwise, the volume will increase
/decrease.
4. SCAN Button
When the button is pressed, it auto-matically scans the radio stations
upwards.
The SCAN feature steps through each station, starting from the initial station,
for 5 seconds.
Press the [SCAN] button again to stop the scan feature and to listen to the
currently selected channel.
5. MUTE Button
When the button is pressed, stops sound
and “Audio Mute” is displayed on LCD.
6. SETUP Button
Press this button to enter SETUP mode,
If no action is taken for 8 seconds, it will
return to previous mode.
In “SETUP” mode, rotate the TUNE knob
to move the cursor between items, and
push the TUNE knob to select.
Select whether long file names are
scrolled continuously (“ON”) or just once
(“OFF”).
Select this item to turn the SDVC(Speed
Dependent Volume Control) feature ON
or OFF. If it is turned ON, volume level is
adjusted automatically according to the
vehicle speed.
Select default display of SIRIUS mode.
“Category/Channel name” or “Artist/Song
Title” can be selected.
Select this item to enter BLUETOOTH
setup mode. Refer to “BLUETOOTH
PHONE OPERATION” section for
detailed information.
Page 218 of 370

3201
Features of your vehicle
Using CD Player
1. CD Slot
Insert a CD label side up and gently push
in while ignition switch is on ACC or ON.
The audio automatically switches to CD
mode and begins to play the CD. If the
audio was turned off, audio power will
automatically turned on as the CD is
inserted.
This audio only recognizes 12cm-size,CD-DA (Audio CD) or ISO data-CD
(MP3 CD).
If UDF data-CD or non-CD (e.g. DVD) is inserted, "Reading Error" message
will be displayed and the disc will be
ejected.
2. CD Indicator(CD Player :PA710S)
When car ignition switch is ACC or ON
and if the CD is loaded, this indicator is lit.
If the CD is ejected the Icon is off.
3. CD Eject Button
Press button to to eject the CD. This
button works regardless of ignition
switch status.
ALL EJECT(CD Changer :PA760S)
Press this button for more than 0.8
seconds to eject all discs inside the
deck in respective order.
4. CD LOAD Button
This compact disc player will accommo-
date up to six compact discs.To insert
discs into the player, perform the follow-
ing:
Press and release the [LOAD] Button.
Green light on the slot will be illuminat-ed and the lowest number of empty
slot will blink on the display. After “Wait”
is displayed on the LCD, the slot will
open with “Insert CD” displayed on the
LCD.
Insert a disc partway into the slot, label side up. The player will pull the disc in.
When the disc is inserted, the disc will
begin to play automatically.
✽ ✽ NOTICE
• The disc can be only inserted while the
green light is blinking on the slot.
• This CD player is suitable only for 12cm discs, do not use irregular
shaped CDs.
To insert multiple discs:
Press and hold the [LOAD] button for
one second or more. You will then hear
a beep sound and the green light on
the slot will be illuminated, and the
numbers of empty disc will blink on the
display.
After “Wait” is displayed on the LCD with the lowest number of empty slot
blinking, the slot will open with “Insert
CD” displayed on the LCD.
Insert a disc partway into the slot, label side up. The player will pull the disc in.
Once the disc is loaded, the numbers
of the empty disc will blink on the dis-
play continuously.
If the next “Insert CD” is displayed
when the slot is illuminated, you can
then load another disc.
Load the remaining disc by following procedures 1 and 2. When you finished
loading 6 discs, the CD player will
begin to play the last CD loaded.
CAUTION
Do not insert a CD if CD indicator
is lit.
Page 244 of 370

3227
Features of your vehicle
Welcome
The Rear Seat Entertainment (RSE)
System is a compact, built-in, easy-to-use
entertainment system designed to provide
family fun while you are on the road. Enjoy
great quality sound from the vehicle
speakers, or have a private, quiet viewing
with the wireless headphones.
The display unit is mounted to the ceiling
in the rear passenger area of the vehicle,
allowing rear-seat passengers to play
DVD movies, video CDs or music CDs.
Users may also plug in a game platform or
VHS player. Headphones, game car-
tridges and other accessories can be kept
neatly out of the way in the 3rd-row arm-
rest compartment.
System Overview
The RSE System includes a mounted
color monitor with a built-in audio/video
control panel and a DVD player. It also
includes a remote control and two (2)
sets of battery-operated wireless head-
phones (batteries are included).
Connections / Setup
The RSE system is designed to make
your time on the road more enjoyable.
Please follow these instructions carefully
to get the most out of your RSE.
✽ ✽NOTICE
RSE operation is prevented during the
first 2 seconds after the ignition switch is
turned to ignition on or accessory mode.
The RSE system is already set up and
ready for use. The system is always
“awake” when the vehicle's ignition is
turned on or when the vehicle is in
“accessory power mode.”
REAR SEAT ENTERTAINMENT SYSTEM (IF EQUIPPED)
CAUTION
Refrain from using food or drinks
near the RSE, the wireless head-phones or the remote control.
Direct sunlight may interfere with the headphone's operation andperformance.
Normal RSE operation cannot be guaranteed with unofficial dupli-cated discs.
In order to prevent inadvertent battery discharge, the RSE willremain in standby mode whenignition switch is turn to ignitionON or accessory mode.
Use of rear seat entertainment system without the engine run-ning will reduce battery power.
CAUTION
Disclaimer: The RSE system is pro- grammed to the regional displayformats for your region (NTSC or PAL). Please note that your RSE willnot read DVDs from a different region.
Page 248 of 370

3231
Features of your vehicle
Using the DVD player
Disc compatibility
Your RSE player accepts and plays all
DVDs in 4:3 (normal) and 16:9 (wide
screen) video formats. With DVDs that
offer multiple formats, the default format
is 16:9 and will stay that way unless the
user changes the format. (See “Display”
to learn how to adjust the format.)
✽ ✽NOTICE
• The DVD player has the capability to
play DVD-Video, DVD-R, DVD-RW,
CD-DA, CD-R, CD-RW and Video-
CD.
• The DVD player has the capability to play CD-DA, DVD, VCD, PCM,
Dolby Digital and DTS formats.
• Please refer to the appendix for the error messages.
Loading a Disc
Insert the disc part way into the load slot.
The player will automatically grip the disc
and pull it in the rest of the way. The player
will display “reading” on the screen and
show the “Kia Motors” logo before begin-
ning the DVD. The player is only capable of reading the
bottom side of a disc. When inserting a
single-sided disc, the label side should be
up. When inserting a two-sided disc, the
desired play side should be down.
✽ ✽
NOTICE
• Because there is no universal standard
for DVD programming, your disc may
behave differently than below. Some
DVDs may present warning messages
about unauthorized duplication, some
will go directly to a menu and others
may start playing the movie immedi-
ately.
• When the vehicle's ignition is active, the loading of any playable disc will
cause the player to initialize and auto-
matically play the disc. If a disc was
playing prior to the ignition being
turned off, it will not automatically
replay once the ignition is turned on
again. Instead, it will go into standby
mode. Press the SRC or
PLAY/PAUSE( ) button to “wake
up” the unit and resume disc play.
Disc Protection
The player has an Auto-Reload Disc
Protection feature to protect discs from
accidental damage. If an ejected disc is
not removed within 25 seconds after being
ejected, it will be pulled back into the play-
er. The disc will not begin playing. Disc can
be played by the SRC or
PLAY/PAUSE( ) buttons.
DVD Controls
You can control your DVD by using the
buttons on the unit's control panel or by
using the remote control. Instructions for
the controls listed below are the same
whether you are using the control panel
or the remote control. However, there are
functions that are only available from the
remote control. These buttons and their
functionality are discussed in the
“REMOTE CONTROL” section begin-
ning.
Page 250 of 370

3233
Features of your vehicle
✽
✽NOTICE
The RSE will enter standby mode when
the vehicle ignition is turned off and
back on. Press the SRC or
PLAY/PAUSE( ) button to “wake
up” the unit and resume disc play.
1. Stop/Eject
While the disc is playing, press the
STOP/EJECT ( ) button to stop disc
play. When the disc has stopped, press
the button again to eject the disc.
✽ ✽NOTICE
The player has an Auto-Reload Disc
Protection feature to protect discs from
accidental damage. If an ejected disc is
not removed within 25 seconds after
being ejected, it will be pulled back into
the player. This is to protect the disc
from accidental damage.
2. Speaker Volume Control
You can adjust the volume one of two
ways. First, if you are adjusting the vol-
ume for audio through the vehicle speak-
ers, you can use the VOLUME button on
the control panel or the remote control.
This button is reserved for sending a sig-
nal to the vehicle speakers only, and will
not adjust the headphone volume. Press
“+” to increase the volume and “-” to
decrease the volume.
Second, the volume on the wireless
headphones can be adjusted by turning
the VOL knob located on the left side of
the headphones.
3. Play/Pause
You do not need to press the play button
after first loading a DVD or VCD; it will
start automatically by playing the first
track or bringing up the disc menu.
If the disc does not automatically load,
press PLAY/PAUSE( ) to play the DVD.
While playing a DVD, press PLAY
/PAUSE( ) to pause the DVD. Press
the button again to resume play.
4. Display
When the player is in DVD mode, press the
DISP button to view the DVD title, chapter
number and elapsed time and other infor-
mation about the DVD currently playing.
It will also display brightness. There are
“Day Time” brightness with brightest level
and “Night Time” brightness which has 70%
level of “Day Time” brightness. Adjust the
level of brightness by pressing the
REV(dimmer) or FWD(brighter) buttons.
The next time the player is turned on, it will
return to the brightness level it was adjusted
to when last used.
The RSE unit has two presets of display
brightness. When the headlamp is turned
on, the display brightness level will be
dimmed as the preset. However, when the
headlamp is turned off, the display bright-
ness will return to the daytime brightness.
Press DISP to adjust the image format. The
image format, also known as the aspect
ratio, is a ratio of the height to width of the
image on the screen. For example, a 4:3
ratio would mean an image that is 4 units by
3 units.