Page 328 of 542
the vehicle stopped or in motion. With the vehicle in
motion, the transfer case will engage/disengage faster if
you momentarily release the accelerator pedal after mov-
ing the transfer case switch. If the vehicle is stopped, the
ignition switch must be in the ON position with the
engine either OFF or RUNNING. This shift cannot be
completed if the ignition switch is in the ACC position.
NOTE:The four-wheel drive system will not allow
shifts between 2WD and 4WD LOCK if the rear wheels
are spinning (no traction). In this situation, the selected
position indicator light will flash and the original posi-
tion indicator light will remain ON. At this time, reduce
speed and stop spinning the wheels to complete the shift.
There may be a delay up to 10 seconds for the shift to
complete after the wheels have stopped spinning.
Delayed shifting out of 4WD LOCK may be experienced
due to uneven tire wear, low tire pressure, or excessive
loading. 4WD Lock To 4WD Low
When shifting into or out of 4WD LOW, some gear noise
may be heard. This noise is normal and is not detrimental
to the vehicle or its occupants.
Shifting can be performed with the vehicle rolling 2 to
3 mph (3 to 5 km/h) using the “Preferred Procedure” or
completely stopped using the “Alternate Procedure.”
Preferred Procedure
1. With the engine RUNNING, slow the vehicle speed to
2 to 3 mph (3 to 5 km/h).
2. Shift the transmission into NEUTRAL.
3. While still rolling, move the transfer case switch to the
desired position.
4. After the desired position indicator light is ON (not
flashing), shift the transmission into gear.
326 STARTING AND OPERATING
Page 344 of 542
ANTI-LOCK BRAKE SYSTEM
The Anti-Lock Brake System (ABS) is designed to aid the
driver in maintaining vehicle control under adverse
braking conditions. The system operates with a separate
computer to modulate hydraulic pressure, to prevent
wheel lock-up and help avoid skidding on slippery
surfaces.
All vehicle wheels and tires must be the same size and
type, and tires must be properly inflated, to produce
accurate signals for the computer.
WARNING!
Significant over or under-inflation of tires or mixing
sizes of tires or wheels on the vehicle can lead to loss
of braking effectiveness.The ABS conducts a low-speed self-test at about 12 mph
(20 km/h). If you have your foot lightly on the brake
while this test is occurring, you may feel slight pedal
movement. The movement can be more apparent on ice
and snow. This is normal.
The ABS pump motor runs during the self-test at 12 mph
(20 km/h) and during an ABS stop. The pump motor
makes a low humming noise during operation, which is
normal.
WARNING!
•Pumping of the Anti-Lock Brakes will diminish
their effectiveness and may lead to a collision.
Pumping makes the stopping distance longer. Just
press firmly on your brake pedal when you need
to slow down or stop.
(Continued)
342 STARTING AND OPERATING
Page 346 of 542
•Engines may idle at higher speeds during warm-up,
which could cause rear wheels to spin and result in
loss of vehicle control. Be especially careful while
driving on slippery roads, in close-quarter maneuver-
ing, parking, or stopping.
•Do not drive too fast for road conditions, especially
when roads are wet or slushy. A wedge of water can
build up between the tire tread and the road. This
hydroplaning action can cause loss of traction, braking
ability, and control.
•After going through deep water or a car wash, brakes
may become wet, resulting in decreased performance
and unpredictable braking action. Dry the brakes by
gentle, intermittent pedal action while driving at very
slow speeds.
ELECTRONIC BRAKE CONTROL SYSTEM
Your vehicle is equipped with an advanced electronic
brake control system commonly referred to as ESC. This
system includes Anti-Lock Brake System (ABS), Traction
Control System (TCS), Brake Assist System (BAS), Hill
Start Assist (HSA), Electronic Roll Mitigation (ERM), and
Electronic Stability Control (ESC). These systems work
together to enhance both vehicle stability and control in
various driving conditions.
Two additional electronic brake control system options
are Hill Descent Control (HDC) and Trailer Sway Control
(TSC). Your vehicle may be equipped with one or both of
these options.
Anti-Lock Brake System (ABS)
This system aids the driver in maintaining vehicle control
under adverse braking conditions. The system controls
hydraulic brake pressure to prevent wheel lock-up to
344 STARTING AND OPERATING
Page 359 of 542

TIRE SAFETY INFORMATION
Tire MarkingsNOTE:
•P (Passenger) - Metric tire sizing is based on U.S.
design standards. P-Metric tires have the letter “P”
molded into the sidewall preceding the size designa-
tion. Example: P215/65R15 95H.
•European-Metric tire sizing is based on European
design standards. Tires designed to this standard have
the tire size molded into the sidewall beginning with
the section width. The letter�P�is absent from this tire
size designation. Example: 215/65R15 96H.
•LT (Light Truck) - Metric tire sizing is based on U.S.
design standards. The size designation for LT-Metric
tires is the same as for P-Metric tires except for the
letters “LT” that are molded into the sidewall preced-
ing the size designation. Example: LT235/85R16.
•Temporary spare tires are high-pressure compact
spares designed for temporary emergency use only.
1 — U.S. DOT Safety
Standards Code (TIN) 4 — Maximum Load
2 — Size Designation 5 — Maximum Pressure
3 — Service Description 6 — Treadwear, Traction and Temperature Grades
5
STARTING AND OPERATING 357
Page 361 of 542
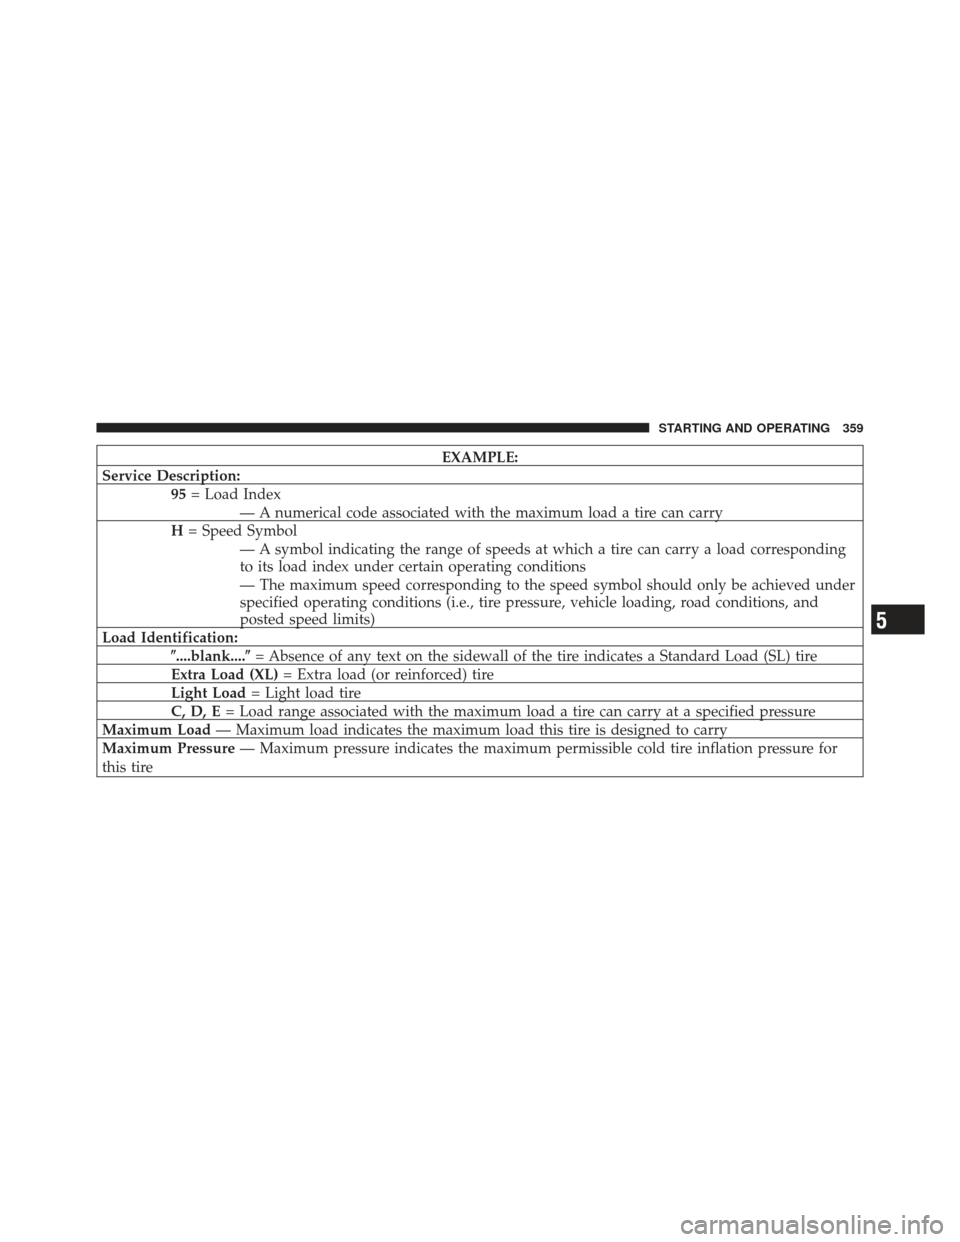
EXAMPLE:
Service Description: 95= Load Index
— A numerical code associated with the maximum load a tire can carry
H = Speed Symbol
— A symbol indicating the range of speeds at which a tire can carry a load corresponding
to its load index under certain operating conditions
— The maximum speed corresponding to the speed symbol should only be achieved under
specified operating conditions (i.e., tire pressure, vehicle loading, road conditions, and
posted speed limits)
Load Identification: �....blank....� = Absence of any text on the sidewall of the tire indicates a Standard Load (SL) tire
Extra Load (XL) = Extra load (or reinforced) tire
Light Load = Light load tire
C, D, E = Load range associated with the maximum load a tire can carry at a specified pressure
Maximum Load — Maximum load indicates the maximum load this tire is designed to carry
Maximum Pressure — Maximum pressure indicates the maximum permissible cold tire inflation pressure for
this tire
5
STARTING AND OPERATING 359
Page 363 of 542
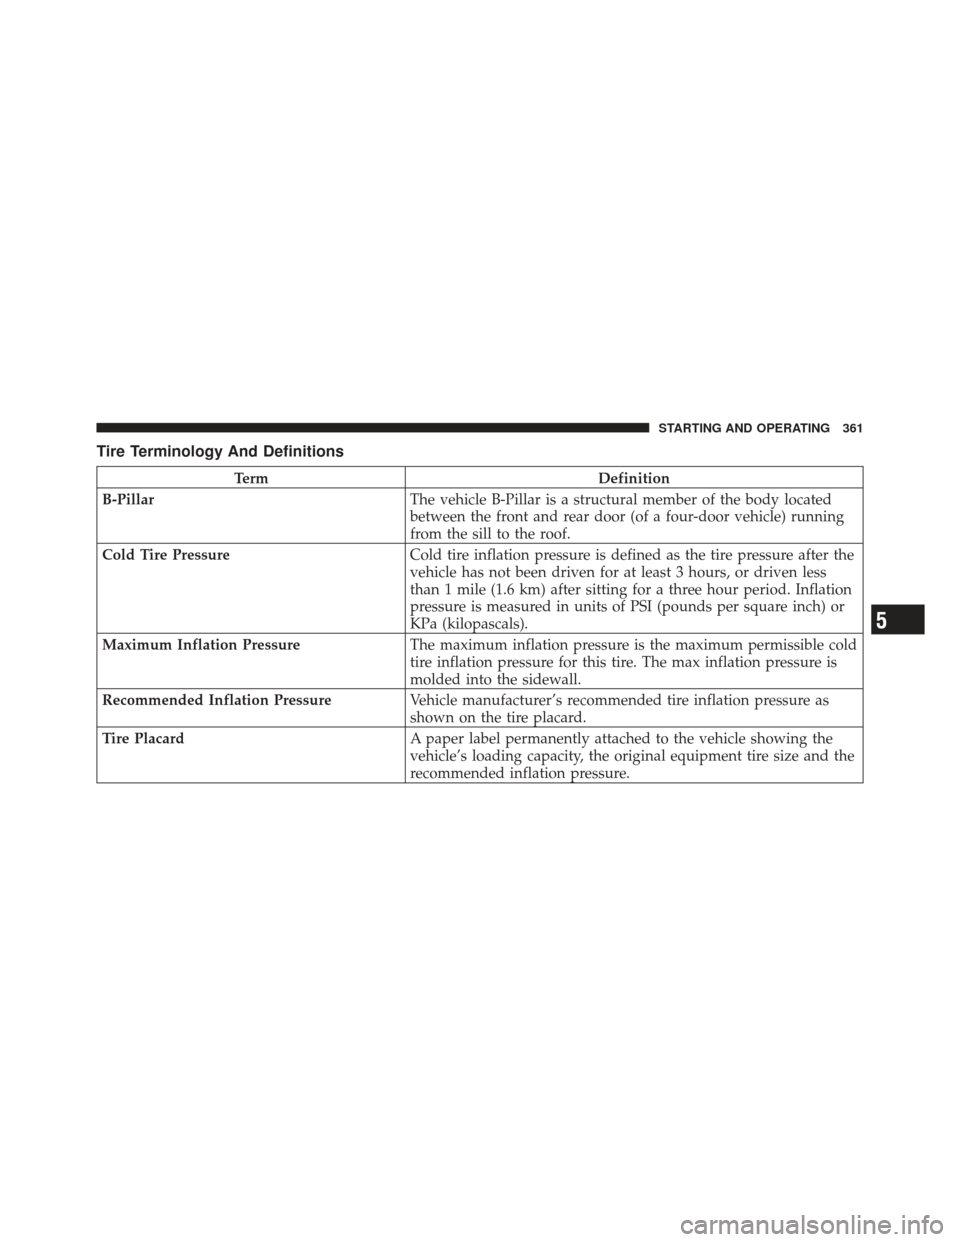
Tire Terminology And Definitions
TermDefinition
B-Pillar The vehicle B-Pillar is a structural member of the body located
between the front and rear door (of a four-door vehicle) running
from the sill to the roof.
Cold Tire Pressure Cold tire inflation pressure is defined as the tire pressure after the
vehicle has not been driven for at least 3 hours, or driven less
than 1 mile (1.6 km) after sitting for a three hour period. Inflation
pressure is measured in units of PSI (pounds per square inch) or
KPa (kilopascals).
Maximum Inflation Pressure The maximum inflation pressure is the maximum permissible cold
tire inflation pressure for this tire. The max inflation pressure is
molded into the sidewall.
Recommended Inflation Pressure Vehicle manufacturer’s recommended tire inflation pressure as
shown on the tire placard.
Tire Placard A paper label permanently attached to the vehicle showing the
vehicle’s loading capacity, the original equipment tire size and the
recommended inflation pressure.
5
STARTING AND OPERATING 361
Page 364 of 542
Tire Loading And Tire Pressure
Tire Placard Location
NOTE:The proper cold tire inflation pressure is listed
on the driver’s side B-Pillar.
Tire And Loading Information Placard
Tire Placard Location
Tire and Loading Information Placard
362 STARTING AND OPERATING
Page 365 of 542
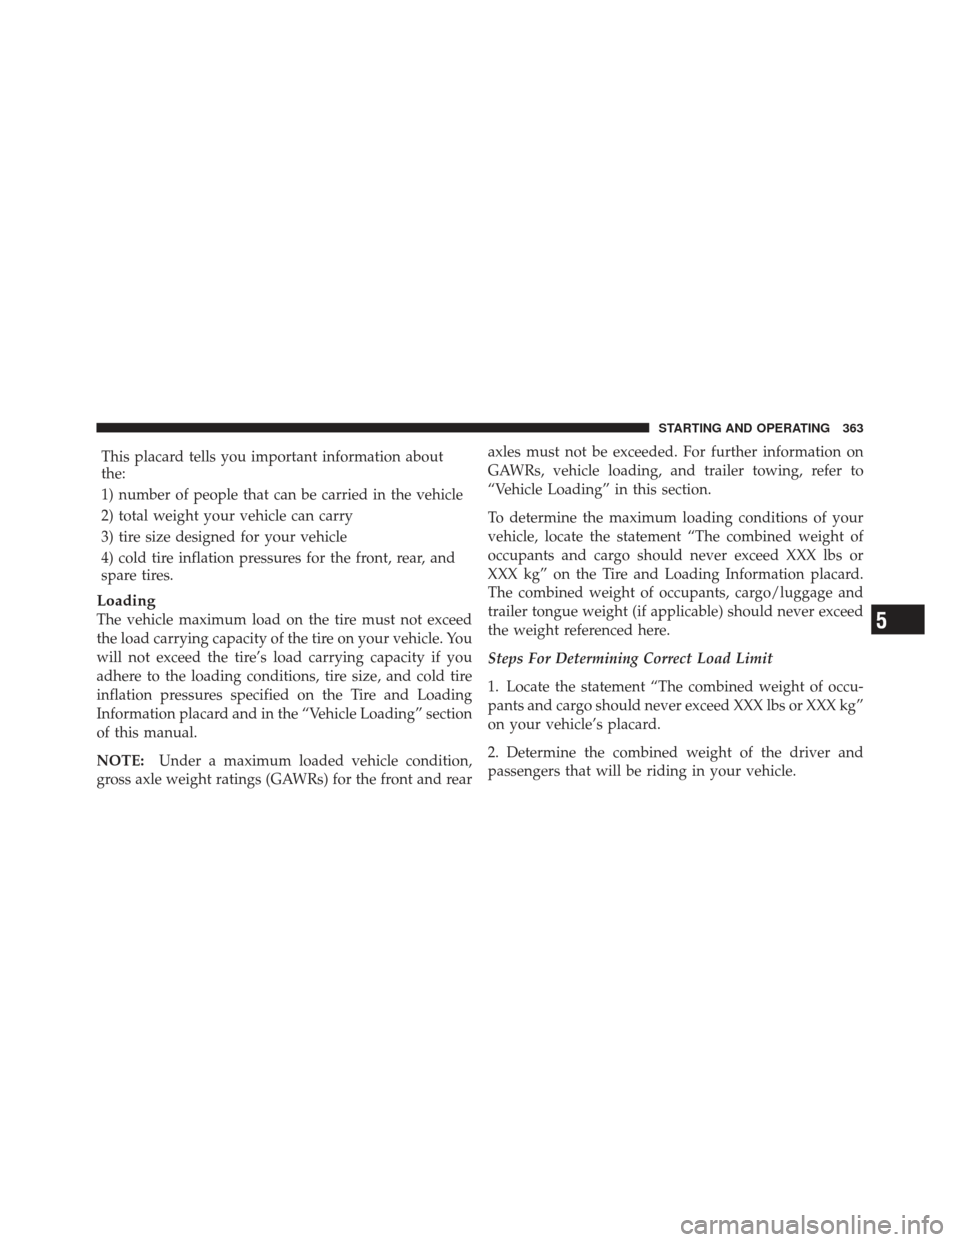
This placard tells you important information about
the:
1) number of people that can be carried in the vehicle
2) total weight your vehicle can carry
3) tire size designed for your vehicle
4) cold tire inflation pressures for the front, rear, and
spare tires.
Loading
The vehicle maximum load on the tire must not exceed
the load carrying capacity of the tire on your vehicle. You
will not exceed the tire’s load carrying capacity if you
adhere to the loading conditions, tire size, and cold tire
inflation pressures specified on the Tire and Loading
Information placard and in the “Vehicle Loading” section
of this manual.
NOTE:Under a maximum loaded vehicle condition,
gross axle weight ratings (GAWRs) for the front and rear axles must not be exceeded. For further information on
GAWRs, vehicle loading, and trailer towing, refer to
“Vehicle Loading” in this section.
To determine the maximum loading conditions of your
vehicle, locate the statement “The combined weight of
occupants and cargo should never exceed XXX lbs or
XXX kg” on the Tire and Loading Information placard.
The combined weight of occupants, cargo/luggage and
trailer tongue weight (if applicable) should never exceed
the weight referenced here.
Steps For Determining Correct Load Limit
1. Locate the statement “The combined weight of occu-
pants and cargo should never exceed XXX lbs or XXX kg”
on your vehicle’s placard.
2. Determine the combined weight of the driver and
passengers that will be riding in your vehicle.5
STARTING AND OPERATING 363