2011 INFINITI QX56 heater
[x] Cancel search: heaterPage 3684 of 5598
MA-14
< PERIODIC MAINTENANCE >
ENGINE MAINTENANCE
If water drain plug on cylinder block is removed, close and tighten it. Refer to EM-107, "Disassem-
bly and Assembly".
2. Check that each hose clamp is firmly tightened.
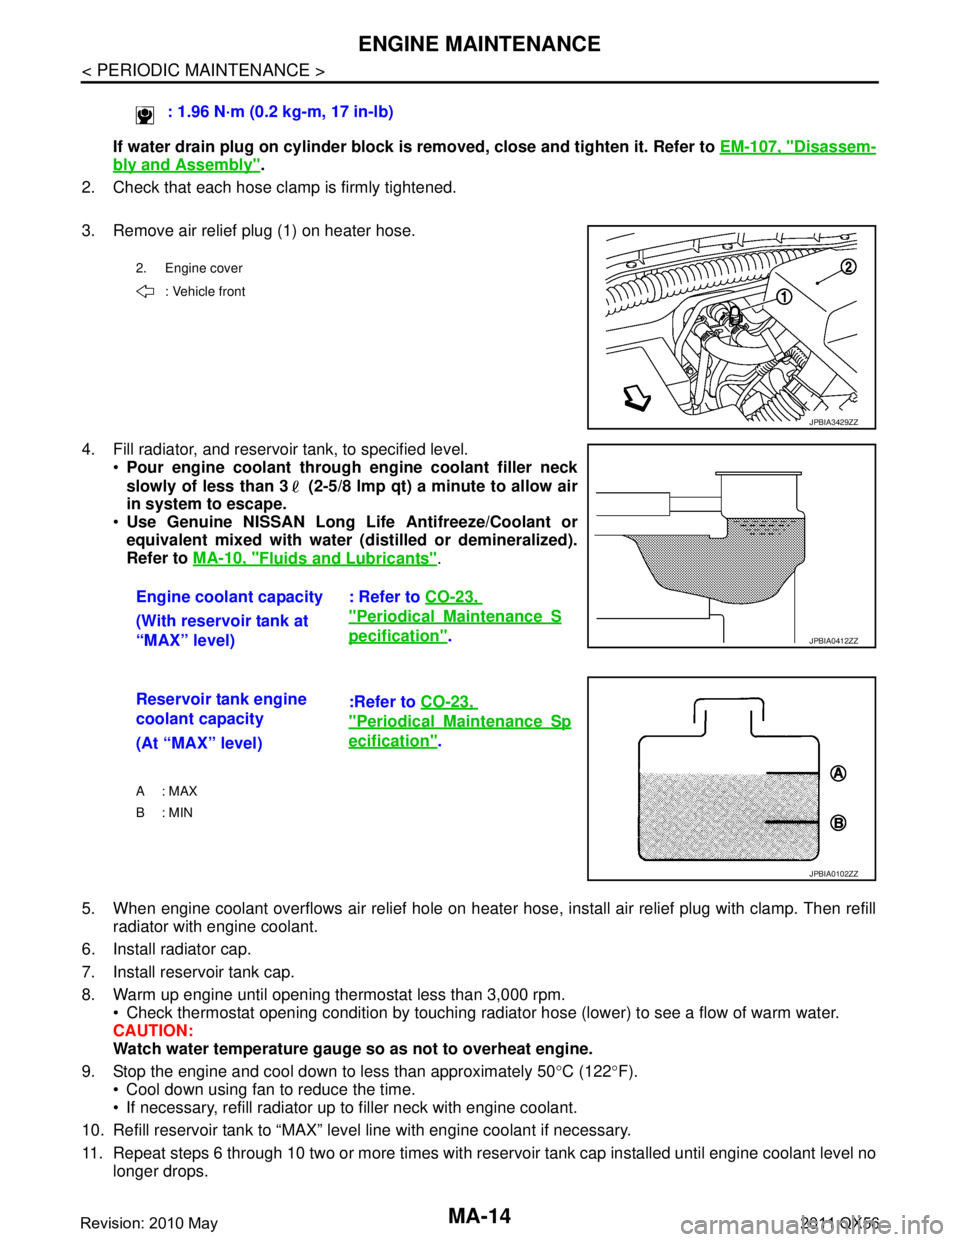
3. Remove air relief plug (1) on heater hose.
4. Fill radiator, and reservoir tank, to specified level. Pour engine coolant through engine coolant filler neck
slowly of less than 3 (2-5/8 lmp qt) a minute to allow air
in system to escape.
Use Genuine NISSAN Long Life Antifreeze/Coolant or
equivalent mixed with water (d istilled or demineralized).
Refer to MA-10, "
Fluids and Lubricants".
5. When engine coolant overflows air relief hole on heater hose, install air relief plug with clamp. Then refill
radiator with engine coolant.
6. Install radiator cap.
7. Install reservoir tank cap.
8. Warm up engine until opening thermostat less than 3,000 rpm. Check thermostat opening condition by touching radiator hose (lower) to see a flow of warm water.
CAUTION:
Watch water temperature gauge so as not to overheat engine.
9. Stop the engine and cool down to less than approximately 50 °C (122 °F).
Cool down using fan to reduce the time.
If necessary, refill radiator up to filler neck with engine coolant.
10. Refill reservoir tank to “MAX” level line with engine coolant if necessary.
11. Repeat steps 6 through 10 two or more times with reservoir tank cap installed until engine coolant level no longer drops. : 1.96 N·m (0.2 kg-m, 17 in-lb)
2. Engine cover
: Vehicle front
JPBIA3429ZZ
Engine coolant capacity : Refer to CO-23,
"PeriodicalMaintenanceS
pecification".
(With reservoir tank at
“MAX” level)JPBIA0412ZZ
Reservoir tank engine
coolant capacity :Refer to
CO-23,
"PeriodicalMaintenanceSp
ecification".
(At “MAX” level)
A : MAX
B: MIN
JPBIA0102ZZ
Revision: 2010 May2011 QX56
Page 3685 of 5598
ENGINE MAINTENANCEMA-15
< PERIODIC MAINTENANCE >
C
DE
F
G H
I
J
K L
M B
MA
N
O A
12. Check cooling system for leakage with engine running.
13. Warm up the engine, and check for sound of engine coolant flow while running engine from idle up to
3,000 rpm with heater temperature controller se t at several position between “COOL” and “WARM”.
Sound may be noticeable at heater unit.
14. Repeat step 13 three times.
15. If sound is heard, bleed air from cooling system by repeating step 4, and steps from 6 to 14 until engine
coolant level no longer drops.
ENGINE COOLANT : FlushingINFOID:0000000006394847
1. Install reservoir tank if removed, and radiator drain plug. CAUTION:
Be sure to clean drain plug and install with new O-ring. Refer to CO-13, "
Exploded View".
If water drain plug on cylinder block is removed, close and tighten it. Refer to EM-107, "
Disassem-
bly and Assembly".
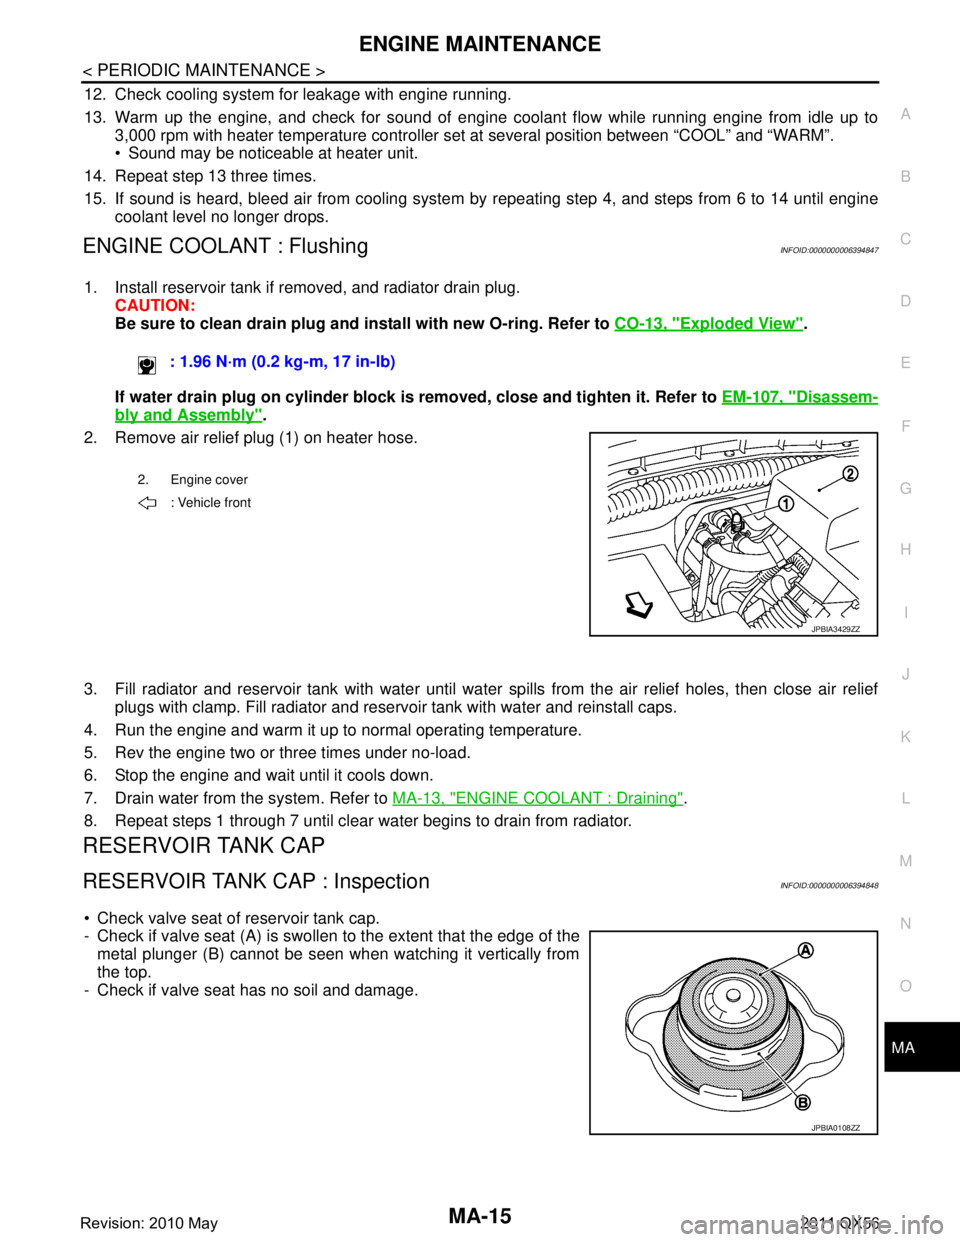
2. Remove air relief plug (1) on heater hose.
3. Fill radiator and reservoir tank with water until water spills from the air relief holes, then close air relief
plugs with clamp. Fill radiator and rese rvoir tank with water and reinstall caps.
4. Run the engine and warm it up to normal operating temperature.
5. Rev the engine two or three times under no-load.
6. Stop the engine and wait until it cools down.
7. Drain water from the system. Refer to MA-13, "
ENGINE COOLANT : Draining".
8. Repeat steps 1 through 7 until clear water begins to drain from radiator.
RESERVOIR TANK CAP
RESERVOIR TANK CAP : InspectionINFOID:0000000006394848
Check valve seat of reservoir tank cap.
- Check if valve seat (A) is swollen to the extent that the edge of the metal plunger (B) cannot be seen when watching it vertically from
the top.
- Check if valve seat has no soil and damage. : 1.96 N·m (0.2 kg-m, 17 in-lb)
2. Engine cover
: Vehicle front
JPBIA3429ZZ
JPBIA0108ZZ
Revision: 2010 May2011 QX56
Page 3740 of 5598

OUTSIDE MIRRORMIR-35
< REMOVAL AND INSTALLATION >
C
DE
F
G H
I
J
K
M A
B
MIR
N
O P
9. Remove fixing screws (A), (B) and then remove power fold unit (2) from bracket (1).
ASSEMBLY
Assemble in the reverse order of disassembly.
GLASS MIRROR
GLASS MIRROR : Removal and InstallationINFOID:0000000006257239
REMOVAL
1. Remove door mirror assembly from front door. Refer to MIR-32, "DOOR MIRROR ASSEMBLY : Removal
and Installation".
2. Remove glass mirror. 1. Place the glass mirror upward.
2. Put a strip of protective tape (B) on housing assembly.
3. As shown in the figure, insert a small flat-bladed screwdriver (A) between glass mirror (1) and actuator (2). Push up both
pawls simultaneously to remove glass mirror lower half side.
NOTE:
Insert flat-bladed screwdriver into recesses, and push up
while rotating (twisting) to make work easier.
4. Remove terminals (A) of mi rror heater attachment from
glass mirror (1) if equipped.
3. Lightly lift up lower side of glass mirror, and detach both pawls of upper side as if pulling it out to disas- semble glass mirror from actuator.
NOTE:
Be careful not to allow grease on sealing agent in center of mirror or back side of glass mirror.
INSTALLATION
Note the following item, and then install in the reverse order n the reverse order of disassembly.
CAUTION:
After installation, visually check that pawls are securely engaged.
DOOR MIRROR COVER
JMLIA0924ZZ
JMLIA0158ZZ
JMLIA0908ZZ
Revision: 2010 May2011 QX56
Page 4471 of 5598
SE-12
< SYSTEM DESCRIPTION >
COMPONENT PARTS
FRONT HEATED SEAT SYSTEM
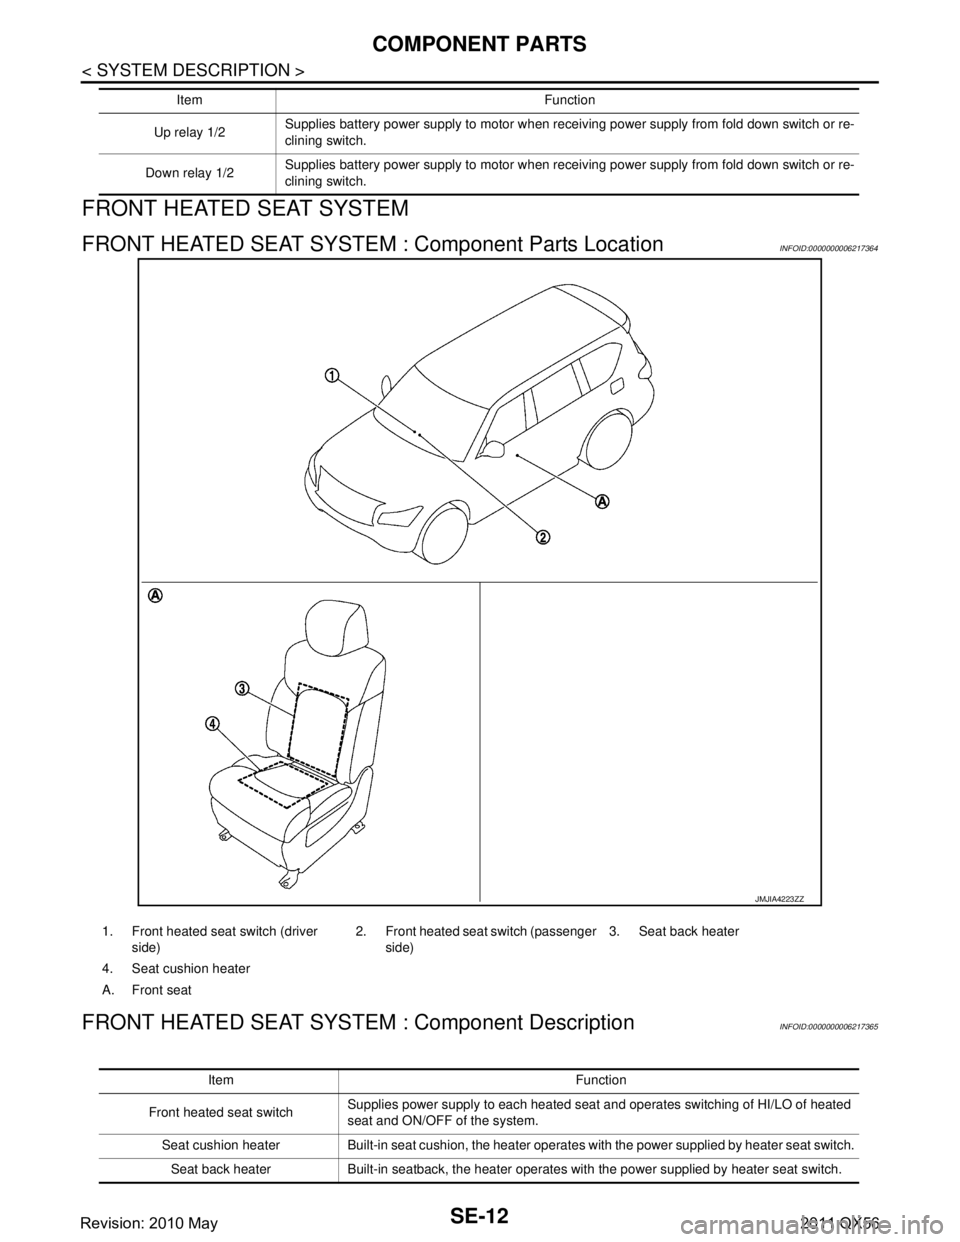
FRONT HEATED SEAT SYSTEM : Component Parts LocationINFOID:0000000006217364
FRONT HEATED SEAT SYSTEM : Component DescriptionINFOID:0000000006217365
Up relay 1/2Supplies battery power supply to motor when receiving power supply from fold down switch or re-
clining switch.
Down relay 1/2 Supplies battery power supply to motor when receiving power supply from fold down switch or re-
clining switch.
Item Function
JMJIA4223ZZ
1. Front heated seat switch (driver
side) 2. Front heated seat switch (passenger
side) 3. Seat back heater
4. Seat cushion heater
A. Front seat
Item Function
Front heated seat switch Supplies power supply to each heated seat and operates switching of HI/LO of heated
seat and ON/OFF of the system.
Seat cushion heater Built-in seat cushion, the heater operates with the power supplied by heater seat switch. Seat back heater Built-in seatback, the heater operates with the power supplied by heater seat switch.
Revision: 2010 May2011 QX56
Page 4472 of 5598
COMPONENT PARTSSE-13
< SYSTEM DESCRIPTION >
C
DE
F
G H
I
K L
M A
B
SE
N
O P
SECOND HEATED SEAT SYSTEM
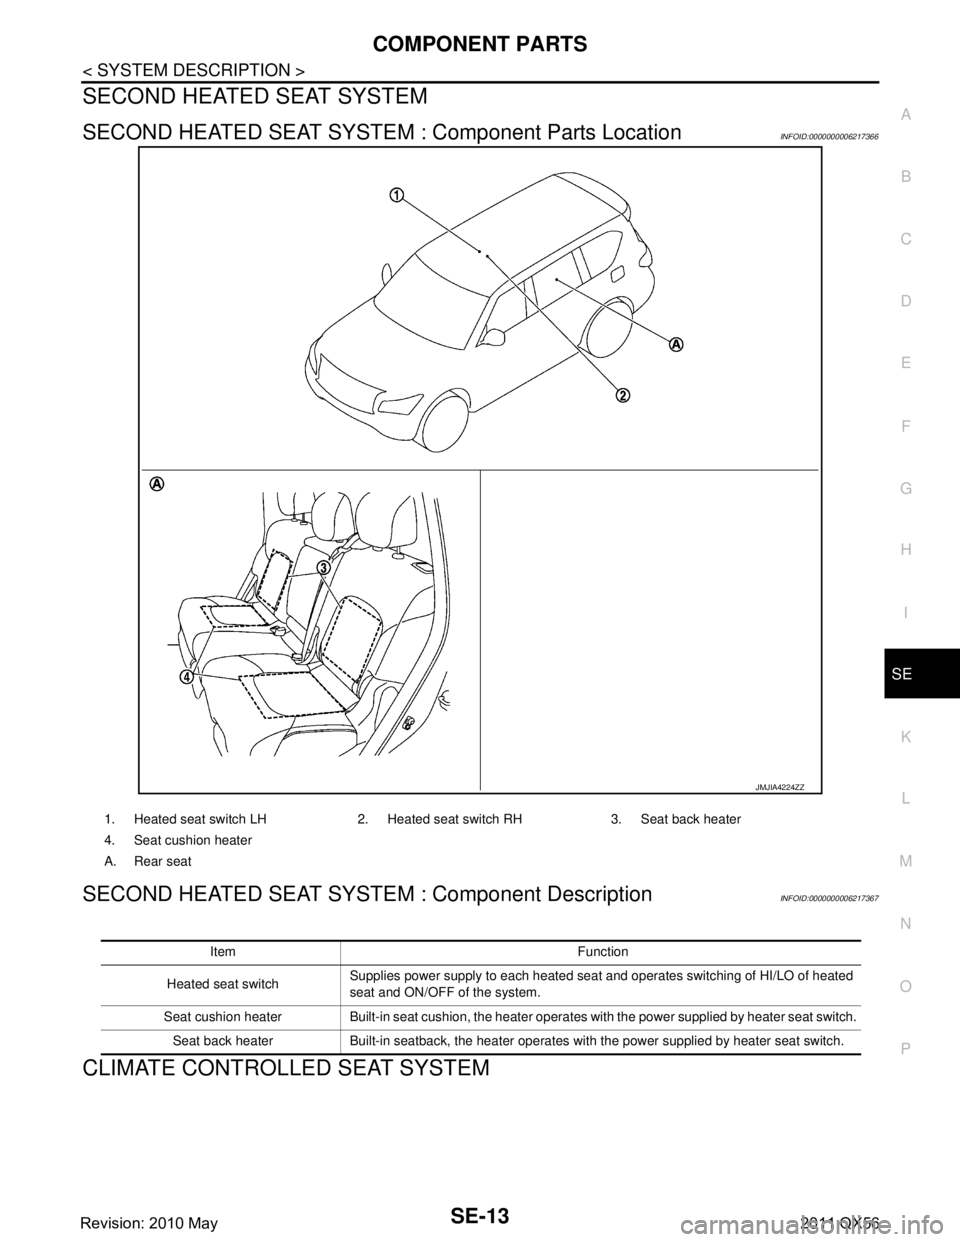
SECOND HEATED SEAT SYSTEM : Component Parts LocationINFOID:0000000006217366
SECOND HEATED SEAT SYSTEM : Component DescriptionINFOID:0000000006217367
CLIMATE CONTROLLED SEAT SYSTEM
JMJIA4224ZZ
1. Heated seat switch LH 2. Heated seat switch RH 3. Seat back heater
4. Seat cushion heater
A. Rear seat
Item Function
Heated seat switch Supplies power supply to each heated seat and operates switching of HI/LO of heated
seat and ON/OFF of the system.
Seat cushion heater Built-in seat cushion, the heater operates with the power supplied by heater seat switch. Seat back heater Built-in seatback, the heater operates with the power supplied by heater seat switch.
Revision: 2010 May2011 QX56
Page 4475 of 5598

SE-16
< SYSTEM DESCRIPTION >
SYSTEM
SYSTEM
POWER SEAT SYSTEM
POWER SEAT SYSTEM : System DescriptionINFOID:0000000006217370
Power seat switch can be operated regardless of the ignition switch position, because power supply is always
supplied to power seat switch.
SLIDING OPERATION
While operating the sliding switch located in power s eat switch, sliding motor operates and makes possible the
seat front and back position adjustment.
RECLINING OPERATION
While operating the reclining switch located in power seat switch, reclining motor operates and makes possi-
ble the seat back forward and backward position adjustment.
LIFTING OPERATION
While operating the lifting switch located in power seat switch, lifting motor operates and makes possible the
seat cushion up and down position adjustment.
LUMBAR SUPPORT SYSTEM
LUMBAR SUPPORT SYSTEM : System DescriptionINFOID:0000000006217371
Lumbar support switch can be operated regardless of t he ignition switch position, because power supply is
always supplied to lumbar support switch.
While operating the lumbar support switch, lumbar support motor operates which allows forward and back-
ward operation of seatback support.
SECOND SEAT POWER UNLOCK SYSTEM
SECOND SEAT POWER UNLOCK SY STEM : System DescriptionINFOID:0000000006217372
Second seat power unlock switch can be operated regardl ess of the ignition switch position, because power
supply is always supplied to second seat power unlock switch and power unlock relay.
Power unlock motor pulls seatback control wire, s eatback folds down, seat lock unlocks, and second seat
tilts up, when second seat power unlock switch is pressed.
THIRD SEAT SEATBACK POWER FOLDING SYSTEM
THIRD SEAT SEATBACK POWER FOLDIN G SYSTEM : System Description
INFOID:0000000006217373
Third seat fold down switch and third seat reclini ng switch can be operated regardless of the ignition switch
position, because power supply is always supplied to thir d seat fold down switch, third seat reclining switch
and relays.
Power folding motor operates and seatback reclining and third seat folding can be performed while third seat
fold down switch and third seat reclining switch are operated.
FRONT HEATED SEAT SYSTEM
FRONT HEATED SEAT SYSTEM : System DescriptionINFOID:0000000006217374
Heated seat is a system that operates when ignition switch is in ON position.
HEATER OPERATION
While operating the heated seat switch, seat cushion heater and seat back heater operate.
Temperature of seat can be adjust ed by operating on heated seat switch.
SECOND HEATED SEAT SYSTEM
SECOND HEATED SEAT SYSTEM : System DescriptionINFOID:0000000006217375
Heated seat is a system that operates when ignition switch is in ON position.
HEATER OPERATION
While operating the heated seat switch, seat cushion heater and seat back heater operate.
Revision: 2010 May2011 QX56
Page 4564 of 5598
FRONT SEATSE-105
< REMOVAL AND INSTALLATION >
C
DE
F
G H
I
K L
M A
B
SE
N
O P
REMOVAL AND INSTALLATION
FRONT SEAT
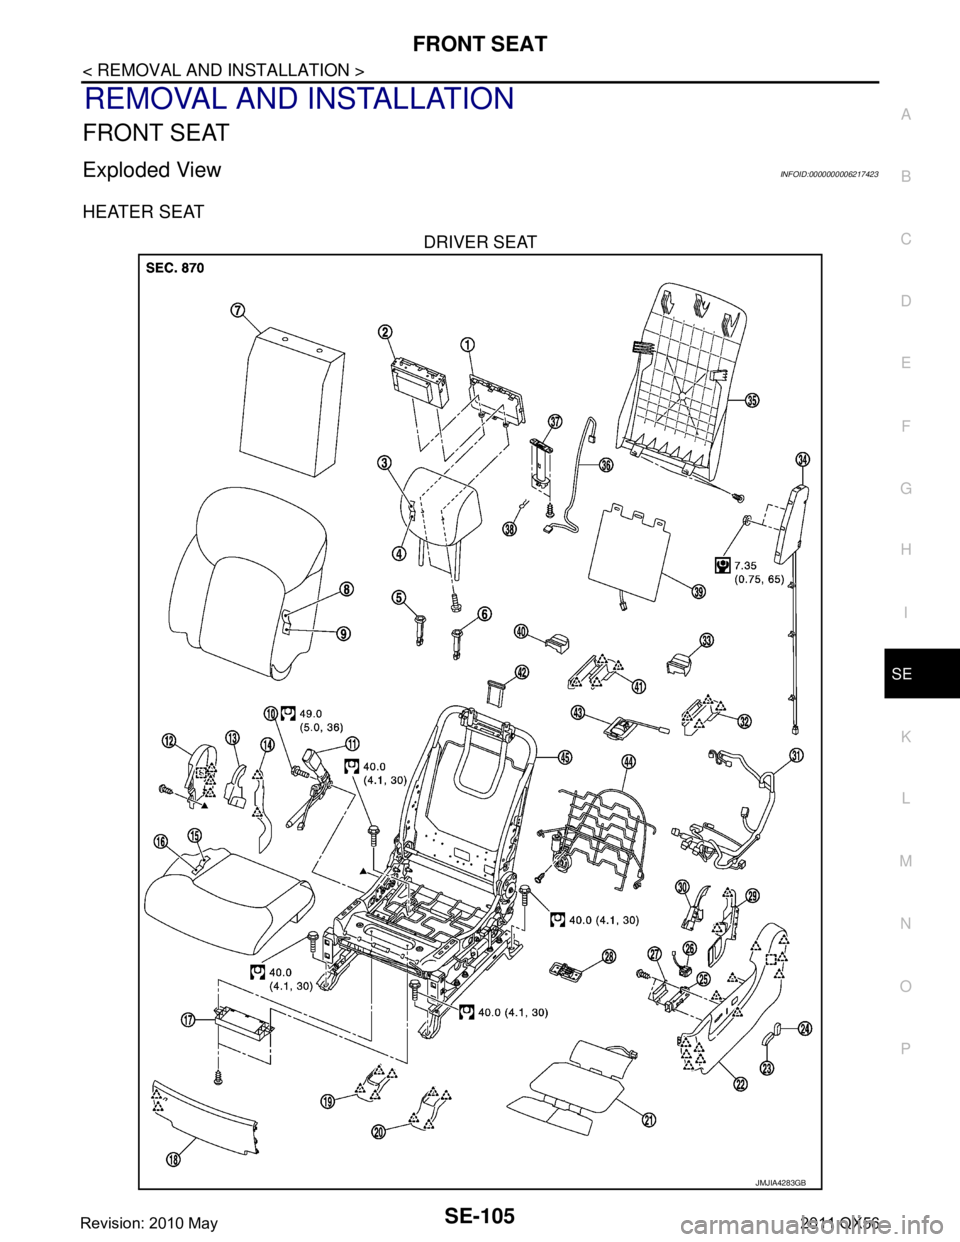
Exploded ViewINFOID:0000000006217423
HEATER SEAT
DRIVER SEAT
JMJIA4283GB
Revision: 2010 May2011 QX56
Page 4565 of 5598
SE-106
< REMOVAL AND INSTALLATION >
FRONT SEAT
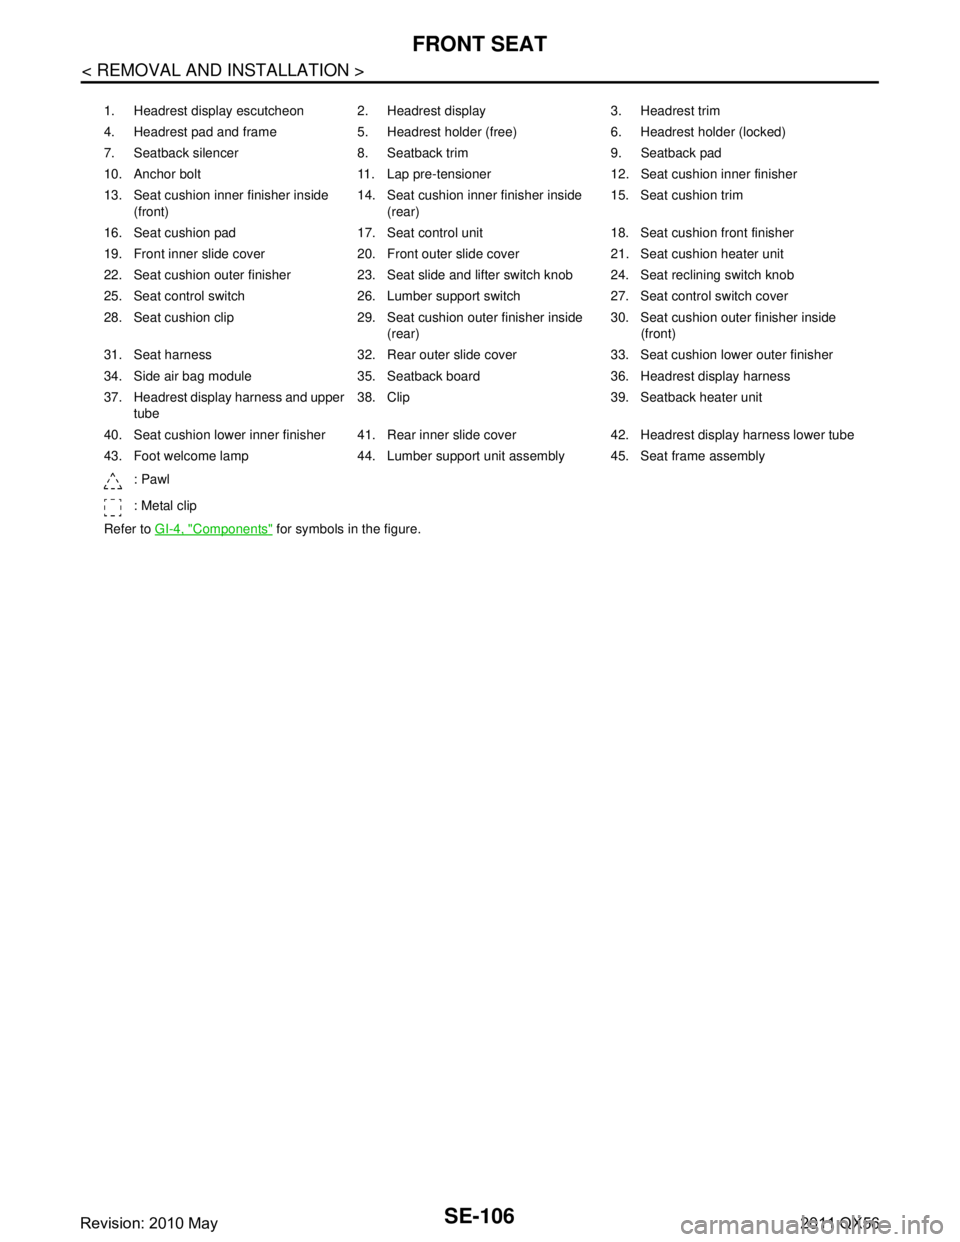
1. Headrest display escutcheon 2. Headrest display 3. Headrest trim
4. Headrest pad and frame 5. Headrest holder (free) 6. Headrest holder (locked)
7. Seatback silencer 8. Seatback trim 9. Seatback pad
10. Anchor bolt 11. Lap pre-tensioner 12. Seat cushion inner finisher
13. Seat cushion inner finisher inside (front) 14. Seat cushion inner finisher inside
(rear) 15. Seat cushion trim
16. Seat cushion pad 17. Seat control unit 18. Seat cushion front finisher
19. Front inner slide cover 20. Front outer slide cover 21. Seat cushion heater unit
22. Seat cushion outer finisher 23. Seat slide and lifter switch knob 24. Seat reclining switch knob
25. Seat control switch 26. Lumber support switch 27. Seat control switch cover
28. Seat cushion clip 29. Seat cushion outer finisher inside (rear)30. Seat cushion outer finisher inside
(front)
31. Seat harness 32. Rear outer slide cover 33. Seat cushion lower outer finisher
34. Side air bag module 35. Seatback board 36. Headrest display harness
37. Headrest display harness and upper tube 38. Clip 39. Seatback heater unit
40. Seat cushion lower inner finisher 41. Rear inner slide cover 42. Headrest display harness lower tube
43. Foot welcome lamp 44. Lumber support unit assembly 45. Seat frame assembly : Pawl
: Metal clip
Refer to GI-4, "
Components" for symbols in the figure.
Revision: 2010 May2011 QX56