2011 INFINITI QX56 ESP
[x] Cancel search: ESPPage 2527 of 5598
![INFINITI QX56 2011 Factory Service Manual
ICC BRAKE SWITCHEC-503
< DTC/CIRCUIT DIAGNOSIS > [VK56VD]
C
D
E
F
G H
I
J
K L
M A
EC
NP
O
ICC BRAKE SWITCH
Component Function CheckINFOID:0000000006218008
1.CHECK ICC BRAKE SWITCH FUNCTION
WITH CONS INFINITI QX56 2011 Factory Service Manual
ICC BRAKE SWITCHEC-503
< DTC/CIRCUIT DIAGNOSIS > [VK56VD]
C
D
E
F
G H
I
J
K L
M A
EC
NP
O
ICC BRAKE SWITCH
Component Function CheckINFOID:0000000006218008
1.CHECK ICC BRAKE SWITCH FUNCTION
WITH CONS](/manual-img/42/57033/w960_57033-2526.png)
ICC BRAKE SWITCHEC-503
< DTC/CIRCUIT DIAGNOSIS > [VK56VD]
C
D
E
F
G H
I
J
K L
M A
EC
NP
O
ICC BRAKE SWITCH
Component Function CheckINFOID:0000000006218008
1.CHECK ICC BRAKE SWITCH FUNCTION
WITH CONSULT-III
1. Turn ignition switch ON.
2. Select “BRAKE SW1” in “DATA MONITOR” mode with CONSULT-III.
3. Check “BRAKE SW1” indication under the following conditions.
WITHOUT CONSULT-III
1. Turn ignition switch ON.
2. Check the voltage between ECM harness connector terminals as per the following.
Is the inspection result normal?
YES >> INSPECTION END
NO >> Go to EC-503, "
Diagnosis Procedure".
Diagnosis ProcedureINFOID:0000000006218009
1.CHECK DTC WITH ADAS CONTROL UNIT
Refer to DAS-21, "
CONSULT-III Function (ICC/ADAS)" and DAS-38, "DTC Index".
Are any DTCs detected?
YES >> Perform the Diagnosis Procedur e corresponding to the detected DTC.
NO >> GO TO 2.
2.CHECK OVERALL FUNCTION
WITH CONSULT-III
1. Turn ignition switch ON.
2. Select “BRAKE SW1” in “DATA MONITOR” mode with CONSULT-III.
3. Check “BRAKE SW1” indication under the following conditions.
WITHOUT CONSULT-III
1. Turn ignition switch ON.
2. Check the voltage between ECM harness connector terminals under the following conditions.
Monitor item Condition Indication
BRAKE SW1
(ICC brake switch) Brake pedalSlightly depressed OFF
Fully released ON
ECM
Condition Voltage
Connector +–
Terminal Terminal
E80 147
(ICC brake switch signal) 175 Brake pedalSlightly depressed Approx. 0 V
Fully released Battery voltage
Monitor item Condition Indication
BRAKE SW1
(ICC brake switch) Brake pedalSlightly depressed OFF
Fully released ON
Revision: 2010 May2011 QX56
Page 2578 of 5598
EM-16
< BASIC INSPECTION >
COMPRESSION PRESSURE
COMPRESSION PRESSURE
InspectionINFOID:0000000006289521
1. Warm up engine thoroughly. Then, stop it.
2. Release fuel pressure. Refer to EC-153, "
Work Procedure".
CAUTION:
If CONSULT-III is not used to release fuel pr essure leave the fuel pump fuse disconnected until
step 7.
3. Remove fuel pump fuse in IPDM E/R. NOTE:
For the fuse number, refer to EC-114, "
Wiring Diagram".
For the fuse arrangement, refer to PG-143, "
Fuse, Connector and Terminal Arrangement".
4. Remove engine cover. Refer to EM-25, "
Exploded View".
5. Remove ignition coil and spark plug from each cylinder. Refer to EM-29, "
Exploded View".
6. Connect engine tachometer (not required in use of CONSULT-III).
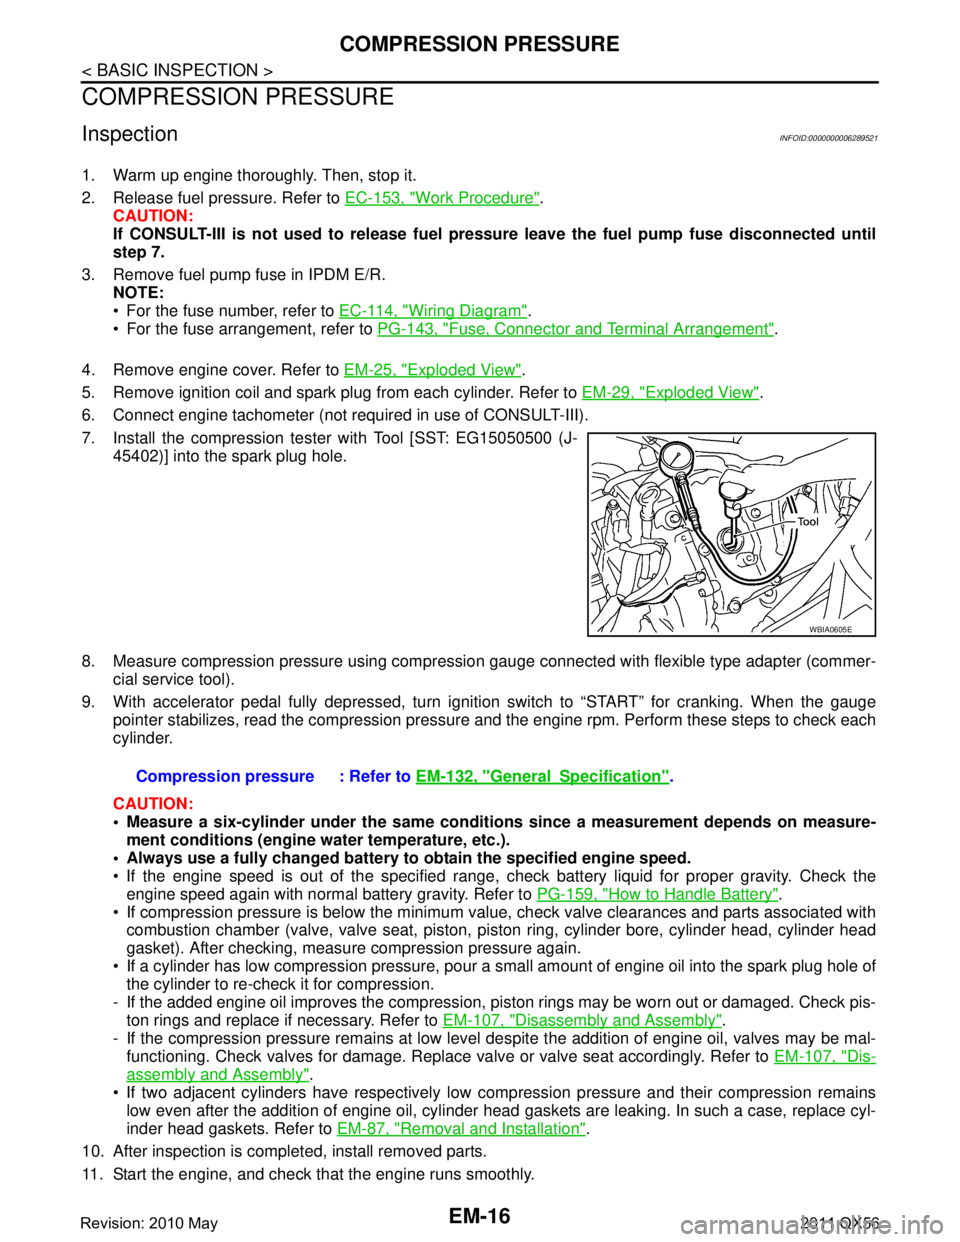
7. Install the compression tester with Tool [SST: EG15050500 (J- 45402)] into the spark plug hole.
8. Measure compression pressure using compressi on gauge connected with flexible type adapter (commer-
cial service tool).
9. With accelerator pedal fully depressed, turn ignition switch to “START” for cranking. When the gauge pointer stabilizes, read the compression pressure and the engine rpm. Perform these steps to check each
cylinder.
CAUTION:
Measure a six-cylinder under the same conditio ns since a measurement depends on measure-
ment conditions (engine water temperature, etc.).
Always use a fully changed battery to obtain the specified engine speed.
If the engine speed is out of the specified range, c heck battery liquid for proper gravity. Check the
engine speed again with normal battery gravity. Refer to PG-159, "
How to Handle Battery".
If compression pressure is below the minimum value, check valve clearances and parts associated with combustion chamber (valve, valve seat, piston, pi ston ring, cylinder bore, cylinder head, cylinder head
gasket). After checking, measure compression pressure again.
If a cylinder has low compression pressure, pour a small amount of engine oil into the spark plug hole of the cylinder to re-check it for compression.
- If the added engine oil improves the compression, pi ston rings may be worn out or damaged. Check pis-
ton rings and replace if necessary. Refer to EM-107, "
Disassembly and Assembly".
- If the compression pressure remains at low level despite the addition of engine oil, valves may be mal- functioning. Check valves for damage. Replace valve or valve seat accordingly. Refer to EM-107, "
Dis-
assembly and Assembly".
If two adjacent cylinders have respectively low co mpression pressure and their compression remains
low even after the addition of engine oil, cylinder head gaskets are leaking. In such a case, replace cyl-
inder head gaskets. Refer to EM-87, "
Removal and Installation".
10. After inspection is completed, install removed parts.
11. Start the engine, and check that the engine runs smoothly.
WBIA0605E
Compression pressure : Refer to EM-132, "GeneralSpecification".
Revision: 2010 May2011 QX56
Page 2606 of 5598
EM-44
< REMOVAL AND INSTALLATION >
HIGH PRESSURE FUEL PUMP AND FUEL HOSE
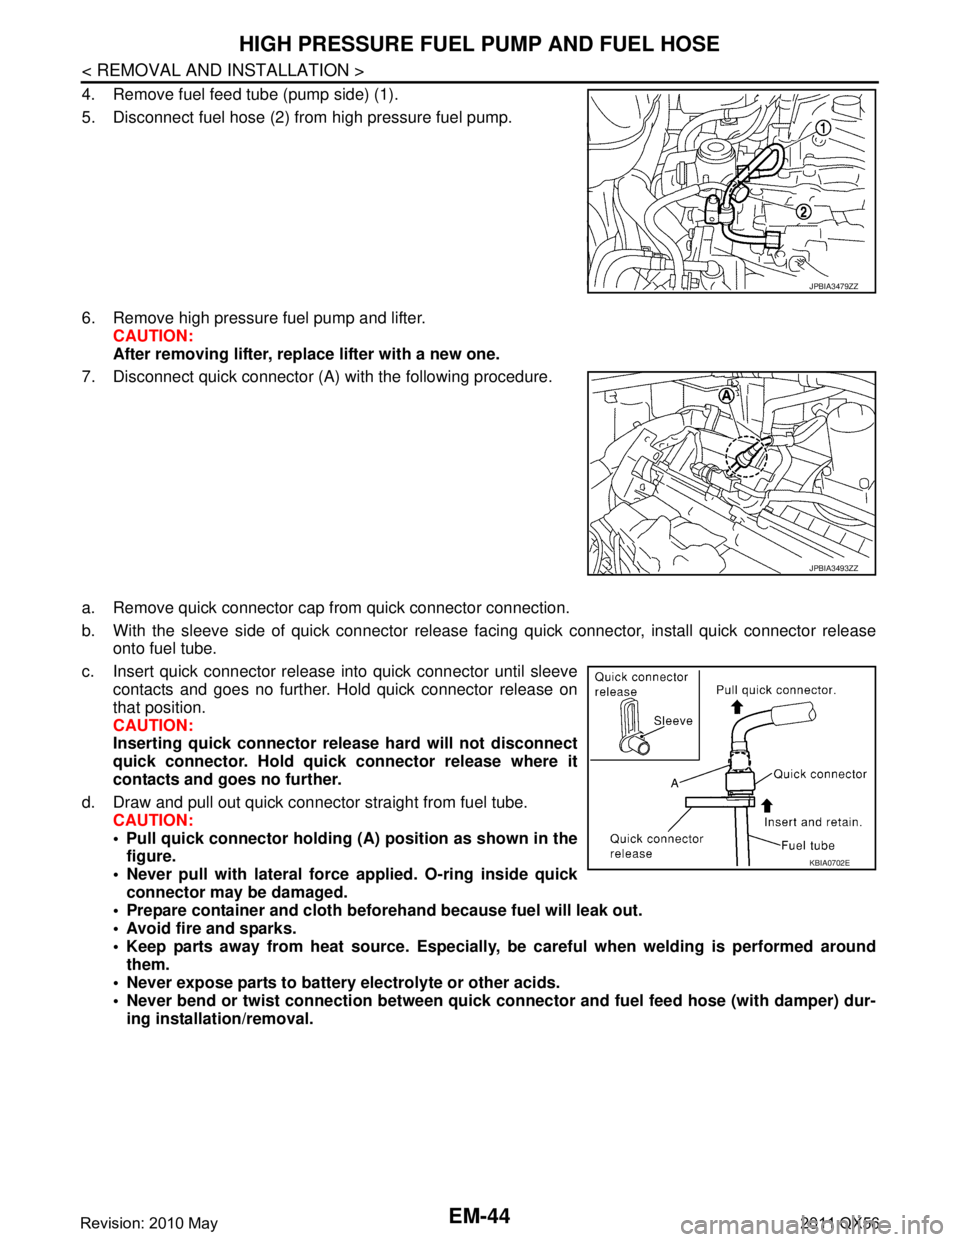
4. Remove fuel feed tube (pump side) (1).
5. Disconnect fuel hose (2) from high pressure fuel pump.
6. Remove high pressure fuel pump and lifter.CAUTION:
After removing lifter, replace lifter with a new one.
7. Disconnect quick connector (A) with the following procedure.
a. Remove quick connector cap from quick connector connection.
b. With the sleeve side of quick connector release facing quick connector, install quick connector release
onto fuel tube.
c. Insert quick connector release into quick connector until sleeve contacts and goes no further. Hold quick connector release on
that position.
CAUTION:
Inserting quick connector re lease hard will not disconnect
quick connector. Hold qui ck connector release where it
contacts and goes no further.
d. Draw and pull out quick connector straight from fuel tube. CAUTION:
Pull quick connector holding (A) position as shown in thefigure.
Never pull with lateral force applied. O-ring inside quick
connector may be damaged.
Prepare container and cloth befo rehand because fuel will leak out.
Avoid fire and sparks.
Keep parts away from heat source. Especially, be careful when welding is performed around
them.
Never expose parts to battery electrolyte or other acids.
Never bend or twist connection between quick c onnector and fuel feed hose (with damper) dur-
ing installation/removal.
JPBIA3479ZZ
JPBIA3493ZZ
KBIA0702E
Revision: 2010 May2011 QX56
Page 2628 of 5598
EM-66
< REMOVAL AND INSTALLATION >
TIMING CHAIN
NOTE:
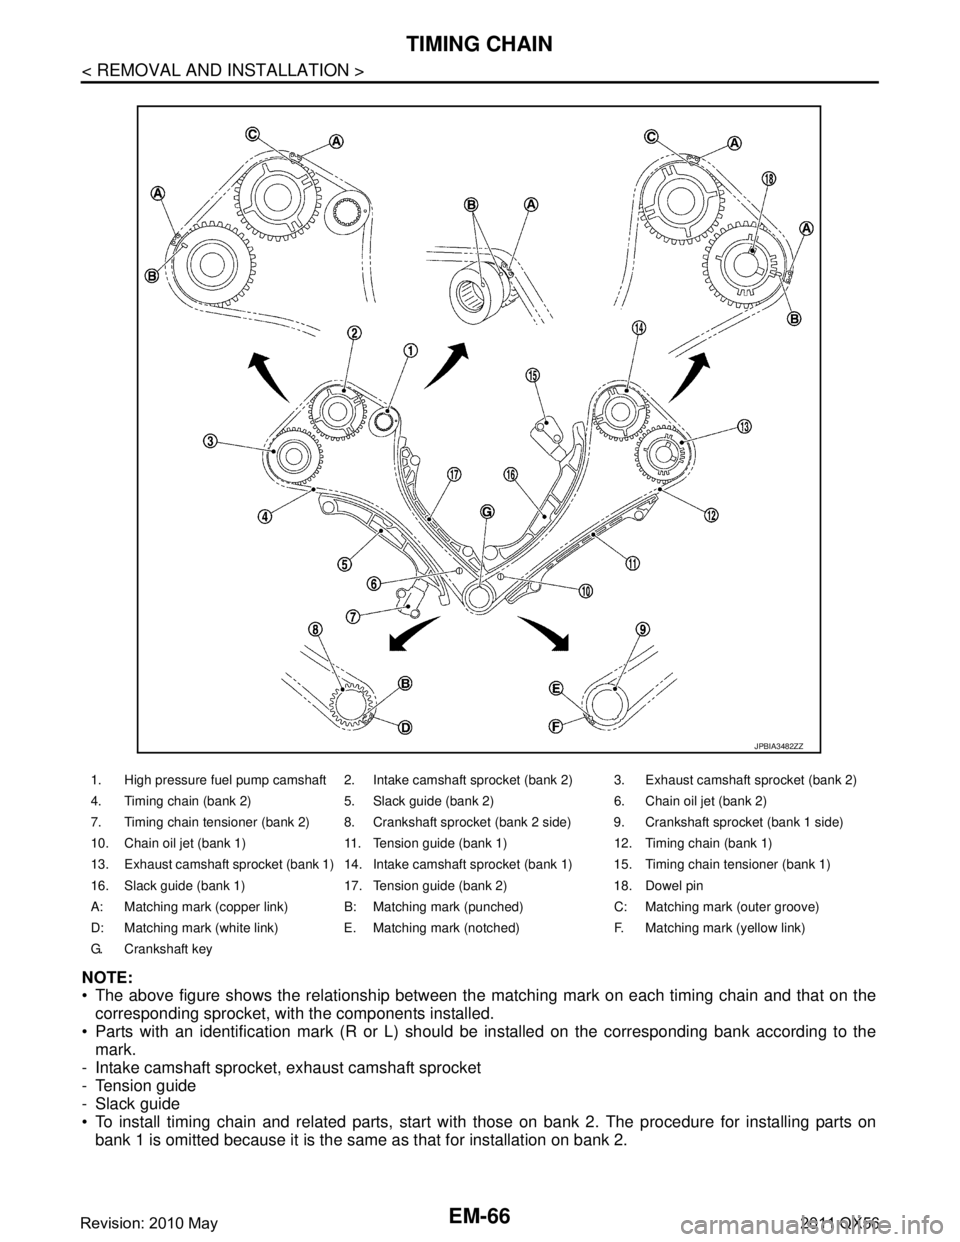
The above figure shows the relationship between the matching mark on each timing chain and that on the
corresponding sprocket, with the components installed.
Parts with an identification mark (R or L) should be installed on the corresponding bank according to the
mark.
- Intake camshaft sprocket, exhaust camshaft sprocket
- Tension guide
- Slack guide
To install timing chain and related parts, start with those on bank 2. The procedure for installing parts on
bank 1 is omitted because it is the same as that for installation on bank 2.
1. High pressure fuel pump camshaft 2. Intake camshaft sprocket (bank 2) 3. Exhaust camshaft sprocket (bank 2)
4. Timing chain (bank 2) 5. Slack guide (bank 2) 6. Chain oil jet (bank 2)
7. Timing chain tensioner (bank 2) 8. Crankshaft sprocket (bank 2 side) 9. Crankshaft sprocket (bank 1 side)
10. Chain oil jet (bank 1) 11. Tension guide (bank 1) 12. Timing chain (bank 1)
13. Exhaust camshaft sprocket (bank 1) 14. Intake camshaft sprocket (bank 1) 15. Timing chain tensioner (bank 1)
16. Slack guide (bank 1) 17. Tension guide (bank 2) 18. Dowel pin
A: Matching mark (copper link) B: Matching mark (punched) C: Matching mark (outer groove)
D: Matching mark (white link) E. Matching mark (notched) F. Matching mark (yellow link)
G. Crankshaft key
JPBIA3482ZZ
Revision: 2010 May2011 QX56
Page 2646 of 5598
EM-84
< REMOVAL AND INSTALLATION >
CAMSHAFT
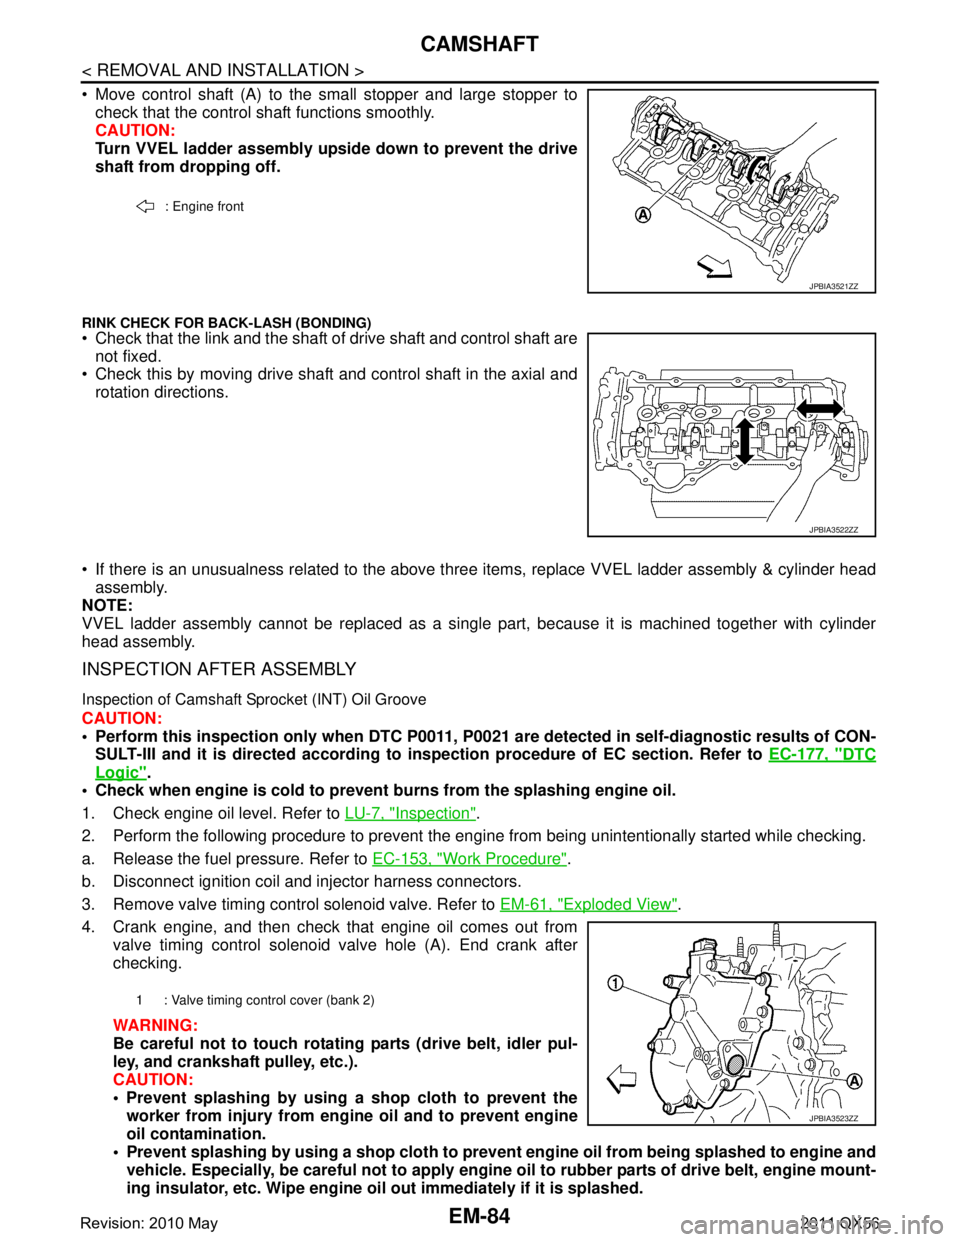
Move control shaft (A) to the small stopper and large stopper tocheck that the control shaft functions smoothly.
CAUTION:
Turn VVEL ladder assembly upside down to prevent the drive
shaft from dropping off.
RINK CHECK FOR BACK-LASH (BONDING) Check that the link and the shaft of drive shaft and control shaft are
not fixed.
Check this by moving drive shaft and control shaft in the axial and
rotation directions.
If there is an unusualness related to the above three items, replace VVEL ladder assembly & cylinder head
assembly.
NOTE:
VVEL ladder assembly cannot be replaced as a singl e part, because it is machined together with cylinder
head assembly.
INSPECTION AFTER ASSEMBLY
Inspection of Camshaft Sprocket (INT) Oil Groove
CAUTION:
Perform this inspection only when DTC P0011, P 0021 are detected in self-diagnostic results of CON-
SULT-III and it is directed according to inspection procedure of EC section. Refer to EC-177, "
DTC
Logic".
Check when engine is cold to prevent burns from the splashing engine oil.
1. Check engine oil level. Refer to LU-7, "
Inspection".
2. Perform the following procedure to prevent the engine from being unintentionally started while checking.
a. Release the fuel pressure. Refer to EC-153, "
Work Procedure".
b. Disconnect ignition coil and injector harness connectors.
3. Remove valve timing control solenoid valve. Refer to EM-61, "
Exploded View".
4. Crank engine, and then check that engine oil comes out from valve timing control solenoid valve hole (A). End crank after
checking.
WARNING:
Be careful not to touch rotati ng parts (drive belt, idler pul-
ley, and crankshaft pulley, etc.).
CAUTION:
Prevent splashing by using a shop cloth to prevent the worker from injury from en gine oil and to prevent engine
oil contamination.
Prevent splashing by using a shop cloth to prevent engine oil from being splashed to engine and
vehicle. Especially, be careful not to apply engine oil to rubber parts of drive belt, engine mount-
ing insulator, etc. Wipe engine oil out immediately if it is splashed.
: Engine front
JPBIA3521ZZ
JPBIA3522ZZ
1 : Valve timing control cover (bank 2)
JPBIA3523ZZ
Revision: 2010 May2011 QX56
Page 2669 of 5598
CYLINDER BLOCKEM-107
< UNIT DISASSEMBLY AND ASSEMBLY >
C
DE
F
G H
I
J
K L
M A
EM
NP
O
Disassembly and AssemblyINFOID:0000000006289583
DISASSEMBLY
1. Remove the following parts:
Oil pans (lower and upper): Refer to EM-54, "
Exploded View" and EM-57, "Exploded View".
Front cover and timing chain: Refer to EM-61, "
Exploded View".
Cylinder head: Refer to EM-86, "
Exploded View".
2. Remove knock sensor. CAUTION:
Carefully handle knock sensor avoiding shocks.
3. Remove oil filter (for VVEL ladder assembly ) from cylinder block, if necessary. Refer to EM-86, "
Exploded
View".
4. Remove piston and connecting rod assembly as per the following: Before removing piston and connecting rod assembly, check the connecting rod side clearance. Refer to
EM-115, "
Inspection".
CAUTION:
Be careful not to drop connecting r od bearing, and to scratch the surface.
a. Position crankshaft pin corresponding to connecting rod to be removed onto the bottom dead center.
b. Loosen mounting bolts, and remove connecting rod bearing cap.
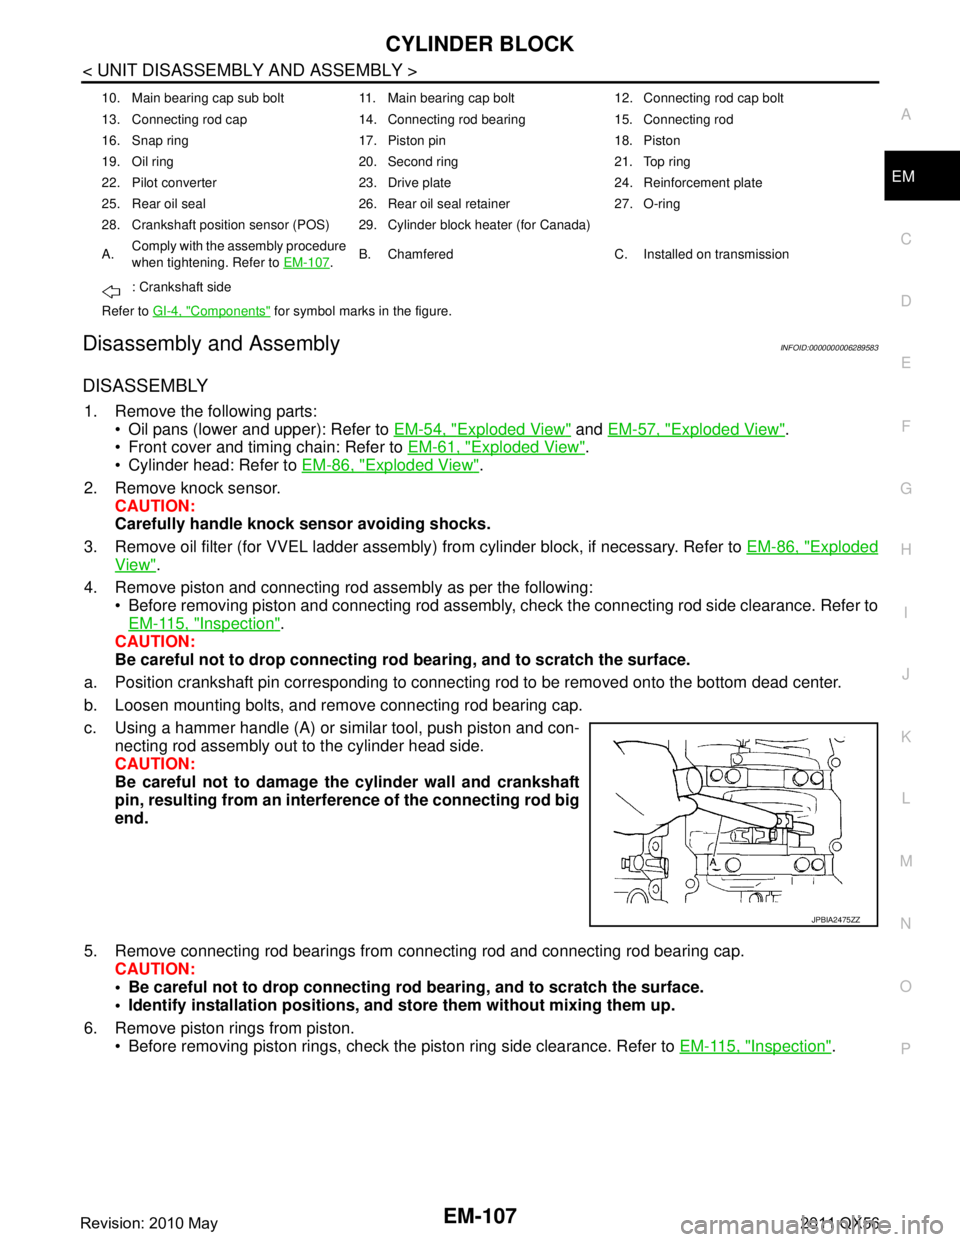
c. Using a hammer handle (A) or similar tool, push piston and con- necting rod assembly out to the cylinder head side.
CAUTION:
Be careful not to damage the cylinder wall and crankshaft
pin, resulting from an interf erence of the connecting rod big
end.
5. Remove connecting rod bearings from connecting rod and connecting rod bearing cap.
CAUTION:
Be careful not to drop connecting rod bearing, and to scratch the surface.
Identify installation positions, and store them without mixing them up.
6. Remove piston rings from piston. Before removing piston rings, check the piston ring side clearance. Refer to EM-115, "
Inspection".
10. Main bearing cap sub bolt 11. Main bearing cap bolt 12. Connecting rod cap bolt
13. Connecting rod cap 14. Connecting rod bearing 15. Connecting rod
16. Snap ring 17. Piston pin 18. Piston
19. Oil ring 20. Second ring 21. Top ring
22. Pilot converter 23. Drive plate 24. Reinforcement plate
25. Rear oil seal 26. Rear oil seal retainer 27. O-ring
28. Crankshaft position sensor (POS) 29. Cylinder block heater (for Canada)
A.Comply with the assembly procedure
when tightening. Refer to
EM-107
.B. Chamfered C. Installed on transmission
: Crankshaft side
Refer to GI-4, "
Components" for symbol marks in the figure.
JPBIA2475ZZ
Revision: 2010 May2011 QX56
Page 2676 of 5598
EM-114
< UNIT DISASSEMBLY AND ASSEMBLY >
CYLINDER BLOCK
Before installing connecting rod bearings, apply engine oil to the bearing surface (inside). Do not applyengine oil to the back surface, but thoroughly clean it.
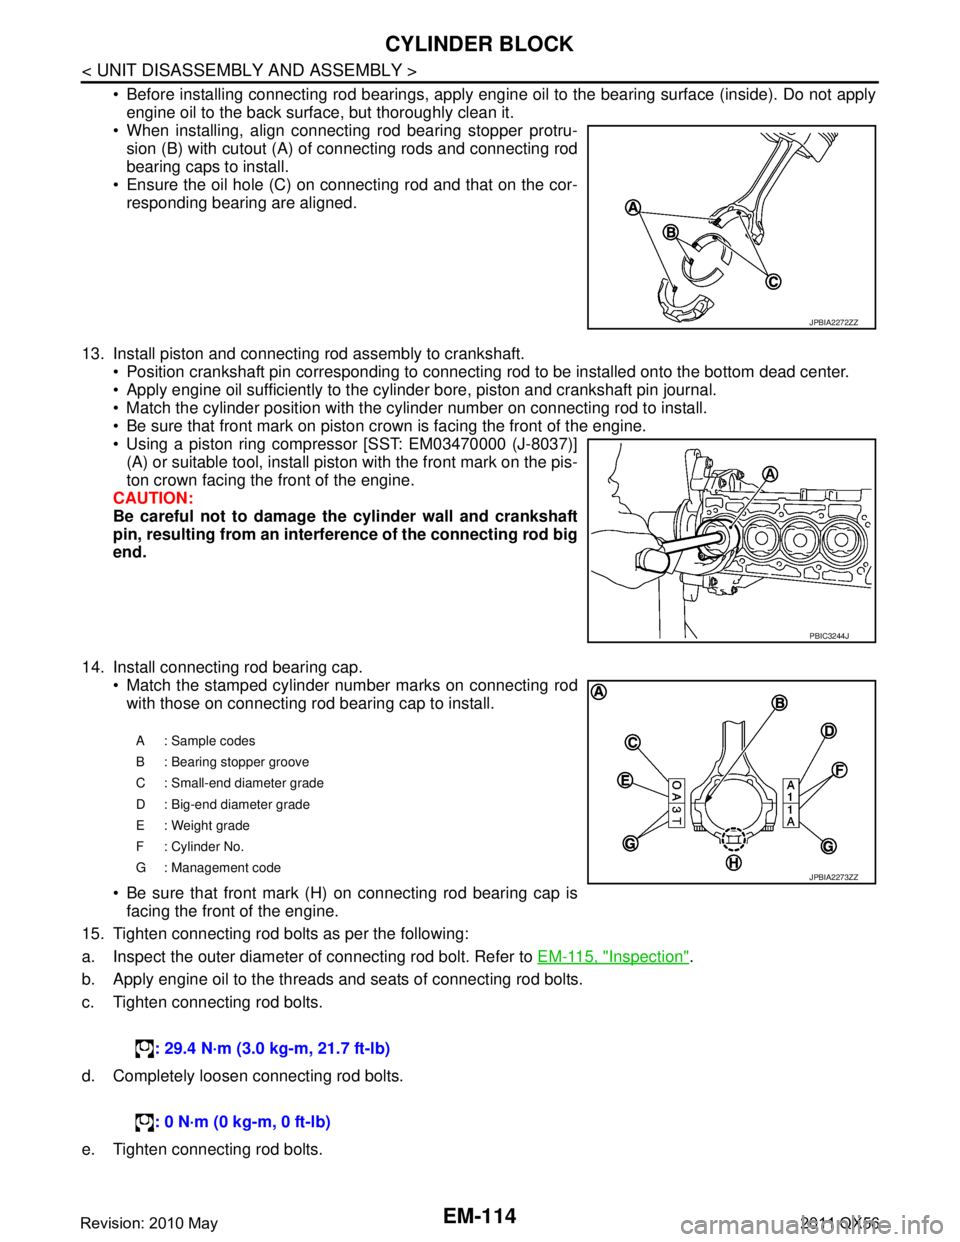
When installing, align connecting rod bearing stopper protru-
sion (B) with cutout (A) of connecting rods and connecting rod
bearing caps to install.
Ensure the oil hole (C) on connecting rod and that on the cor-
responding bearing are aligned.
13. Install piston and connecting rod assembly to crankshaft. Position crankshaft pin corresponding to connecting rod to be installed onto the bottom dead center.
Apply engine oil sufficiently to the cylinder bore, piston and crankshaft pin journal.
Match the cylinder position with the cyli nder number on connecting rod to install.
Be sure that front mark on piston cr own is facing the front of the engine.
Using a piston ring compressor [SST: EM03470000 (J-8037)]
(A) or suitable tool, install piston with the front mark on the pis-
ton crown facing the front of the engine.
CAUTION:
Be careful not to damage the cylinder wall and crankshaft
pin, resulting from an interf erence of the connecting rod big
end.
14. Install connecting rod bearing cap. Match the stamped cylinder number marks on connecting rodwith those on connecting rod bearing cap to install.
Be sure that front mark (H) on connecting rod bearing cap is facing the front of the engine.
15. Tighten connecting rod bolts as per the following:
a. Inspect the outer diameter of connecting rod bolt. Refer to EM-115, "
Inspection".
b. Apply engine oil to the threads and seats of connecting rod bolts.
c. Tighten connecting rod bolts.
d. Completely loosen connecting rod bolts.
e. Tighten connecting rod bolts.
JPBIA2272ZZ
PBIC3244J
A: Sample codes
B : Bearing stopper groove
C : Small-end diameter grade
D : Big-end diameter grade
E : Weight grade
F : Cylinder No.
G : Management code
: 29.4 N·m (3.0 kg-m, 21.7 ft-lb)
: 0 N·m (0 kg-m, 0 ft-lb)
JPBIA2273ZZ
Revision: 2010 May2011 QX56
Page 2685 of 5598
CYLINDER BLOCKEM-123
< UNIT DISASSEMBLY AND ASSEMBLY >
C
DE
F
G H
I
J
K L
M A
EM
NP
O
Cut a plastigage slightly shorter than the bearing width,
and place it in crankshaft axial direction, avoiding oil
holes.
Install main bearing to cylinder block and main bearing cap, and tighten main bearing cap bolts with main
bearing cap to the specified torque. Refer to EM-107, "
Disassembly and Assembly" for the tightening proce-
dure.
CAUTION:
Never rotate crankshaft.
Remove main bearing cap and bearings, and using the scale on the plastigage bag, measure the plastigage width.
NOTE:
The procedure when the measured value exceeds the limit is the
same as that described in the “Method by Calculation”.
MAIN BEARING CRUSH HEIGHT
When main bearing cap is removed after being tightened to thespecified torque with main bearings (1) installed, the tip end of
bearing must protrude. Refer to EM-107, "
Disassembly and
Assembly" for the tightening procedure.
If the standard is not met, replace main bearings.
CONNECTING ROD BEARING CRUSH HEIGHT
When connecting rod bearing cap is removed after being tightened to the specified torque with connecting rod bearings (1) installed,
the tip end of bearing must protrude. Refer to EM-107, "
Disassem-
bly and Assembly" for the tightening procedure.
If the standard is not met, replace connecting rod bearings.
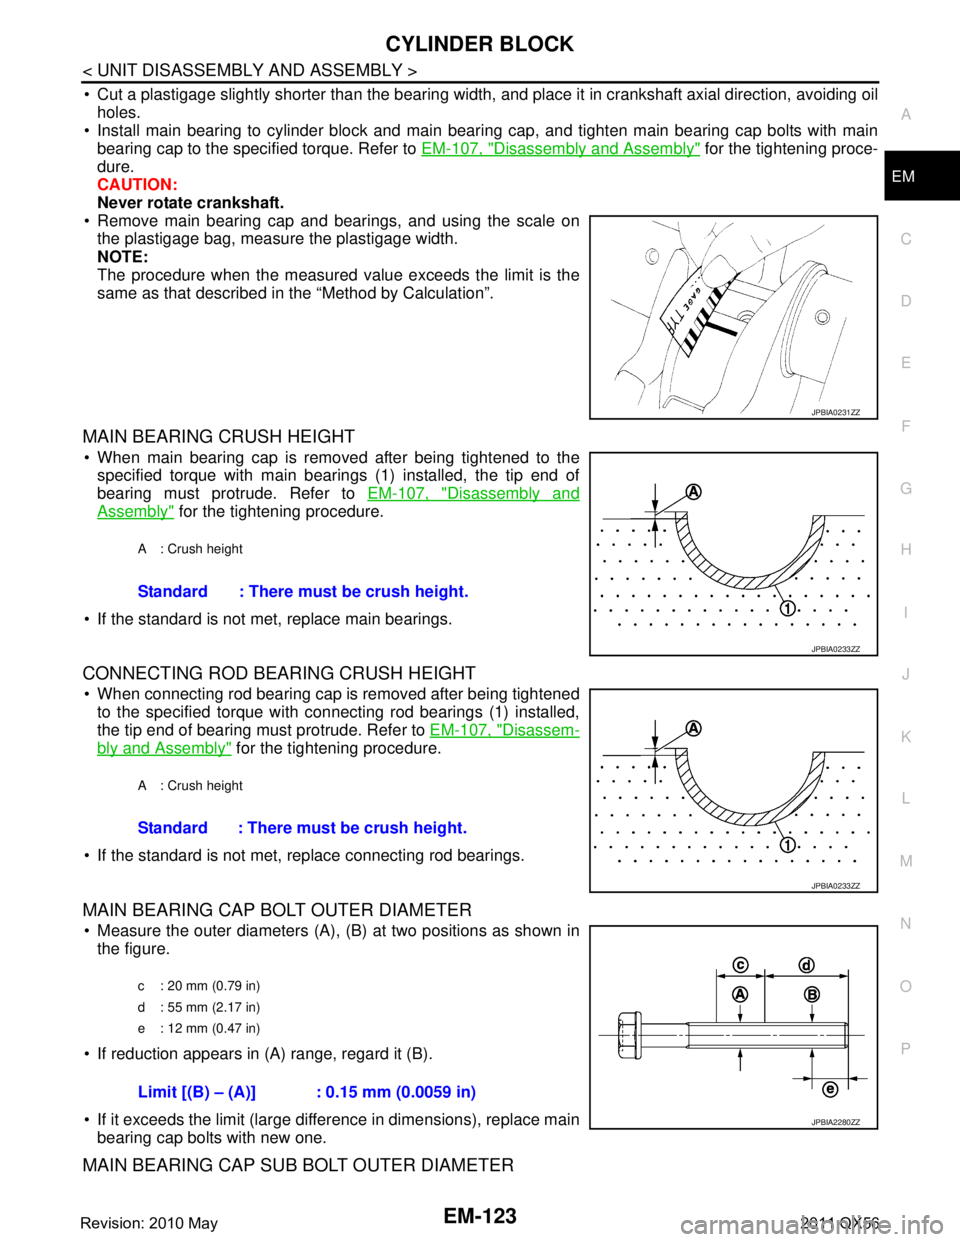
MAIN BEARING CAP BOLT OUTER DIAMETER
Measure the outer diameters (A), (B) at two positions as shown in
the figure.
If reduction appears in (A) range, regard it (B).
If it exceeds the limit (large difference in dimensions), replace main bearing cap bolts with new one.
MAIN BEARING CAP SUB BOLT OUTER DIAMETER
JPBIA0231ZZ
A : Crush height
Standard : There must be crush height.
JPBIA0233ZZ
A : Crush height
Standard : There must be crush height.
JPBIA0233ZZ
c : 20 mm (0.79 in)
d : 55 mm (2.17 in)
e : 12 mm (0.47 in)
Limit [(B) – (A)] : 0.15 mm (0.0059 in)
JPBIA2280ZZ
Revision: 2010 May2011 QX56