2011 INFINITI QX56 brake
[x] Cancel search: brakePage 4274 of 5598
REAR SUSPENSION MEMBERRSU-19
< UNIT REMOVAL AND INSTALLATION >
C
DF
G H
I
J
K L
M A
B
RSU
N
O P
16. Remove final drive. Refer to DLN-201, "Removal and Installation".
17. Remove rear tube assembly A and rear tube assembly B. (With HBMC) Refer to SCS-44, "
REAR TUBE
ASSEMBLY : Removal and Installation".
18. Set suitable jack under rear suspension member.
19. Slowly lower jack, then remove rear suspension member, suspension arm, front lower link, wheel hub and housing from vehicle as a unit.
20. Remove mounting bolts and nuts, then remove suspension arm, front lower link, wheel hub and housing from rear suspension member.
21. Perform inspection after removal. Refer to RSU-19, "
Inspection and Adjustment".
INSTALLATION
Note the following, and install in the reverse order of the removal.
Perform the final tightening of each of parts under unladen conditions, which were removed when removing
rear suspension assembly.
Perform inspection after installation. Refer to RSU-19, "
Inspection and Adjustment".
Perform adjustment after installation. (With HBMC) Refer to RSU-19, "
Inspection and Adjustment".
Inspection and AdjustmentINFOID:0000000006225678
INSPECTION AFTER REMOVAL
Check rear suspension member for deformation, cracks, or any other damage. Replace if necessary.
INSPECTION AFTER INSTALLATION
1. Adjust parking brake operation (stroke). Refer to PB-3, "Inspection and Adjustment".
2. Check wheel alignment. Refer to RSU-6, "
Inspection".
3. Adjust neutral position of steering angle sensor. Refer to BRC-64, "
Work Procedure".
4. Adjust levelizer adjustment of height sensor. Refer to EXL-61, "
LEVELIZER ADJUSTMENT : Special
Repair Requirement".
5. Check standard vehicle height setting of vehicle height sensor. Refer to SCS-67, "
Work Procedure".
6. Check wheel sensor harness for proper connection. Refer to BRC-135, "
REAR WHEEL SENSOR :
Exploded View"
ADJUSTMENT AFTER INSTALLATION (WITH HBMC)
Bleed air from the HBMC. Refer to SCS-18, "Work Procedure".
Revision: 2010 May2011 QX56
Page 4278 of 5598
PRECAUTIONSSB-3
< PRECAUTION >
C
DE
F
G
I
J
K L
M A
B
SB
N
O P
5. When the repair work is completed, re-connect both battery cables. With the brake pedal released, turn
the push-button ignition switch from ACC position to ON position, then to LOCK position. (The steering
wheel will lock when the push-button ignition switch is turned to LOCK position.)
6. Perform self-diagnosis check of a ll control units using CONSULT-III.
Precaution for Seat Belt ServiceINFOID:0000000006217608
CAUTION:
Before removing the front seat belt pre-tensioner assembly, turn the ignition switch off, disconnect
battery negative terminal and wait at least 3 minutes.
Never use electrical test equipment for front seat belt pre-tensioner connector.
After replacing or reinstalling front seat belt pre-tensioner assembly, or reconnecting front seat belt
pre-tensioner connector, check th e system function. Refer to SRC-14, "
Description".
Never use disassembled buckle or seat belt assembly.
Replace anchor bolts if th ey are deformed or worn out.
Never oil tongue and buckle.
If any component of seat belt assembly is questiona ble, do not repair. Replace the entire seat belt
assembly.
If webbing is cut, frayed or damaged, replace seat belt assembly.
When replacing seat belt assembly, u se a genuine NISSAN seat belt assembly.
AFTER A COLLISION
WARNING:
Inspect all seat belt assemblies including retractors and attached hardware after any collision.
NISSAN recommends that all seat belt assemblies in u se during a collision be replaced unless the col-
lision was minor and the belts show no damage a nd continue to operate properly. Failure to do so
could result in serious personal injury in an accide nt. Seat belt assemblies not in use during a colli-
sion should also be replaced if either damage or im proper operation is noted. Seat belt pre-tensioners
should be replaced even if the seat belts are not in use during a frontal collision in which the air bags
are deployed.
Replace any seat belt assembly (including anchor bolts) if:
The seat belt was in use at the time of a collision (except for minor collisions and the belts, retractors and
buckles show no damage and continue to operate properly).
The seat belt was damaged in an accident (i.e. torn webbing, bent retractor or guide).
The seat belt attaching point was damaged in an accident. Inspect the seat belt attaching area for damage or distortion and repair as necessary before installing a new seat belt assembly.
Anchor bolts are deformed or worn out.
The front seat belt pre-tensioner should be replaced even if the seat belts are not in use during the collision
in which the air bags are deployed.
Revision: 2010 May2011 QX56
Page 4280 of 5598
FRONT SEAT BELTSB-5
< REMOVAL AND INSTALLATION >
C
DE
F
G
I
J
K L
M A
B
SB
N
O P
SEAT BELT RETRACTOR ON-VEHICLE CHECK
Emergency Locking Retractors (ELR) and Automatic Locking Retractors (ALR)
NOTE:
All seat belt retractors are Emergency Locking Retr actors (ELR) type. In an emergency (sudden stop) the
retractor will lock and prevent the webbing from extendi ng any further. All 3-point type seat belt retractors
except the driver seat belt also have an Automati c Locking Retractors (ALR) mode. The ALR mode (also
called child restraint mode) is used when installing child seats. The ALR mode is activated when the seat belt
is fully extended. When the webbing is then retracted part ially, the ALR mode automatically locks the seat belt
in a specific position so the webbi ng cannot be extended any further. To c ancel the ALR mode, allow the seat
belt to fully wind back into the retractor.
Check the seat belt retractors with the following test(s ) to determine if a retractor assembly is operating prop-
erly.
ELR Function Stationary Check
Grasp the shoulder webbing and pull forward quickly. The retractor should lock and prevent the belt from
extending further.
ALR Function Stationary Check
1. Pull out the entire length of seat bel t from retractor until a click is heard.
2. Retract the webbing partially. A clicking noise should be heard as the webbing retracts indicating that the
retractor is in the Automatic Locking Retractors (ALR) mode.
3. Grasp the seat belt and try to pull out the retractor. The webbing must lock and not extend any further. If it
does not operate normally, replace the retractor assembly.
4. Allow the entire length of the webbing to retract to cancel the automatic locking mode.
ELR Function Moving Check
WARNING:
Perform the following test in a safe, open area clear of other vehicles and obstructions (for example, a
large, empty parking lot). Road surface must be p aved and dry. Never perform the following test on
wet or gravel roads or on public streets and highways. This could result in an accident and serious
personal injury. The driver and passenger must be prepared to brace themselves in the event that the
retractor does not lock.
1. Fasten driver seat belt. Buckle a passenger into the seat for the belt that is to be tested.
2. Proceed to the designated safe area.
3. Drive the vehicle at approximately 16 km/h ( 10 MPH). Notify any passengers of a pending sudden stop
and the driver and passenger must be prepared to brac e themselves in the event that the retractor does
not lock. Apply brakes firmly and make a very hard stop.
During stopping, seat belts should lock and not be extended. If the seat belt retractor assembly does not lock,
perform the retractor off-vehicle check.
SEAT BELT RETRACTOR OFF-VEHICLE CHECK
1. Remove the front seat belt retractor. Refer to SB-6, "SEAT BELT RETRACTOR : Removal and Installa-
tion".
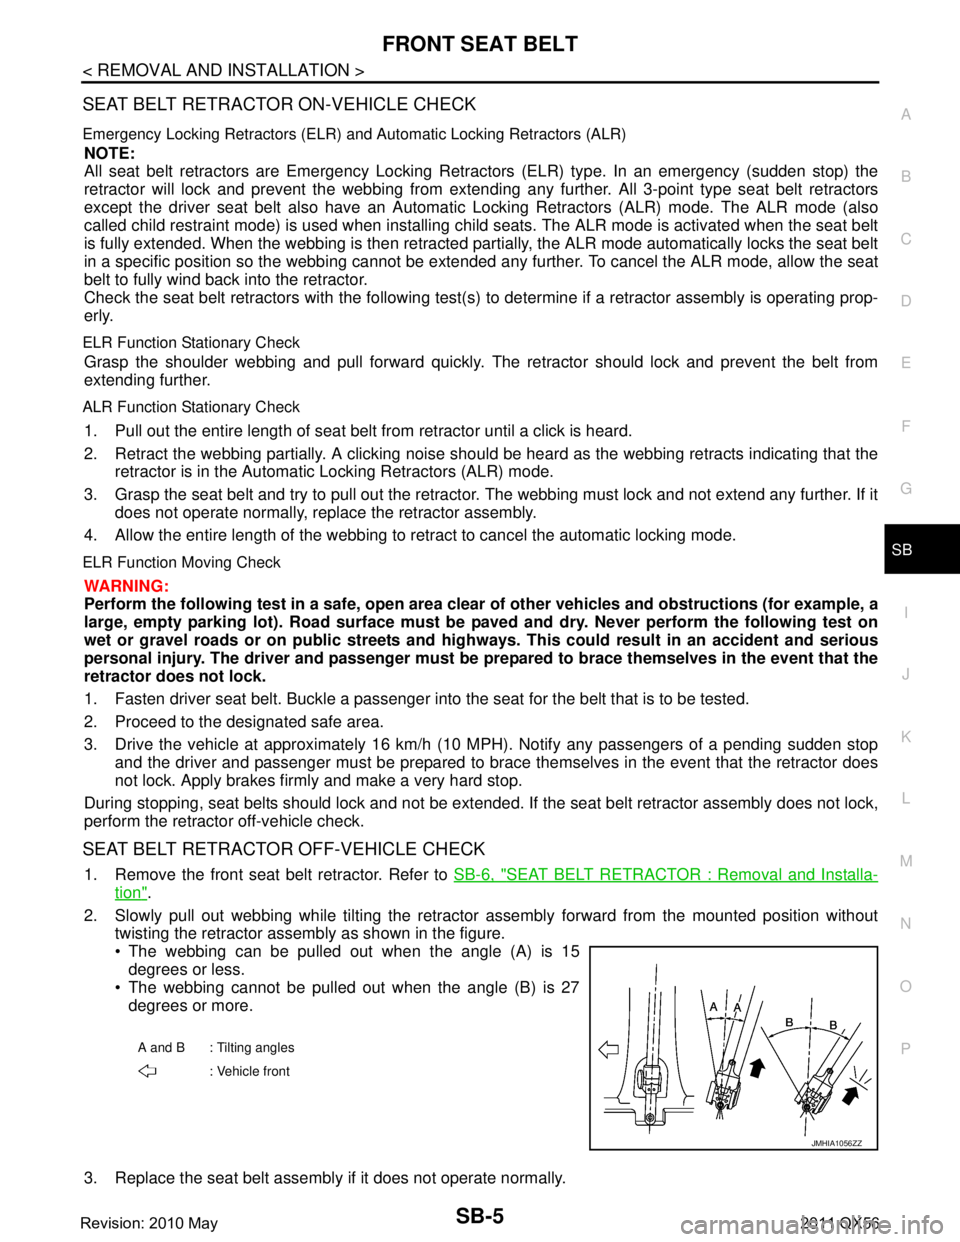
2. Slowly pull out webbing while tilting the retracto r assembly forward from the mounted position without
twisting the retractor assembly as shown in the figure.
The webbing can be pulled out when the angle (A) is 15
degrees or less.
The webbing cannot be pulled out when the angle (B) is 27
degrees or more.
3. Replace the seat belt assembly if it does not operate normally.
A and B : Tilting angles : Vehicle front
JMHIA1056ZZ
Revision: 2010 May2011 QX56
Page 4286 of 5598
SECOND SEAT BELTSB-11
< REMOVAL AND INSTALLATION >
C
DE
F
G
I
J
K L
M A
B
SB
N
O P
3. Grasp the seat belt and try to pull out the retractor. The webbing must lock and not extend any further. If it
does not operate normally, replace the retractor assembly.
4. Allow the entire length of the webbing to retract to cancel the automatic locking mode.
ELR Function Moving Check
WARNING:
Perform the following test in a safe, open area clear of other vehicles and obstructions (for example, a
large, empty parking lot). Road surface must be p aved and dry. Never perform the following test on
wet or gravel roads or on public streets and highways. This could result in an accident and serious
personal injury. The driver and passenger must be prepared to brace themselves in the event that the
retractor does not lock.
1. Fasten driver seat belt. Buckle a passenger into the seat for the belt that is to be tested.
2. Proceed to the designated safe area.
3. Drive the vehicle at approximately 16 km/h ( 10 MPH). Notify any passengers of a pending sudden stop
and the driver and passenger must be prepared to brac e themselves in the event that the retractor does
not lock. Apply brakes firmly and make a very hard stop.
During stopping, seat belts should lock and not be extended. If the seat belt retractor assembly does not lock,
perform the retractor off-vehicle check.
SEAT BELT RETRACTOR OFF-VEHICLE CHECK
1. Remove the second seat belt retractor. Refer to SB-13, "SEAT BELT RETRACTOR : Removal and Instal-
lation".
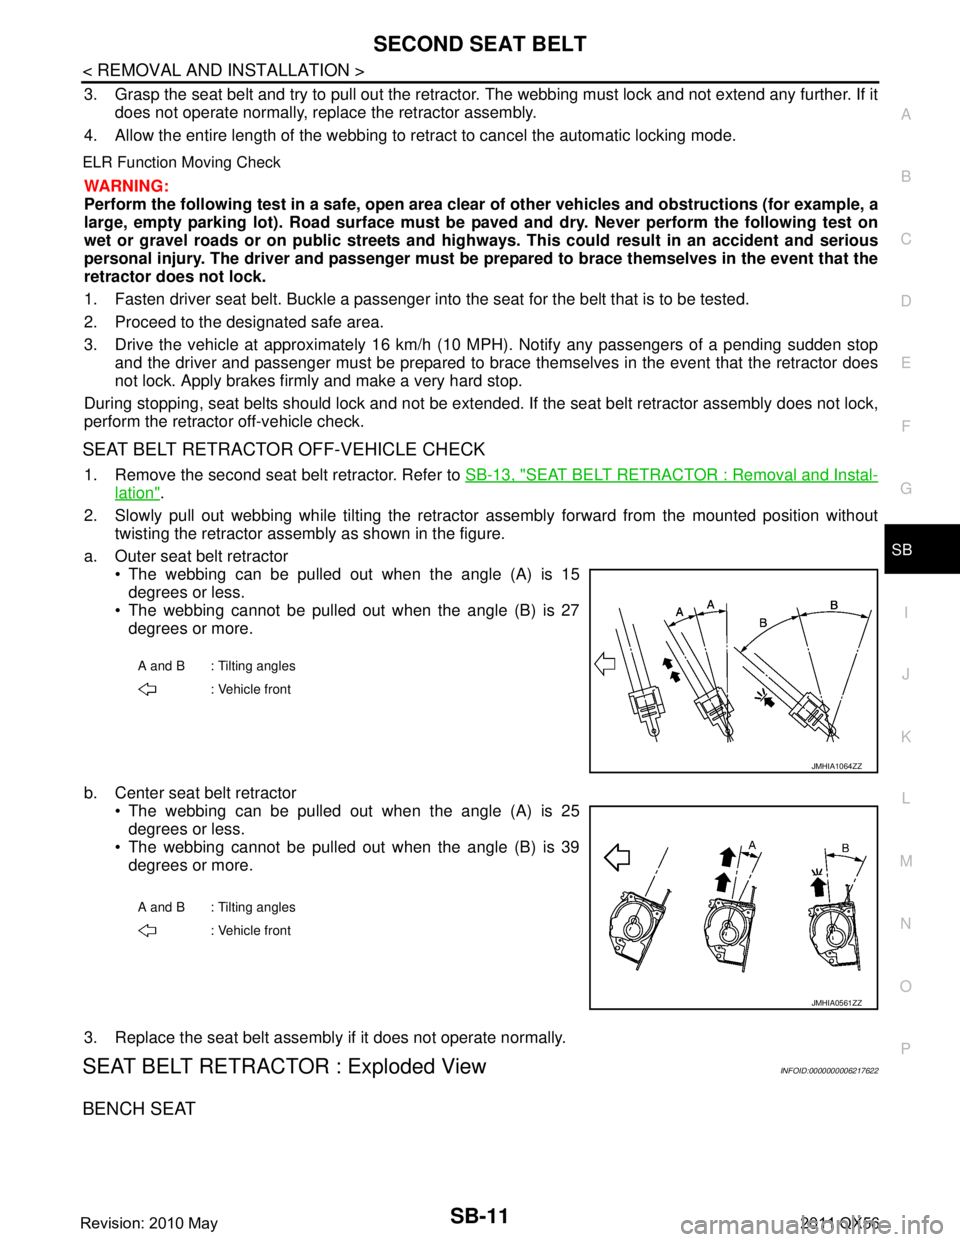
2. Slowly pull out webbing while tilting the retracto r assembly forward from the mounted position without
twisting the retractor assembly as shown in the figure.
a. Outer seat belt retractor The webbing can be pulled out when the angle (A) is 15degrees or less.
The webbing cannot be pulled out when the angle (B) is 27
degrees or more.
b. Center seat belt retractor The webbing can be pulled out when the angle (A) is 25
degrees or less.
The webbing cannot be pulled out when the angle (B) is 39
degrees or more.
3. Replace the seat belt assembly if it does not operate normally.
SEAT BELT RETRACTOR : Exploded ViewINFOID:0000000006217622
BENCH SEAT
A and B : Tilting angles : Vehicle front
JMHIA1064ZZ
A and B : Tilting angles
: Vehicle front
JMHIA0561ZZ
Revision: 2010 May2011 QX56
Page 4293 of 5598
SB-18
< REMOVAL AND INSTALLATION >
THIRD SEAT BELT
3. Grasp the seat belt and try to pull out the retractor. The webbing must lock and not extend any further. If it
does not operate normally, replace the retractor assembly.
4. Allow the entire length of the webbing to re tract to cancel the automatic locking mode.
ELR Function Moving Check
WARNING:
Perform the following test in a safe, open area clear of other vehicles and obstructions (for example, a
large, empty parking lot). Road surface must be p aved and dry. Never perform the following test on
wet or gravel roads or on public streets and highw ays. This could result in an accident and serious
personal injury. The driver and passenger must be prepared to brace themselves in the event that the
retractor does not lock.
1. Fasten driver seat belt. Buckle a passenger in to the seat for the belt that is to be tested.
2. Proceed to the designated safe area.
3. Drive the vehicle at approximately 16 km/h ( 10 MPH). Notify any passengers of a pending sudden stop
and the driver and passenger must be prepared to brace themselves in the event that the retractor does
not lock. Apply brakes firmly and make a very hard stop.
During stopping, seat belts should lock and not be extended. If the seat belt retractor assembly does not lock,
perform the retractor off-vehicle check.
SEAT BELT RETRACTOR OFF-VEHICLE CHECK
1. Remove the third seat belt retractor. Refer to SB-19, "SEAT BELT RETRACTOR : Removal and Installa-
tion".
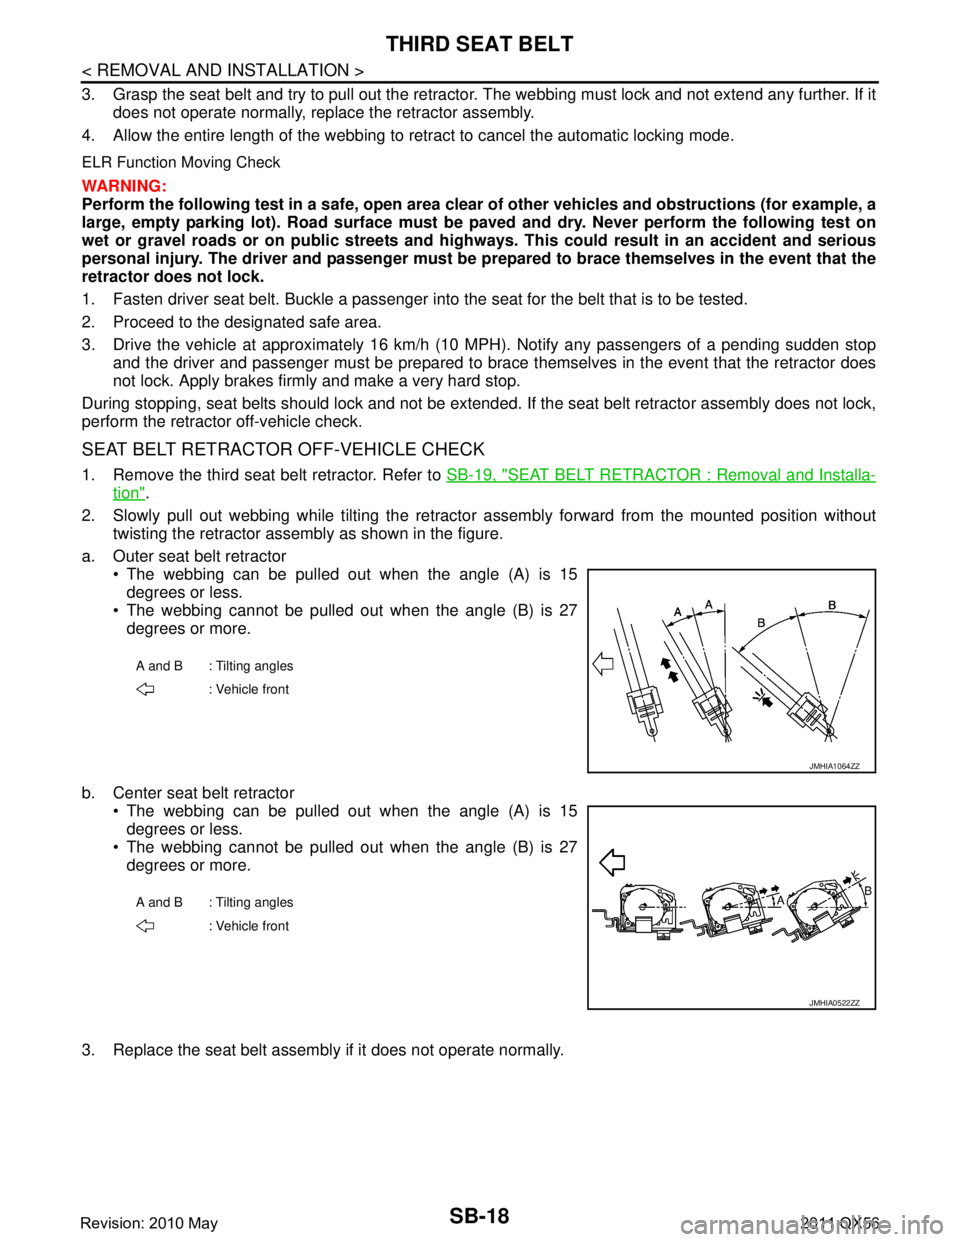
2. Slowly pull out webbing while tilting the retracto r assembly forward from the mounted position without
twisting the retractor assembly as shown in the figure.
a. Outer seat belt retractor The webbing can be pulled out when the angle (A) is 15degrees or less.
The webbing cannot be pulled out when the angle (B) is 27
degrees or more.
b. Center seat belt retractor The webbing can be pulled out when the angle (A) is 15
degrees or less.
The webbing cannot be pulled out when the angle (B) is 27
degrees or more.
3. Replace the seat belt assembly if it does not operate normally.
A and B : Tilting angles : Vehicle front
JMHIA1064ZZ
A and B : Tilting angles: Vehicle front
JMHIA0522ZZ
Revision: 2010 May2011 QX56
Page 4299 of 5598

SBC-2
DTC Logic ...............................................................38
Diagnosis Procedure ..............................................38
Component Inspection ............................................39
B2454 SEAT BLT PWR DR CIRC .....................41
DTC Logic ............................................................ ...41
Diagnosis Procedure ..............................................41
B2455 CONTROL UNIT DR ..............................42
DTC Logic ............................................................ ...42
Diagnosis Procedure ..............................................42
B2456 SEAT BLT PWR AS ...............................43
DTC Logic ............................................................ ...43
Diagnosis Procedure ..............................................43
B2457 CONTROL UNIT AS ...............................44
DTC Logic ............................................................ ...44
Diagnosis Procedure ..............................................44
B2458 LOCAL COMM .......................................45
DTC Logic ............................................................ ...45
Diagnosis Procedure ..............................................45
B2461 VHCL SPEED SIGNAL ..........................47
Description ........................................................... ...47
DTC Logic ...............................................................47
Diagnosis Procedure ..............................................47
B2463 ROLLOVER SIGNAL .............................48
Description ........................................................... ...48
DTC Logic ...............................................................48
Diagnosis Procedure ..............................................48
B2466 DR/AS CONTROL UNIT ........................49
DTC Logic ............................................................ ...49
Diagnosis Procedure ..............................................49
B2470 SYS HEAT PROTC DR ..........................50
Description ........................................................... ...50
DTC Logic ...............................................................50
Diagnosis Procedure ..............................................50
B2471 SYS HEAT PROTC AS ..........................51
Description ........................................................... ...51
DTC Logic ...............................................................51
Diagnosis Procedure ............................................ ...51
POWER SUPPLY AND GROUND CIRCUIT .....52
Diagnosis Procedure ............................................ ...52
SEAT BELT BUCKLE SWITCH (DRIVER
SIDE) ..................................................................
53
Component Function Check ................................ ...53
Diagnosis Procedure ...............................................53
Component Inspection [Seat Belt Assembly (Driv-
er Side)] ..................................................................
54
SEAT BELT BUCKLE SWITCH (PASSEN-
GER SIDE) .........................................................
55
Component Function Check ................................ ...55
Diagnosis Procedure ...............................................55
Component Inspection [Seat Belt Assembly (Pas-
senger Side)] ...........................................................
56
SEAT BELT WARNING LAMP CIRCUIT ..........57
Component Function Check ................................ ...57
Diagnosis Procedure ...............................................57
Component Inspection [Seat Belt Assembly (Pas-
senger Side)] ...........................................................
58
SYMPTOM DIAGNOSIS ............................60
PRE-CRASH SEAT BELT DOSE NOT OPER-
ATE ................................................................. ...
60
Diagnosis Procedure ............................................ ...60
SEAT BELT WARNING LAMP DOES NOT
TURN OFF .........................................................
61
Diagnosis Procedure ............................................ ...61
SEAT BELT WARNING LAMP DOES NOT
TURN ON ...........................................................
62
Diagnosis Procedure ............................................ ...62
REMOVAL AND INSTALLATION ..............63
BRAKE PEDAL STROKE SENSOR .............. ...63
Exploded View ..................................................... ...63
Removal and Installation .........................................63
Revision: 2010 May2011 QX56
Page 4302 of 5598
COMPONENT PARTSSBC-5
< SYSTEM DESCRIPTION >
C
DE
F
G
I
J
K L
M A
B
SBC
N
O P
SYSTEM DESCRIPTION
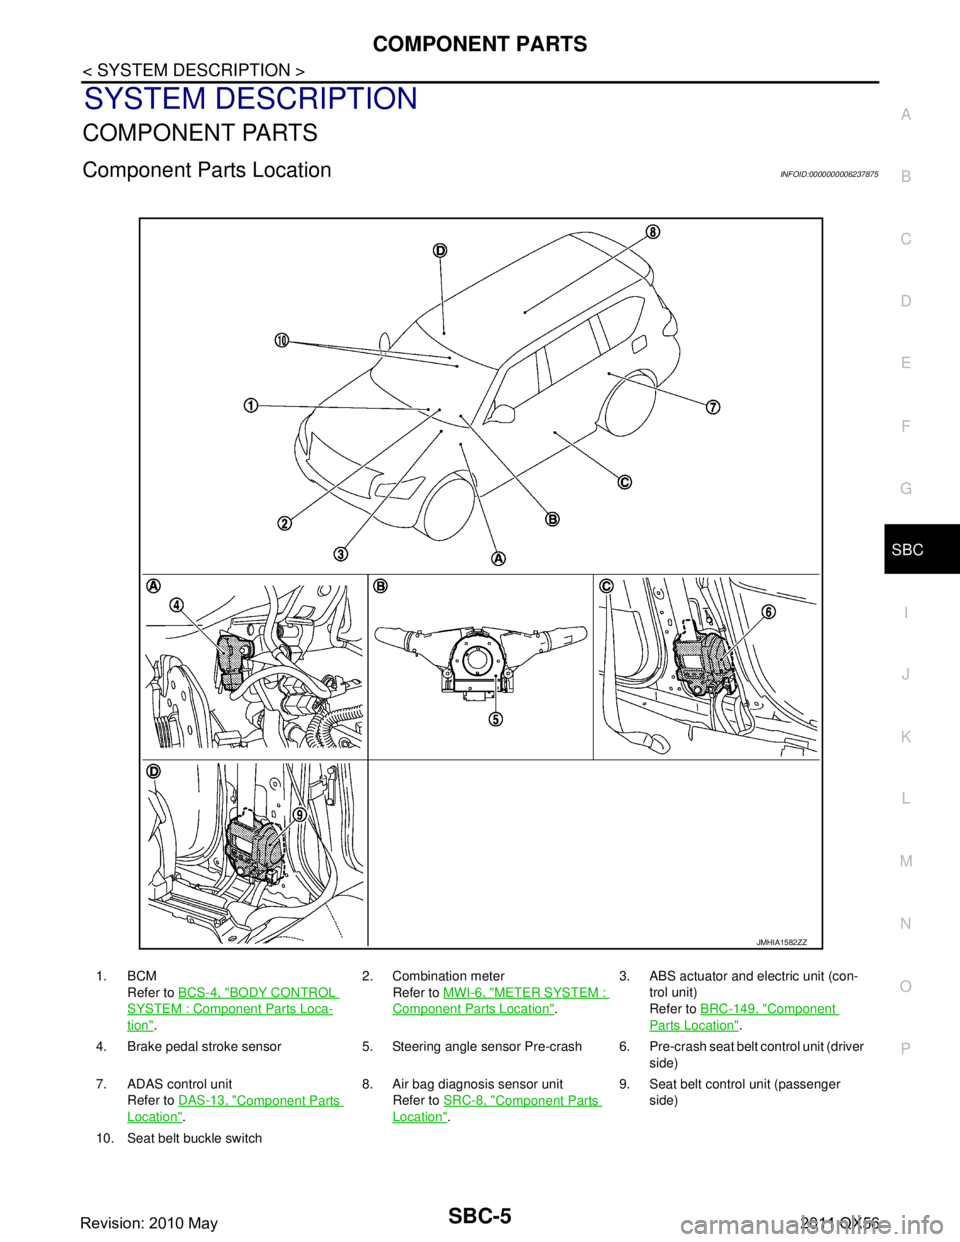
COMPONENT PARTS
Component Parts LocationINFOID:0000000006237875
1. BCM Refer to BCS-4, "
BODY CONTROL
SYSTEM : Componen t Parts Loca-
tion". 2. Combination meter
Refer to MWI-6, "
METER SYSTEM :
Component Parts Location". 3. ABS actuator and electric unit (con-
trol unit)
Refer to BRC-149, "Component
Parts Location".
4. Brake pedal stroke sensor 5. Steering angle sensor Pre-crash 6. Pre-crash seat belt control unit (driver side)
7. ADAS control unit Refer to DAS-13, "
Component Parts
Location". 8. Air bag diagnosis sensor unit
Refer to SRC-8, "
Component Parts
Location". 9. Seat belt control unit (passenger
side)
10. Seat belt buckle switch
JMHIA1582ZZ
Revision: 2010 May2011 QX56
Page 4303 of 5598

SBC-6
< SYSTEM DESCRIPTION >
COMPONENT PARTS
Component Description
INFOID:0000000006237876
A. View with instrument driver lower cov- er removed B. Combination switch C. View with center pillar lower garnish
removed (driver side)
D. View with center pillar lower garnish re- moved (passenger side)
Component Function
ABS actuator and electric unit (control unit) ABS operation signal is rece
ived from ABS actuator and el ectric unit (control unit)
via CAN communication.
ADAS control unit Intelligent brake assistance operation signal is received from ADAS control unit
via CAN communication.
Air bag diagnosis sensor unit Detects a collision and supplies power supply for deployment to air bag module
and pre-tensioner seat belt.
Performs the deploy judgement of passenger air bag based on the information from Occupant Detection System control unit
BCM Ignition ON signal, sleep/wake up signal, and door switch signal are received
from BCM via CAN communication.
Brake pedal stroke sensor It changes voltage according to brake pedal depressed amount and sends the
signal to pre-crash seat belt control unit.
There are 2 signals (brake pedal stroke sensor 1 and 2) sent from the brake
pedal stroke sensor. Pre-crash seat belt control unit judges the stroke amount
and the speed of the brake pedal according to the voltage of the signal sent by
each side.
Combination meter Transmits vehicle speed signal to pre-crash seat belt control unit (driver side).
Turns the seat belt warning lamp ON when the seat belt is unfastened.
Occupant detection system control unit Judges the passenger seat condition based on the information from occupant de-
tection unit.
Pre-crush seat belt control unit (driver side) Total control of pre-crash seat belt system is operated according to transmit sig-
nal.
Driver seat belt retractor integrates pre-crash seat belt control unit (driver side), driver seat belt motor, and tension reducer.
Seat belt motor operates each operation of pull, return, and hold.
Pre-crush seat belt control unit (passenger side) Control of passenger pre-crash seat belt is operated according to transmit sig-
nal.
Passenger seat belt retractor integrates pre-crash seat belt control unit (driver seat), driver seat belt motor, and tension reducer.
Seat belt motor operates each operation of pull, return, and hold.
Seat belt buckle switch (driver side) Fastening or not fastening of seat belt is judged. This judgment is used for con-
trol of driver pre-crash seat belt system.
Seat belt warning lamp on combination meter turns ON when seat belt is not fastened while ignition switch is ON.
The seat belt buckle switch is installed in the seat belt buckle.
Seat belt buckle switch (passenger side) Fastening or not fastening of seat belt is judged. This judgment is used to con-
trol passenger pre-crash seat belt system.
The seat belt buckle switch is installed in the seat belt buckle.
Steering angle sensor Steering angle sensor signal, steering angle speed signal, steering angle sensor
neutral position adjustment completion signal, and steering angle sensor mal-
function signal are received via CAN communication.
Revision: 2010 May2011 QX56