2011 INFINITI QX56 seat adjustment
[x] Cancel search: seat adjustmentPage 3400 of 5598

IP-10
< SYMPTOM DIAGNOSIS >
SQUEAK AND RATTLE TROUBLE DIAGNOSES
1. Trunk lid dumpers out of adjustment
2. Trunk lid striker out of adjustment
3. Trunk lid torsion bars knocking together
4. A loose license plate or bracket
Most of these incidents can be repaired by adjusting, securing, or insulating the item(s) or component(s) caus-
ing the noise.
SUNROOF/HEADLINING
Noises in the sunroof / headlining area can often be traced to one of the following items:
1. Sunroof lid, rail, linkage, or seals making a rattle or light knocking noise
2. Sunvisor shaft shaking in the holder
3. Front or rear windshield touching headlining and squeaking
Again, pressing on the components to stop the noise while duplicating the conditions can isolate most of these
incidents. Repairs usually consist of insulating with felt cloth tape.
SEATS
When isolating seat noise it is important to note t he position the seat is in and the load placed on the seat
when the noise occurs. These conditions should be duplic ated when verifying and isolating the cause of the
noise.
Causes of seat noise include:
1. Headrest rods and holder
2. A squeak between the seat pad cushion and frame
3. The rear seatback lock and bracket
These noises can be isolated by moving or pressing on the suspected components while duplicating the con-
ditions under which the noise occurs. Most of thes e incidents can be repaired by repositioning the component
or applying urethane tape to the contact area.
UNDERHOOD
Some interior noise may be caused by components under the hood or on the engine wall. The noise is then
transmitted into the passenger compartment.
Causes of transmitted underhood noise include:
1. Any component mounted to the engine wall
2. Components that pass through the engine wall
3. Engine wall mounts and connectors
4. Loose radiator mounting pins
5. Hood bumpers out of adjustment
6. Hood striker out of adjustment
These noises can be difficult to isolate since they cannot be reached from the interior of the vehicle. The best
method is to secure, move, or insulate one component at a time and test drive the vehicle. Also, engine RPM
or load can be changed to isolate the noise. Repairs can usually be made by moving, adjusting, securing, or
insulating the component causing the noise.
Revision: 2010 May2011 QX56
Page 3732 of 5598
SQUEAK AND RATTLE TROUBLE DIAGNOSESMIR-27
< SYMPTOM DIAGNOSIS >
C
DE
F
G H
I
J
K
M A
B
MIR
N
O P
Most of these incidents can be repaired by adjusting, securing or insulatingthe item(s) or component(s) caus-
ing the noise.
SUNROOF/HEADLINING
Noises in the sunroof/headlining area can often be traced to one of the following:
1. Sunroof lid, rail, linkage or seals making a rattle or light knockingnoise
2. Sunvisor shaft shaking in the holder
3. Front or rear windshield touching headlining and squeaking
Again, pressing on the components to stop the noise whil e duplicatingthe conditions can isolate most of these
incidents. Repairs usually consistof insulating with felt cloth tape.
SEATS
When isolating seat noise it's important to note the pos ition the seatis in and the load placed on the seat when
the noise is present. These conditionsshould be duplic ated when verifying and isolating the cause of the
noise.
Cause of seat noise include:
1. Headrest rods and holder
2. A squeak between the seat pad cushion and frame
3. The rear seatback lock and bracket
These noises can be isolated by moving or pressing on the suspectedcomponents while duplicating the condi-
tions under which the noise occurs. Most of these incidents can be repaired by repositioning the component
orapplying urethane tape to the contact area.
UNDERHOOD
Some interior noise may be caused by components under the hood or onthe engine wall. The noise is then
transmitted into the passenger compartment.
Causes of transmitted underhood noise include:
1. Any component mounted to the engine wall
2. Components that pass through the engine wall
3. Engine wall mounts and connectors
4. Loose radiator mounting pins
5. Hood bumpers out of adjustment
6. Hood striker out of adjustment
These noises can be difficult to isolate since they cannot be reached from the interior of the vehicle. The best
method is to secure, move or insulate one component at a time and test drive the vehicle. Also, engine RPM
or load can be changed to isolate the noise. Repairs c an usually be made by moving, adjusting, securing, or
insulating the component causing the noise.
Revision: 2010 May2011 QX56
Page 4215 of 5598
RF-1
BODY EXTERIOR, DOORS, ROOF & VEHICLE SECURITY
C
D
E
F
G H
I
J
L
M
SECTION RF
A
B
RF
N
O P
CONTENTS
ROOF
PRECAUTION ................ ...............................3
PRECAUTIONS .............................................. .....3
Precaution for Supplemental Restraint System
(SRS) "AIR BAG" and "SEAT BELT PRE-TEN-
SIONER" ............................................................. ......
3
PREPARATION ............................................4
PREPARATION .............................................. .....4
Commercial Service Tool .................................... ......4
SYSTEM DESCRIPTION ..............................5
COMPONENT PARTS ................................... .....5
Component Parts Location ................................ ......5
Component Description ............................................5
SYSTEM ..............................................................6
System Diagram ................................................. ......6
System Description ...................................................6
ECU DIAGNOSIS INFORMATION ...............7
BCM (BODY CONTROL MODULE) ............... .....7
List of ECU Reference ........................................ ......7
SUNROOF SYSTEM ...................................... .....8
Reference Value ................................................. ......8
WIRING DIAGRAM .......................................9
SUNROOF MOTOR ASSEMBLY ................... .....9
Wiring Diagram ................................................... ......9
BASIC INSPECTION ...................................16
DIAGNOSIS AND REPAIR WORKFLOW ..... ....16
WorkFlow ............................................................ ....16
INSPECTION AND ADJUSTMENT ....................17
ADDITIONAL SERVICE WHEN REPLACING
CONTROL UNIT .................................................... ....
17
ADDITIONAL SERVICE WHEN REPLACING
CONTROL UNIT : Description .................................
17
ADDITIONAL SERVICE WHEN REPLACING
CONTROL UNIT : Special Repair Requirement ......
17
DTC/CIRCUIT DIAGNOSIS .........................18
POWER SUPPLY AND GROUND CIRCUIT ....18
Diagnosis Procedure .......................................... ....18
VEHICLE SPEED SIGNAL CIRCUIT ................20
Component Function Check ..................................20
Diagnosis Procedure ..............................................20
SUNROOF SWITCH ..........................................21
Component Function Check ..................................21
Diagnosis Procedure ..............................................21
Component Inspection .............................................22
SYMPTOM DIAGNOSIS ..............................23
SUNROOF DOES NOT OPERATE PROPER-
LY ......................................................................
23
Description ........................................................... ....23
Diagnosis Procedure ...............................................23
SUNROOF DOES NOT OPERATE ANTI-
PINCH FUNCTION ............................................
24
Diagnosis Procedure ........................................... ....24
RETAINED POWER OPERATION DOES NOT
OPERATE PROPERLY .....................................
25
Diagnosis Procedure ...............................................25
SQUEAK AND RATTLE TROUBLE DIAG-
NOSES ..............................................................
26
Work Flow ................................................................26
Inspection Procedure ...............................................28
Diagnostic Worksheet ..............................................30
REMOVAL AND INSTALLATION ...............32
GLASS LID ........................................................32
Revision: 2010 May2011 QX56
Page 4243 of 5598
SQUEAK AND RATTLE TROUBLE DIAGNOSESRF-29
< SYMPTOM DIAGNOSIS >
C
DE
F
G H
I
J
L
M A
B
RF
N
O P
3. Trunk lid torsion bars knocking together
4. A loose license plate or bracket
Most of these incidents can be repaired by adjusting, se curing, or insulating the item(s) or component(s) caus-
ing the noise.
SUNROOF/HEADLINING
Noises in the sunroof / headlining area can of ten be traced to one of the following items:
1. Sunroof lid, rail, linkage, or seals making a rattle or light knocking noise
2. Sunvisor shaft shaking in the holder
3. Front or rear windshield touching headlining and squeaking
Again, pressing on the components to stop the noise while duplicating the conditions can isolate most of these
incidents. Repairs usually consist of insulating with felt cloth tape.
SEATS
When isolating seat noise it is important to note the position the seat is in and the load placed on the seat
when the noise occurs. These conditions should be duplic ated when verifying and isolating the cause of the
noise.
Causes of seat noise include:
1. Headrest rods and holder
2. A squeak between the seat pad cushion and frame
3. The rear seatback lock and bracket
These noises can be isolated by moving or pressing on the suspected components while duplicating the con-
ditions under which the noise occurs. Most of thes e incidents can be repaired by repositioning the component
or applying urethane tape to the contact area.
UNDERHOOD
Some interior noise may be caused by components under the hood or on the engine wall. The noise is then
transmitted into the passenger compartment.
Causes of transmitted underhood noise include:
1. Any component mounted to the engine wall
2. Components that pass through the engine wall
3. Engine wall mounts and connectors
4. Loose radiator mounting pins
5. Hood bumpers out of adjustment
6. Hood striker out of adjustment
These noises can be difficult to isolate since they cannot be reached from the interior of the vehicle. The best
method is to secure, move, or insulate one component at a time and test drive the vehicle. Also, engine RPM
or load can be changed to isolate the noise. Repairs c an usually be made by moving, adjusting, securing, or
insulating the component causing the noise.
Revision: 2010 May2011 QX56
Page 4253 of 5598
SUNROOF UNIT ASSEMBLYRF-39
< REMOVAL AND INSTALLATION >
C
DE
F
G H
I
J
L
M A
B
RF
N
O P
5. Remove grip bracket.
6. Remove sunroof bracket bolts.
7. Remove nuts from the front end and side rail, and then remove sunroof unit assembly from roof panel.
8. Remove sunroof unit assembly through the passenger compartment while being careful not to damage the seats and trim.
INSTALLATION
1. Temporarily tighten the mounting nuts to the side rail of sunroof unit assembly.
2. Temporarily tighten the mounting nuts to the front end of sunroof unit assembly.
3. Temporarily tighten the mounting bolts to the sunroof brackets (LH,RH).
4. Tighten the installation points diagonally excluding the installation points of the sunroof brackets around the roof opening.
5. Tighten the mounting nuts to the front end and side rail.
6. Tighten the sunroof bracket bolts of the vehicl e side, and then tighten the bolt of the rail side.
7. Install the glass lid. NOTE:
After installation, perform fitting adjustment. Refer to RF-33, "
Adjustment".
8. Connect drain hoses.
9. Install headlining. Refer to INT-29, "
Removal and Installation".
Disassembly and AssemblyINFOID:0000000006141252
DISASSEMBLY
1. Remove sunshade stopper mounting from the rear end of sunroof frame.
2. Remove rear drain assembly from sunroof guide assembly.
3. Remove sunshade from the rear end of sunroof frame.
ASSEMBLY
Assemble in the reverse order of disassembly.
Revision: 2010 May2011 QX56
Page 4264 of 5598
REAR LOWER LINK & COIL SPRINGRSU-9
< REMOVAL AND INSTALLATION >
C
DF
G H
I
J
K L
M A
B
RSU
N
O P
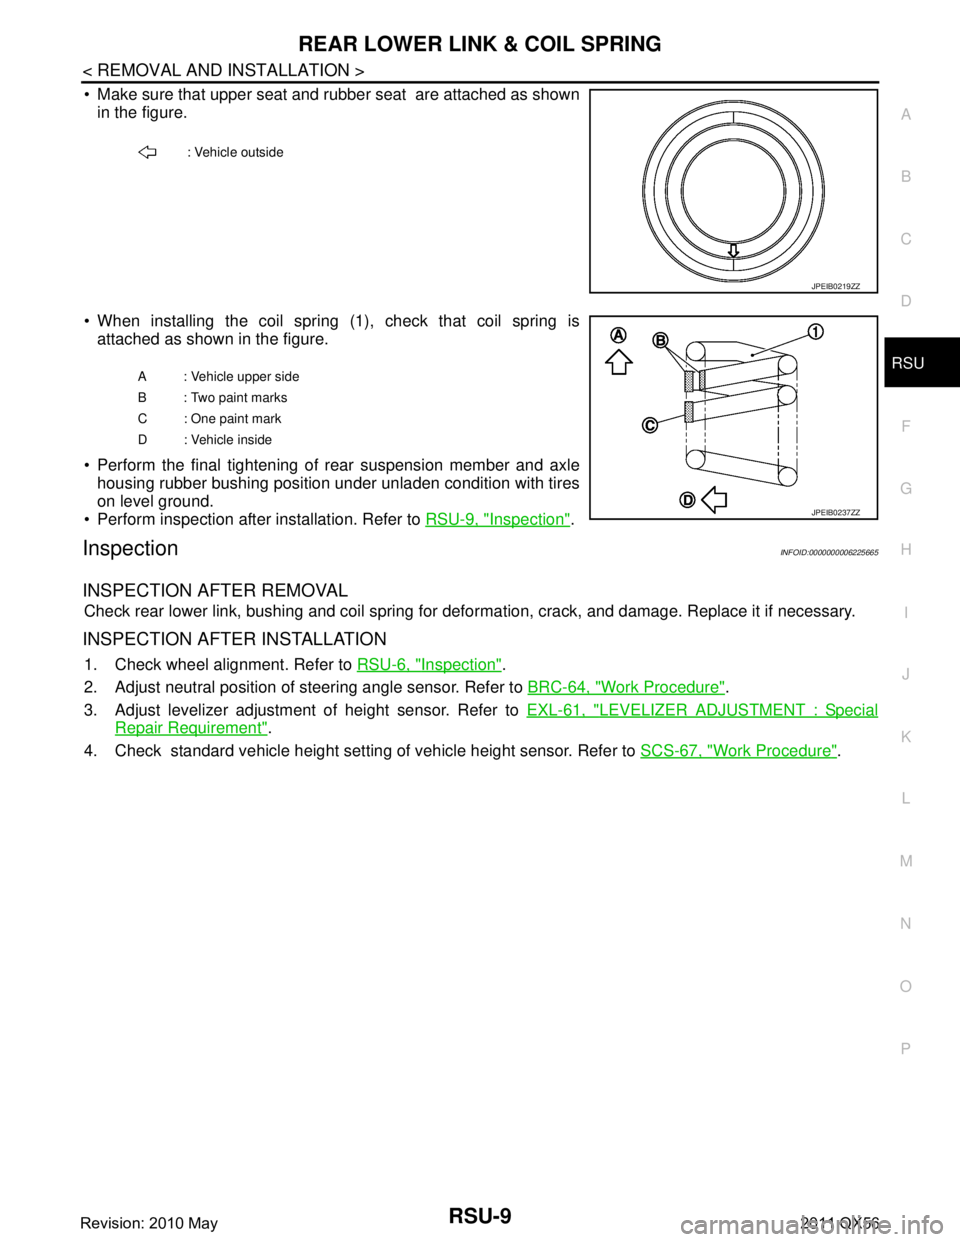
Make sure that upper seat and rubber seat are attached as shown in the figure.
When installing the coil spring (1), check that coil spring is attached as shown in the figure.
Perform the final tightening of rear suspension member and axle housing rubber bushing position under unladen condition with tires
on level ground.
Perform inspection after installation. Refer to RSU-9, "
Inspection".
InspectionINFOID:0000000006225665
INSPECTION AFTER REMOVAL
Check rear lower link, bushing and coil spring for defor mation, crack, and damage. Replace it if necessary.
INSPECTION AFTER INSTALLATION
1. Check wheel alignment. Refer to RSU-6, "Inspection".
2. Adjust neutral position of steering angle sensor. Refer to BRC-64, "
Work Procedure".
3. Adjust levelizer adjustment of height sensor. Refer to EXL-61, "
LEVELIZER ADJUSTMENT : Special
Repair Requirement".
4. Check standard vehicle height setting of vehicle height sensor. Refer to SCS-67, "
Work Procedure".
: Vehicle outside
JPEIB0219ZZ
A : Vehicle upper side
B : Two paint marks
C : One paint mark
D : Vehicle inside
JPEIB0237ZZ
Revision: 2010 May2011 QX56
Page 4303 of 5598

SBC-6
< SYSTEM DESCRIPTION >
COMPONENT PARTS
Component Description
INFOID:0000000006237876
A. View with instrument driver lower cov- er removed B. Combination switch C. View with center pillar lower garnish
removed (driver side)
D. View with center pillar lower garnish re- moved (passenger side)
Component Function
ABS actuator and electric unit (control unit) ABS operation signal is rece
ived from ABS actuator and el ectric unit (control unit)
via CAN communication.
ADAS control unit Intelligent brake assistance operation signal is received from ADAS control unit
via CAN communication.
Air bag diagnosis sensor unit Detects a collision and supplies power supply for deployment to air bag module
and pre-tensioner seat belt.
Performs the deploy judgement of passenger air bag based on the information from Occupant Detection System control unit
BCM Ignition ON signal, sleep/wake up signal, and door switch signal are received
from BCM via CAN communication.
Brake pedal stroke sensor It changes voltage according to brake pedal depressed amount and sends the
signal to pre-crash seat belt control unit.
There are 2 signals (brake pedal stroke sensor 1 and 2) sent from the brake
pedal stroke sensor. Pre-crash seat belt control unit judges the stroke amount
and the speed of the brake pedal according to the voltage of the signal sent by
each side.
Combination meter Transmits vehicle speed signal to pre-crash seat belt control unit (driver side).
Turns the seat belt warning lamp ON when the seat belt is unfastened.
Occupant detection system control unit Judges the passenger seat condition based on the information from occupant de-
tection unit.
Pre-crush seat belt control unit (driver side) Total control of pre-crash seat belt system is operated according to transmit sig-
nal.
Driver seat belt retractor integrates pre-crash seat belt control unit (driver side), driver seat belt motor, and tension reducer.
Seat belt motor operates each operation of pull, return, and hold.
Pre-crush seat belt control unit (passenger side) Control of passenger pre-crash seat belt is operated according to transmit sig-
nal.
Passenger seat belt retractor integrates pre-crash seat belt control unit (driver seat), driver seat belt motor, and tension reducer.
Seat belt motor operates each operation of pull, return, and hold.
Seat belt buckle switch (driver side) Fastening or not fastening of seat belt is judged. This judgment is used for con-
trol of driver pre-crash seat belt system.
Seat belt warning lamp on combination meter turns ON when seat belt is not fastened while ignition switch is ON.
The seat belt buckle switch is installed in the seat belt buckle.
Seat belt buckle switch (passenger side) Fastening or not fastening of seat belt is judged. This judgment is used to con-
trol passenger pre-crash seat belt system.
The seat belt buckle switch is installed in the seat belt buckle.
Steering angle sensor Steering angle sensor signal, steering angle speed signal, steering angle sensor
neutral position adjustment completion signal, and steering angle sensor mal-
function signal are received via CAN communication.
Revision: 2010 May2011 QX56
Page 4461 of 5598

SE-2
SECOND HEATED SEAT SYSTEM : System De-
scription ..................................................................
16
CLIMATE CONTROLLED SEAT SYSTEM ........... ...17
CLIMATE CONTROLLED SEAT SYSTEM : Sys-
tem Diagram ........................................................ ...
17
CLIMATE CONTROLLED SEAT SYSTEM : Sys-
tem Description .................................................... ...
17
CLIMATE CONTROLLED SEAT SYSTEM : Fail-
safe .........................................................................
17
ECU DIAGNOSIS INFORMATION ..............20
CLIMATE CONTROLLED SEAT CONTROL
UNIT ................................................................ ...
20
Reference Value .................................................. ...20
Fail-safe ..................................................................21
WIRING DIAGRAM .....................................24
POWER SEAT CONTROL SYSTEM (PAS-
SENGER SIDE) ............................................... ...
24
Wiring Diagram .................................................... ...24
LUMBAR SUPPORT SYSTEM ..........................28
Wiring Diagram .................................................... ...28
SECOND SEAT POWER UNLOCK SYSTEM ...33
Wiring Diagram .......................................................33
THIRD SEAT SEATBACK POWER FOLDING
SYSTEM .......................................................... ...
39
Wiring Diagram .................................................... ...39
FRONT HEATED SEAT SYSTEM .....................45
Wiring Diagram .................................................... ...45
SECOND HEATED SEAT SYSTEM ..................50
Wiring Diagram .................................................... ...50
CLIMATE CONTROLLED SEAT SYSTEM .......55
Wiring Diagram .................................................... ...55
BASIC INSPECTION ...................................66
DIAGNOSIS AND REPAIR WORK FLOW ..... ...66
Work Flow ............................................................ ...66
DTC/CIRCUIT DIAGNOSIS ...................... ...67
POWER SUPPLY AND GROUND CIRCUIT .. ...67
CLIMATE CONTROLLED SEAT CONTROL UNIT ...67
CLIMATE CONTROLLED SEAT CONTROL UNIT
: Diagnosis Procedure ............................................
67
CLIMATE CONTROLLED SEAT CONTROL UNIT
: Component Inspection ..........................................
70
CLIMATE CONTROLLED SEAT SWITCH ........72
Component Function Check .............................. ...72
Diagnosis Procedure ..............................................72
Component Inspection ............................................74
SEATBACK THERMAL ELECTRIC UNIT ........75
Component Function Check ............................... ...75
Diagnosis Procedure ...............................................75
SEATBACK THERMAL ELECTRIC UNIT
SENSOR ............................................................
77
Component Function Check ............................... ...77
Diagnosis Procedure ...............................................77
Component Inspection ............................................78
SEAT CUSHION THERMAL ELECTRIC UNIT ...79
Component Function Check ............................... ...79
Diagnosis Procedure ...............................................79
SEAT CUSHION THERMAL ELECTRIC UNIT
SENSOR ............................................................
81
Component Function Check ............................... ...81
Diagnosis Procedure ...............................................81
Component Inspection ............................................82
CLIMATE CONTROLLED SEATBACK
BLOWER MOTOR .............................................
83
Component Function Check ............................... ...83
Diagnosis Procedure ...............................................83
CLIMATE CONTROLLED SEAT CUSHION
BLOWER MOTOR .............................................
86
Component Function Check ............................... ...86
Diagnosis Procedure ...............................................86
CLIMATE CONTROLLED SEAT SWITCH IN-
DICATOR ...........................................................
89
Component Function Check ............................... ...89
Diagnosis Procedure ...............................................89
CLIMATE CONTROLLED SEAT BLOWER
FILTER ...............................................................
91
SEATBACK BLOWER MOTOR ............................. ...91
SEATBACK BLOWER MOTOR : Diagnosis Pro-
cedure .....................................................................
91
SEAT CUSHION BLOWER MOTOR ..................... ...91
SEAT CUSHION BLOWER MOTOR : Diagnosis
Procedure ...............................................................
91
SYMPTOM DIAGNOSIS ............................92
CLIMATE CONTROLLED SEAT DOES NOT
OPERATE. ...................................................... ...
92
Diagnosis Procedure ............................................ ...92
TEMPERATURE ADJUSTMENT IS IMPOSSI-
BLE ....................................................................
94
SEATBACK ............................................................ ...94
SEATBACK : Diagnosis Procedure ........................94
SEAT CUSHION ..................................................... ...94
SEAT CUSHION : Diagnosis Procedure .................94
Revision: 2010 May2011 QX56