2011 INFINITI QX56 Wiring
[x] Cancel search: WiringPage 1427 of 5598
![INFINITI QX56 2011 Factory Service Manual
DAS-462
< WIRING DIAGRAM >[BSW]
DRIVER ASSISTANCE SYSTEMS
JCOWM0366GB
Revision: 2010 May2011 QX56 INFINITI QX56 2011 Factory Service Manual
DAS-462
< WIRING DIAGRAM >[BSW]
DRIVER ASSISTANCE SYSTEMS
JCOWM0366GB
Revision: 2010 May2011 QX56](/manual-img/42/57033/w960_57033-1426.png)
DAS-462
< WIRING DIAGRAM >[BSW]
DRIVER ASSISTANCE SYSTEMS
JCOWM0366GB
Revision: 2010 May2011 QX56
Page 1450 of 5598
![INFINITI QX56 2011 Factory Service Manual
DAS
U1000 CAN COMM CIRCUITDAS-485
< DTC/CIRCUIT DIAGNOSIS > [BSW]
C
D
E
F
G H
I
J
K L
M B
N P A
U1000 CAN COMM CIRCUIT
SIDE RADAR LH
SIDE RADAR LH : DescriptionINFOID:0000000006223905
CAN COMMUNICATI INFINITI QX56 2011 Factory Service Manual
DAS
U1000 CAN COMM CIRCUITDAS-485
< DTC/CIRCUIT DIAGNOSIS > [BSW]
C
D
E
F
G H
I
J
K L
M B
N P A
U1000 CAN COMM CIRCUIT
SIDE RADAR LH
SIDE RADAR LH : DescriptionINFOID:0000000006223905
CAN COMMUNICATI](/manual-img/42/57033/w960_57033-1449.png)
DAS
U1000 CAN COMM CIRCUITDAS-485
< DTC/CIRCUIT DIAGNOSIS > [BSW]
C
D
E
F
G H
I
J
K L
M B
N P A
U1000 CAN COMM CIRCUIT
SIDE RADAR LH
SIDE RADAR LH : DescriptionINFOID:0000000006223905
CAN COMMUNICATION
CAN (Controller Area Network) is a serial communication line for real time applications. It is an on-vehicle mul-
tiplex communication line with high data communicati on speed and excellent error detection ability. Modern
vehicle is equipped with many electronic control units , and each control unit shares information and links with
other control units during operation (not independent). In CAN communication, control units are connected
with 2 communication lines (CAN-H, CAN-L) allowing a high rate of information transmission with less wiring.
Each control unit transmits/receives data but selectively reads the required data only.
CAN communication signal chart. Refer to LAN-28, "
CAN COMMUNICATION SYSTEM : CAN Communica-
tion Signal Chart".
ITS COMMUNICATION
ITS communication is a multiplex communication syste m. This enables the system to transmit and receive
large quantities of data at high speed by connec ting control units with 2 communication lines.
ITS communication lines adopt twisted-pair line st yle (two lines twisted) for noise immunity.
SIDE RADAR LH : DTC LogicINFOID:0000000006223906
DTC DETECTION LOGIC
SIDE RADAR LH : Diagnosis ProcedureINFOID:0000000006223907
1.PERFORM THE SELF-DIAGNOSIS
1. Start the engine.
2. Turn the BSW system ON, and then wait for 2 seconds or more.
3. Perform “All DTC Readi ng” with CONSULT-III.
4. Check if the “U1000” is detected as the current malfunction in “Self Diagnostic Result” of “SIDE RADAR
LEFT”.
Is
“U1000” detected as the current malfunction?
YES >> Refer to LAN-18, "Trouble Diagnosis Flow Chart".
NO >> Refer to GI-40, "
Intermittent Incident".
SIDE RADAR RH
SIDE RADAR RH : DescriptionINFOID:0000000006223908
CAN COMMUNICATION
CAN (Controller Area Network) is a serial communication line for real time applications. It is an on-vehicle mul-
tiplex communication line with high data communicati on speed and excellent error detection ability. Modern
vehicle is equipped with many electronic control units , and each control unit shares information and links with
other control units during operation (not independent). In CAN communication, control units are connected
with 2 communication lines (CAN-H, CAN-L) allowing a high rate of information transmission with less wiring.
Each control unit transmits/receives data but selectively reads the required data only.
CAN communication signal chart. Refer to LAN-28, "
CAN COMMUNICATION SYSTEM : CAN Communica-
tion Signal Chart".
ITS COMMUNICATION
ITS communication is a multiplex communication syste m. This enables the system to transmit and receive
large quantities of data at high speed by connec ting control units with 2 communication lines.
ITS communication lines adopt twisted-pair line st yle (two lines twisted) for noise immunity.
DTC Trouble diagnosis name DTC detecting condition Possible causes
U1000 CAN COMM CIRCUIT If Side radar LH is not transmitting or receiving ITS
communication signal for 2 seconds or more ITS communication system
Revision: 2010 May2011 QX56
Page 1451 of 5598
![INFINITI QX56 2011 Factory Service Manual
DAS-486
< DTC/CIRCUIT DIAGNOSIS >[BSW]
U1000 CAN COMM CIRCUIT
SIDE RADAR RH : DTC Logic
INFOID:0000000006223909
DTC DETECTION LOGIC
SIDE RADAR RH : Diagnosis ProcedureINFOID:0000000006223910
1.PERFOR INFINITI QX56 2011 Factory Service Manual
DAS-486
< DTC/CIRCUIT DIAGNOSIS >[BSW]
U1000 CAN COMM CIRCUIT
SIDE RADAR RH : DTC Logic
INFOID:0000000006223909
DTC DETECTION LOGIC
SIDE RADAR RH : Diagnosis ProcedureINFOID:0000000006223910
1.PERFOR](/manual-img/42/57033/w960_57033-1450.png)
DAS-486
< DTC/CIRCUIT DIAGNOSIS >[BSW]
U1000 CAN COMM CIRCUIT
SIDE RADAR RH : DTC Logic
INFOID:0000000006223909
DTC DETECTION LOGIC
SIDE RADAR RH : Diagnosis ProcedureINFOID:0000000006223910
1.PERFORM THE SELF-DIAGNOSIS
1. Start the engine.
2. Turn the BSW system ON, and then wait for 2 seconds or more.
3. Perform “All DTC Reading” with CONSULT-III.
4. Check if the “U1000” is detected as the current ma lfunction in “Self Diagnostic Result” of “SIDE RADAR
RIGHT”.
Is
“U1000” detected as the current malfunction?
YES >> Refer to LAN-18, "Trouble Diagnosis Flow Chart".
NO >> Refer to GI-40, "
Intermittent Incident".
ADAS CONTROL UNIT
ADAS CONTROL UNIT : DescriptionINFOID:0000000006223911
CAN COMMUNICATION
CAN (Controller Area Network) is a serial communication line for real time applications. It is an on-vehicle mul-
tiplex communication line with high data communication speed and excellent error detection ability. Modern
vehicle is equipped with many electronic control units , and each control unit shares information and links with
other control units during operation (not independent). In CAN communication, control units are connected
with 2 communication lines (CAN-H, CAN-L) allowing a hi gh rate of information transmission with less wiring.
Each control unit transmits/receives data but selectively reads the required data only.
CAN communication signal chart. Refer to LAN-28, "
CAN COMMUNICATION SYSTEM : CAN Communica-
tion Signal Chart".
ITS COMMUNICATION
ITS communication is a multiplex communication system . This enables the system to transmit and receive
large quantities of data at high speed by connecting control units with 2 communication lines.
ITS communication lines adopt twisted-pair line st yle (two lines twisted) for noise immunity.
ADAS CONTROL UNIT : DTC LogicINFOID:0000000006223912
DTC DETECTION LOGIC
NOTE:
If “U1000” is detected, first diagnose the CAN communication system.
ADAS CONTROL UNIT : Diagnosis ProcedureINFOID:0000000006223913
1.PERFORM THE SELF-DIAGNOSIS
1. Turn the ignition switch ON.
2. Turn the BSW system ON, and then wait for 30 seconds or more.
3. Perform “All DTC Reading” with CONSULT-III.
4. Check if the “U1000” is detected as the current ma lfunction in “Self Diagnostic Result” of “ICC/ADAS”.
DTC Trouble diagnosis name DTC detecting condition Possible causes
U1000 CAN COMM CIRCUIT If Side radar RH is not transmitting or receiving
ITS communication signal for 2 seconds or more ITS communication system
DTC
(On board display) Trouble diagnosis name DTC detecting condition Possible causes
U1000 (100) CAN COMM CIRCUIT If ADAS control unit is not transmitting or receiv-
ing CAN communication signal or ITS communi-
cation signal for 2 seconds or more CAN communication system
ITS communication system
Revision: 2010 May2011 QX56
Page 1493 of 5598
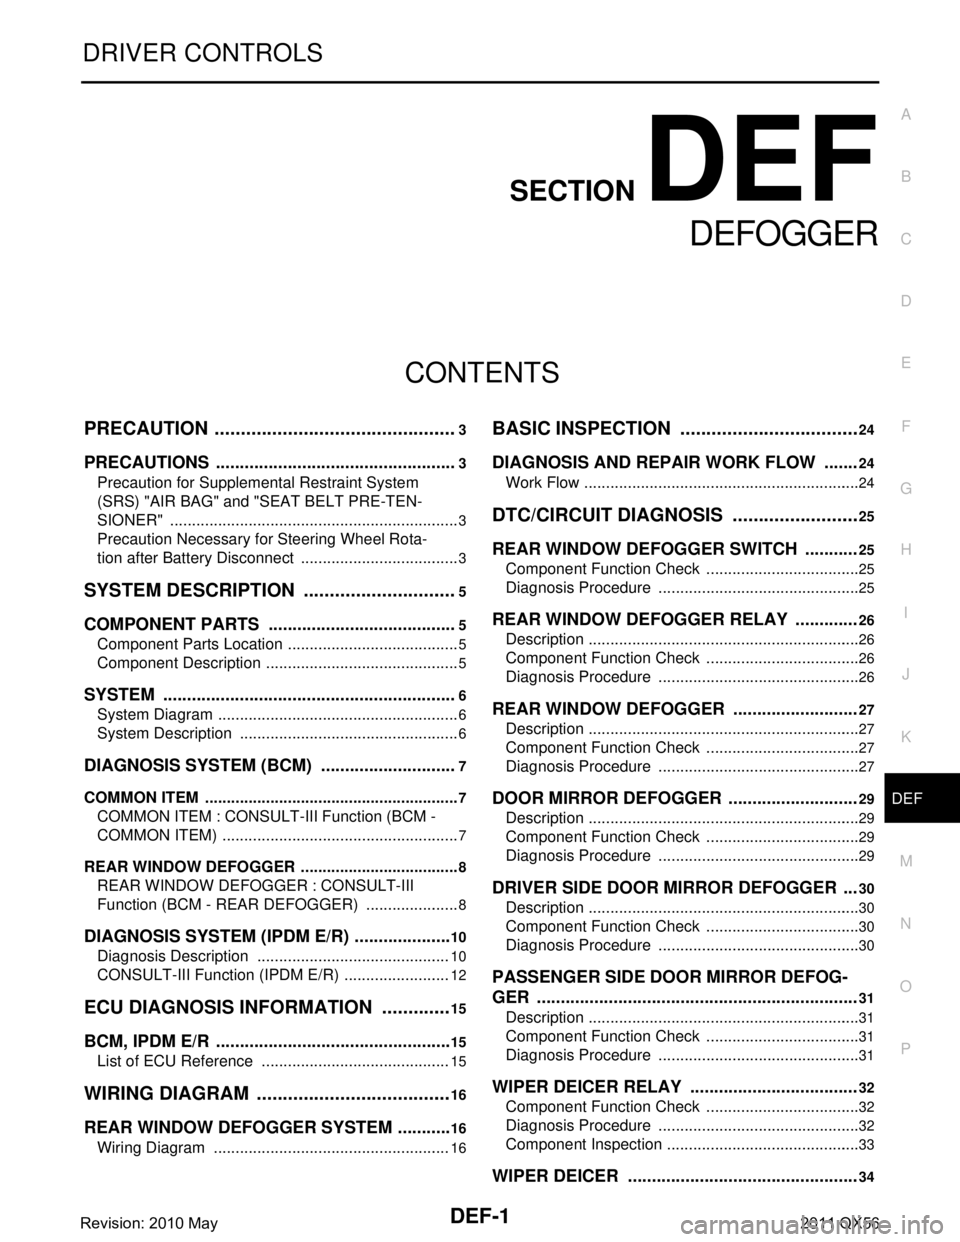
DEF-1
DRIVER CONTROLS
C
DE
F
G H
I
J
K
M
SECTION DEF
A
B
DEF
N
O P
CONTENTS
DEFOGGER
PRECAUTION ................ ...............................3
PRECAUTIONS .............................................. .....3
Precaution for Supplemental Restraint System
(SRS) "AIR BAG" and "SEAT BELT PRE-TEN-
SIONER" ............................................................. ......
3
Precaution Necessary for Steering Wheel Rota-
tion after Battery Disconnect .....................................
3
SYSTEM DESCRIPTION ..............................5
COMPONENT PARTS ................................... .....5
Component Parts Location .................................. ......5
Component Description .............................................5
SYSTEM ..............................................................6
System Diagram .................................................. ......6
System Description ...................................................6
DIAGNOSIS SYSTEM (BCM) .............................7
COMMON ITEM ..................................................... ......7
COMMON ITEM : CONSULT-III Function (BCM -
COMMON ITEM) .......................................................
7
REAR WINDOW DEFOGGER ............................... ......8
REAR WINDOW DEFOGGER : CONSULT-III
Function (BCM - REAR DEFOGGER) ......................
8
DIAGNOSIS SYSTEM (IPDM E/R) .....................10
Diagnosis Description ......................................... ....10
CONSULT-III Function (IPDM E/R) .........................12
ECU DIAGNOSIS INFORMATION ..............15
BCM, IPDM E/R .............................................. ....15
List of ECU Reference ........................................ ....15
WIRING DIAGRAM ......................................16
REAR WINDOW DEFOGGER SYSTEM ........ ....16
Wiring Diagram ................................................... ....16
BASIC INSPECTION ...................................24
DIAGNOSIS AND REPAIR WORK FLOW .......24
Work Flow ............................................................ ....24
DTC/CIRCUIT DIAGNOSIS .........................25
REAR WINDOW DEFOGGER SWITCH ...........25
Component Function Check ................................ ....25
Diagnosis Procedure ...............................................25
REAR WINDOW DEFOGGER RELAY .............26
Description ...............................................................26
Component Function Check ....................................26
Diagnosis Procedure ...............................................26
REAR WINDOW DEFOGGER ..........................27
Description ...............................................................27
Component Function Check ....................................27
Diagnosis Procedure ...............................................27
DOOR MIRROR DEFOGGER ...........................29
Description ...............................................................29
Component Function Check ....................................29
Diagnosis Procedure ...............................................29
DRIVER SIDE DOOR MIRROR DEFOGGER ...30
Description ...............................................................30
Component Function Check ....................................30
Diagnosis Procedure ...............................................30
PASSENGER SIDE DOOR MIRROR DEFOG-
GER ...................................................................
31
Description ...............................................................31
Component Function Check ....................................31
Diagnosis Procedure ...............................................31
WIPER DEICER RELAY ...................................32
Component Function Check ....................................32
Diagnosis Procedure ...............................................32
Component Inspection .............................................33
WIPER DEICER ................................................34
Revision: 2010 May2011 QX56
Page 1495 of 5598
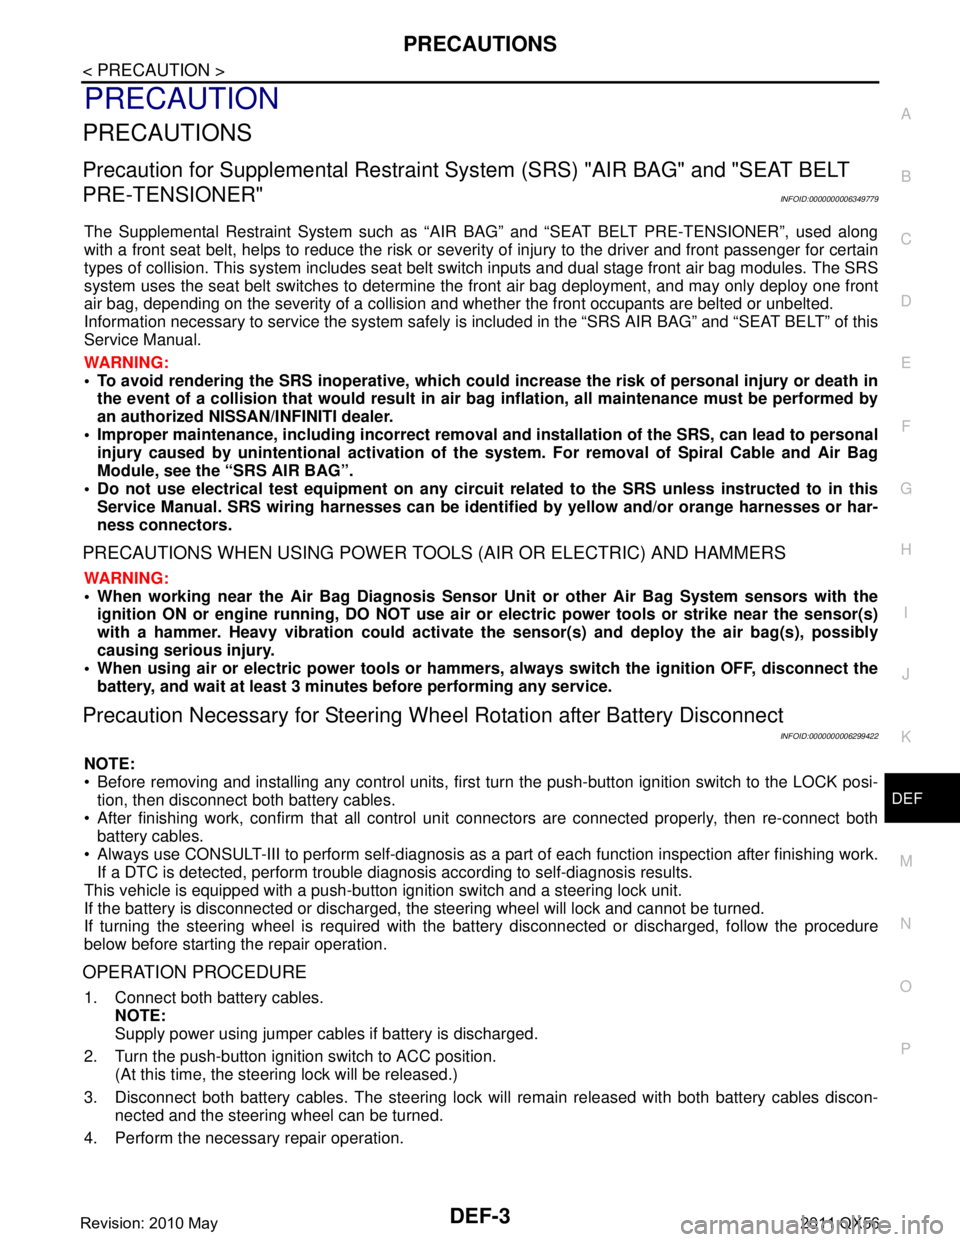
PRECAUTIONSDEF-3
< PRECAUTION >
C
DE
F
G H
I
J
K
M A
B
DEF
N
O P
PRECAUTION
PRECAUTIONS
Precaution for Supplemental Restraint System (SRS) "AIR BAG" and "SEAT BELT
PRE-TENSIONER"
INFOID:0000000006349779
The Supplemental Restraint System such as “A IR BAG” and “SEAT BELT PRE-TENSIONER”, used along
with a front seat belt, helps to reduce the risk or severi ty of injury to the driver and front passenger for certain
types of collision. This system includes seat belt switch inputs and dual stage front air bag modules. The SRS
system uses the seat belt switches to determine the front air bag deployment, and may only deploy one front
air bag, depending on the severity of a collision and whether the front occupants are belted or unbelted.
Information necessary to service the system safely is included in the “SRS AIR BAG” and “SEAT BELT” of this
Service Manual.
WARNING:
• To avoid rendering the SRS inoper ative, which could increase the risk of personal injury or death in
the event of a collision that would result in air ba g inflation, all maintenance must be performed by
an authorized NISSAN/INFINITI dealer.
Improper maintenance, including in correct removal and installation of the SRS, can lead to personal
injury caused by unintentional act ivation of the system. For removal of Spiral Cable and Air Bag
Module, see the “SRS AIR BAG”.
Do not use electrical test equipm ent on any circuit related to the SRS unless instructed to in this
Service Manual. SRS wiring harnesses can be identi fied by yellow and/or orange harnesses or har-
ness connectors.
PRECAUTIONS WHEN USING POWER TOOLS (AIR OR ELECTRIC) AND HAMMERS
WARNING:
When working near the Air Bag Diagnosis Sensor Unit or other Air Bag System sensors with the
ignition ON or engine running, DO NOT use air or electric power tools or strike near the sensor(s)
with a hammer. Heavy vibration could activate the sensor(s) and deploy the air bag(s), possibly
causing serious injury.
When using air or electric power tools or hammers , always switch the ignition OFF, disconnect the
battery, and wait at least 3 minutes before performing any service.
Precaution Necessary for Steering Wh eel Rotation after Battery Disconnect
INFOID:0000000006299422
NOTE:
Before removing and installing any control units, first tu rn the push-button ignition switch to the LOCK posi-
tion, then disconnect both battery cables.
After finishing work, confirm that all control unit connectors are connected properly, then re-connect both
battery cables.
Always use CONSULT-III to perform self-diagnosis as a part of each function inspection after finishing work.
If a DTC is detected, perform trouble diagnos is according to self-diagnosis results.
This vehicle is equipped with a push-button ignition switch and a steering lock unit.
If the battery is disconnect ed or discharged, the steering wheel will lock and cannot be turned.
If turning the steering wheel is required with the battery disconnected or discharged, follow the procedure
below before starting the repair operation.
OPERATION PROCEDURE
1. Connect both battery cables. NOTE:
Supply power using jumper cables if battery is discharged.
2. Turn the push-button ignition switch to ACC position. (At this time, the steering lock will be released.)
3. Disconnect both battery cables. The steering lock wil l remain released with both battery cables discon-
nected and the steering wheel can be turned.
4. Perform the necessary repair operation.
Revision: 2010 May2011 QX56
Page 1508 of 5598
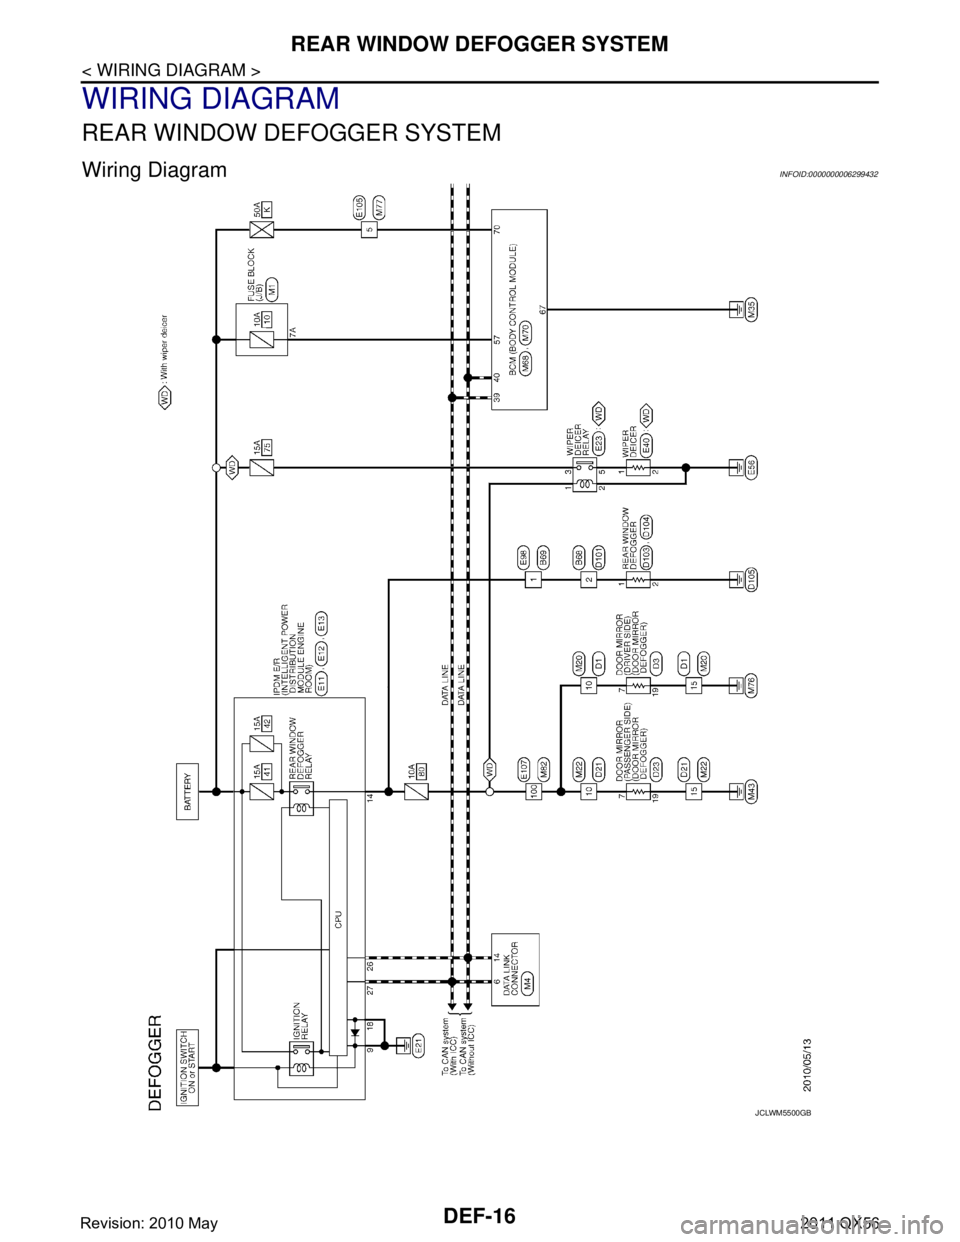
DEF-16
< WIRING DIAGRAM >
REAR WINDOW DEFOGGER SYSTEM
WIRING DIAGRAM
REAR WINDOW DEFOGGER SYSTEM
Wiring DiagramINFOID:0000000006299432
JCLWM5500GB
Revision: 2010 May2011 QX56
Page 1509 of 5598
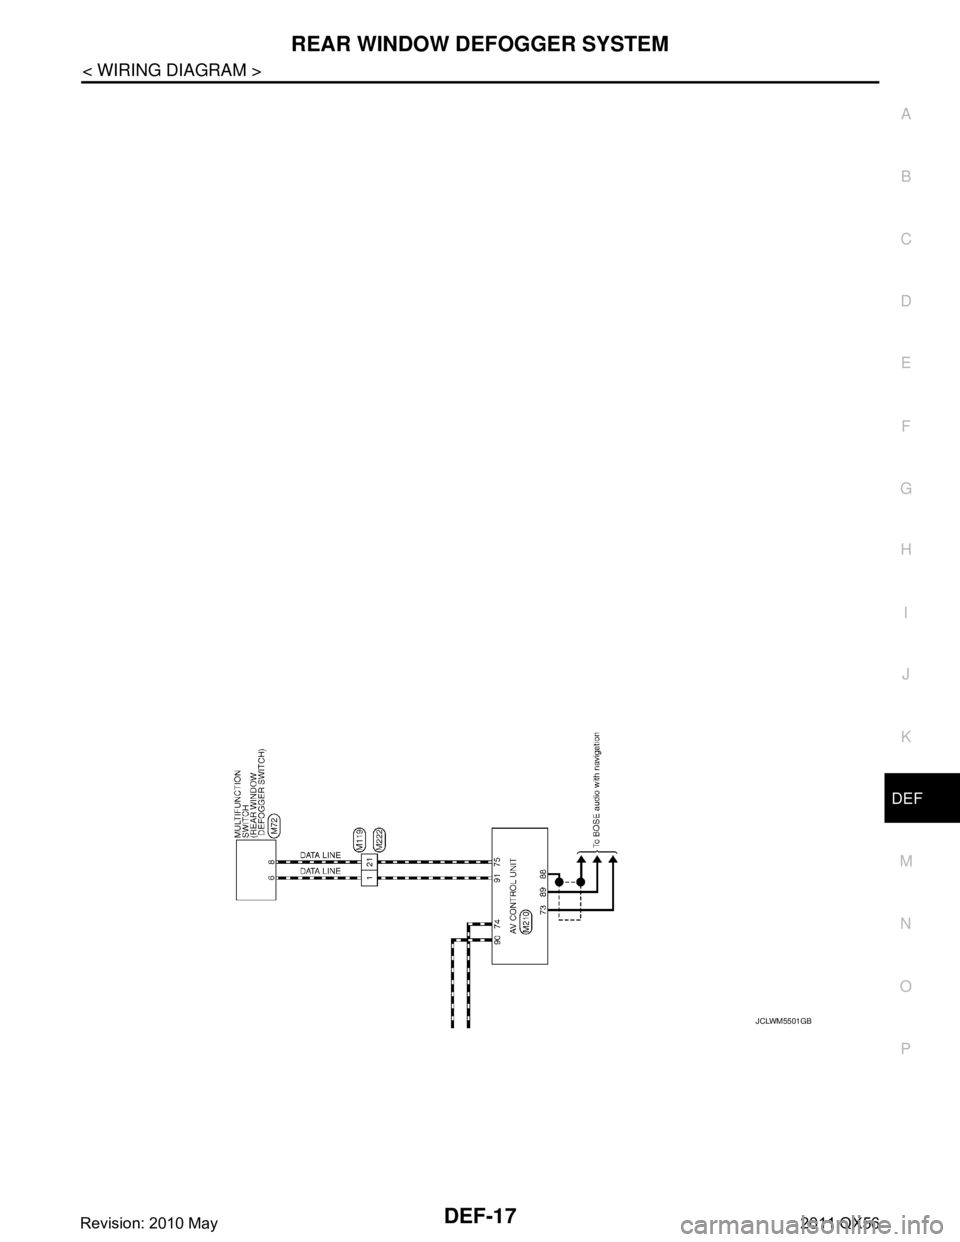
REAR WINDOW DEFOGGER SYSTEMDEF-17
< WIRING DIAGRAM >
C
DE
F
G H
I
J
K
M A
B
DEF
N
O P
JCLWM5501GB
Revision: 2010 May2011 QX56
Page 1510 of 5598
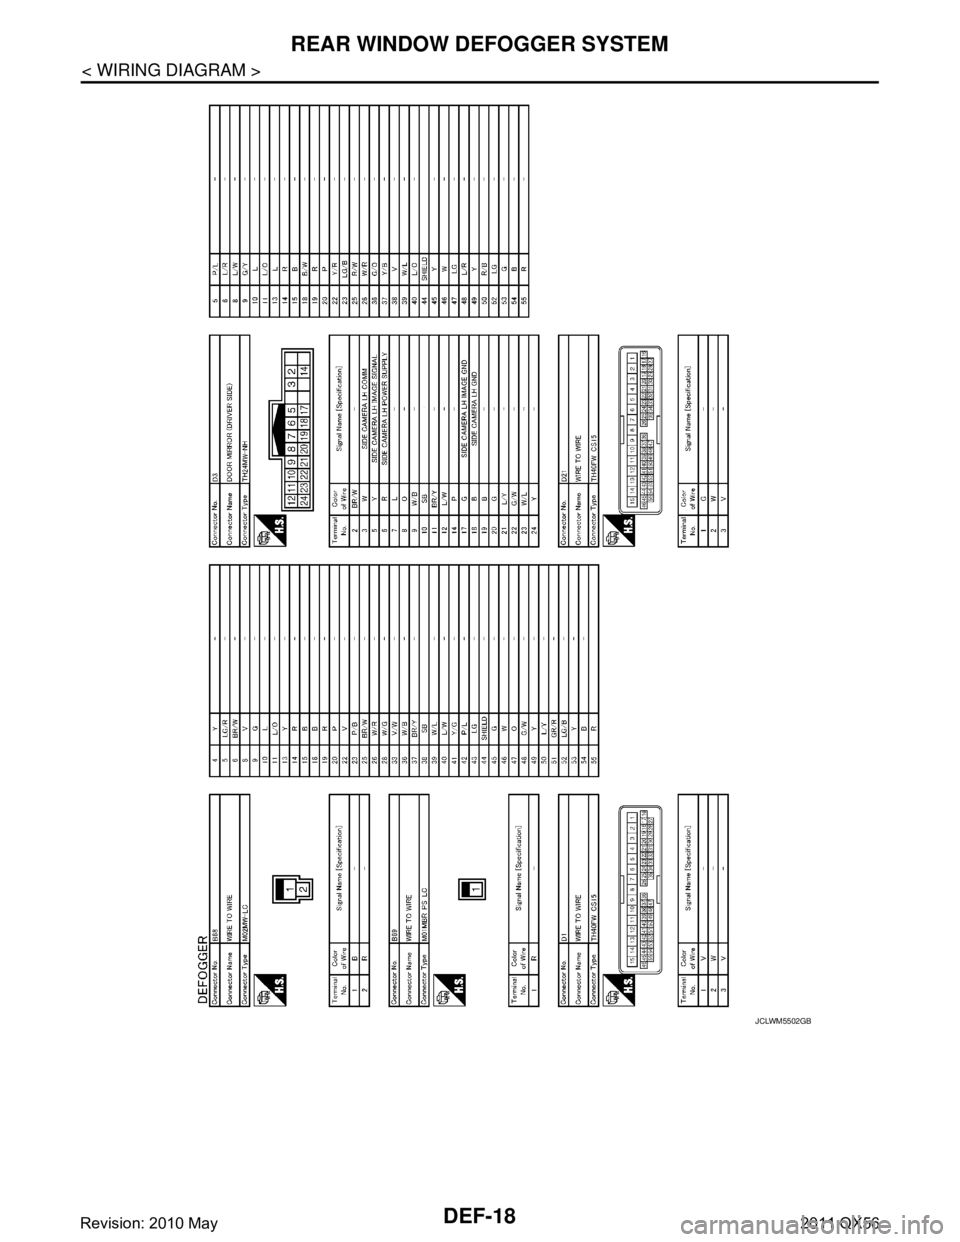
DEF-18
< WIRING DIAGRAM >
REAR WINDOW DEFOGGER SYSTEM
JCLWM5502GB
Revision: 2010 May2011 QX56