Page 4572 of 5598
FRONT SEATSE-113
< REMOVAL AND INSTALLATION >
C
DE
F
G H
I
K L
M A
B
SE
N
O P
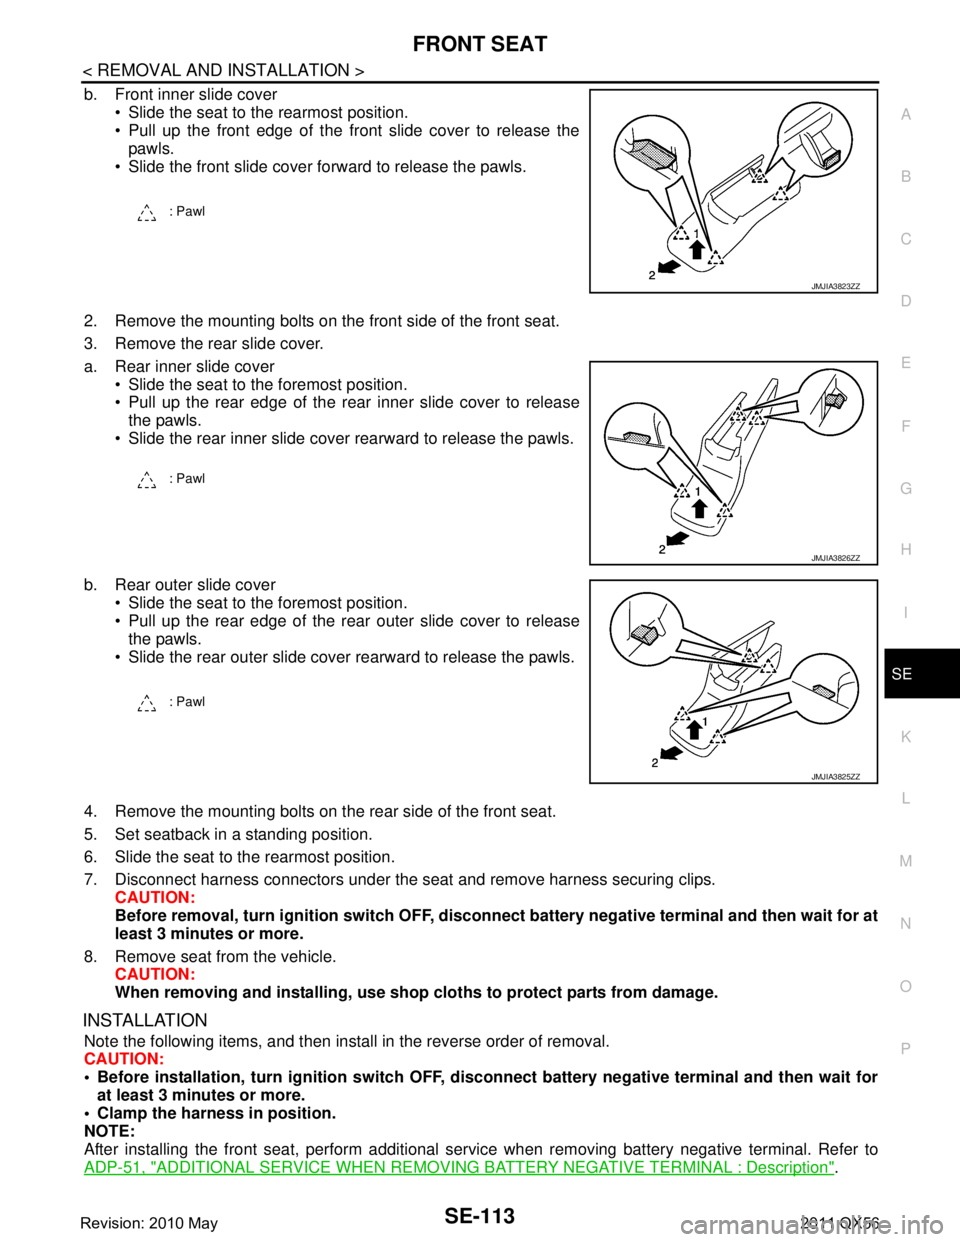
b. Front inner slide cover Slide the seat to the rearmost position.
Pull up the front edge of the front slide cover to release thepawls.
Slide the front slide cover forward to release the pawls.
2. Remove the mounting bolts on the front side of the front seat.
3. Remove the rear slide cover.
a. Rear inner slide cover Slide the seat to the foremost position.
Pull up the rear edge of the rear inner slide cover to releasethe pawls.
Slide the rear inner slide cover rearward to release the pawls.
b. Rear outer slide cover Slide the seat to the foremost position.
Pull up the rear edge of the rear outer slide cover to releasethe pawls.
Slide the rear outer slide cover rearward to release the pawls.
4. Remove the mounting bolts on t he rear side of the front seat.
5. Set seatback in a standing position.
6. Slide the seat to the rearmost position.
7. Disconnect harness connectors under the seat and remove harness securing clips. CAUTION:
Before removal, turn ignition sw itch OFF, disconnect battery negative terminal and then wait for at
least 3 minutes or more.
8. Remove seat from the vehicle. CAUTION:
When removing and installing, use shop cloths to protect parts from damage.
INSTALLATION
Note the following items, and then install in the reverse order of removal.
CAUTION:
Before installation, turn ignition switch OFF, disconnect battery ne gative terminal and then wait for
at least 3 minutes or more.
Clamp the harness in position.
NOTE:
After installing the front seat, perform additional serv ice when removing battery negative terminal. Refer to
ADP-51, "
ADDITIONAL SERVICE WHEN REMOVING BATTERY NEGATIVE TERMINAL : Description".
: Pawl
JMJIA3823ZZ
: Pawl
JMJIA3826ZZ
: Pawl
JMJIA3825ZZ
Revision: 2010 May2011 QX56
Page 4574 of 5598
FRONT SEATSE-115
< REMOVAL AND INSTALLATION >
C
DE
F
G H
I
K L
M A
B
SE
N
O P
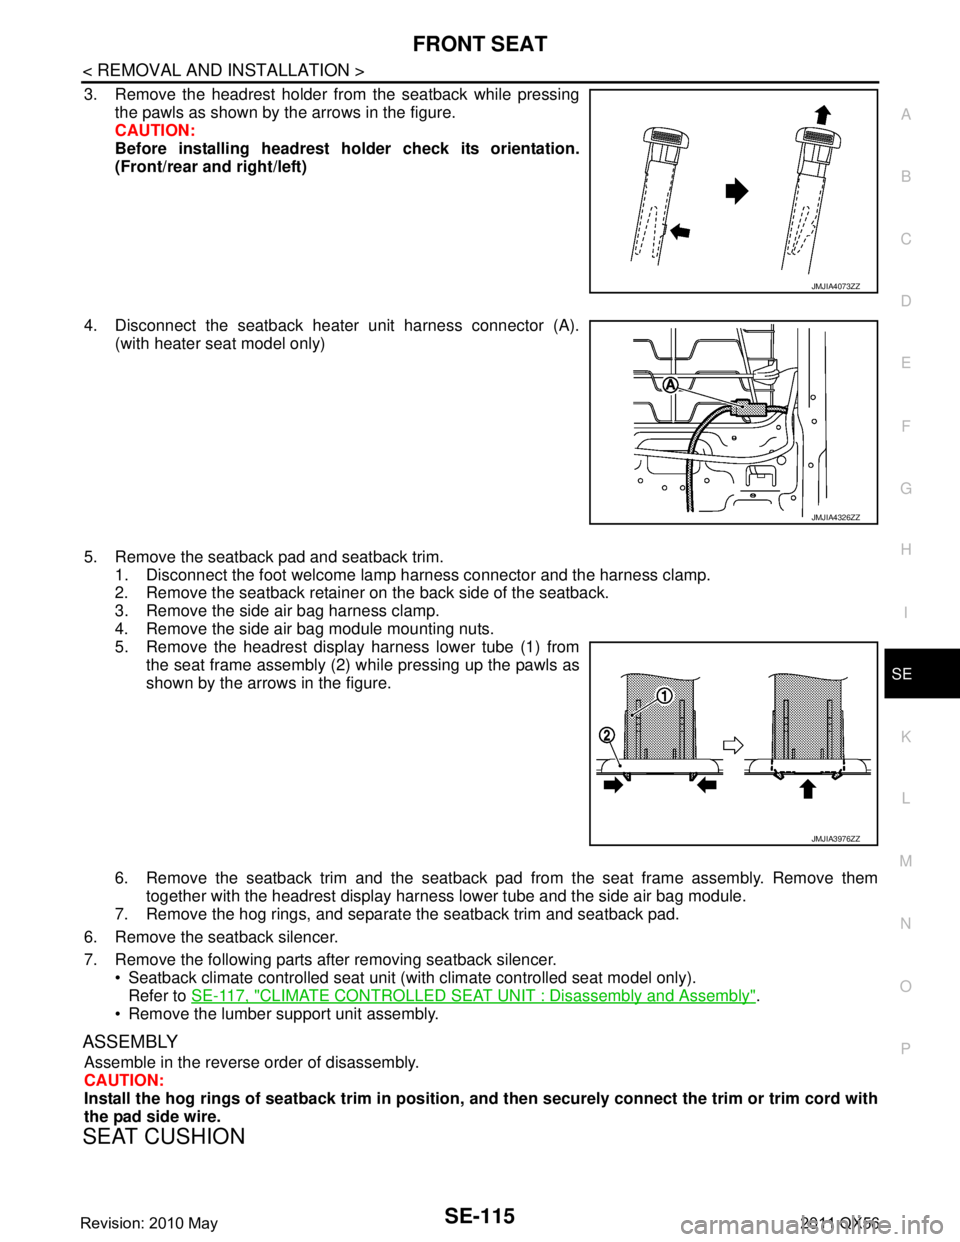
3. Remove the headrest holder from the seatback while pressing the pawls as shown by the arrows in the figure.
CAUTION:
Before installing headrest holder check its orientation.
(Front/rear and right/left)
4. Disconnect the seatback heater unit harness connector (A). (with heater seat model only)
5. Remove the seatback pad and seatback trim. 1. Disconnect the foot welcome lamp harness connector and the harness clamp.
2. Remove the seatback retainer on the back side of the seatback.
3. Remove the side air bag harness clamp.
4. Remove the side air bag module mounting nuts.
5. Remove the headrest display harness lower tube (1) from
the seat frame assembly (2) while pressing up the pawls as
shown by the arrows in the figure.
6. Remove the seatback trim and the seatback pad from the seat frame assembly. Remove them
together with the headrest display harness lower tube and the side air bag module.
7. Remove the hog rings, and separate the seatback trim and seatback pad.
6. Remove the seatback silencer.
7. Remove the following parts after removing seatback silencer. Seatback climate controlled seat unit (wit h climate controlled seat model only).
Refer to SE-117, "
CLIMATE CONTROLLED SEAT UNIT : Disassembly and Assembly".
Remove the lumber support unit assembly.
ASSEMBLY
Assemble in the reverse order of disassembly.
CAUTION:
Install the hog rings of seatback trim in position, and then securely connect the trim or trim cord with
the pad side wire.
SEAT CUSHION
JMJIA4073ZZ
JMJIA4326ZZ
JMJIA3976ZZ
Revision: 2010 May2011 QX56
Page 4576 of 5598
FRONT SEATSE-117
< REMOVAL AND INSTALLATION >
C
DE
F
G H
I
K L
M A
B
SE
N
O P
ASSEMBLY
Assemble in the reverse order of disassembly.
CAUTION:
Install the hog rings of seat cushion trim in positi on, and then securely connect the trim or trim cord
with the pad side wire.
CLIMATE CONTROLLED SEAT UNIT
CLIMATE CONTROLLED SEAT UNI T : Disassembly and AssemblyINFOID:0000000006217427
DISASSEMBLY
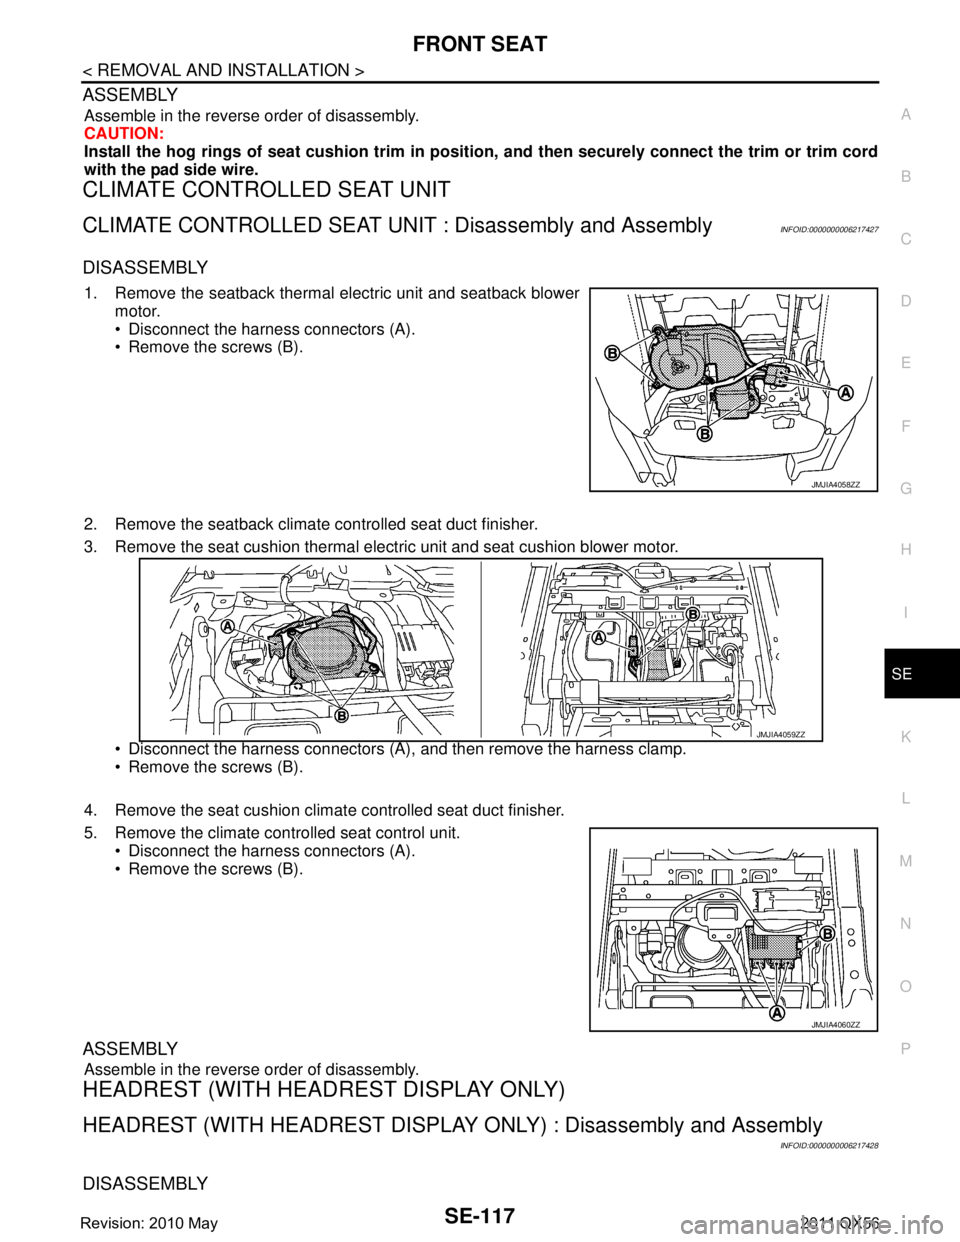
1. Remove the seatback thermal electric unit and seatback blower
motor.
Disconnect the harness connectors (A).
Remove the screws (B).
2. Remove the seatback climate controlled seat duct finisher.
3. Remove the seat cushion thermal electric unit and seat cushion blower motor.
Disconnect the harness connectors (A), and then remove the harness clamp.
Remove the screws (B).
4. Remove the seat cushion climat e controlled seat duct finisher.
5. Remove the climate controlled seat control unit. Disconnect the harness connectors (A).
Remove the screws (B).
ASSEMBLY
Assemble in the reverse order of disassembly.
HEADREST (WITH HEAD REST DISPLAY ONLY)
HEADREST (WITH HEADREST DISPLAY ONLY) : Disassembly and Assembly
INFOID:0000000006217428
DISASSEMBLY
JMJIA4058ZZ
JMJIA4059ZZ
JMJIA4060ZZ
Revision: 2010 May2011 QX56
Page 4578 of 5598
FRONT SEATSE-119
< REMOVAL AND INSTALLATION >
C
DE
F
G H
I
K L
M A
B
SE
N
O P
4. Pull downward and remove headrest display escutcheon (1) and headrest display unit (2) by pulling them out and remov-
ing pins on upper side of display.
5. Disconnect inner harness connector.
6. Remove headrest display escutcheon from headrest display unit. Press headrest display escutcheon to the headrest display unit side. Disconnect pawls on upper side
and remove headrest display escutcheon.
4. Remove the headrest display harness upper tube from headrest trim.
5. Remove the headrest trim from headrest pad and frame.
ASSEMBLY
Assembly in the reverse order of disassembly.
JMJIA4233ZZ
Revision: 2010 May2011 QX56
Page 4584 of 5598
SECOND SEATSE-125
< REMOVAL AND INSTALLATION >
C
DE
F
G H
I
K L
M A
B
SE
N
O P
Removal and InstallationINFOID:0000000006217430
REMOVAL
CAUTION:
When removing and installing, use shop cloths to protect parts from damage.
When removing and installing, 2 workers ar e required so as to prevent it from dropping.
1. Remove the headrest.
2. Remove the seat hinge cover.
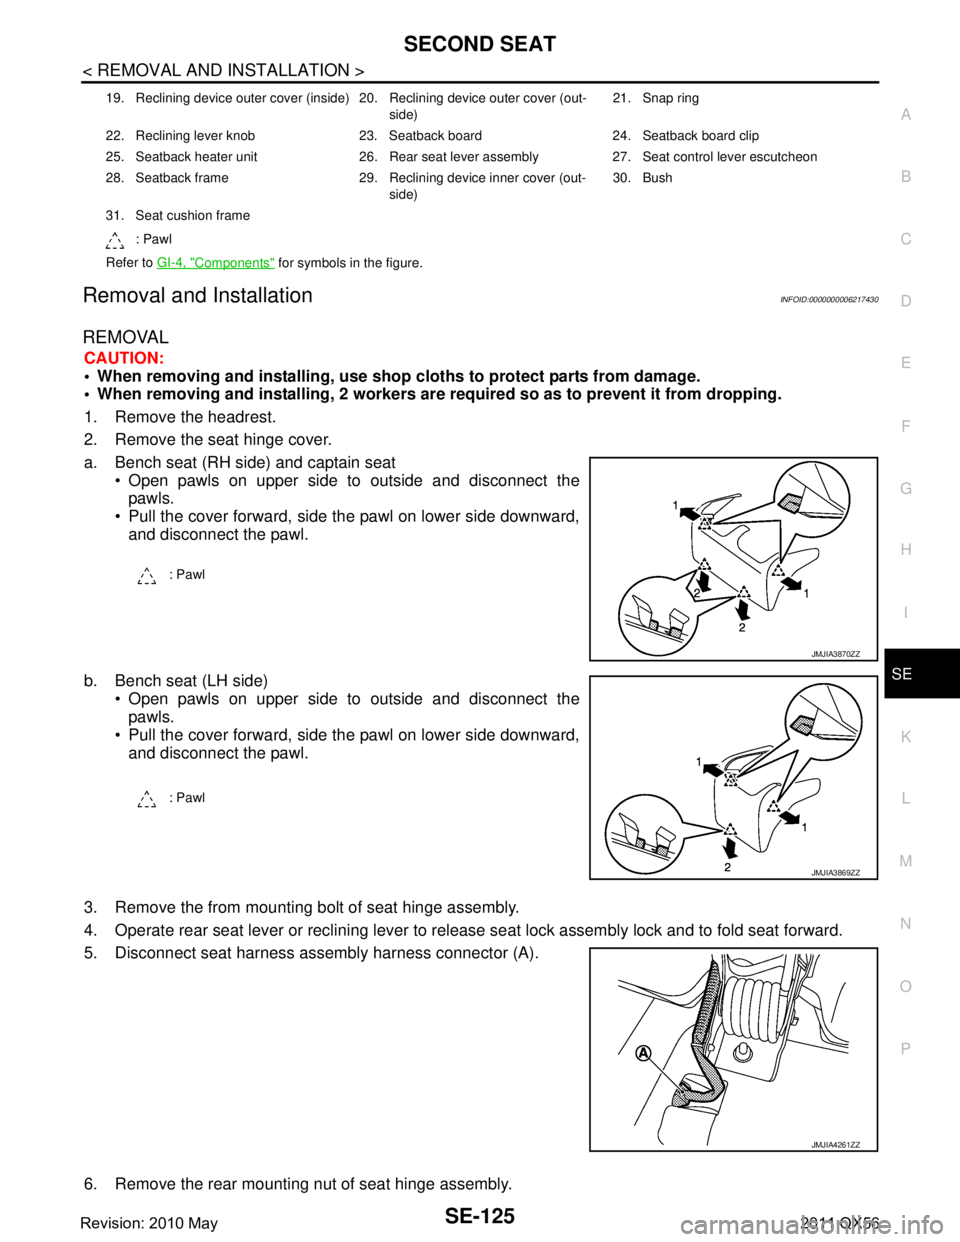
a. Bench seat (RH side) and captain seat Open pawls on upper side to outside and disconnect thepawls.
Pull the cover forward, side the pawl on lower side downward, and disconnect the pawl.
b. Bench seat (LH side) Open pawls on upper side to outside and disconnect thepawls.
Pull the cover forward, side the pawl on lower side downward,
and disconnect the pawl.
3. Remove the from mounting bolt of seat hinge assembly.
4. Operate rear seat lever or reclining lever to releas e seat lock assembly lock and to fold seat forward.
5. Disconnect seat harness assembly harness connector (A).
6. Remove the rear mounting nut of seat hinge assembly.
19. Reclining device outer cover (inside) 20. Reclining device outer cover (out- side)21. Snap ring
22. Reclining lever knob 23. Seatback board 24. Seatback board clip
25. Seatback heater unit 26. Rear seat lever assembly 27. Seat control lever escutcheon
28. Seatback frame 29. Reclining device inner cover (out- side)30. Bush
31. Seat cushion frame : Pawl
Refer to GI-4, "
Components" for symbols in the figure.
: Pawl
JMJIA3870ZZ
: Pawl
JMJIA3869ZZ
JMJIA4261ZZ
Revision: 2010 May2011 QX56
Page 4586 of 5598
SECOND SEATSE-127
< REMOVAL AND INSTALLATION >
C
DE
F
G H
I
K L
M A
B
SE
N
O P
(heater seat model only)
5. Remove the rear seat lever assembly. 1. Remove the rear seat lever assembly fixing screws.
2. Lift rear seat lever assembly and remove seatback control wire.
6. Remove the seatback center finisher. 1. Pull seatback center finisher cover rearward to remove.
2. Remove the seatback center finisher fixing screws.
3. Remove the seat belt from seatback center finisher.
7. Remove the center seat belt anchor. 1. Remove the seat cushion and seat cushion under cover.
Refer to SE-130, "
SEAT CUSHION : Disassembly and Assembly".
2. Remove the center seat belt anchor. Refer to SB-13, "
SEAT BELT RETRACTOR : Removal and Installation".
8. Remove the seatback trim and seatback pad. 1. Remove the headrest holder. CAUTION:
Before installing headrest holder check its orientation.
(front/rear and right/left)
JMJIA4471ZZ
: Pawl
JMJIA3877ZZ
PIIB4084J
Revision: 2010 May2011 QX56
Page 4588 of 5598

SECOND SEATSE-129
< REMOVAL AND INSTALLATION >
C
DE
F
G H
I
K L
M A
B
SE
N
O P
1. Slide and align the clips (B) to the holes on the seatback as shown in the figure, and then remove the seatback board
(A).
2. Remove the clips after removing the seatback board.
3. Disconnect the seatback heater unit harness connector (A).
(heater seat model only)
4. Remove the rear seat lever assembly. 1. Remove the rear seat lever assembly fixing screws.
2. Lift rear seat lever assembly and remove seatback control wire.
5. Remove the seatback trim and seatback pad. 1. Remove the headrest holder. CAUTION:
Before installing headrest holder check its orientation.
(front/rear and right/left)
2. Roll up seatback trim (2) from backward to forward so that seat control lever escutcheon (1) is visible.
3. Remove the seat control lever escutcheon (1).
4. Remove the seatback trim and seat back pad from the seatback frame.
5. Remove the hog rings, and separate the seatback trim and seatback pad.
6. Remove the seatback frame.
JMJIA4076ZZ
JMJIA4262ZZ
PIIB4084J
: Pawl
JMJIA3878ZZ
Revision: 2010 May2011 QX56
Page 4590 of 5598
SECOND SEATSE-131
< REMOVAL AND INSTALLATION >
C
DE
F
G H
I
K L
M A
B
SE
N
O P
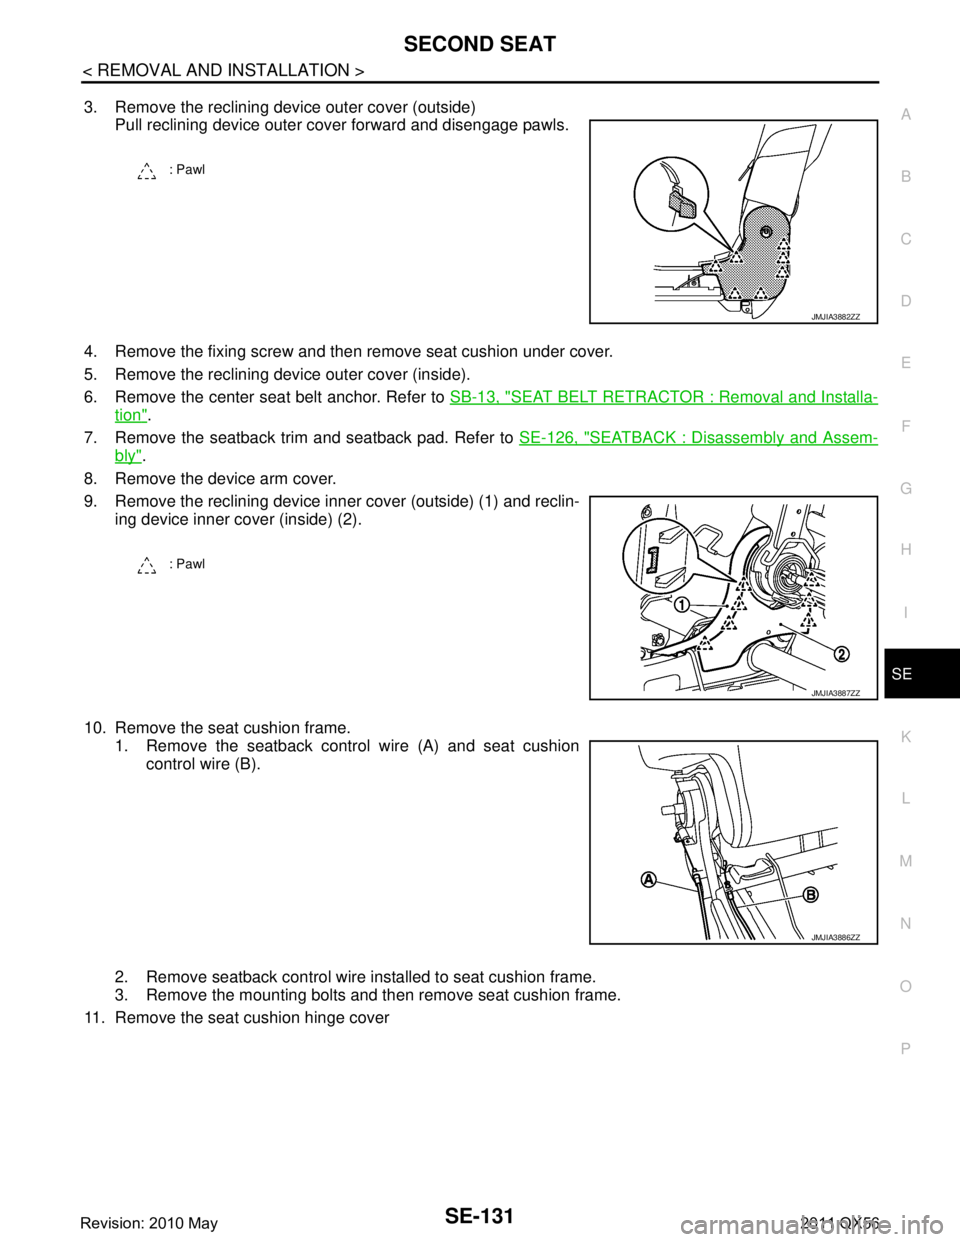
3. Remove the reclining device outer cover (outside) Pull reclining device outer cover forward and disengage pawls.
4. Remove the fixing screw and then remove seat cushion under cover.
5. Remove the reclining device outer cover (inside).
6. Remove the center seat belt anchor. Refer to SB-13, "
SEAT BELT RETRACTOR : Removal and Installa-
tion".
7. Remove the seatback trim and seatback pad. Refer to SE-126, "
SEATBACK : Disassembly and Assem-
bly".
8. Remove the device arm cover.
9. Remove the reclining device inner cover (outside) (1) and reclin- ing device inner cover (inside) (2).
10. Remove the seat cushion frame. 1. Remove the seatback control wire (A) and seat cushion control wire (B).
2. Remove seatback control wire installed to seat cushion frame.
3. Remove the mounting bolts and then remove seat cushion frame.
11. Remove the seat cushion hinge cover
: Pawl
JMJIA3882ZZ
: Pawl
JMJIA3887ZZ
JMJIA3886ZZ
Revision: 2010 May2011 QX56