2011 INFINITI QX56 engine
[x] Cancel search: enginePage 5493 of 5598
C1750, C1751, C1752, C1753 RECEIVER
WT-43
< DTC/CIRCUIT DIAGNOSIS >
C
D F
G H
I
J
K L
M A
B
WT
N
O P
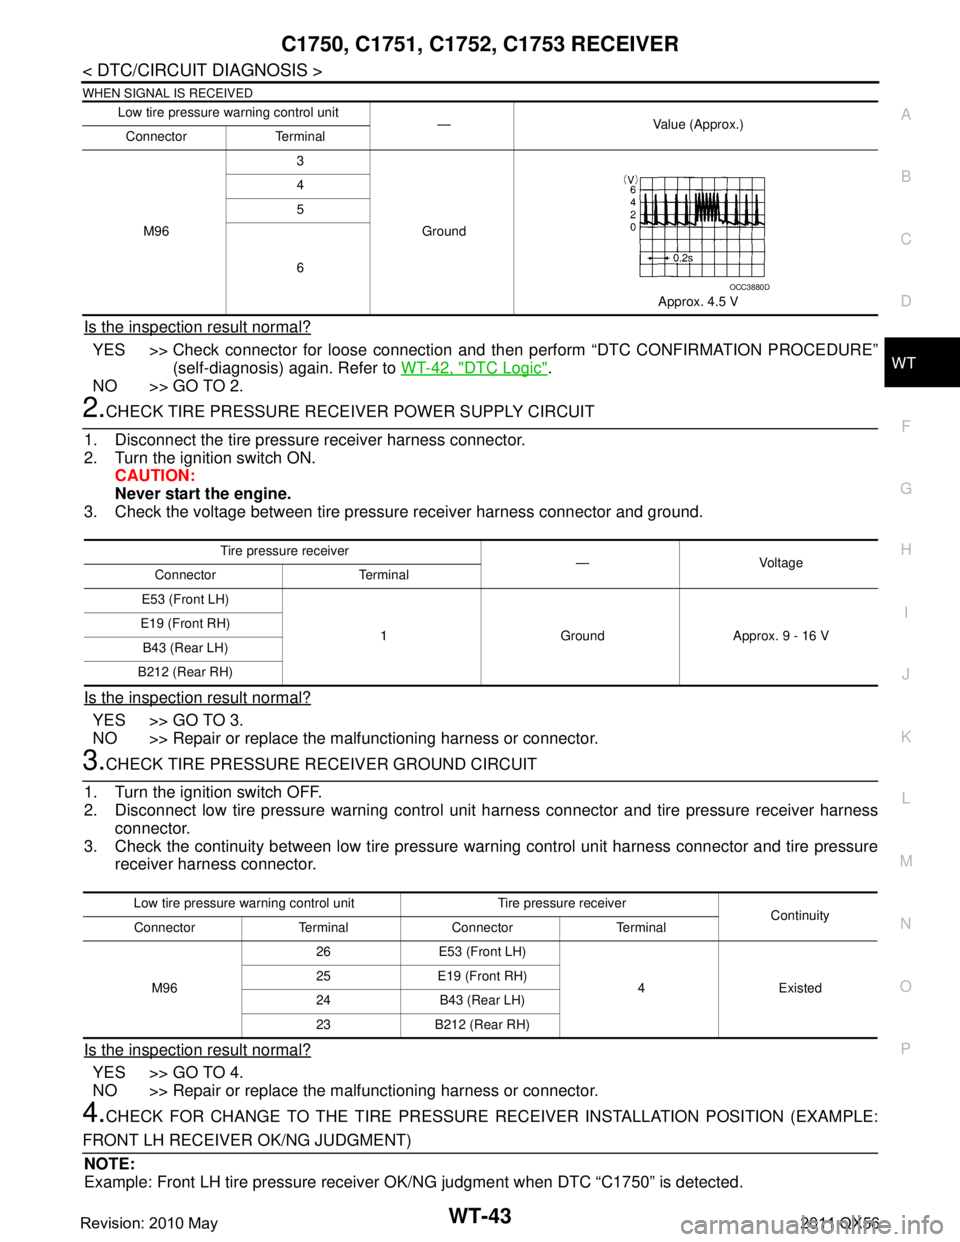
WHEN SIGNAL IS RECEIVED
Is the inspection result normal?
YES >> Check connector for loose connection and t hen perform “DTC CONFIRMATION PROCEDURE”
(self-diagnosis) again. Refer to WT-42, "
DTC Logic".
NO >> GO TO 2.
2.CHECK TIRE PRESSURE RECE IVER POWER SUPPLY CIRCUIT
1. Disconnect the tire pressure receiver harness connector.
2. Turn the ignition switch ON. CAUTION:
Never start the engine.
3. Check the voltage between tire pressure receiver harness connector and ground.
Is the inspection result normal?
YES >> GO TO 3.
NO >> Repair or replace the malfunctioning harness or connector.
3.CHECK TIRE PRESSURE RECEIVER GROUND CIRCUIT
1. Turn the ignition switch OFF.
2. Disconnect low tire pressure warning control unit harness connector and tire pressure receiver harness connector.
3. Check the continuity between low tire pressure warning control unit harness connector and tire pressure
receiver harness connector.
Is the inspection result normal?
YES >> GO TO 4.
NO >> Repair or replace the malfunctioning harness or connector.
4.CHECK FOR CHANGE TO THE TIRE PRESSURE RECEIVER INSTALLATION POSITION (EXAMPLE:
FRONT LH RECEIVER OK/NG JUDGMENT) NOTE:
Example: Front LH tire pressure receiver OK/NG judgment when DTC “C1750” is detected.
Low tire pressure warning control unit
— Value (Approx.)
Connector Terminal
M96 3
Ground
Approx. 4.5 V
4
5
6
OCC3880D
Tire pressu
re receiver
—Voltage
Connector Terminal
E53 (Front LH)
1 Ground Approx. 9 - 16 V
E19 (Front RH)
B43 (Rear LH)
B212 (Rear RH)
Low tire pressure wa rning control unit Tire pressure receiver
Continuity
Connector Terminal Connector Terminal
M96 26 E53 (Front LH)
4 Existed
25 E19 (Front RH)
24 B43 (Rear LH)
23 B212 (Rear RH)
Revision: 2010 May2011 QX56
Page 5501 of 5598
POWER SUPPLY AND GROUND CIRCUITWT-51
< DTC/CIRCUIT DIAGNOSIS >
C
DF
G H
I
J
K L
M A
B
WT
N
O P
POWER SUPPLY AND GROUND CIRCUIT
Diagnosis ProcedureINFOID:0000000006225530
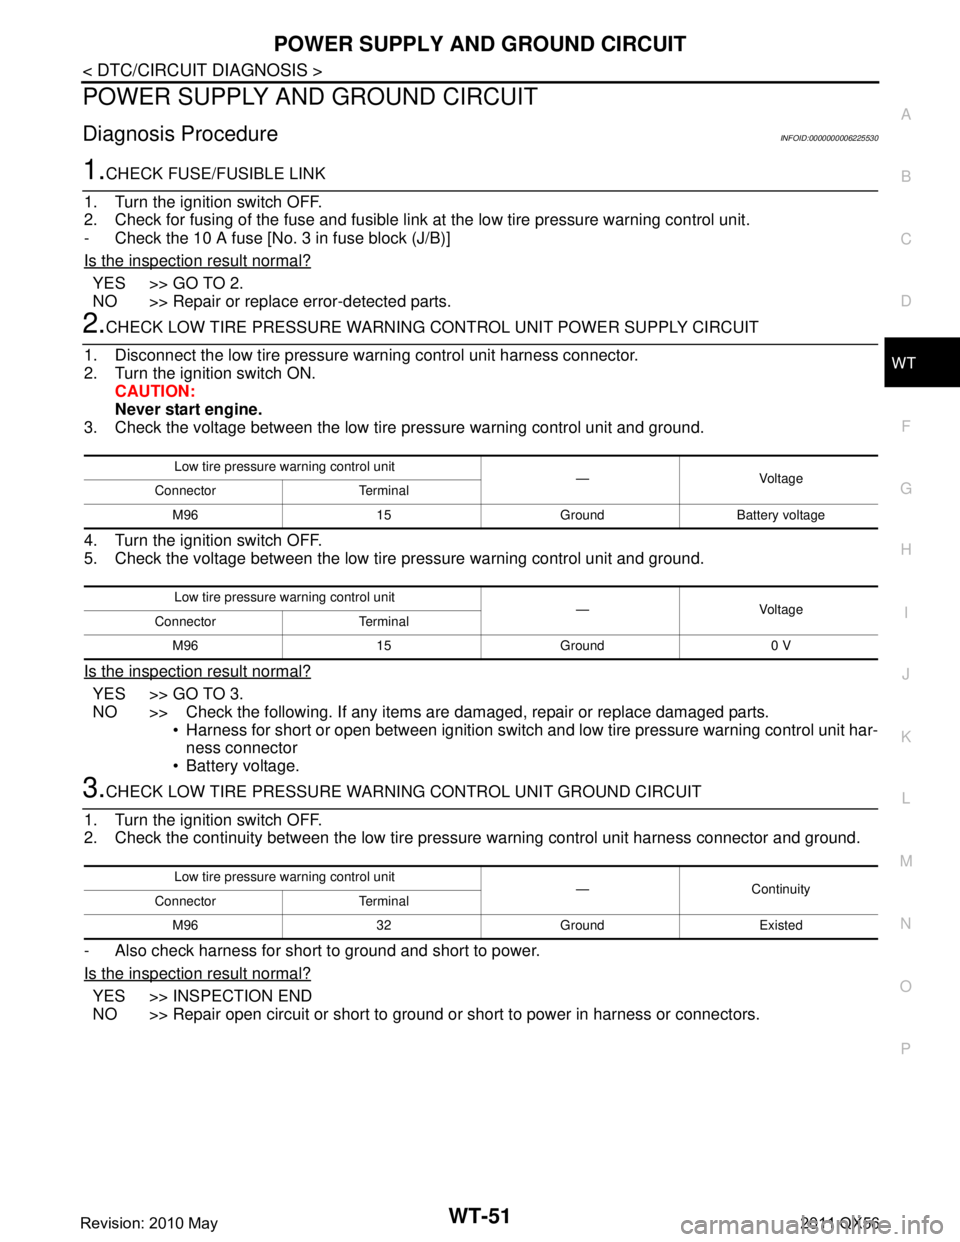
1.CHECK FUSE/FUSIBLE LINK
1. Turn the ignition switch OFF.
2. Check for fusing of the fuse and fusible link at the low tire pressure warning control unit.
- Check the 10 A fuse [No. 3 in fuse block (J/B)]
Is the inspection result normal?
YES >> GO TO 2.
NO >> Repair or replace error-detected parts.
2.CHECK LOW TIRE PRESSURE WARNING CONTROL UNIT POWER SUPPLY CIRCUIT
1. Disconnect the low tire pressure warning control unit harness connector.
2. Turn the ignition switch ON. CAUTION:
Never start engine.
3. Check the voltage between the low tire pressure warning control unit and ground.
4. Turn the ignition switch OFF.
5. Check the voltage between the low tire pressure warning control unit and ground.
Is the inspection result normal?
YES >> GO TO 3.
NO >> Check the following. If any items are damaged, repair or replace damaged parts. Harness for short or open between ignition switch and low tire pressure warning control unit har-ness connector
Battery voltage.
3.CHECK LOW TIRE PRESSURE WARNI NG CONTROL UNIT GROUND CIRCUIT
1. Turn the ignition switch OFF.
2. Check the continuity between the low tire pressure warning control unit harness connector and ground.
- Also check harness for short to ground and short to power.
Is the inspection result normal?
YES >> INSPECTION END
NO >> Repair open circuit or short to ground or short to power in harness or connectors.
Low tire pressure warning control unit —Voltage
Connector Terminal
M96 15 Ground Battery voltage
Low tire pressure warning control unit —Voltage
Connector Terminal
M96 15 Ground 0 V
Low tire pressure warning control unit —Continuity
Connector Terminal
M96 32 Ground Existed
Revision: 2010 May2011 QX56
Page 5502 of 5598
WT-52
< DTC/CIRCUIT DIAGNOSIS >
LOW TIRE PRESSURE WARNING LAMP
LOW TIRE PRESSURE WARNING LAMP
Component Function CheckINFOID:0000000006225531
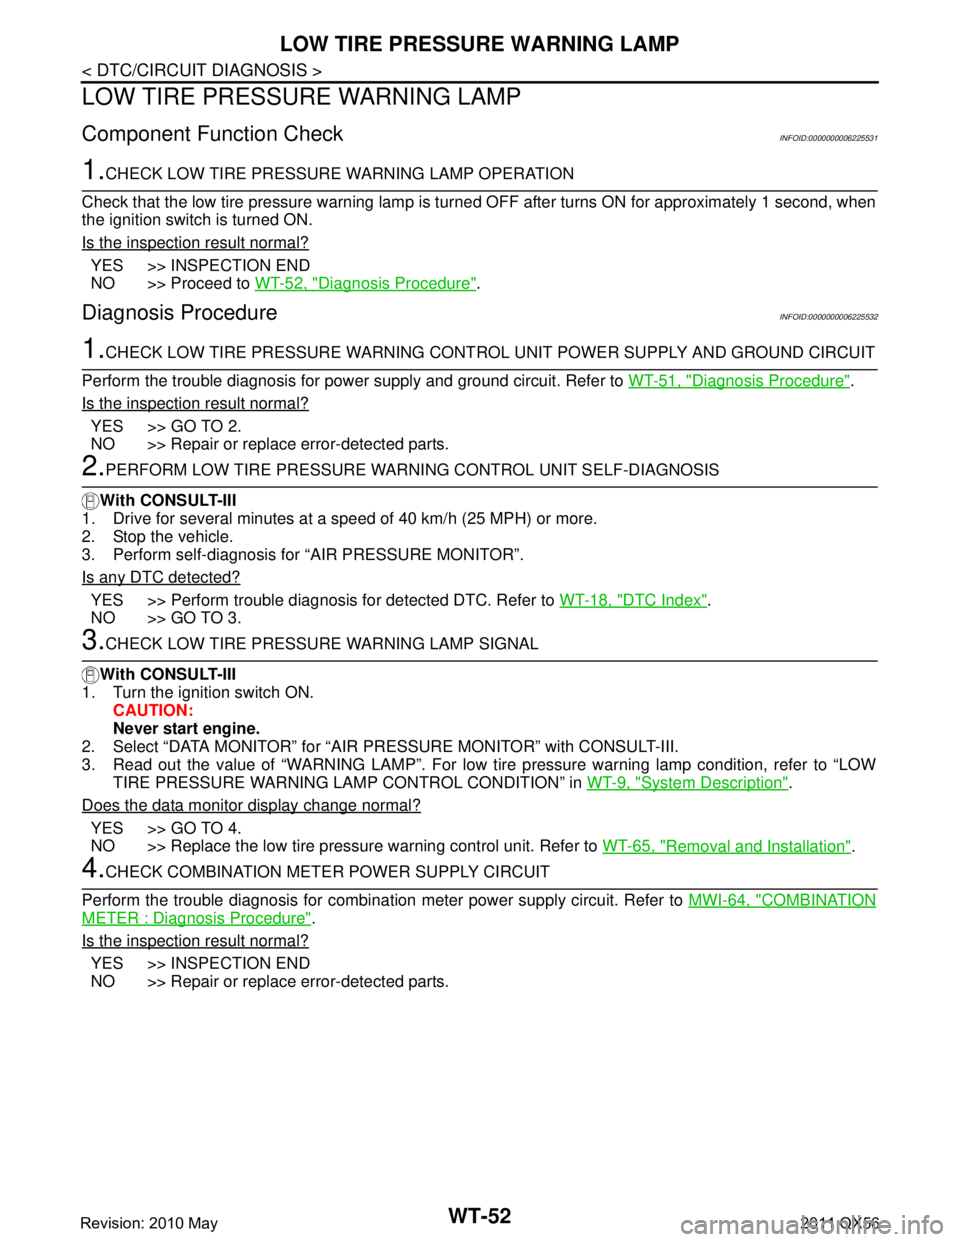
1.CHECK LOW TIRE PRESSURE WARNING LAMP OPERATION
Check that the low tire pressure warning lamp is tu rned OFF after turns ON for approximately 1 second, when
the ignition switch is turned ON.
Is the inspection result normal?
YES >> INSPECTION END
NO >> Proceed to WT-52, "
Diagnosis Procedure".
Diagnosis ProcedureINFOID:0000000006225532
1.CHECK LOW TIRE PRESSURE WARNING CONT ROL UNIT POWER SUPPLY AND GROUND CIRCUIT
Perform the trouble diagnosis for power supply and ground circuit. Refer to WT-51, "
Diagnosis Procedure".
Is the inspection result normal?
YES >> GO TO 2.
NO >> Repair or replace error-detected parts.
2.PERFORM LOW TIRE PRESSURE WARNI NG CONTROL UNIT SELF-DIAGNOSIS
With CONSULT-III
1. Drive for several minutes at a s peed of 40 km/h (25 MPH) or more.
2. Stop the vehicle.
3. Perform self-diagnosis for “AIR PRESSURE MONITOR”.
Is any DTC detected?
YES >> Perform trouble diagnosis for detected DTC. Refer to WT-18, "DTC Index".
NO >> GO TO 3.
3.CHECK LOW TIRE PRESSURE WARNING LAMP SIGNAL
With CONSULT-III
1. Turn the ignition switch ON.
CAUTION:
Never start engine.
2. Select “DATA MONITOR” for “AIR PR ESSURE MONITOR” with CONSULT-III.
3. Read out the value of “WARNING LAMP”. For low tire pressure warning lamp condition, refer to “LOW TIRE PRESSURE WARNING LA MP CONTROL CONDITION” in WT-9, "
System Description".
Does the data monitor display change normal?
YES >> GO TO 4.
NO >> Replace the low tire pressure warning control unit. Refer to WT-65, "
Removal and Installation".
4.CHECK COMBINATION METER POWER SUPPLY CIRCUIT
Perform the trouble diagnosis for combination meter power supply circuit. Refer to MWI-64, "
COMBINATION
METER : Diagnosis Procedure".
Is the inspection result normal?
YES >> INSPECTION END
NO >> Repair or replace error-detected parts.
Revision: 2010 May2011 QX56
Page 5507 of 5598
LOW TIRE PRESSURE WARNING LAMP DOES NOT TURN OFFWT-57
< SYMPTOM DIAGNOSIS >
C
DF
G H
I
J
K L
M A
B
WT
N
O P
LOW TIRE PRESSURE WARNING LAMP DOES NOT TURN OFF
DescriptionINFOID:0000000006225536
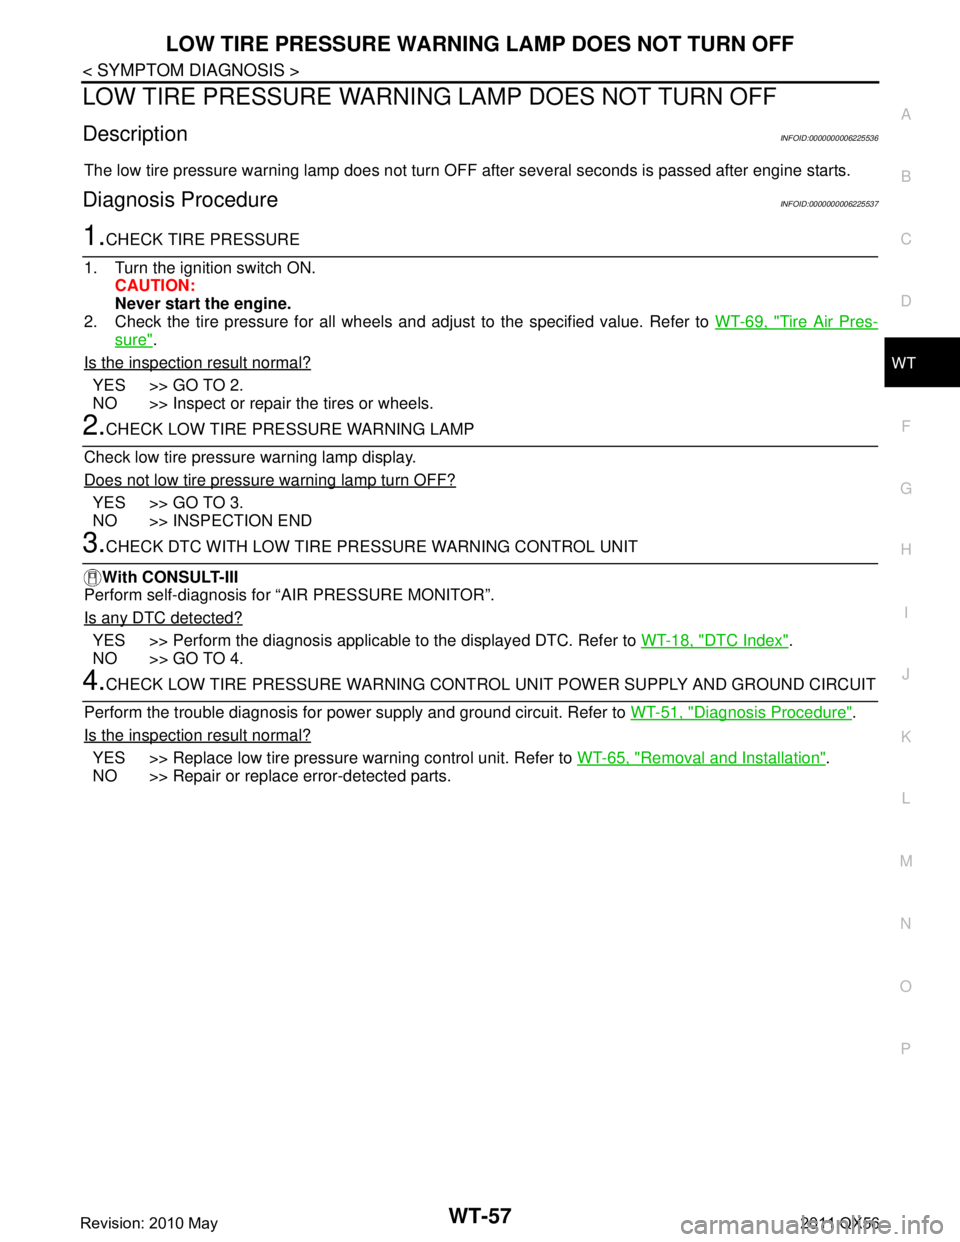
The low tire pressure warning lamp does not turn OFF after several seconds is passed after engine starts.
Diagnosis ProcedureINFOID:0000000006225537
1.CHECK TIRE PRESSURE
1. Turn the ignition switch ON. CAUTION:
Never start the engine.
2. Check the tire pressure for all wheels and adjust to the specified value. Refer to WT-69, "
Tire Air Pres-
sure".
Is the inspection result normal?
YES >> GO TO 2.
NO >> Inspect or repair the tires or wheels.
2.CHECK LOW TIRE PRE SSURE WARNING LAMP
Check low tire pressure warning lamp display.
Does not low tire pressure warning lamp turn OFF?
YES >> GO TO 3.
NO >> INSPECTION END
3.CHECK DTC WITH LOW TIRE PR ESSURE WARNING CONTROL UNIT
With CONSULT-III
Perform self-diagnosis for “AIR PRESSURE MONITOR”.
Is any DTC detected?
YES >> Perform the diagnosis applicable to the displayed DTC. Refer to WT-18, "DTC Index".
NO >> GO TO 4.
4.CHECK LOW TIRE PRESSURE WARNING CONT ROL UNIT POWER SUPPLY AND GROUND CIRCUIT
Perform the trouble diagnosis for power supply and ground circuit. Refer to WT-51, "
Diagnosis Procedure".
Is the inspection result normal?
YES >> Replace low tire pressure warning control unit. Refer to WT-65, "Removal and Installation".
NO >> Repair or replace error-detected parts.
Revision: 2010 May2011 QX56
Page 5509 of 5598
TIRE INFLATION INDICATOR DOES NOT ACTIVATEWT-59
< SYMPTOM DIAGNOSIS >
C
DF
G H
I
J
K L
M A
B
WT
N
O P
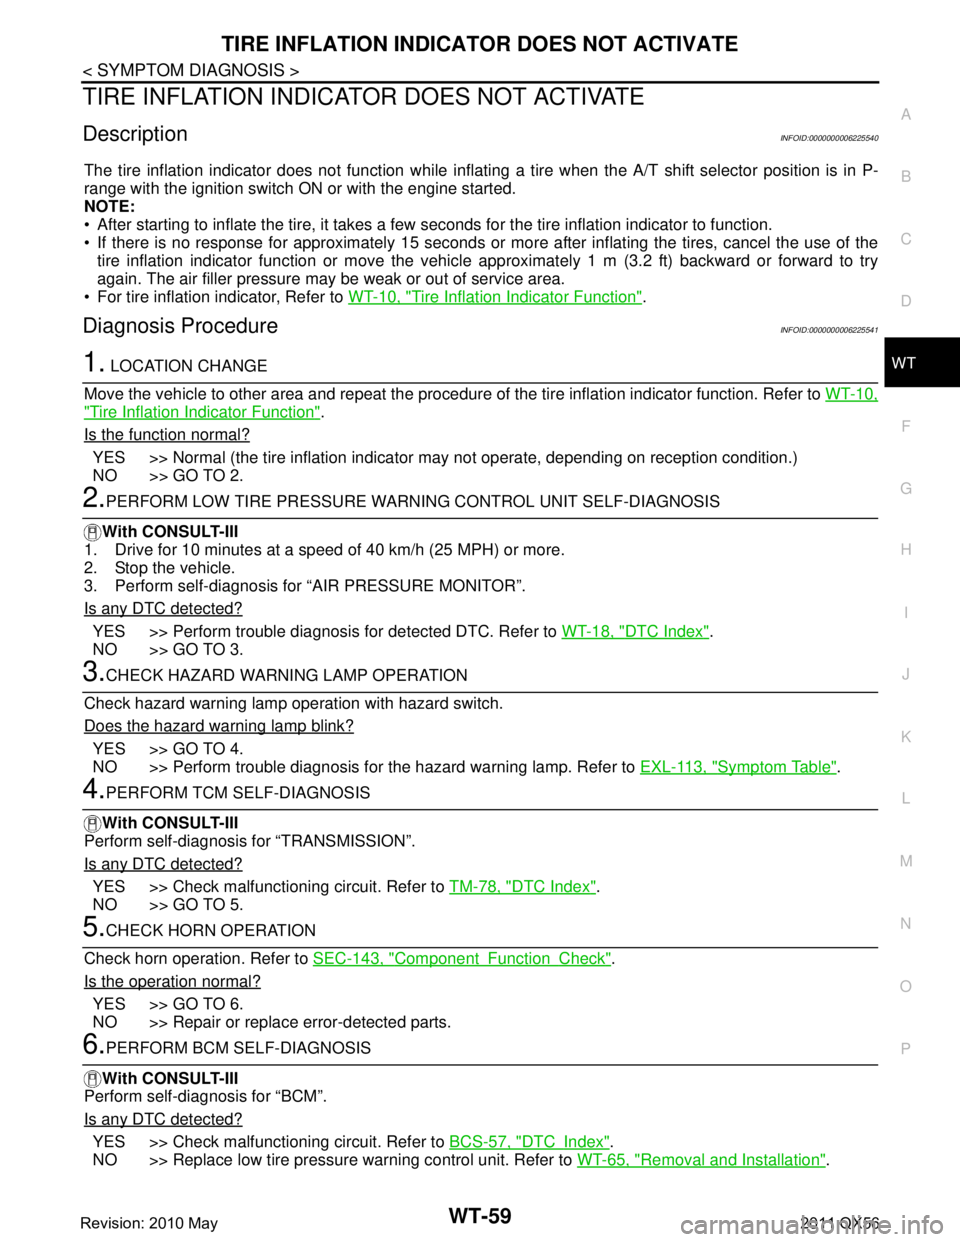
TIRE INFLATION INDICATOR DOES NOT ACTIVATE
DescriptionINFOID:0000000006225540
The tire inflation indicator does not function while inflat ing a tire when the A/T shift selector position is in P-
range with the ignition switch ON or with the engine started.
NOTE:
After starting to inflate the tire, it takes a few seconds for the tire inflation indicator to function.
If there is no response for approximately 15 seconds or mo re after inflating the tires, cancel the use of the
tire inflation indicator function or move the vehicle approximately 1 m (3.2 ft) backward or forward to try
again. The air filler pressure may be weak or out of service area.
For tire inflation indicator, Refer to WT-10, "
Tire Inflation Indicator Function".
Diagnosis ProcedureINFOID:0000000006225541
1. LOCATION CHANGE
Move the vehicle to other area and repeat the procedure of the tire inflation indicator function. Refer to WT-10,
"Tire Inflation Indicator Function".
Is the function normal?
YES >> Normal (the tire inflation indicator may not operate, depending on reception condition.)
NO >> GO TO 2.
2.PERFORM LOW TIRE PRESSURE WARNI NG CONTROL UNIT SELF-DIAGNOSIS
With CONSULT-III
1. Drive for 10 minutes at a speed of 40 km/h (25 MPH) or more.
2. Stop the vehicle.
3. Perform self-diagnosis for “AIR PRESSURE MONITOR”.
Is any DTC detected?
YES >> Perform trouble diagnosis for detected DTC. Refer to WT-18, "DTC Index".
NO >> GO TO 3.
3.CHECK HAZARD WARNING LAMP OPERATION
Check hazard warning lamp operation with hazard switch.
Does the hazard warning lamp blink?
YES >> GO TO 4.
NO >> Perform trouble diagnosis for the hazard warning lamp. Refer to EXL-113, "
Symptom Table".
4.PERFORM TCM SELF-DIAGNOSIS
With CONSULT-III
Perform self-diagnosis for “TRANSMISSION”.
Is any DTC detected?
YES >> Check malfunctioning circuit. Refer to TM-78, "DTC Index".
NO >> GO TO 5.
5.CHECK HORN OPERATION
Check horn operation. Refer to SEC-143, "
ComponentFunctionCheck".
Is the operation normal?
YES >> GO TO 6.
NO >> Repair or replace error-detected parts.
6.PERFORM BCM SELF-DIAGNOSIS
With CONSULT-III
Perform self-diagnosis for “BCM”.
Is any DTC detected?
YES >> Check malfunctioning circuit. Refer to BCS-57, "DTCIndex".
NO >> Replace low tire pressure warning control unit. Refer to WT-65, "
Removal and Installation".
Revision: 2010 May2011 QX56
Page 5522 of 5598
PRECAUTIONSWW-3
< PRECAUTION >
C
DE
F
G H
I
J
K
M A
B
WW
N
O P
PRECAUTION
PRECAUTIONS
Precaution for Supplemental Restraint System (SRS) "AIR BAG" and "SEAT BELT
PRE-TENSIONER"
INFOID:0000000006349780
The Supplemental Restraint System such as “A IR BAG” and “SEAT BELT PRE-TENSIONER”, used along
with a front seat belt, helps to reduce the risk or severi ty of injury to the driver and front passenger for certain
types of collision. This system includes seat belt switch inputs and dual stage front air bag modules. The SRS
system uses the seat belt switches to determine the front air bag deployment, and may only deploy one front
air bag, depending on the severity of a collision and whether the front occupants are belted or unbelted.
Information necessary to service the system safely is included in the “SRS AIR BAG” and “SEAT BELT” of this
Service Manual.
WARNING:
• To avoid rendering the SRS inoper ative, which could increase the risk of personal injury or death in
the event of a collision that would result in air ba g inflation, all maintenance must be performed by
an authorized NISSAN/INFINITI dealer.
Improper maintenance, including in correct removal and installation of the SRS, can lead to personal
injury caused by unintentional act ivation of the system. For removal of Spiral Cable and Air Bag
Module, see the “SRS AIR BAG”.
Do not use electrical test equipm ent on any circuit related to the SRS unless instructed to in this
Service Manual. SRS wiring harnesses can be identi fied by yellow and/or orange harnesses or har-
ness connectors.
PRECAUTIONS WHEN USING POWER TOOLS (AIR OR ELECTRIC) AND HAMMERS
WARNING:
When working near the Air Bag Diagnosis Sensor Unit or other Air Bag System sensors with the
ignition ON or engine running, DO NOT use air or electric power tools or strike near the sensor(s)
with a hammer. Heavy vibration could activate the sensor(s) and deploy the air bag(s), possibly
causing serious injury.
When using air or electric power tools or hammers , always switch the ignition OFF, disconnect the
battery, and wait at least 3 minutes before performing any service.
Precaution Necessary for Steering Wh eel Rotation after Battery Disconnect
INFOID:0000000006300446
NOTE:
Before removing and installing any control units, first tu rn the push-button ignition switch to the LOCK posi-
tion, then disconnect both battery cables.
After finishing work, confirm that all control unit connectors are connected properly, then re-connect both
battery cables.
Always use CONSULT-III to perform self-diagnosis as a part of each function inspection after finishing work.
If a DTC is detected, perform trouble diagnos is according to self-diagnosis results.
For vehicle with steering lock unit, if the battery is disconnected or discharged, the steering wheel will lock and
cannot be turned.
If turning the steering wheel is required with the batte ry disconnected or discharged, follow the operation pro-
cedure below before starting the repair operation.
OPERATION PROCEDURE
1. Connect both battery cables. NOTE:
Supply power using jumper cables if battery is discharged.
2. Turn the push-button ignition switch to ACC position. (At this time, the steering lock will be released.)
3. Disconnect both battery cables. The steering lock wil l remain released with both battery cables discon-
nected and the steering wheel can be turned.
4. Perform the necessary repair operation.
Revision: 2010 May2011 QX56
Page 5524 of 5598
COMPONENT PARTSWW-5
< SYSTEM DESCRIPTION >
C
DE
F
G H
I
J
K
M A
B
WW
N
O P
SYSTEM DESCRIPTION
COMPONENT PARTS
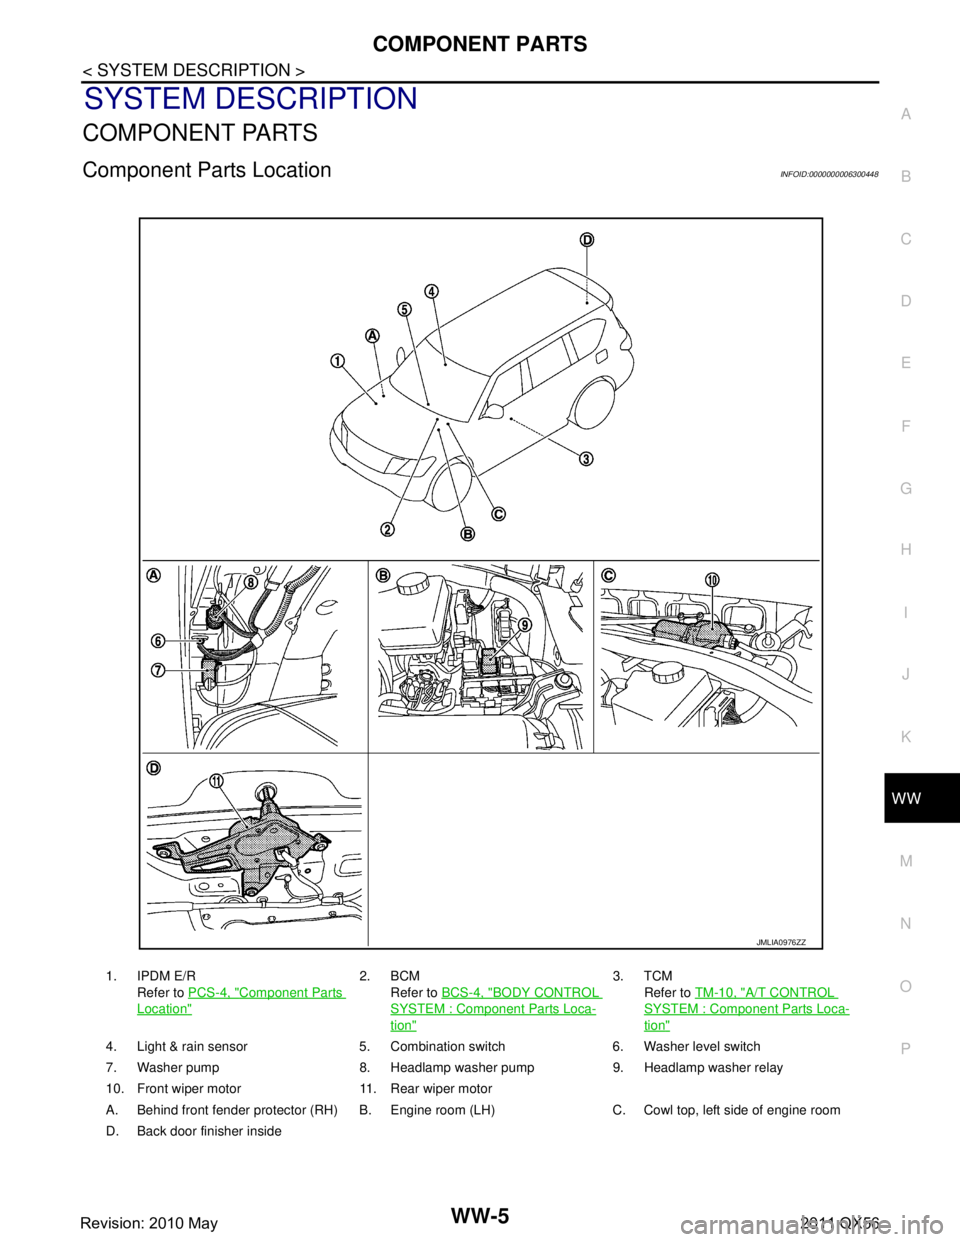
Component Parts LocationINFOID:0000000006300448
1. IPDM E/R Refer to PCS-4, "
Component Parts
Location"
2. BCM
Refer to BCS-4, "
BODY CONTROL
SYSTEM : Component Parts Loca-
tion"
3. TCM
Refer to TM-10, "
A/T CONTROL
SYSTEM : Componen t Parts Loca-
tion"
4. Light & rain sensor 5. Combination switch 6. Washer level switch
7. Washer pump 8. Headlamp washer pump 9. Headlamp washer relay
10. Front wiper motor 11. Rear wiper motor
A. Behind front fender protector (RH) B. Engine room (LH) C. Cowl top, left side of engine room
D. Back door finisher inside
JMLIA0976ZZ
Revision: 2010 May2011 QX56
Page 5533 of 5598

WW-14
< SYSTEM DESCRIPTION >
DIAGNOSIS SYSTEM (BCM)
DIAGNOSIS SYSTEM (BCM)
COMMON ITEM
COMMON ITEM : CONSULT-III Function (BCM - COMMON ITEM)INFOID:0000000006349813
APPLICATION ITEM
CONSULT-III performs the following functions via CAN communication with BCM.
SYSTEM APPLICATION
BCM can perform the following functions for each system.
NOTE:
It can perform the diagnosis modes except the following for all sub system selection items.
×: Applicable item
*: This item is indicated, but not used.
FREEZE FRAME DATA (FFD)
The BCM records the following vehicle condition at the time a particular DTC is detected, and displays on
CONSULT-III.
Diagnosis mode Function Description
Work Support Changes the setting for each system function.
Self Diagnostic Result Displays the diagnosis results judged by BCM. Refer to BCS-57, "
DTCIndex".
CAN Diag Support Monitor Monitors the reception status of CAN communication viewed from BCM. Refer to CONSULT-III opera-
tion manual.
Data Monitor The BCM input/output signals are displayed.
Active Test The signals used to activate ea ch device are forcibly supplied from BCM.
Ecu Identification The BCM part number is displayed.
Configuration Read and save the vehicle specification.
Write the vehicle specification when replacing BCM.
System Sub system selection item Diagnosis mode
Work Support Data Monitor Active Test
Door lock DOOR LOCK ×××
Rear window defogger REAR DEFOGGER ××
Warning chime BUZZER ××
Interior room lamp timer INT LAMP ×××
Exterior lamp HEAD LAMP ×××
Wiper and washer WIPER ×××
Turn signal and hazard warning lamps FLASHER ×××
— AIR CONDITONER* ××
Intelligent Key system
Engine start system INTELLIGENT KEY
×××
Combination switch COMB SW ×
Body control system BCM ×
IVIS IMMU ×××
Interior room lamp battery saver BATTERY SAVER ×××
Back door TRUNK ×
Vehicle security system THEFT ALM ×××
RAP system RETAINED PWR ×
Signal buffer system SIGNAL BUFFER ××
Revision: 2010 May2011 QX56