2011 INFINITI QX56 air condition
[x] Cancel search: air conditionPage 5053 of 5598
STC-8
< ECU DIAGNOSIS INFORMATION >
POWER STEERING CONTROL UNIT
ECU DIAGNOSIS INFORMATION
POWER STEERING CONTROL UNIT
Reference Value INFOID:0000000006256121
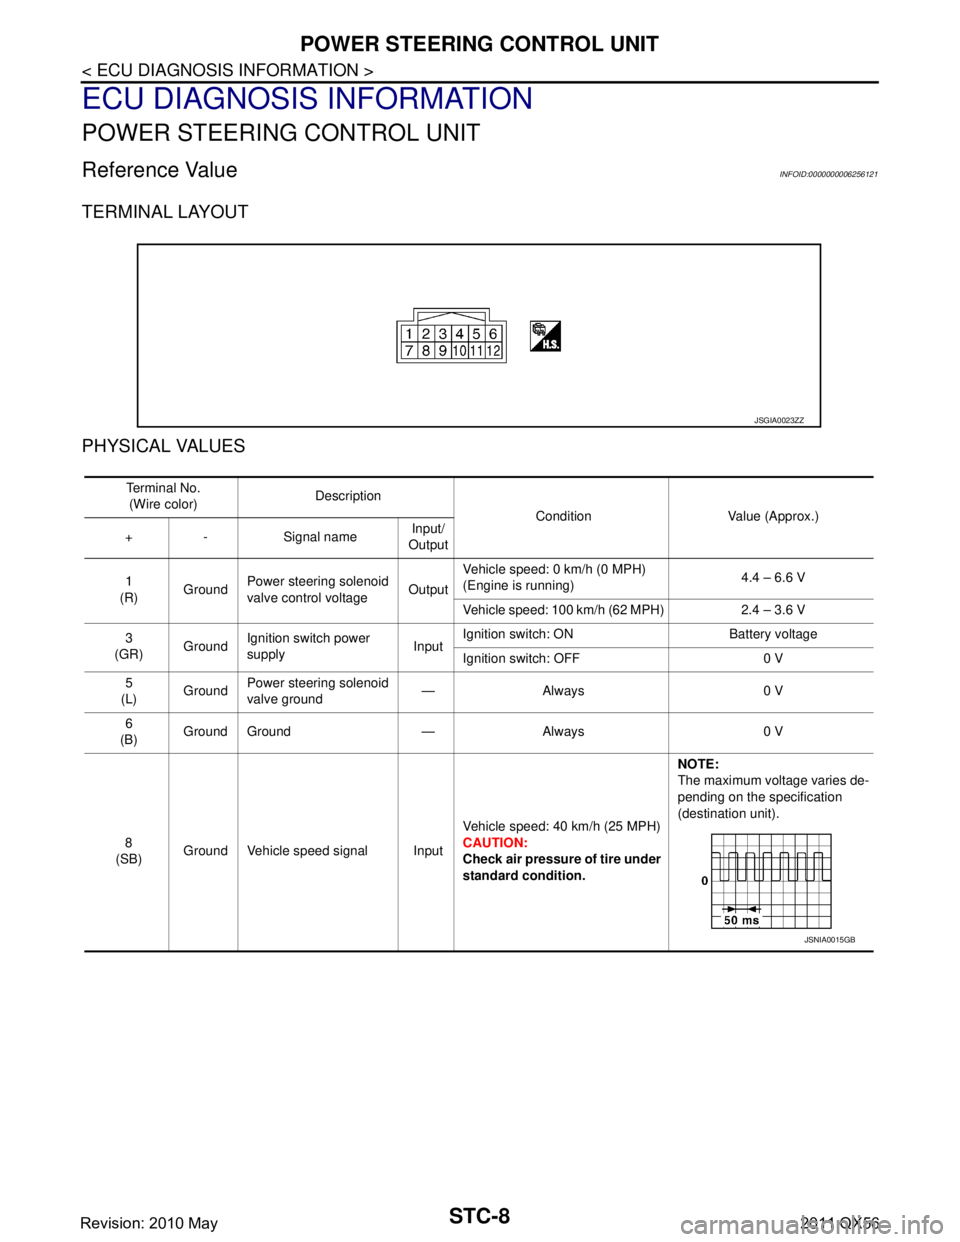
TERMINAL LAYOUT
PHYSICAL VALUES
JSGIA0023ZZ
Te r m i n a l N o .(Wire color) Description
Condition Value (Approx.)
+ - Signal name Input/
Output
1
(R) GroundPower steering
solenoid
valve control voltage OutputVehicle speed: 0 km/h (0 MPH)
(Engine is running)
4.4 – 6.6 V
Vehicle speed: 100 km/h (62 MPH) 2.4 – 3.6 V
3
(GR) GroundIgnition switch power
supply InputIgnition switch: ON Battery voltage
Ignition switch: OFF 0 V
5
(L) Ground
Power steering
solenoid
valve ground —Always 0 V
6
(B) Ground Ground — Always 0 V
8
(SB) Ground Vehicle speed signal Input Vehicle speed: 40 km/h (25 MPH)
CAUTION:
Check air pressure of tire under
standard condition.NOTE:
The maximum voltage varies de-
pending on the specification
(destination unit).
JSNIA0015GB
Revision: 2010 May2011 QX56
Page 5054 of 5598
POWER STEERING CONTROL UNITSTC-9
< ECU DIAGNOSIS INFORMATION >
C
DE
F
H I
J
K L
M A
B
STC
N
O PCAUTION:
When using circuit tester or osci lloscope to measure voltage for in spection, be sure not to forcibly
extend any connector terminals.
Fail-Safe INFOID:0000000006256122
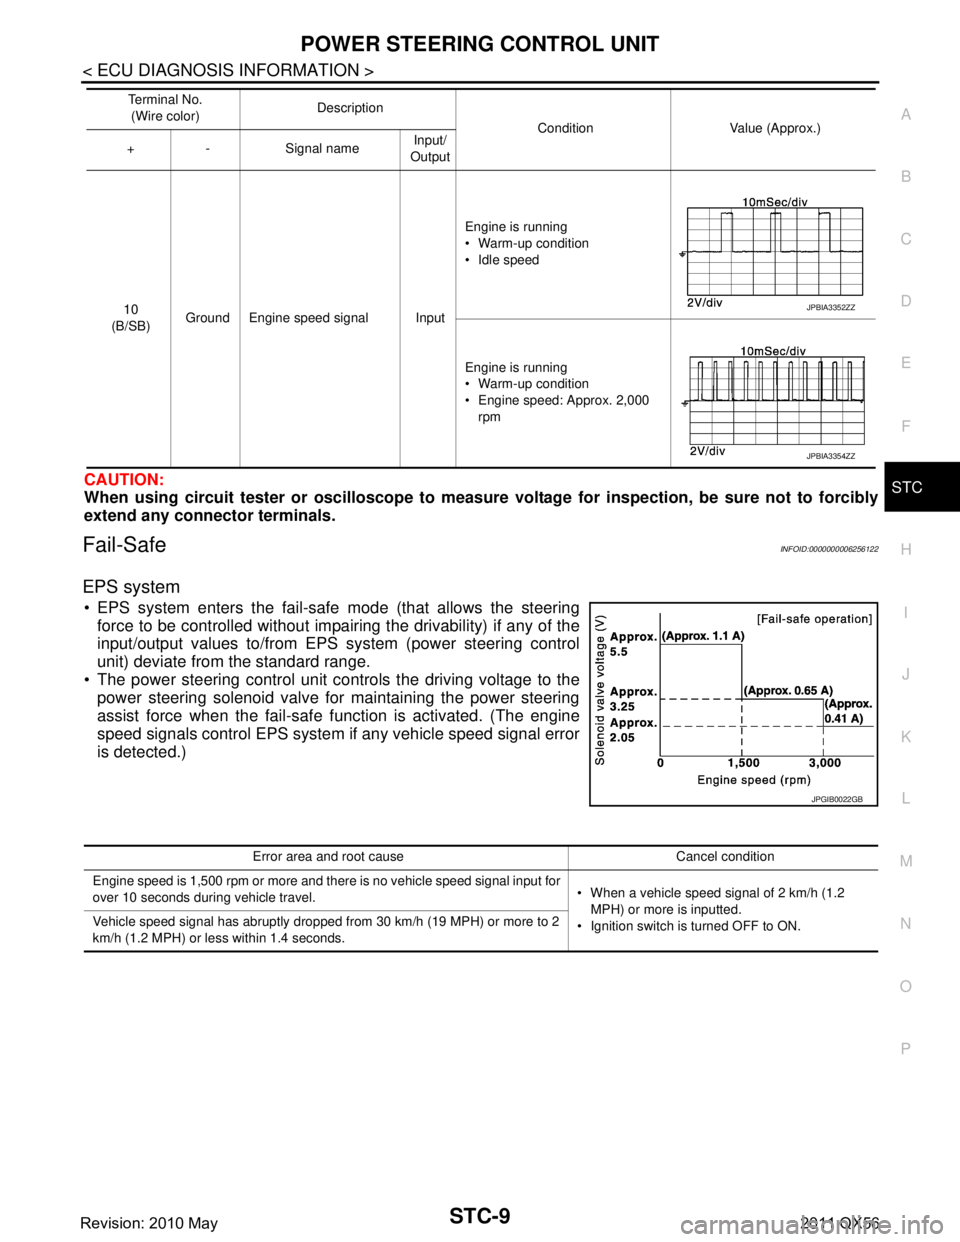
EPS system
EPS system enters the fail-safe mode (that allows the steering
force to be controlled without impair ing the drivability) if any of the
input/output values to/from EPS system (power steering control
unit) deviate from the standard range.
The power steering control unit controls the driving voltage to the
power steering solenoid valve for maintaining the power steering
assist force when the fail-safe function is activated. (The engine
speed signals control EPS system if any vehicle speed signal error
is detected.)
10
(B/SB) Ground Engine speed signal Input Engine is running
Warm-up condition
Idle speed
Engine is running
Warm-up condition
Engine speed: Approx. 2,000
rpm
Te r m i n a l N o .
(Wire color) Description
Condition Value (Approx.)
+ - Signal name Input/
OutputJPBIA3352ZZ
JPBIA3354ZZ
JPGIB0022GB
Error area and root cause Cancel condition
Engine speed is 1,500 rpm or more and there is no vehicle speed signal input for
over 10 seconds during vehicle travel. When a vehicle speed signal of 2 km/h (1.2
MPH) or more is inputted.
Ignition switch is turned OFF to ON.
Vehicle speed signal has abruptly dropped from 30 km/h (19 MPH) or more to 2
km/h (1.2 MPH) or less within 1.4 seconds.
Revision: 2010 May2011 QX56
Page 5061 of 5598

STC-16
< DTC/CIRCUIT DIAGNOSIS >
POWER STEERING SOLENOID VALVE
POWER STEERING SOLENOID VALVE
Component Function CheckINFOID:0000000006256126
1.CHECK POWER STEERING SOLENOID VALVE OPERATION
Check changes in steering force from a halt condition to high-speed driving.
Is the inspection result normal?
YES >> INSPECTION END
NO >> Check the power steering solenoid valve. Refer to STC-16, "
Diagnosis Procedure".
Diagnosis Procedure INFOID:0000000006256127
1.CHECK POWER STEERING SOLENOID VALVE SIGNAL
1. Turn the ignition switch OFF.
2. Check the voltage between power steering control unit harness connector and ground.
Is the inspection result normal?
YES >> GO TO 4.
NO >> GO TO 2.
2.CHECK HARNESS BETWEEN POWER STEERING SO LENOID VALVE AND POWER STEERING CON-
TROL UNIT
1. Turn the ignition switch OFF.
2. Disconnect power steering solenoid valve harness connector.
3. Disconnect power steering control unit harness connector.
4. Check the continuity between power steering solenoid valve harness connector and the power steering
control unit harness connector.
5. Check the continuity between power st eering control unit harness connector and ground.
Is the inspection result normal?
YES >> GO TO 3.
NO >> Repair or replace error-detected parts.
3.CHECK POWER STEERING SOLENOID VALVE
Check the power steering solenoid valve. Refer to STC-17, "
Component Inspection".
Is the inspection result normal?
YES >> GO TO 4.
NO >> Replace gear-sub assembly. Refer to ST-43, "
Disassembly and Assembly".
Power steering control unit
— Condition Voltage (Approx.)
Connector Terminal
M108 1 Ground Vehicle speed: 0 km/h (0 MPH)
(Engine is running)
4.4 – 6.6 V
Vehicle speed: 100 km/h (62 MPH) 2.4 – 3.6 V
Power steering solenoid valve Power steering control unit Continuity
Connector Terminal Connector Terminal
F45 1
M108 1 Existed
25Existed
Power steering control unit — Continuity
Connector Terminal
M108 1
Ground Not existed
5
Revision: 2010 May2011 QX56
Page 5063 of 5598
STC-18
< DTC/CIRCUIT DIAGNOSIS >
ENGINE SPEED SIGNAL CIRCUIT
ENGINE SPEED SIGNAL CIRCUIT
Diagnosis ProcedureINFOID:0000000006256129
1.PERFORM ECM SELF-DIAGNOSIS
With CONSULT-III
Perform “ENGINE” self-diagnosis.
Is any DTC detected?
YES >> Check the DTC. Refer to EC-98, "DTC Index".
NO >> GO TO 2.
2.CHECK HARNESS BETWEEN ECM AND POWER STEERING CONTROL UNIT
1. Turn the ignition switch OFF.
2. Disconnect ECM harness connectors.
3. Disconnect power steering control unit harness connector.
4. Check the continuity between ECM harness connecto r and power steering control unit harness connector.
5. Check the continuity between power st eering control unit harness connector and ground.
Is the inspection result normal?
YES >> GO TO 3.
NO >> Repair or replace error-detected parts.
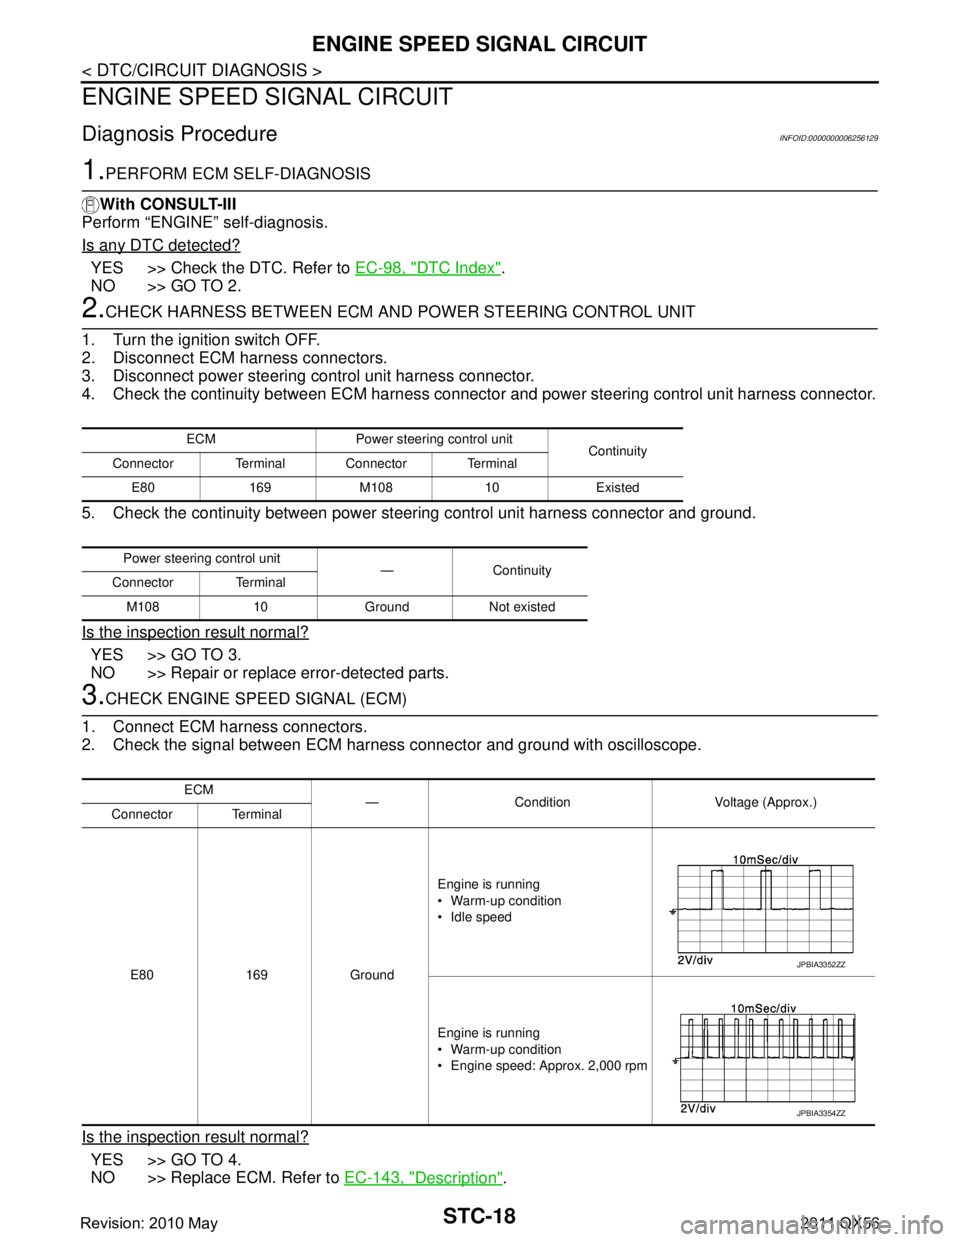
3.CHECK ENGINE SPEED SIGNAL (ECM)
1. Connect ECM harness connectors.
2. Check the signal between ECM harness connector and ground with oscilloscope.
Is the inspection result normal?
YES >> GO TO 4.
NO >> Replace ECM. Refer to EC-143, "
Description".
ECM Power steering control unit
Continuity
Connector Terminal Connector Terminal
E80 169 M108 10 Existed
Power steering control unit — Continuity
Connector Terminal
M108 10 Ground Not existed
ECM — Condition Voltage (Approx.)
Connector Terminal
E80 169 Ground Engine is running
Warm-up condition
Idle speed
Engine is running
Warm-up condition
Engine speed: Approx. 2,000 rpm
JPBIA3352ZZ
JPBIA3354ZZ
Revision: 2010 May2011 QX56
Page 5064 of 5598
ENGINE SPEED SIGNAL CIRCUITSTC-19
< DTC/CIRCUIT DIAGNOSIS >
C
DE
F
H I
J
K L
M A
B
STC
N
O P
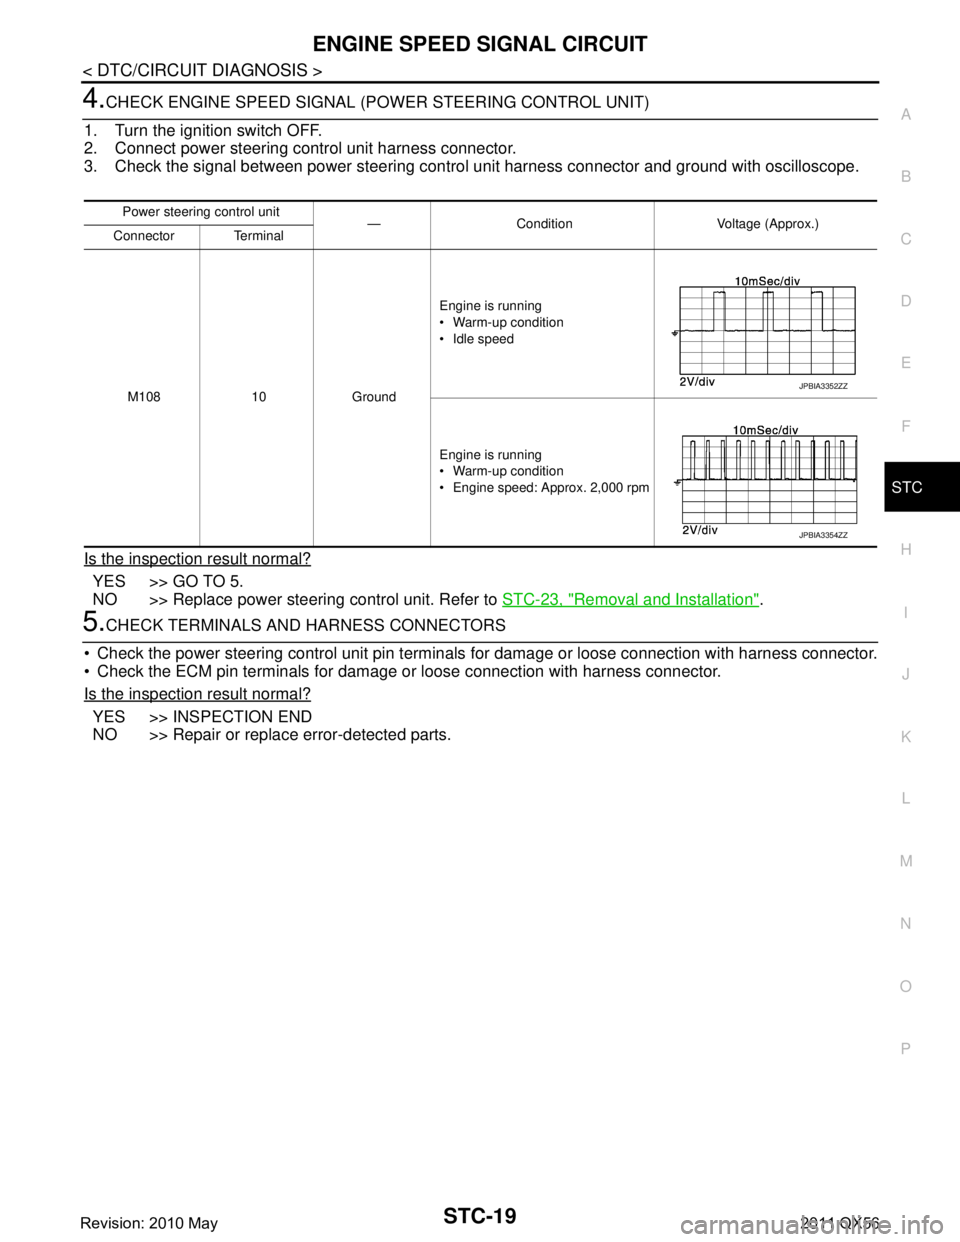
4.CHECK ENGINE SPEED SIGNAL (P OWER STEERING CONTROL UNIT)
1. Turn the ignition switch OFF.
2. Connect power steering control unit harness connector.
3. Check the signal between power steering control unit harness connector and ground with oscilloscope.
Is the inspection result normal?
YES >> GO TO 5.
NO >> Replace power steering control unit. Refer to STC-23, "
Removal and Installation".
5.CHECK TERMINALS AND HARNESS CONNECTORS
Check the power steering control unit pin terminal s for damage or loose connection with harness connector.
Check the ECM pin terminals for damage or loose connection with harness connector.
Is the inspection result normal?
YES >> INSPECTION END
NO >> Repair or replace error-detected parts.
Power steering control unit — Condition Voltage (Approx.)
Connector Terminal
M108 10 Ground Engine is running
Warm-up condition
Idle speed
Engine is running
Warm-up condition
Engine speed: Approx. 2,000 rpm
JPBIA3352ZZ
JPBIA3354ZZ
Revision: 2010 May2011 QX56
Page 5065 of 5598
STC-20
< DTC/CIRCUIT DIAGNOSIS >
VEHICLE SPEED SIGNAL CIRCUIT
VEHICLE SPEED SIGNAL CIRCUIT
Diagnosis ProcedureINFOID:0000000006256130
1.PERFORM COMBINATION METER SELF-DIAGNOSIS
With CONSULT-III
Perform “METER/M&A” self-diagnosis. Refer to MWI-30, "
CONSULT-III Function".
Is any DTC detected?
YES >> Check the DTC.
NO >> GO TO 2.
2.CHECK HARNESS BETWEEN COMBINATION ME TER AND POWER STEERING CONTROL UNIT
1. Turn the ignition switch OFF.
2. Disconnect combination meter harness connector.
3. Disconnect power steering control unit harness connector.
4. Check the continuity between combination meter harness connector and power steering control unit har-
ness connector.
5. Check the continuity between power st eering control unit harness connector and ground.
Is the inspection result normal?
YES >> GO TO 3.
NO >> Repair or replace error-detected parts.
3.CHECK VEHICLE SPEED SIGN AL (COMBINATION METER)
1. Connect combination meter harness connector.
2. Check the combination meter input/output standard values. Refer to MWI-35, "
Reference Value".
Is the inspection result normal?
YES >> GO TO 4.
NO >> Replace combination meter Refer to MWI-85, "
Removal and Installation".
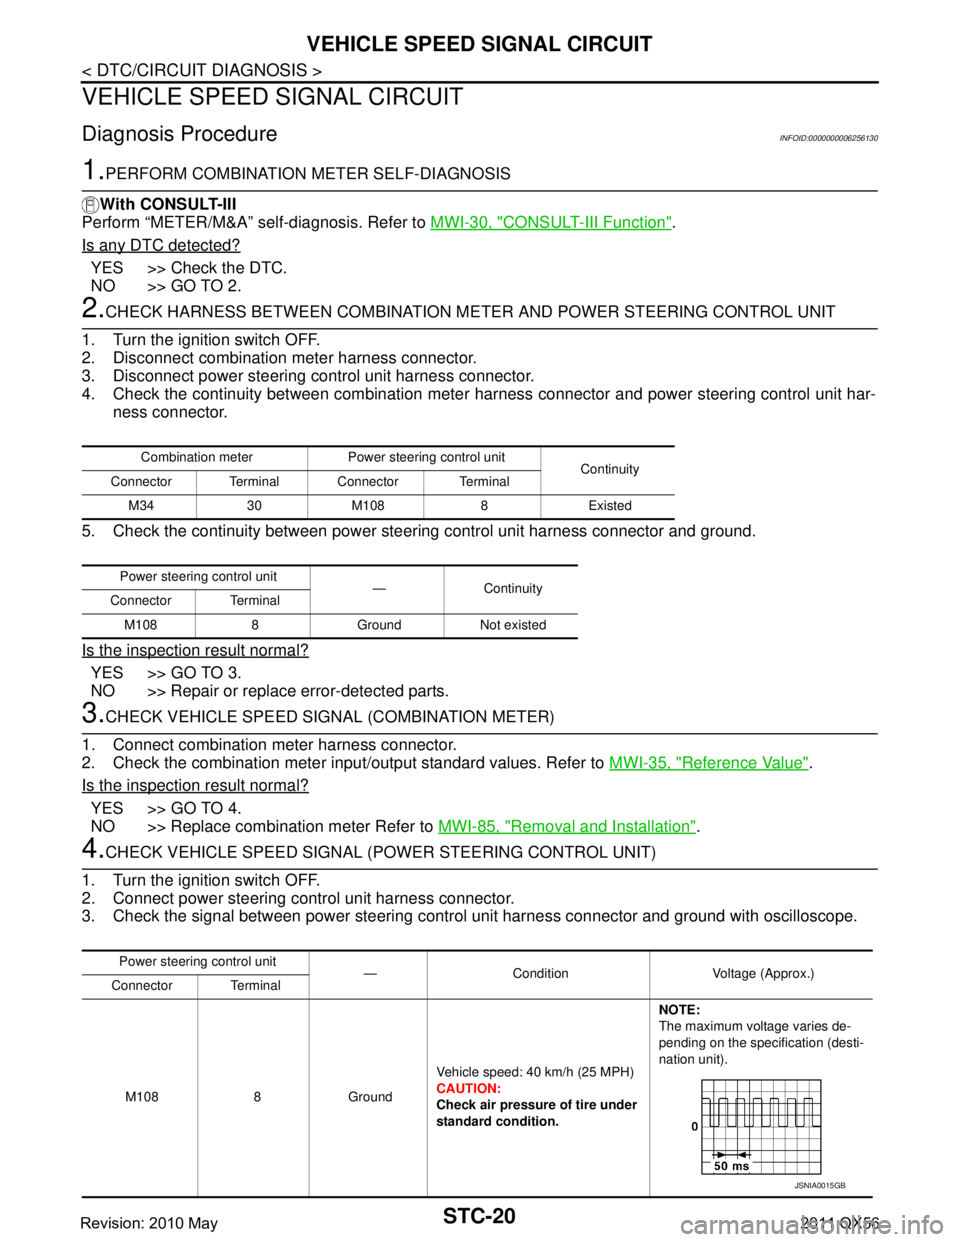
4.CHECK VEHICLE SPEED SIGNAL (POWER STEERING CONTROL UNIT)
1. Turn the ignition switch OFF.
2. Connect power steering control unit harness connector.
3. Check the signal between power steering cont rol unit harness connector and ground with oscilloscope.
Combination meter Power steering control unit
Continuity
Connector Terminal Connector Terminal
M34 30 M108 8 Existed
Power steering control unit —Continuity
Connector Terminal
M108 8 Ground Not existed
Power steering control unit — Condition Voltage (Approx.)
Connector Terminal
M108 8 Ground Vehicle speed: 40 km/h (25 MPH)
CAUTION:
Check air pressure of tire under
standard condition.NOTE:
The maximum voltage varies de-
pending on the specification (desti-
nation unit).
JSNIA0015GB
Revision: 2010 May2011 QX56
Page 5083 of 5598
S CONNECTOR CIRCUITSTR-15
< DTC/CIRCUIT DIAGNOSIS >
C
DE
F
G H
I
J
K L
M A
STR
NP
O
S CONNECTOR CIRCUIT
Diagnosis ProcedureINFOID:0000000006275525
CAUTION:
Perform diagnosis under the cond
ition that engine cannot start by the following procedure.
1. Remove fuel pump fuse.
2. Crank or start the engine (where possi ble) until the fuel pressure is released.
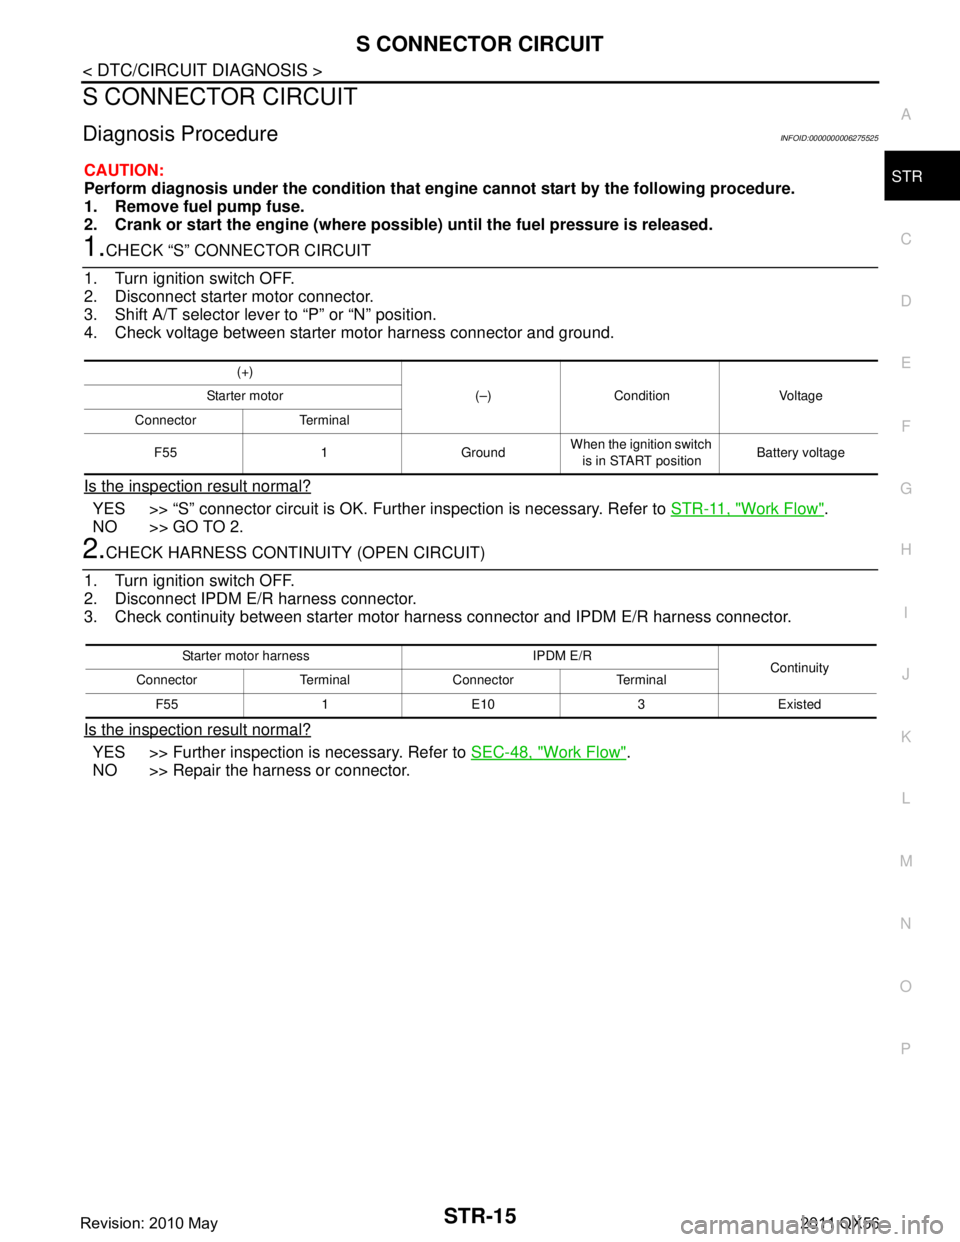
1.CHECK “S” CONNECTOR CIRCUIT
1. Turn ignition switch OFF.
2. Disconnect starter motor connector.
3. Shift A/T selector lever to “P” or “N” position.
4. Check voltage between starter motor harness connector and ground.
Is the inspection result normal?
YES >> “S” connector circuit is OK. Furt her inspection is necessary. Refer to STR-11, "Work Flow".
NO >> GO TO 2.
2.CHECK HARNESS CONTI NUITY (OPEN CIRCUIT)
1. Turn ignition switch OFF.
2. Disconnect IPDM E/R harness connector.
3. Check continuity between starter motor harness connector and IPDM E/R harness connector.
Is the inspection result normal?
YES >> Further inspection is necessary. Refer to SEC-48, "Work Flow".
NO >> Repair the harness or connector.
(+)
(–) Condition Voltage
Starter motor
Connector Terminal
F55 1 Ground When the ignition switch
is in START position Battery voltage
Starter motor harness IPDM E/R
Continuity
Connector Terminal Connector Terminal
F55 1 E10 3 Existed
Revision: 2010 May2011 QX56
Page 5177 of 5598
![INFINITI QX56 2011 Factory Service Manual
DIAGNOSIS AND REPAIR WORK FLOWTM-89
< BASIC INSPECTION > [7AT: RE7R01B]
C
EF
G H
I
J
K L
M A
B
TM
N
O P
6.IDENTIFY MALFUNCTIONING SYSTEM WI TH “DIAGNOSIS CHART BY SYMPTOM”
Use TM-165, "
Symptom INFINITI QX56 2011 Factory Service Manual
DIAGNOSIS AND REPAIR WORK FLOWTM-89
< BASIC INSPECTION > [7AT: RE7R01B]
C
EF
G H
I
J
K L
M A
B
TM
N
O P
6.IDENTIFY MALFUNCTIONING SYSTEM WI TH “DIAGNOSIS CHART BY SYMPTOM”
Use TM-165, "
Symptom](/manual-img/42/57033/w960_57033-5176.png)
DIAGNOSIS AND REPAIR WORK FLOWTM-89
< BASIC INSPECTION > [7AT: RE7R01B]
C
EF
G H
I
J
K L
M A
B
TM
N
O P
6.IDENTIFY MALFUNCTIONING SYSTEM WI TH “DIAGNOSIS CHART BY SYMPTOM”
Use TM-165, "
Symptom Table" from the symptom inspection result in step 4. Then identify where to start per-
forming the diagnosis based on possible causes and symptoms.
>> GO TO 8.
7.REPAIR OR REPLACE THE MALFUNCTIONING PARTS
Repair or replace the detected malfunctioning parts.
Reconnect parts or connector after repairing or replacing, and then erase DTC if necessary.
>> GO TO 8.
8.FINAL CHECK
Perform “DTC CONFIRMATION PROCEDURE” again to make sure that the repair is correctly performed.
Check that malfunctions are not reproduced when obtai ning the malfunction information from the customer,
referring to the symptom inspection result in step 3 or 4.
Is DTC or malfunction symptom reproduced?
YES-1 >> DTC is reproduced: GO TO 5.
YES-2 >> Malfunction symptom is reproduced: GO TO 6.
NO >> Before delivering the vehicle to the customer, make sure that DTC is erased.
Question sheetINFOID:0000000006226790
DESCRIPTION
There are many operating conditions that may cause a malfunction
of the transmission parts. By understanding those conditions prop-
erly, a quick and exact diagnosis can be achieved.
In general, customers have their own criteria for a problem. There-
fore, it is important to understand the symptom and status well
enough by asking the customer about the concerns carefully. In
order to systemize all the inform ation for the diagnosis, prepare the
question sheet referring to the question points.
WORKSHEET SAMPLE
SEF907L
Question Sheet
Customer name MR/MS Engine # Manuf. Date Incident Date VIN
Model & Year In Service Date
Trans. Mileage km / Mile
Revision: 2010 May2011 QX56