2011 HYUNDAI TUCSON ESP
[x] Cancel search: ESPPage 253 of 382
Driving your vehicle
52
5
Driving with a trailer
Towing a trailer requires a certain
amount of experience. Before setting out
for the open road, you must get to know
your trailer. Acquaint yourself with the
feel of handling and braking with the
added weight of the trailer. And always
keep in mind that the vehicle you are
driving is now a good deal longer and not
nearly so responsive as your vehicle is
by itself.
Before you start, check the trailer hitch
and platform, safety chains, electrical
connector(s), lights, tires and mirror
adjustment. If the trailer has electric
brakes, start your vehicle and trailer mov-
ing and then apply the trailer brake con-
troller by hand to be sure the brakes are
working. This lets you check your electri-
cal connection at the same time.
During your trip, check occasionally to be
sure that the load is secure, and that the
lights and any trailer brakes are still work-ing.
Following distance
Stay at least twice as far behind the vehi-
cle ahead as you would when driving
your vehicle without a trailer. This can
help you avoid situations that require
heavy braking and sudden turns.
Passing
You’ll need more passing distance up
ahead when you’re towing a trailer. And,
because of the increased vehicle length,
you’ll need to go much farther beyond the
passed vehicle before you can return to
your lane. Due to the added load to the
engine when going uphill the vehicle may
also take longer to pass than it would on
flat ground.
Backing up
Hold the bottom of the steering wheel
with one hand. Then, to move the trailer
to the left, just move your hand to the left.
To move the trailer to the right, move your
hand to the right. Always back up slowly
and, if possible, have someone guide
you.
Making turns
When you’re turning with a trailer, make
wider turns than normal. Do this so your
trailer won’t strike soft shoulders, curbs,
road signs, trees, or other objects. Avoid
jerky or sudden maneuvers. Signal well in
advance before turning or lane changes.
Turn signals when towing a trailer
When you tow a trailer, your vehicle has
to have a different turn signal flasher and
extra wiring. The green arrows on your
instrument panel will flash whenever you
signal a turn or lane change. Properly
connected, the trailer lights will also flash
to alert other drivers you’re about to turn,
change lanes, or stop.
When towing a trailer, the green arrows
on your instrument panel will flash for
turns even if the bulbs on the trailer are
burned out. Thus, you may think drivers
behind you are seeing your signals
when, in fact, they are not. It’s important
to check occasionally to be sure the trail-
er bulbs are still working. You must also
check the lights every time you discon-
nect and then reconnect the wires.
Do not connect a trailer lighting system
directly to your vehicle’s lighting system.
Use only an approved trailer wiring har-
ness.
Page 269 of 382
67
What to do in an emergency
TIRE PRESSURE MONITORING SYSTEM (TPMS)
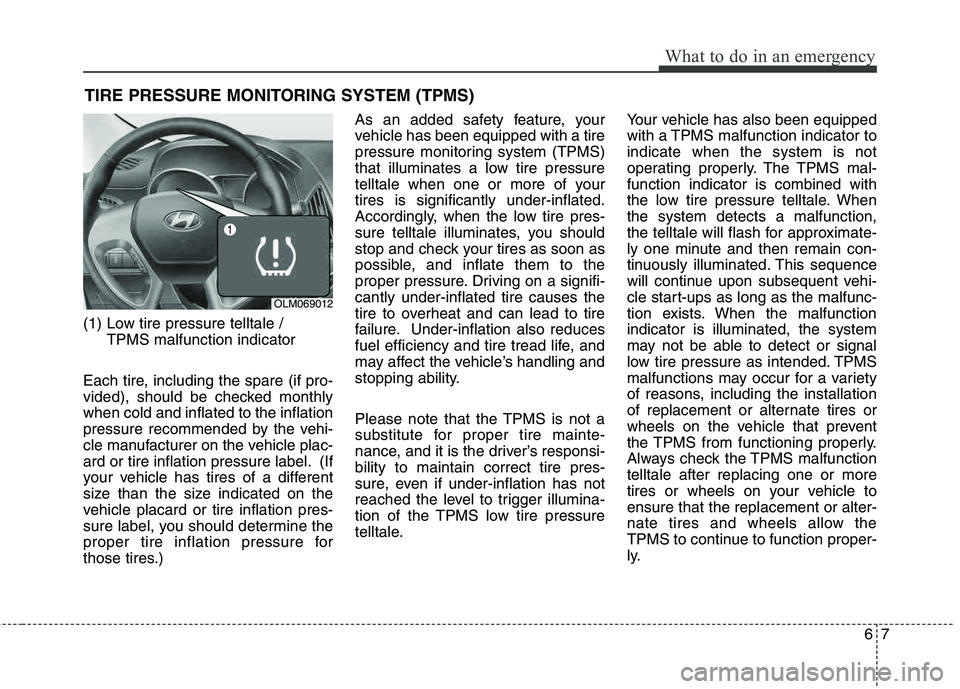
(1) Low tire pressure telltale / TPMS malfunction indicator
Each tire, including the spare (if pro-
vided), should be checked monthlywhen cold and inflated to the inflation
pressure recommended by the vehi-
cle manufacturer on the vehicle plac-
ard or tire inflation pressure label. (If
your vehicle has tires of a different
size than the size indicated on the
vehicle placard or tire inflation pres-
sure label, you should determine the
proper tire inflation pressure for
those tires.) As an added safety feature, your
vehicle has been equipped with a tire
pressure monitoring system (TPMS)
that illuminates a low tire pressure
telltale when one or more of yourtires is significantly under-inflated.
Accordingly, when the low tire pres-
sure telltale illuminates, you should
stop and check your tires as soon as
possible, and inflate them to the
proper pressure. Driving on a signifi-cantly under-inflated tire causes the
tire to overheat and can lead to tire
failure. Under-inflation also reduces
fuel efficiency and tire tread life, and
may affect the vehicle’s handling and
stopping ability.
Please note that the TPMS is not a
substitute for proper tire mainte-
nance, and it is the driver’s responsi-bility to maintain correct tire pres-
sure, even if under-inflation has not
reached the level to trigger illumina-
tion of the TPMS low tire pressure
telltale.
Your vehicle has also been equipped
with a TPMS malfunction indicator toindicate when the system is not
operating properly. The TPMS mal-function indicator is combined with
the low tire pressure telltale. Whenthe system detects a malfunction,
the telltale will flash for approximate-
ly one minute and then remain con-
tinuously illuminated. This sequence
will continue upon subsequent vehi-
cle start-ups as long as the malfunc-
tion exists. When the malfunctionindicator is illuminated, the system
may not be able to detect or signal
low tire pressure as intended. TPMS
malfunctions may occur for a variety
of reasons, including the installation
of replacement or alternate tires or
wheels on the vehicle that prevent
the TPMS from functioning properly.
Always check the TPMS malfunctiontelltale after replacing one or more
tires or wheels on your vehicle toensure that the replacement or alter-
nate tires and wheels allow the
TPMS to continue to function proper-
ly.
OLM069012
Page 273 of 382
611
What to do in an emergency
Allow the tire to cool before measur-
ing the inflation pressure. Always be
sure the tire is cold before inflating to
the recommended pressure.
A cold tire means the vehicle has
been sitting for 3 hours and driven forless than 1 mile (1.6 km) in that 3
hour period.This device complies with Part 15of the FCC rules.
Operation is subject to the following
two conditions:
1. This device may not cause harm-
ful interference, and
2. This device must accept any inter- ference received, including inter-
ference that may cause undesired
operation.
CAUTION
Do not use any tire sealant if
your vehicle is equipped with aTire Pressure MonitoringSystem. The liquid sealant candamage the tire pressure sen- sors.
WARNING - Protecting TPMS
Tampering with, modifying, or
disabling the Tire PressureMonitoring System (TPMS)
components may interfere withthe system's ability to warn the
driver of low tire pressure con-
ditions and/or TPMS malfunc-
tions. Tampering with, modify-
ing, or disabling the TirePressure Monitoring System
(TPMS) components may void
the warranty for that portion of
the vehicle.
WARNING- TPMS
The TPMS cannot alert you to severe and sudden tire dam-
age caused by external fac-
tors such as nails or roaddebris.
If you feel any vehicle instabil- ity, immediately take your foot
off the accelerator, apply the
brakes gradually and with
light force, and slowly move to
a safe position off the road.
WARNING
Changes or modifications not
expressly approved by the party
responsible for compliance
could void the user's authorityto operate the equipment.
Page 281 of 382
619
What to do in an emergency
Do not take this vehicle through anautomatic car wash while the com- pact spare tire is installed.
Do not use tire chains on the com- pact spare tire. Because of the
smaller size, a tire chain will not fit
properly. This could damage the
vehicle and result in loss of thechain.
The compact spare tire should not be installed on the front axle if the
vehicle must be driven in snow or
on ice.
Do not use the compact spare tire on any other vehicle because thistire has been designed especially
for your vehicle.
The compact spare tire’s tread life is shorter than a regular tire.
Inspect your compact spare tire
regularly and replace worn com-
pact spare tires with the same sizeand design, mounted on the samewheel. The compact spare tire should not
be used on any other wheels, nor
should standard tires, snow tires,
wheel covers or trim rings be used
with the compact spare wheel. Ifsuch use is attempted, damage tothese items or other car compo-
nents may occur.
Do not use more than one compact spare tire at a time.
Do not tow a trailer while the com- pact spare tire is installed.
CAUTION
When the original tire and wheel
are repaired and reinstalled onthe vehicle, the wheel nut torquemust be set correctly to preventwheel vibration. The correctwheel nut tightening torque is65~79lb-ft (9~11kg.m).
Page 289 of 382
73
Maintenance
MAINTENANCE SERVICES
You should exercise the utmost care to
prevent damage to your vehicle and
injury to yourself whenever performing
any maintenance or inspection proce-
dures.
Should you have any doubts concerning
the inspection or servicing of your vehi-
cle, we strongly recommend that you
have an authorized HYUNDAI dealer
perform this work.
An authorized HYUNDAI dealer has fac-
tory-trained technicians and genuine
HYUNDAI parts to service your vehicle
properly. For expert advice and quality
service, see an authorized HYUNDAI
dealer.
Inadequate, incomplete or insufficient
servicing may result in operational prob-
lems with your vehicle that could lead to
vehicle damage, an accident, or person-
al injury.
Owner’s responsibility
✽✽ NOTICE
Maintenance Service and Record
Retention are the owner's responsibility.
You should retain documents that show
proper maintenance has been performed
on your vehicle in accordance with the
scheduled maintenance service charts
shown on the following pages. You need
this information to establish your compli-
ance with the servicing and maintenance
requirements of your vehicle warranties.
Detailed warranty information is provided
in your Owner’s Handbook & Warranty
Information booklet. Repairs and adjustments required as a
result of improper maintenance or a lack
of required maintenance are not covered.
We recommend you have your vehicle
maintained and repaired by an author-
ized HYUNDAI dealer. An authorized
HYUNDAI dealer meets HYUNDAI’s high
service quality standards and receives
technical support from HYUNDAI in
order to provide you with a high level of
service satisfaction.
Owner maintenance precautions
Improper or incomplete service may
result in problems. This section gives
instructions only for the maintenance
items that are easy to perform.
As explained earlier in this section, sev-
eral procedures can be done only by an
authorized HYUNDAI dealer with special
tools.
✽✽ NOTICE
Improper owner maintenance during the
warranty period may affect warranty
coverage. For details, read the separate
Owner’s Handbook & Warranty
Information booklet provided with the
vehicle. If you're unsure about any serv-
icing or maintenance procedure, have it
done by an authorized HYUNDAI dealer.
Page 290 of 382
Maintenance
4
7
The following lists are vehicle checks and
inspections that should be performed by
the owner or an authorized HYUNDAIdealer at the frequencies indicated to
help ensure safe, dependable operation
of your vehicle.
Any adverse conditions should be
brought to the attention of your dealer as
soon as possible.
These Owner Maintenance Checks are
generally not covered by warranties and
you may be charged for labor, parts and
lubricants used.Owner maintenance schedule
When you stop for fuel:
Check the engine oil level.
Check the coolant level in coolant
reservoir.
Check the windshield washer fluid level.
Look for low or under-inflated tires.
WARNING- Maintenance work
Performing maintenance work on a vehicle can be dangerous. You
can be seriously injured while
performing some maintenance
procedures. If you lack sufficient
knowledge and experience or the
proper tools and equipment to do
the work, have it done by an
authorized HYUNDAI dealer.
Working under the hood with the engine running is dangerous. It
becomes even more dangerous
when you wear jewelry or loose
clothing. These can become
entangled in moving parts and
result in injury. Therefore, if you
must run the engine while work-
ing under the hood, make certain
that you remove all jewelry (espe-
cially rings, bracelets, watches,
and necklaces) and all neckties,
scarves, and similar loose cloth-
ing before getting near theengine or cooling fans.
OWNER MAINTENANCE
WARNING
Be careful when checking your
engine coolant level when the
engine is hot. Scalding hot coolant
and steam may blow out under
pressure. This could cause burns
or other serious injury.
Page 330 of 382
Maintenance
44
7
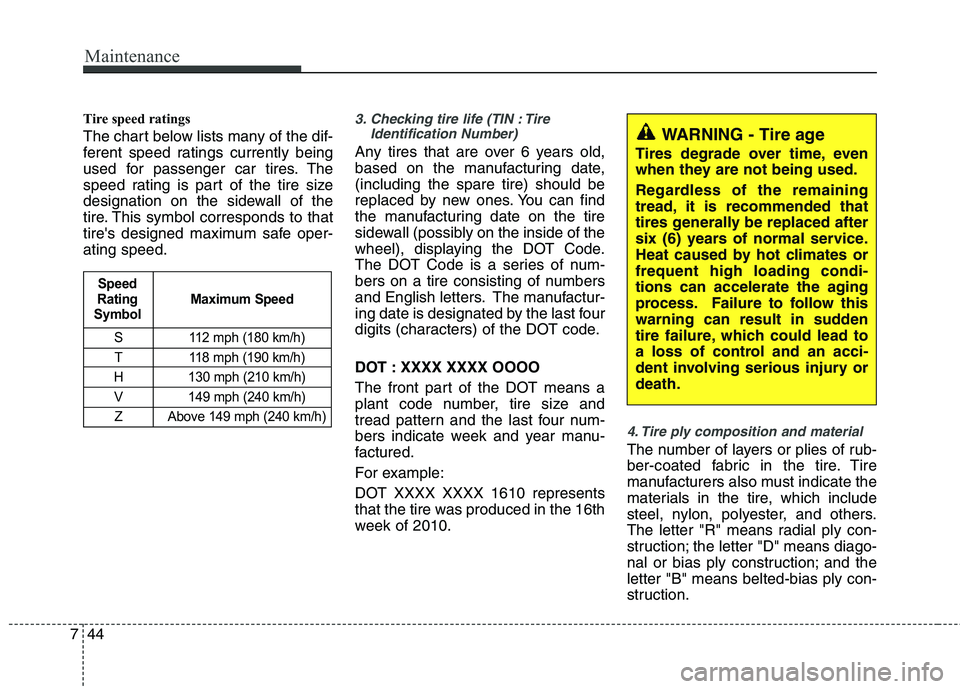
Tire speed ratings
The chart below lists many of the dif-
ferent speed ratings currently being
used for passenger car tires. The
speed rating is part of the tire size
designation on the sidewall of the
tire. This symbol corresponds to that
tire's designed maximum safe oper-ating speed.
3. Checking tire life (TIN : Tire
Identification Number)
Any tires that are over 6 years old,
based on the manufacturing date,(including the spare tire) should be
replaced by new ones. You can find
the manufacturing date on the tire
sidewall (possibly on the inside of the
wheel), displaying the DOT Code.
The DOT Code is a series of num-
bers on a tire consisting of numbers
and English letters. The manufactur-
ing date is designated by the last four
digits (characters) of the DOT code.
DOT : XXXX XXXX OOOO
The front part of the DOT means a
plant code number, tire size and
tread pattern and the last four num-
bers indicate week and year manu-
factured.
For example:
DOT XXXX XXXX 1610 represents
that the tire was produced in the 16th
week of 2010.
4. Tire ply composition and material
The number of layers or plies of rub-
ber-coated fabric in the tire. Tire
manufacturers also must indicate the
materials in the tire, which include
steel, nylon, polyester, and others.
The letter "R" means radial ply con-
struction; the letter "D" means diago-
nal or bias ply construction; and theletter "B" means belted-bias ply con-
struction.
S 112 mph (180 km/h)
T 118 mph (190 km/h)
H 130 mph (210 km/h) V 149 mph (240 km/h) Z Above 149 mph (240 km/h)
Maximum Speed
Speed
Rating
Symbol
WARNING - Tire age
Tires degrade over time, even
when they are not being used.
Regardless of the remaining
tread, it is recommended that
tires generally be replaced after
six (6) years of normal service.
Heat caused by hot climates orfrequent high loading condi-
tions can accelerate the aging
process. Failure to follow this
warning can result in sudden
tire failure, which could lead to
a loss of control and an acci-
dent involving serious injury ordeath.
Page 331 of 382
745
Maintenance
5. Maximum permissible inflationpressure
This number is the greatest amount of air pressure that should be put in
the tire. Do not exceed the maximum
permissible inflation pressure. Refer
to the Tire and Loading Information
label for recommended inflation
pressure.
6. Maximum load rating
This number indicates the maximum
load in kilograms and pounds that
can be carried by the tire. When
replacing the tires on the vehicle,
always use a tire that has the same
load rating as the factory installed
tire.
7. Uniform tire quality grading
Quality grades can be found where
applicable on the tire sidewall
between tread shoulder and maxi-
mum section width.
For example:
TREAD wear 200
TRACTION AA
TEMPERATURE A
Tread wear
The tread wear grade is a compara-
tive rating based on the wear rate ofthe tire when tested under controlled
conditions on a specified govern-
ment test course. For example, a tire
graded 150 would wear one-and-a-
half times (1½) as well on the gov-
ernment course as a tire graded 100.
The relative performance of tires depends upon the actual conditions
of their use, however, and may
depart significantly from the norm
due to variations in driving habits,
service practices and differences in
road characteristics and climate.
These grades are molded on the
side-walls of passenger vehicle tires. The tires available as standard or
optional equipment on your vehicle
may vary with respect to grade.
Traction - AA, A, B & C
The traction grades, from highest to
lowest, are AA, A, B and C. Those
grades represent the tire’s ability to
stop on wet pavement as measuredunder controlled conditions on spec-
ified government test surfaces of
asphalt and concrete. A tire marked
C may have poor traction perform-
ance.
WARNING
The traction grade assigned to this tire is based on straight-ahead braking traction tests,
and does not include accelera-
tion, cornering, hydroplaning,
or peak traction characteristics.