2011 HYUNDAI TUCSON ESP
[x] Cancel search: ESPPage 120 of 382
439
Features of your vehicle
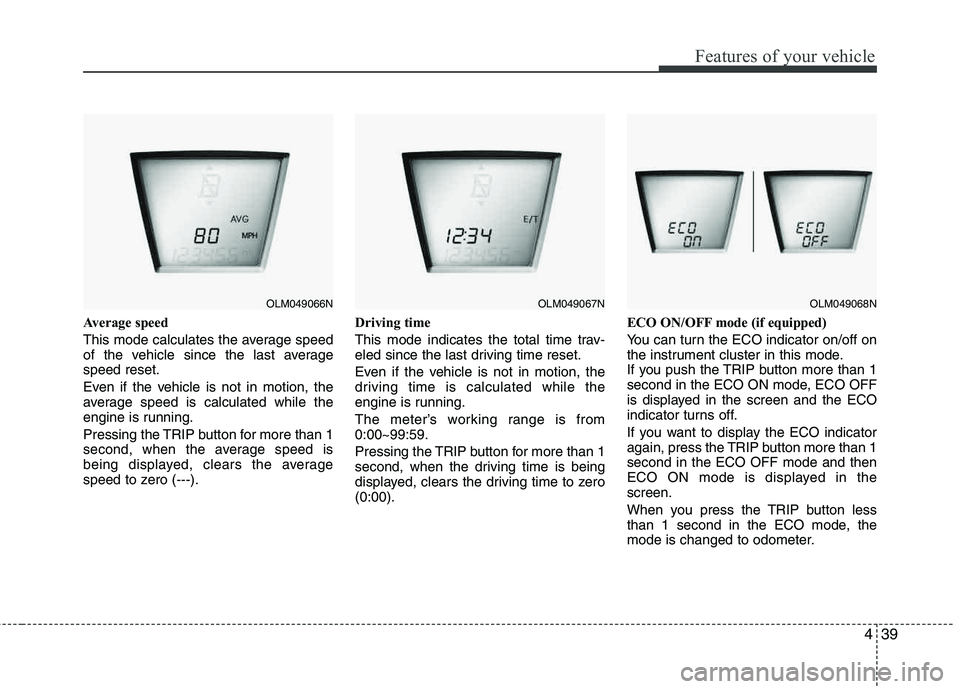
Average speed
This mode calculates the average speed
of the vehicle since the last averagespeed reset.
Even if the vehicle is not in motion, the
average speed is calculated while the
engine is running.
Pressing the TRIP button for more than 1
second, when the average speed is
being displayed, clears the average
speed to zero (---).Driving time
This mode indicates the total time trav-
eled since the last driving time reset.
Even if the vehicle is not in motion, the
driving time is calculated while the
engine is running.
The meter’s working range is from 0:00~99:59.
Pressing the TRIP button for more than 1
second, when the driving time is being
displayed, clears the driving time to zero (0:00).ECO ON/OFF mode (if equipped)
You can turn the ECO indicator on/off on
the instrument cluster in this mode.
If you push the TRIP button more than 1
second in the ECO ON mode, ECO OFF
is displayed in the screen and the ECO
indicator turns off.
If you want to display the ECO indicator
again, press the TRIP button more than 1 second in the ECO OFF mode and then
ECO ON mode is displayed in the screen.
When you press the TRIP button less
than 1 second in the ECO mode, the
mode is changed to odometer.
OLM049066NOLM049067NOLM049068N
Page 129 of 382
Features of your vehicle
48
4
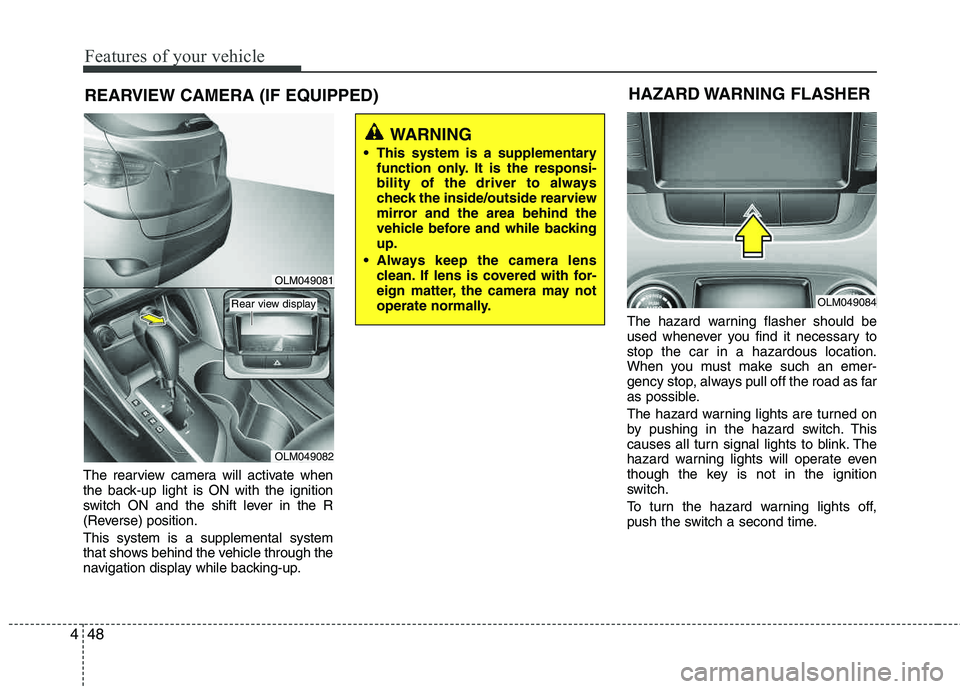
REARVIEW CAMERA (IF EQUIPPED)
The rearview camera will activate when
the back-up light is ON with the ignition
switch ON and the shift lever in the R
(Reverse) position. This system is a supplemental system
that shows behind the vehicle through the
navigation display while backing-up. The hazard warning flasher should be
used whenever you find it necessary to stop the car in a hazardous location.
When you must make such an emer-
gency stop, always pull off the road as far
as possible.
The hazard warning lights are turned on
by pushing in the hazard switch. This
causes all turn signal lights to blink. The
hazard warning lights will operate even
though the key is not in the ignition
switch.
To turn the hazard warning lights off,
push the switch a second time.
WARNING
This system is a supplementary function only. It is the responsi-
bility of the driver to always
check the inside/outside rearview
mirror and the area behind the
vehicle before and while backingup.
Always keep the camera lens clean. If lens is covered with for-
eign matter, the camera may not
operate normally.
HAZARD WARNING FLASHER
OLM049084
OLM049081
OLM049082
Rear view display
Page 158 of 382
477
Features of your vehicle
For maximum defrosting, set the tem-perature control to the extreme
right/hot position and the fan speedcontrol to the highest speed.
If warm air to the floor is desired while defrosting or defogging, set the modeto the floor-defrost position.
Before driving, clear all snow and ice from the windshield, rear window, out-
side rear view mirrors, and all side win-
dows.
Clear all snow and ice from the hood and air inlet in the cowl grill to improveheater and defroster efficiency and to
reduce the probability of fogging up the inside of the windshield.
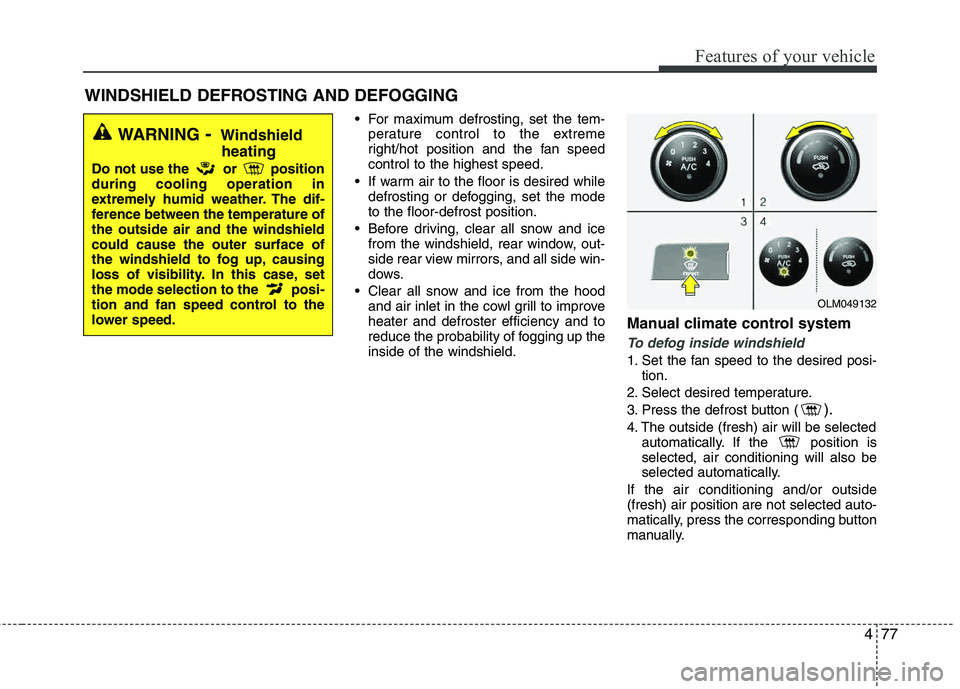
Manual climate control system
To defog inside windshield
1. Set the fan speed to the desired posi-
tion.
2. Select desired temperature.
3. Press the defrost button (
).
4. The outside (fresh) air will be selected automatically. If the position is selected, air conditioning will also be
selected automatically.
If the air conditioning and/or outside(fresh) air position are not selected auto-
matically, press the corresponding button
manually.
WINDSHIELD DEFROSTING AND DEFOGGING
WARNING - Windshield
heating
Do not use the or position during cooling operation in
extremely humid weather. The dif-
ference between the temperature of the outside air and the windshield could cause the outer surface of
the windshield to fog up, causing
loss of visibility. In this case, set
the mode selection to the posi-
tion and fan speed control to the
lower speed.
OLM049132
Page 159 of 382
Features of your vehicle
78
4
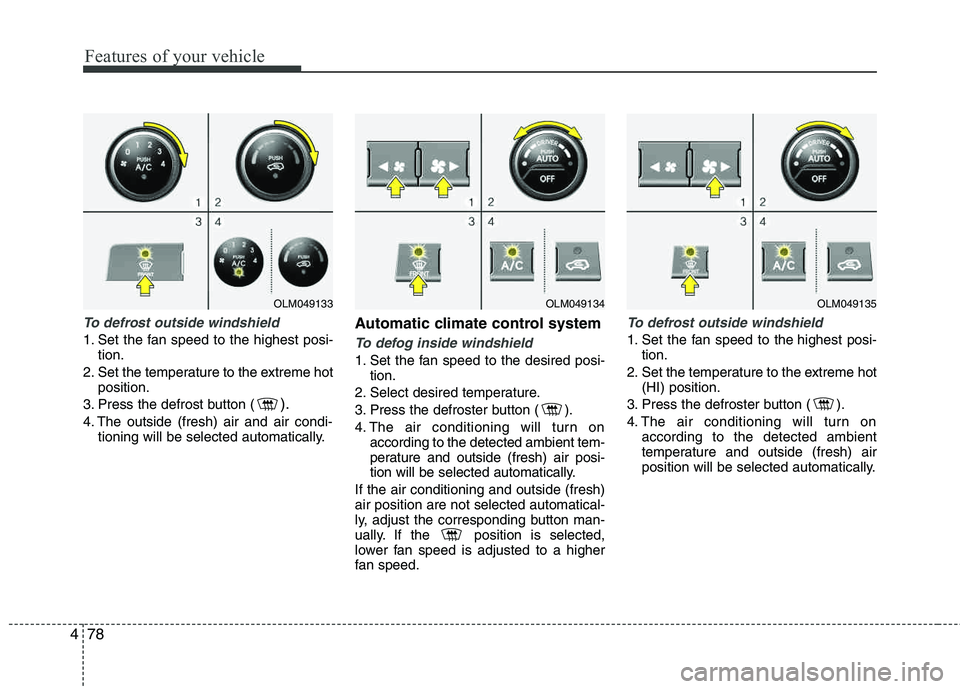
To defrost outside windshield
1. Set the fan speed to the highest posi-
tion.
2. Set the temperature to the extreme hot position.
3. Press the defrost button (
).
4. The outside (fresh) air and air condi- tioning will be selected automatically.
Automatic climate control system
To defog inside windshield
1. Set the fan speed to the desired posi- tion.
2. Select desired temperature.
3. Press the defroster button ( ).
4. The air conditioning will turn on according to the detected ambient tem-
perature and outside (fresh) air posi-
tion will be selected automatically.
If the air conditioning and outside (fresh)air position are not selected automatical-
ly, adjust the corresponding button man-
ually. If the position is selected,
lower fan speed is adjusted to a higher
fan speed.
To defrost outside windshield
1. Set the fan speed to the highest posi- tion.
2. Set the temperature to the extreme hot (HI) position.
3. Press the defroster button ( ).
4. The air conditioning will turn on according to the detected ambient
temperature and outside (fresh) air
position will be selected automatically.
OLM049134OLM049135OLM049133
Page 170 of 382
489
Features of your vehicle
✽✽NOTICE
If you install an aftermarket HID head-
lamp, your vehicle's audio and electron-
ic device may malfunction.
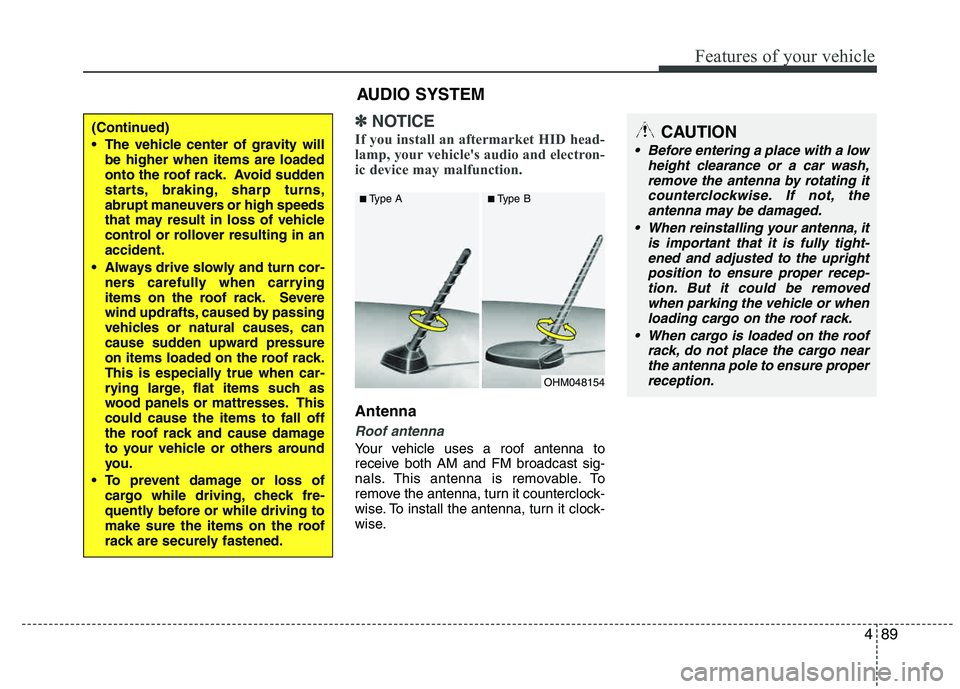
Antenna
Roof antenna
Your vehicle uses a roof antenna to
receive both AM and FM broadcast sig-
nals. This antenna is removable. To
remove the antenna, turn it counterclock-
wise. To install the antenna, turn it clock-
wise.
OHM048154
■
Type A ■Type B
CAUTION
• Before entering a place with a low
height clearance or a car wash,remove the antenna by rotating it
counterclockwise. If not, theantenna may be damaged.
When reinstalling your antenna, it is important that it is fully tight-
ened and adjusted to the uprightposition to ensure proper recep-tion. But it could be removed
when parking the vehicle or whenloading cargo on the roof rack.
When cargo is loaded on the roof rack, do not place the cargo near
the antenna pole to ensure properreception.
AUDIO SYSTEM
(Continued)
The vehicle center of gravity will be higher when items are loaded
onto the roof rack. Avoid sudden
starts, braking, sharp turns,
abrupt maneuvers or high speeds
that may result in loss of vehicle
control or rollover resulting in anaccident.
Always drive slowly and turn cor- ners carefully when carrying
items on the roof rack. Severe
wind updrafts, caused by passing
vehicles or natural causes, can
cause sudden upward pressure
on items loaded on the roof rack.
This is especially true when car-
rying large, flat items such as
wood panels or mattresses. Thiscould cause the items to fall off
the roof rack and cause damage
to your vehicle or others around
you.
To prevent damage or loss of cargo while driving, check fre-
quently before or while driving to
make sure the items on the roof
rack are securely fastened.
Page 177 of 382
![HYUNDAI TUCSON 2011 Owners Manual Features of your vehicle
96
4
Using RADIO, SETUP, VOLUME
and AUDIO CONTROL
1. AM Selection Button
Pressing the [AM] button selects the AM
band. AM Mode is displayed on the LCD.
2. FM Selection But HYUNDAI TUCSON 2011 Owners Manual Features of your vehicle
96
4
Using RADIO, SETUP, VOLUME
and AUDIO CONTROL
1. AM Selection Button
Pressing the [AM] button selects the AM
band. AM Mode is displayed on the LCD.
2. FM Selection But](/manual-img/35/56206/w960_56206-176.png)
Features of your vehicle
96
4
Using RADIO, SETUP, VOLUME
and AUDIO CONTROL
1. AM Selection Button
Pressing the [AM] button selects the AM
band. AM Mode is displayed on the LCD.
2. FM Selection Button Turns to FM mode and toggles FM1 and
FM2 when the button is pressed each
time.
3. Automatic Station Seek Button
When the [SEEK ] is pressed, it will
automatically tune to the next lower station.
When the [SEEK ] is pressed, it will automatically tune to the next higher station.
4. Power ON/OFF Button & Volume Control Knob
Turns the audio system on/off whenthe ignition switch is on ACC or ON.
If the knob is turned clockwise/counter- clockwise, the volume will increase
/decrease.
5. Preset Selection Button
Press [1]~[6] buttons less than 0.8 sec-ond to play the station saved in each
button.
Press [1]~[6] b utton more than 0.8 sec-
ond or longer to save the current station
to the respective button with a beep.
6. SCAN Button
When the button is pressed, it auto- matically scans the radio stations
upwards.
The SCAN feature steps through each station, starting from the initial station,
for ten seconds.
Press the [SCAN] button again to stop the scan feature and to listen to the currently selected channel.
7. DISP Button
Turn the LCD Display & Backlight on/off
when [DISP] button press.
8. SETUP Button
Press this Button to enter SETUP mode,
If no action is taken for 8 seconds, it will
return to previous mode.
In “SETUP” mode, rotate the TUNE knob
to move the cursor between items, and
push the TUNE knob to select.
Select whether long file names are
scrolled continuously (“ON”) or just once(“OFF”).
Select this item to turn the SDVC(Speed
Dependent Volume Control) feature ON
or OFF. If it is turned ON, volume level is adjusted automatically according to the
vehicle speed.
This function creates virtual sound
effects and allows adjustments to the
BASS level. HIGH
➟MID ➟LOW ➟OFF
Select default display of XM mode.
“Category/Channel name” or “Artist/Song
Title” can be selected.
Page 190 of 382
4109
Features of your vehicle
Using XM Satellite Radio
Your vehicle is equipped with 3 months
complimentary period of XM Satellite
Radio so you have access to over 130
channels of music, information, and
entertainment programming.
1. XM Selection Button
Turns to XM Satellite Radio Mode. XMmode toggles in order to XM1➟XM2➟XM3➟XM1... when the button is pressed
each time.
2. Channel Selection Button
Push [TRACK ] button for less than
0.8 seconds to select previous channel.
Push [TRACK ] button for 0.8 sec- onds or longer to continuously move to
previous channel.
Push [SEEK ] button for less than 0.8 seconds to select next channel.
Push [SEEK ] button for 0.8 sec- onds or longer to continuously move to
next channel.
Radio ID : Seek or Tune to XM channel 0 to display the Radio ID.
3. Preset Selection Button
Push [1]~[6] buttons less than 0.8 sec-
onds to play the channel saved in each
button. Push Preset button for 0.8 sec-
onds or longer to save current channel to
the respective button with a beep.
4. SCAN Selection Button
Press to hear a brief sampling of all
channel. To cancel the scan mode, press
the button once again.
5. INFO Button
Displays the information of the current
channel in the order of Artist/Song title➟Category/Channel name➟Current Play
Channel➟Artist/Song title➟Category/
Channel name... when the button is
pressed each time.
If can not display the whole text informa-
tion, rotate the tune button to see the
next page.
6. CATEGORY Search Button
Push [FOLDER ] button to search
previous category.
Push [CAT ] button to search next category. To listen to the displayed cat-
egory, press the TUNE/SETUP button.
To scan channel in displayed category,
press the scan button. To search chan-
nel in displayed category, press seek
buttons or turn the tune button clock-
wise/counterclockwise.(CATEGORY
icon is will be turned on in Categorymode)
7. Manual Channel Selection Button
While listening to XM broadcast, rotate
this control to the right or left to searchother channels while listening to current
channel. (Turn to the right to searchhigh-
er channels and left, lower channels)
Page 193 of 382
Features of your vehicle
112
4
■
Voice Recognition Activation
The voice recognition engine con-
tained in the Bluetooth ®
System can be
activated in the following conditions:
- Button Activation The voice recognition system will be
active when the button is pressed
and after the sound of a Beep.
- Active Listening The voice recognition system will be
active for a period of time when the
Voice Recognition system has asked
for a customer response.
The system can recognize single dig- itsfrom zero to nine while number
greater than ten will not be recognized.
If the command is not recognized, the system will announce "Pardon" or No
input voice signal from microphone.(No response)
The system shall cancel voice recogni- tion mode in following cases : When
pressing the button and saying
cancel following the beep. When not
making a call and pressing the but-
ton. When voice recognition has failed
3 consecutive times. At any time if you say “help”, the sys-
tem will announce what commands are
available.
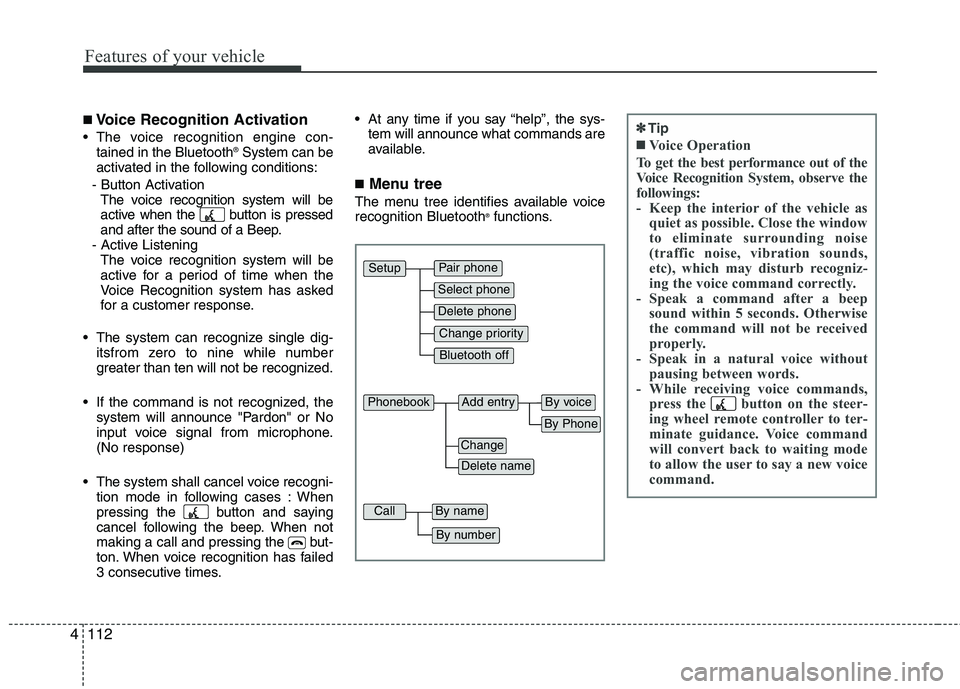
■ Menu tree
The menu tree identifies available voicerecognition Bluetooth ®
functions.
Pair phone
Select phone
Change priority
Delete phone
Bluetooth off
Setup
Add entryPhonebook
Change
Delete name
By Phone
By voice
CallBy name
By number
✽✽ Tip
■Voice Operation
To get the best performance out of the
Voice Recognition System, observe the
followings:
- Keep the interior of the vehicle as quiet as possible. Close the window
to eliminate surrounding noise
(traffic noise, vibration sounds,
etc), which may disturb recogniz-
ing the voice command correctly.
- Speak a command after a beep sound within 5 seconds. Otherwise
the command will not be received
properly.
- Speak in a natural voice without pausing between words.
- While receiving voice commands, press the button on the steer-
ing wheel remote controller to ter-
minate guidance. Voice command
will convert back to waiting mode
to allow the user to say a new voice
command.