Page 82 of 312
47
Features of your vehicle
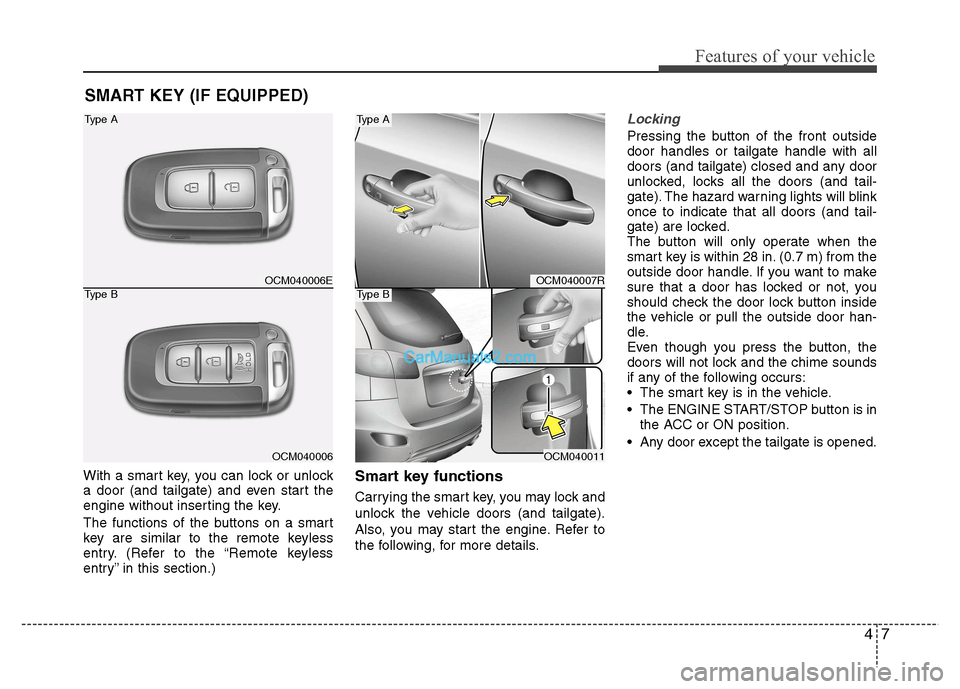
With a smart key, you can lock or unlock
a door (and tailgate) and even start the
engine without inserting the key.
The functions of the buttons on a smart
key are similar to the remote keyless
entry. (Refer to the “Remote keyless
entry” in this section.)Smart key functions
Carrying the smart key, you may lock and
unlock the vehicle doors (and tailgate).
Also, you may start the engine. Refer to
the following, for more details.
Locking
Pressing the button of the front outside door handles or tailgate handle with all
doors (and tailgate) closed and any door
unlocked, locks all the doors (and tail-
gate). The hazard warning lights will blinkonce to indicate that all doors (and tail-
gate) are locked.
The button will only operate when the
smart key is within 28 in. (0.7 m) from the
outside door handle. If you want to make
sure that a door has locked or not, you
should check the door lock button inside
the vehicle or pull the outside door han-
dle.
Even though you press the button, the
doors will not lock and the chime sounds
if any of the following occurs:
The smart key is in the vehicle.
The ENGINE START/STOP button is in
the ACC or ON position.
Any door except the tailgate is opened.
SMART KEY (IF EQUIPPED)
OCM040006E
OCM040006
Type A
Type BOCM040007R
OCM040011
Type A
Type B
Page 103 of 312
Features of your vehicle
28
4
D110000AUN
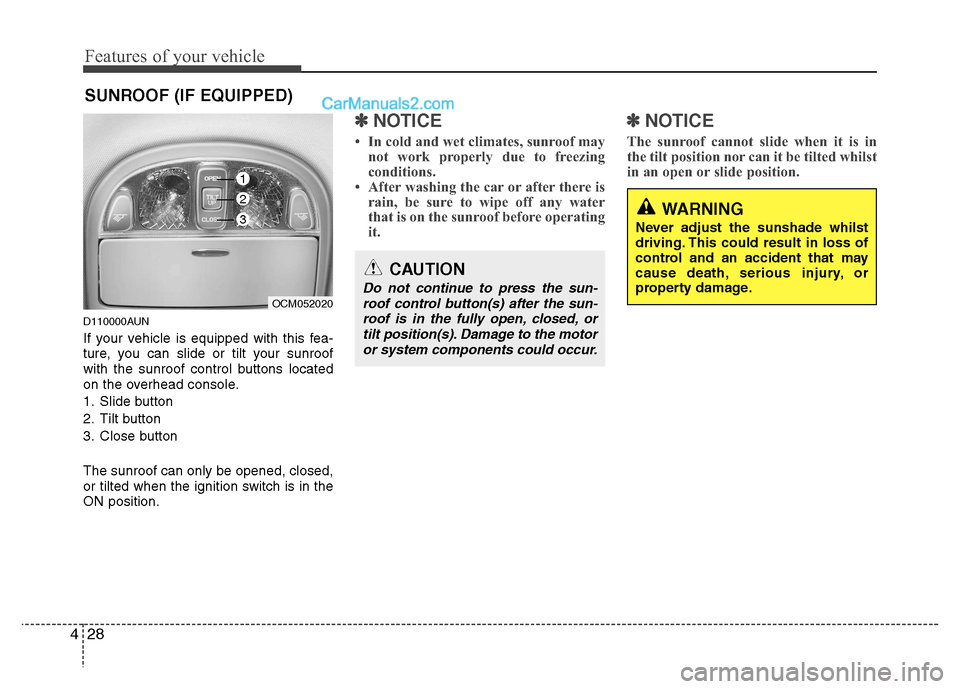
If your vehicle is equipped with this fea-
ture, you can slide or tilt your sunroof
with the sunroof control buttons located
on the overhead console.
1. Slide button
2. Tilt button
3. Close button The sunroof can only be opened, closed,
or tilted when the ignition switch is in theON position.
✽✽
NOTICE
In cold and wet climates, sunroof may not work properly due to freezing
conditions.
After washing the car or after there is
rain, be sure to wipe off any water
that is on the sunroof before operating
it. ✽✽
NOTICE
The sunroof cannot slide when it is in
the tilt position nor can it be tilted whilst
in an open or slide position.
SUNROOF (IF EQUIPPED)
OCM052020
CAUTION
Do not continue to press the sun- roof control button(s) after the sun- roof is in the fully open, closed, ortilt position(s). Damage to the motor
or system components could occur.
WARNING
Never adjust the sunshade whilst
driving. This could result in loss of
control and an accident that may
cause death, serious injury, or
property damage.
1
2
3
Page 155 of 312
Features of your vehicle
80
4
Mode selection
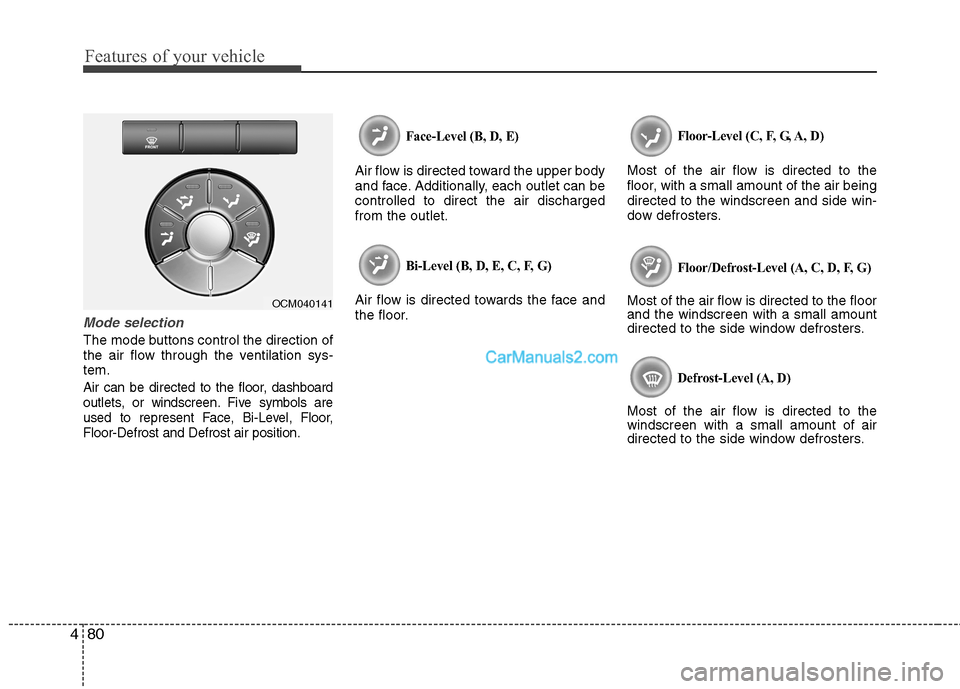
The mode buttons control the direction of
the air flow through the ventilation sys-tem.
Air can be directed to the floor, dashboard
outlets, or windscreen. Five symbols are
used to represent Face, Bi-Level, Floor,Floor-Defrost and Defrost air position. Face-Level (B, D, E)
Air flow is directed toward the upper body
and face. Additionally, each outlet can becontrolled to direct the air dischargedfrom the outlet.
Bi-Level (B, D, E, C, F, G)
Air flow is directed towards the face and
the floor.
Floor-Level (C, F, G, A, D)
Most of the air flow is directed to the
floor, with a small amount of the air beingdirected to the windscreen and side win-
dow defrosters.
Floor/Defrost-Level (A, C, D, F, G)
Most of the air flow is directed to the floor and the windscreen with a small amount
directed to the side window defrosters.
Defrost-Level (A, D)
Most of the air flow is directed to thewindscreen with a small amount of air
directed to the side window defrosters.
OCM040141
Page 164 of 312
489
Features of your vehicle
Manual heating and air condition- ing The heating and cooling system can be
controlled manually by pressing buttons
or turning knob(s) other than the AUTO
button. In this case, the system workssequentially according to the order of
buttons or knob(s) selected.
1. Start the engine.
2. Set the mode to the desired position.For improving the effectiveness of heating and cooling;- Heating: - Cooling:
3. Set the temperature control to the desired position.
4. Set the air intake control to the outside (fresh) air position.
5. Set the fan speed control to the desired speed.
6. If air conditioning is desired, turn the air conditioning system on.
Press the AUTO button in order to con-
vert to full automatic control of the sys-tem.
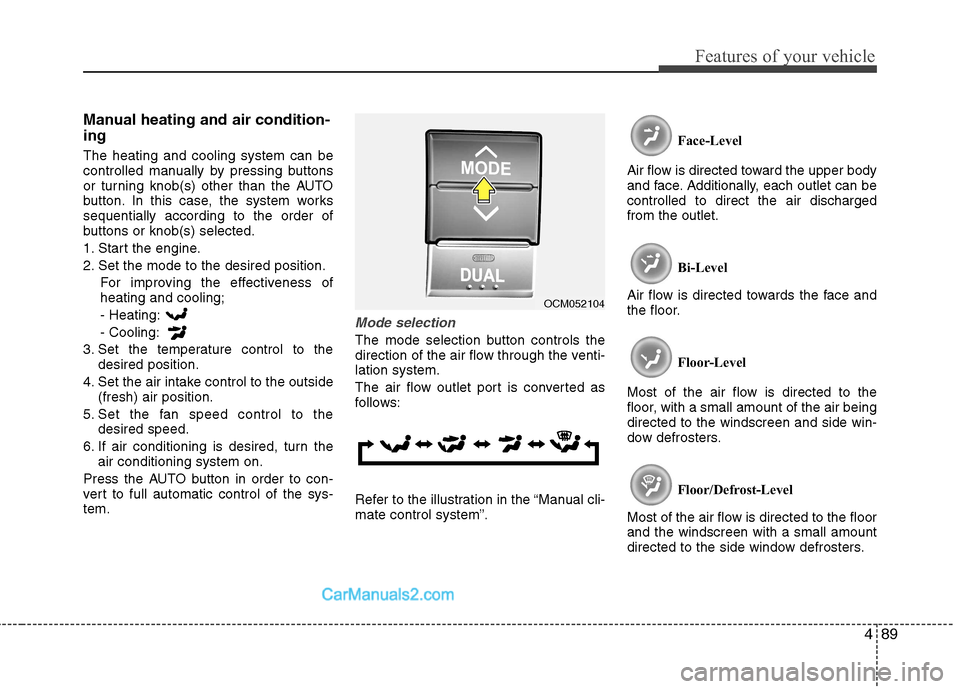
Mode selection
The mode selection button controls the
direction of the air flow through the venti-lation system.
The air flow outlet port is converted as
follows:
Refer to the illustration in the “Manual cli- mate control system”. Face-Level
Air flow is directed toward the upper body
and face. Additionally, each outlet can becontrolled to direct the air dischargedfrom the outlet.
Bi-Level
Air flow is directed towards the face and
the floor.
Floor-Level
Most of the air flow is directed to the
floor, with a small amount of the air beingdirected to the windscreen and side win-
dow defrosters.
Floor/Defrost-Level
Most of the air flow is directed to the floorand the windscreen with a small amount
directed to the side window defrosters.
OCM052104
Page 169 of 312
Features of your vehicle
94
4
OFF mode
Press the front blower OFF button to turn off the front air climate control system.
However, you can still operate the mode
and air intake buttons as long as the igni-
tion switch is in the ON position. 3rd row air conditioning (if equipped)
To turn on the 3rd row air conditioning control system
1. Press the 3rd row air conditioning
ON/OFF button located on the front
climate control panel and set the fanspeed to the desired speed with the
3rd row fan speed switch. (indicator
light on the ON/OFF button ( ) willilluminate). 2. To turn off the 3rd row air conditioning
control system, press the 3rd row air
conditioning ON/OFF button ( ) oncemore located on the front climate con-
trol panel or set the fan speed to the
OFF position with the 3rd row fan
speed switch (indicator light on the
ON/OFF button ( ) is not illuminat-ed).
OCM052099OCM040217R
Page 180 of 312
4105
Features of your vehicle
D280600AUN
Digital clock (if equipped)Whenever the battery terminals or relat-
ed fuses are disconnected, you must
reset the time.
When the ignition switch is in the ACC or
ON position, the clock buttons operate as
follows:
D280601AUN
HOUR (1)
Pressing the “H” button will advance
the time displayed by one hour.
D280602AUN
MINUTE (2)
Pressing the “M” button will advance
the time displayed by one minute.
D280603AUN
RESET (3, if equipped)
To clear away minutes, press the “R”
button with your finger, a pencil or sim-
ilar object. Then the clock will be set
precisely on the hour.
For example, if the “R” button is
pressed whilst the time is between
9:01 and 9:29, the display will be resetto 9:00.
9:01 ~ 9:29 display changed to 9:00
9:30 ~ 9:59 display changed to 10:00
WARNING
Do not adjust the clock whilst driv-
ing. You may lose your steering
control and cause severe personal
injury or accidents.
OCM040173
OCM040173L
Type A
Type B
Page 181 of 312
Features of your vehicle
106
4
D280604AUN
Display conversion:
Type A
To change the 12 hour format to the 24
hour format, press the “R” button for
more than 4 seconds.
For example, if the “R” button is
pressed for more than 4 seconds whilst
the time is 10:15 p.m., the display willbe changed to 22:15.
Type B To change the 24 hour format to the 12
hours format (if equipped), whilst
pressing the “H” button, press the “M”
button for 3 seconds or more. For
example, if the “H” and “M” buttons are
pressed for more than 3 seconds whilst
the time is 22:15, the display willchange to 10:15. D281400BFD
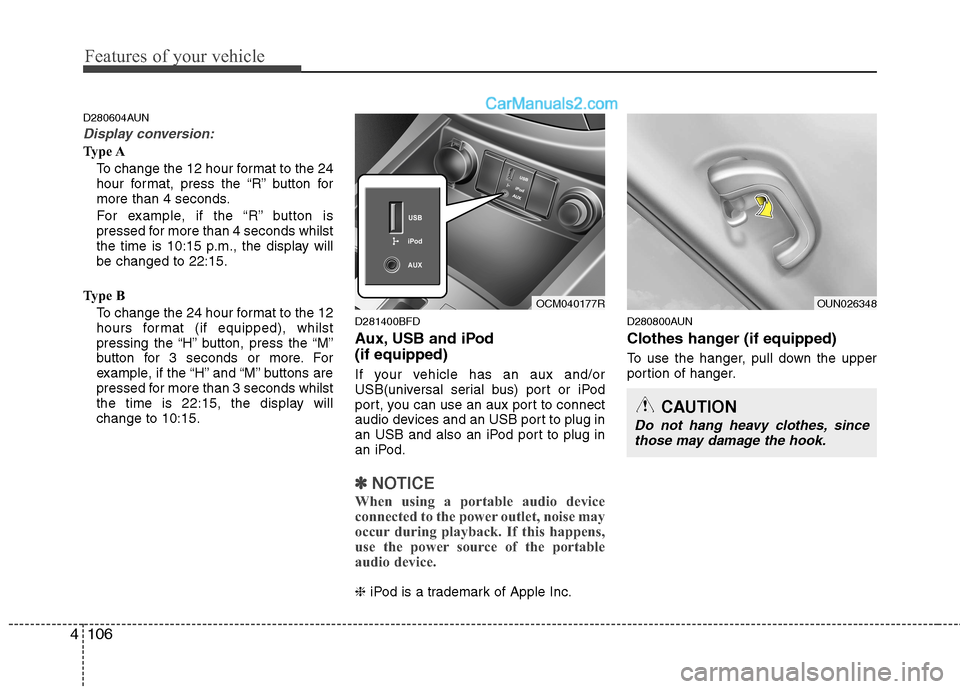
Aux, USB and iPod (if equipped)
If your vehicle has an aux and/or
USB(universal serial bus) port or iPod
port, you can use an aux port to connect
audio devices and an USB port to plug in
an USB and also an iPod port to plug in
an iPod.
✽✽
NOTICE
When using a portable audio device
connected to the power outlet, noise may
occur during playback. If this happens,
use the power source of the portable
audio device.
❈ iPod is a trademark of Apple Inc. D280800AUN
Clothes hanger (if equipped)
To use the hanger, pull down the upper
portion of hanger.
OCM040177ROUN026348
CAUTION
Do not hang heavy clothes, since
those may damage the hook.
Page 187 of 312
Features of your vehicle
112
4
D300200AFD
Audio remote control (if equipped)
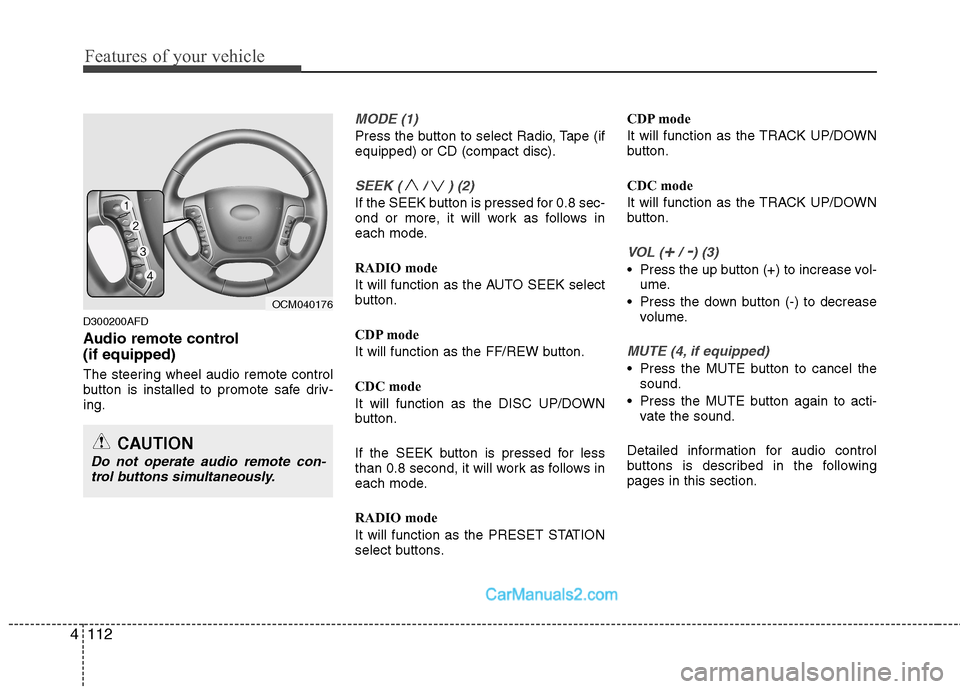
The steering wheel audio remote control
button is installed to promote safe driv-ing.
MODE (1)
Press the button to select Radio, Tape (if equipped) or CD (compact disc).
SEEK ( / ) (2)
If the SEEK button is pressed for 0.8 sec-
ond or more, it will work as follows in
each mode.
RADIO mode
It will function as the AUTO SEEK select
button.
CDP mode
It will function as the FF/REW button.
CDC mode
It will function as the DISC UP/DOWN
button.
If the SEEK button is pressed for less
than 0.8 second, it will work as follows in
each mode.
RADIO mode
It will function as the PRESET STATION
select buttons. CDP mode
It will function as the TRACK UP/DOWN
button.
CDC mode
It will function as the TRACK UP/DOWN
button.
VOL (+/ -) (3)
• Press the up button (+) to increase vol-
ume.
Press the down button (-) to decrease volume.
MUTE (4, if equipped)
Press the MUTE button to cancel thesound.
Press the MUTE button again to acti- vate the sound.
Detailed information for audio control
buttons is described in the followingpages in this section.
CAUTION
Do not operate audio remote con- trol buttons simultaneously.
OCM040176