2011 Hyundai Santa Fe audio
[x] Cancel search: audioPage 16 of 312
23
Your vehicle at a glance
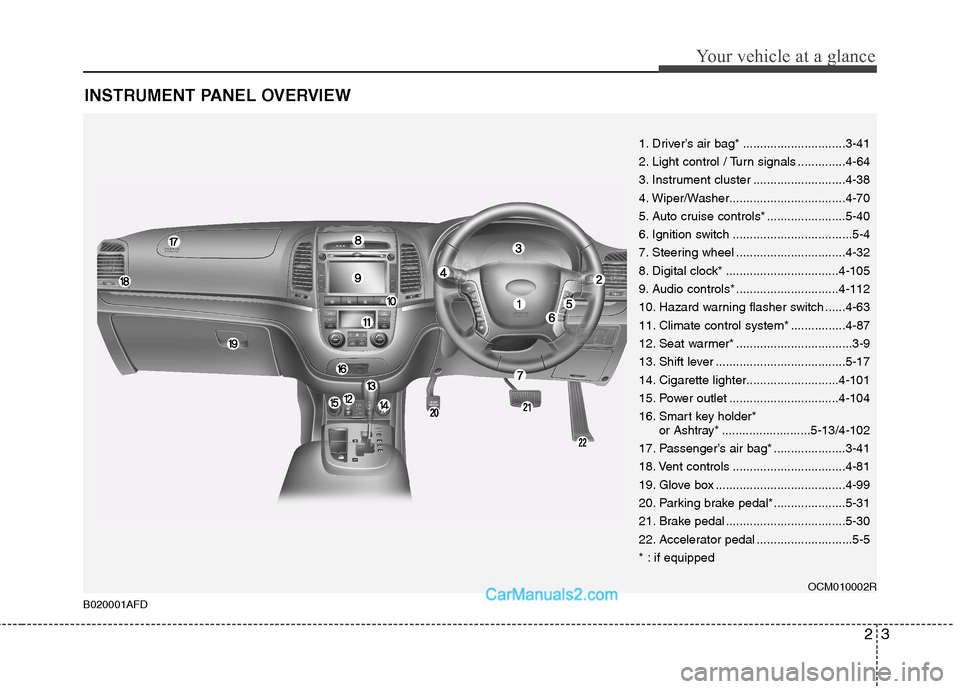
INSTRUMENT PANEL OVERVIEW
1. Driver’s air bag* ..............................3-41
2. Light control / Turn signals ..............4-64
3. Instrument cluster ...........................4-38
4. Wiper/Washer..................................4-70
5. Auto cruise controls* .......................5-40
6. Ignition switch ...................................5-4
7. Steering wheel ................................4-32
8. Digital clock* .................................4-105
9. Audio controls* ..............................4-112
10. Hazard warning flasher switch ......4-63
11. Climate control system* ................4-87
12. Seat warmer* ..................................3-9
13. Shift lever ......................................5-17
14. Cigarette lighter...........................4-101
15. Power outlet ................................4-10416.
Smart key holder*
or Ashtray*..........................5-13/4-102
17. Passenger’s air bag* .....................3-41
18. Vent controls .................................4-81
19. Glove box ......................................4-99
20. Parking brake pedal*.....................5-31
21. Brake pedal ...................................5-30
22. Accelerator pedal ............................5-5
* : if equipped
OCM010002R
B020001AFD
Page 76 of 312
4
Keys / 4-2
Remote keyless entry / 4-5
Smart key / 4-7
Theft-alarm system / 4-10
Door locks / 4-12
Tailgate / 4-16
Windows / 4-18
Bonnet / 4-22
Fuel filler lid / 4-24
Sunroof / 4-28
Steering wheel / 4-32
Mirrors / 4-34
Instrument cluster / 4-38
Rear parking assist system / 4-60
Rearview camera / 4-62
Hazard warning flasher / 4-63
Lighting / 4-64
Wipers and washers / 4-70
Interior light / 4-74
Defroster / 4-77
Manual climate control system / 4-78
Automatic climate control system / 4-87
Windscreen defrosting and defogging / 4-95
Storage compartment / 4-98
Interior features / 4-101
Exterior features / 4-110
Audio system / 4-111
Features of your vehicle
Page 138 of 312
463
Features of your vehicle
The rearview camera will activate when
the back-up light is ON with the ignition
switch ON and the shift lever in the R
(Reverse) position. This system is a sup-
plemental system that shows behind the
vehicle through the rearview display mir-
ror whilst backing-up.
Type A
The rearview camera may be turned off
by pressing the ON/OFF button when the
rearview camera is activated. To turn the
camera on again, press the ON/OFF but-
ton again when the ignition switch is on
and the shift lever in R (Reverse). Also,
the camera will turn on automatically
whenever the ignition switch is turned offand on again.
Type B (if equipped)
If your vehicle is equipped with AVN
(Audio, Video and Navigation) system,
rearview display will show behind the
vehicle through the AVN monitor whilst
backing-up.D180000AUN
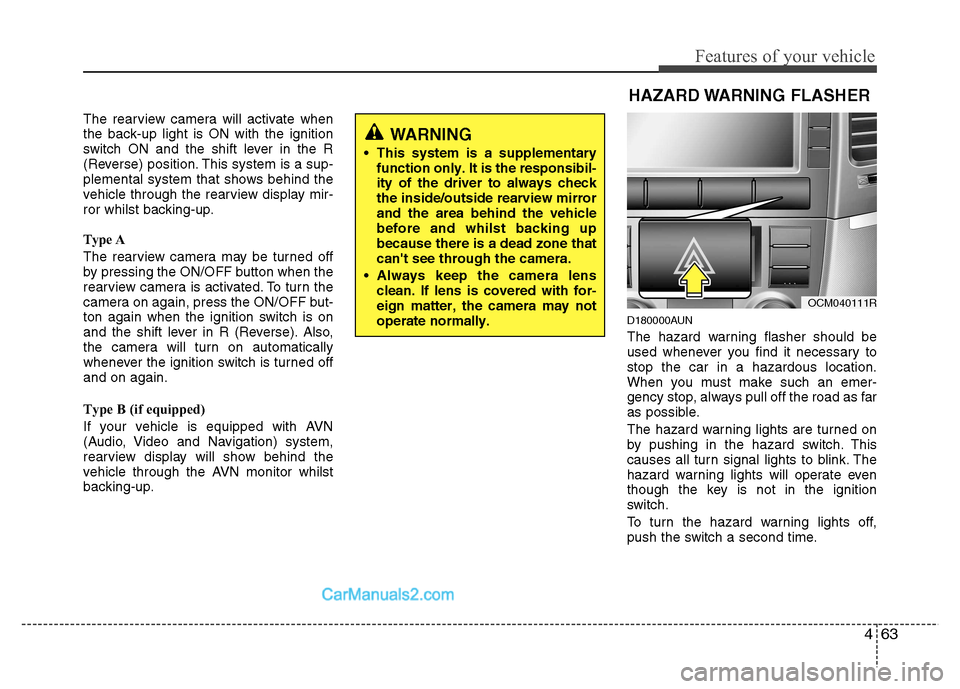
The hazard warning flasher should be
used whenever you find it necessary tostop the car in a hazardous location.
When you must make such an emer-
gency stop, always pull off the road as far
as possible.
The hazard warning lights are turned on
by pushing in the hazard switch. This
causes all turn signal lights to blink. The
hazard warning lights will operate even
though the key is not in the ignition
switch.
To turn the hazard warning lights off,
push the switch a second time.
WARNING
This system is a supplementary function only. It is the responsibil- ity of the driver to always checkthe inside/outside rearview mirrorand the area behind the vehiclebefore and whilst backing upbecause there is a dead zone thatcan't see through the camera.
Always keep the camera lens clean. If lens is covered with for-eign matter, the camera may notoperate normally.
OCM040111R
HAZARD WARNING FLASHER
Page 179 of 312
Features of your vehicle
104
4
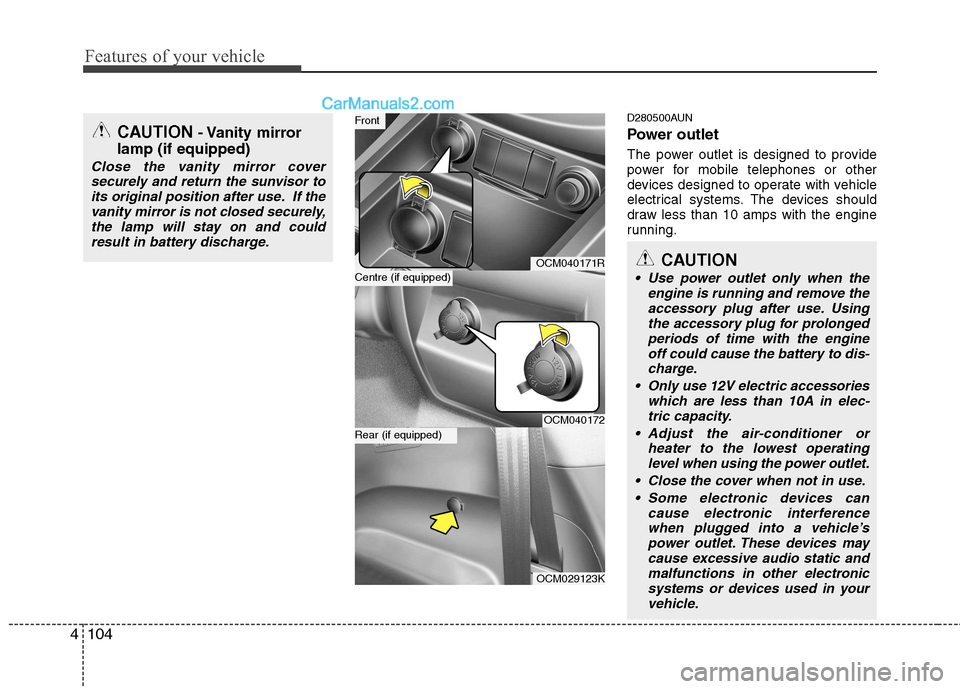
D280500AUN
Power outlet
The power outlet is designed to provide
power for mobile telephones or other
devices designed to operate with vehicle
electrical systems. The devices should
draw less than 10 amps with the engine
running.
CAUTION - Vanity mirror
lamp (if equipped)
Close the vanity mirror cover securely and return the sunvisor to
its original position after use. If thevanity mirror is not closed securely,the lamp will stay on and could result in battery discharge.
OCM040171R
OCM040172
OCM029123K
Centre (if equipped)
Front
Rear (if equipped)
CAUTION
Use power outlet only when the engine is running and remove the
accessory plug after use. Using the accessory plug for prolongedperiods of time with the engineoff could cause the battery to dis-
charge.
Only use 12V electric accessories which are less than 10A in elec-tric capacity.
Adjust the air-conditioner or heater to the lowest operatinglevel when using the power outlet.
Close the cover when not in use. Some electronic devices can cause electronic interferencewhen plugged into a vehicle’s
power outlet. These devices maycause excessive audio static and malfunctions in other electronic
systems or devices used in your vehicle.
Page 181 of 312
Features of your vehicle
106
4
D280604AUN
Display conversion:
Type A
To change the 12 hour format to the 24
hour format, press the “R” button for
more than 4 seconds.
For example, if the “R” button is
pressed for more than 4 seconds whilst
the time is 10:15 p.m., the display willbe changed to 22:15.
Type B To change the 24 hour format to the 12
hours format (if equipped), whilst
pressing the “H” button, press the “M”
button for 3 seconds or more. For
example, if the “H” and “M” buttons are
pressed for more than 3 seconds whilst
the time is 22:15, the display willchange to 10:15. D281400BFD
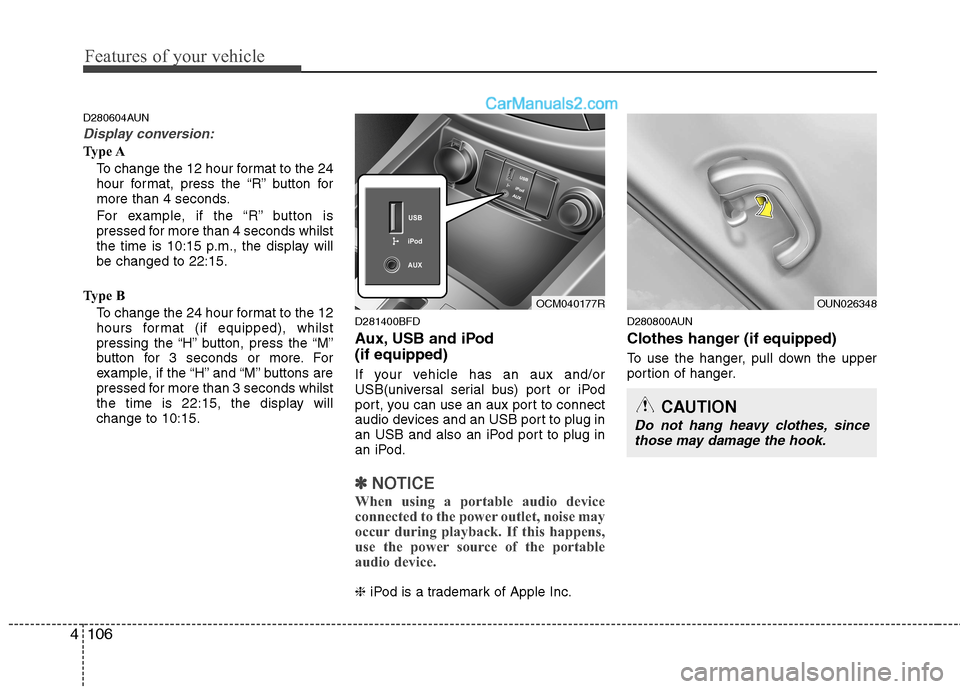
Aux, USB and iPod (if equipped)
If your vehicle has an aux and/or
USB(universal serial bus) port or iPod
port, you can use an aux port to connect
audio devices and an USB port to plug in
an USB and also an iPod port to plug in
an iPod.
✽✽
NOTICE
When using a portable audio device
connected to the power outlet, noise may
occur during playback. If this happens,
use the power source of the portable
audio device.
❈ iPod is a trademark of Apple Inc. D280800AUN
Clothes hanger (if equipped)
To use the hanger, pull down the upper
portion of hanger.
OCM040177ROUN026348
CAUTION
Do not hang heavy clothes, since
those may damage the hook.
Page 186 of 312
4111
Features of your vehicle
✽✽NOTICE
If you install an aftermarket HID head
lamp, your vehicle’s audio and electron-
ic device may malfunction.
Antenna D300102BFD
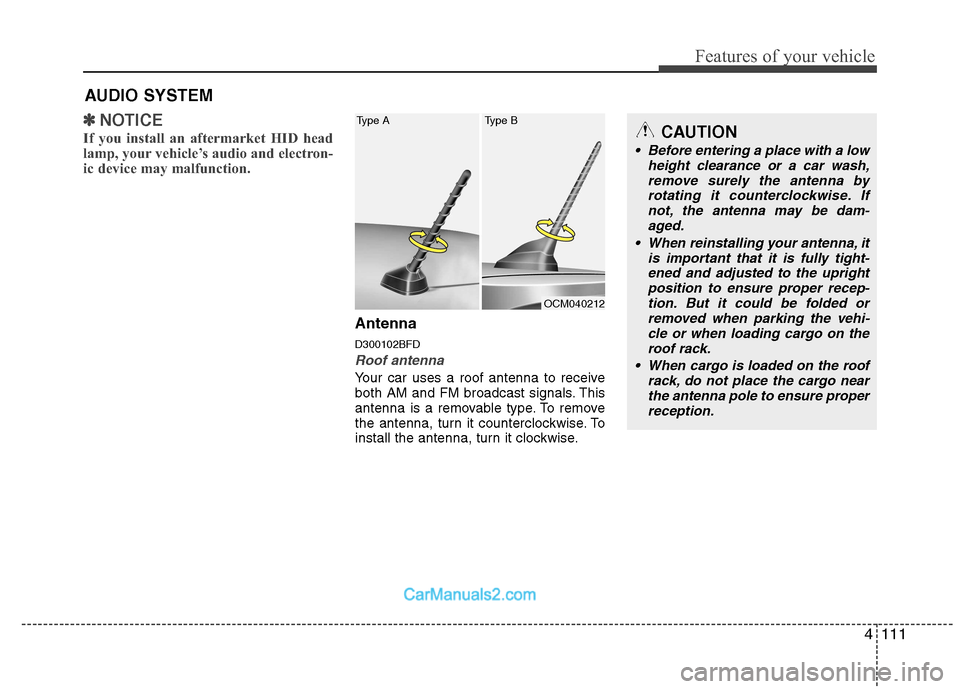
Roof antenna
Your car uses a roof antenna to receive
both AM and FM broadcast signals. This
antenna is a removable type. To remove
the antenna, turn it counterclockwise. To
install the antenna, turn it clockwise.
AUDIO SYSTEM
CAUTION
• Before entering a place with a low
height clearance or a car wash,
remove surely the antenna by rotating it counterclockwise. Ifnot, the antenna may be dam-aged.
When reinstalling your antenna, it is important that it is fully tight-ened and adjusted to the upright position to ensure proper recep-
tion. But it could be folded or removed when parking the vehi-cle or when loading cargo on the roof rack.
When cargo is loaded on the roof rack, do not place the cargo nearthe antenna pole to ensure properreception.
OCM040212
Type A Type B
Page 187 of 312
Features of your vehicle
112
4
D300200AFD
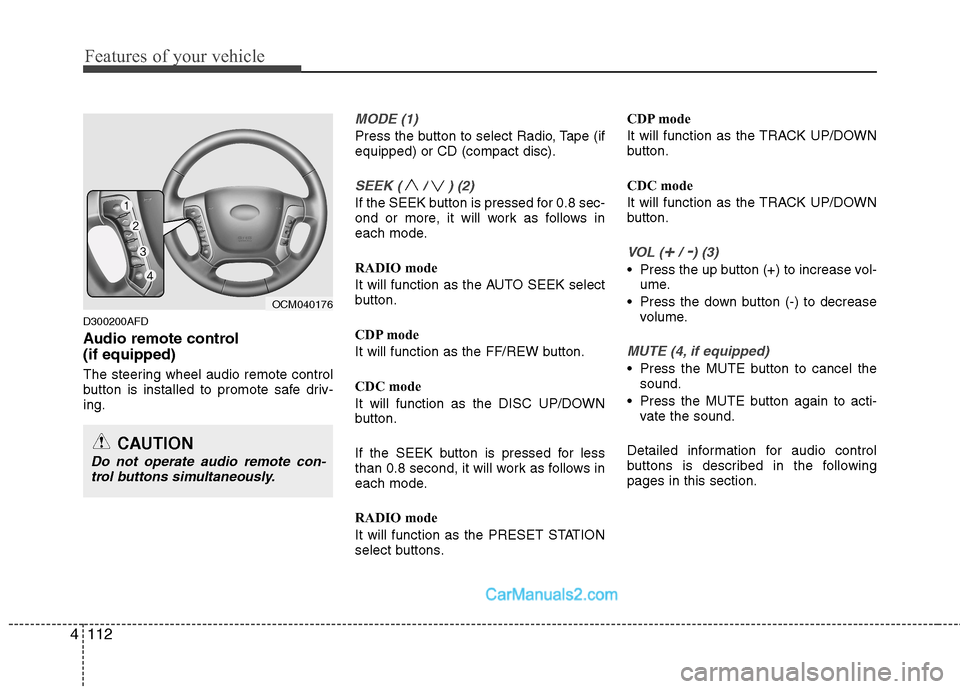
Audio remote control (if equipped)
The steering wheel audio remote control
button is installed to promote safe driv-ing.
MODE (1)
Press the button to select Radio, Tape (if equipped) or CD (compact disc).
SEEK ( / ) (2)
If the SEEK button is pressed for 0.8 sec-
ond or more, it will work as follows in
each mode.
RADIO mode
It will function as the AUTO SEEK select
button.
CDP mode
It will function as the FF/REW button.
CDC mode
It will function as the DISC UP/DOWN
button.
If the SEEK button is pressed for less
than 0.8 second, it will work as follows in
each mode.
RADIO mode
It will function as the PRESET STATION
select buttons. CDP mode
It will function as the TRACK UP/DOWN
button.
CDC mode
It will function as the TRACK UP/DOWN
button.
VOL (+/ -) (3)
• Press the up button (+) to increase vol-
ume.
Press the down button (-) to decrease volume.
MUTE (4, if equipped)
Press the MUTE button to cancel thesound.
Press the MUTE button again to acti- vate the sound.
Detailed information for audio control
buttons is described in the followingpages in this section.
CAUTION
Do not operate audio remote con- trol buttons simultaneously.
OCM040176
Page 188 of 312
4113
Features of your vehicle
D300800AFD
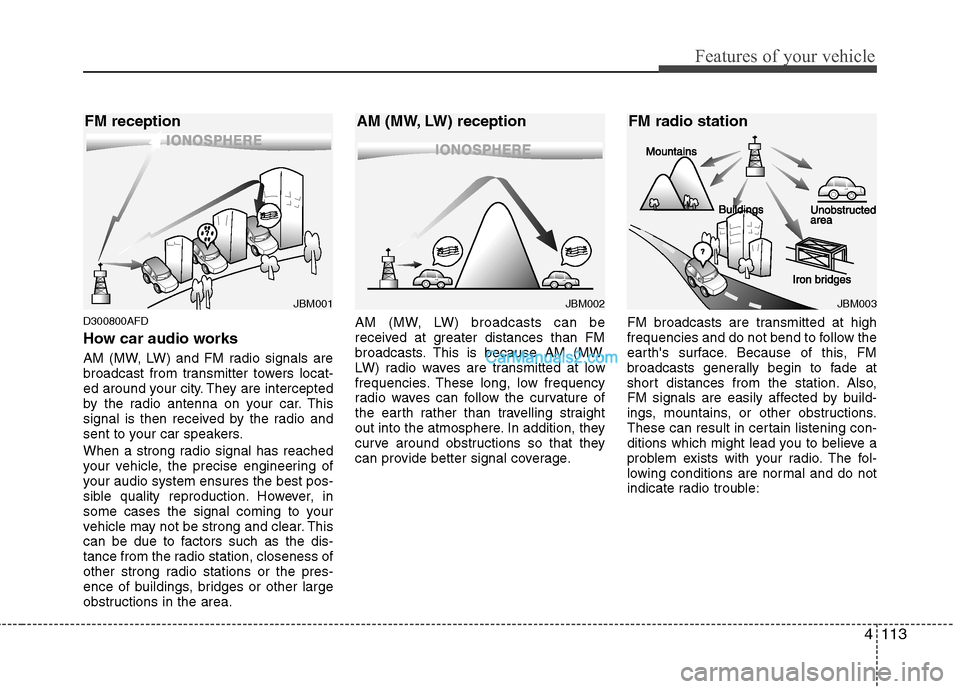
How car audio works
AM (MW, LW) and FM radio signals are
broadcast from transmitter towers locat-
ed around your city. They are intercepted
by the radio antenna on your car. This
signal is then received by the radio and
sent to your car speakers.
When a strong radio signal has reached
your vehicle, the precise engineering of
your audio system ensures the best pos-
sible quality reproduction. However, in
some cases the signal coming to your
vehicle may not be strong and clear. This
can be due to factors such as the dis-
tance from the radio station, closeness of
other strong radio stations or the pres-
ence of buildings, bridges or other large
obstructions in the area.AM (MW, LW) broadcasts can be
received at greater distances than FM
broadcasts. This is because AM (MW,
LW) radio waves are transmitted at low
frequencies. These long, low frequency
radio waves can follow the curvature of
the earth rather than travelling straight
out into the atmosphere. In addition, they
curve around obstructions so that they
can provide better signal coverage.
FM broadcasts are transmitted at high
frequencies and do not bend to follow the
earth's surface. Because of this, FM
broadcasts generally begin to fade at
short distances from the station. Also,
FM signals are easily affected by build-
ings, mountains, or other obstructions.
These can result in certain listening con-
ditions which might lead you to believe a
problem exists with your radio. The fol-
lowing conditions are normal and do not
indicate radio trouble:
JBM001JBM002
FM reception AM (MW, LW) receptionJBM003
FM radio station