2011 HYUNDAI IX35 engine
[x] Cancel search: enginePage 298 of 560
What to do in an emergency
6
6
Jump starting procedure
1. Make sure the booster battery is 12-
volt and that its negative terminal is
grounded.
2. If the booster battery is in another vehicle, do not allow the vehicles totouch.
3. Turn off all unnecessary electrical loads.
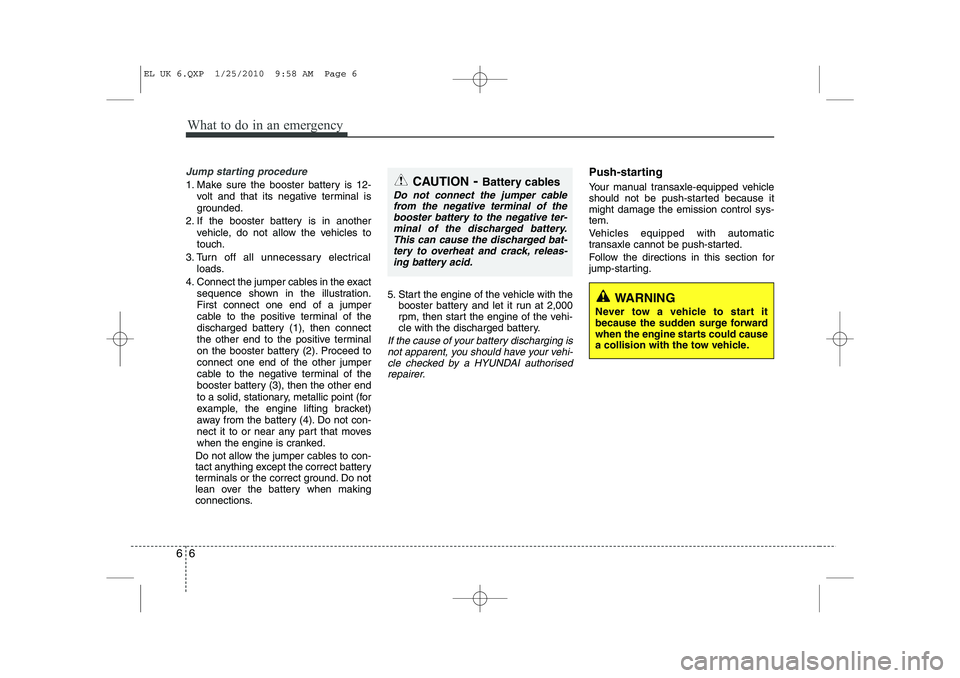
4. Connect the jumper cables in the exact sequence shown in the illustration.First connect one end of a jumper
cable to the positive terminal of the
discharged battery (1), then connect
the other end to the positive terminal
on the booster battery (2). Proceed toconnect one end of the other jumper
cable to the negative terminal of the
booster battery (3), then the other end
to a solid, stationary, metallic point (for
example, the engine lifting bracket)
away from the battery (4). Do not con-
nect it to or near any part that moves
when the engine is cranked.
Do not allow the jumper cables to con-
tact anything except the correct battery
terminals or the correct ground. Do not
lean over the battery when making
connections. 5. Start the engine of the vehicle with the
booster battery and let it run at 2,000
rpm, then start the engine of the vehi-
cle with the discharged battery.
If the cause of your battery discharging is
not apparent, you should have your vehi-cle checked by a HYUNDAI authorised repairer.
Push-starting
Your manual transaxle-equipped vehicle
should not be push-started because itmight damage the emission control sys-tem.
Vehicles equipped with automatic
transaxle cannot be push-started.
Follow the directions in this section for
jump-starting.
WARNING
Never tow a vehicle to start it
because the sudden surge forward
when the engine starts could cause
a collision with the tow vehicle.
CAUTION - Battery cables
Do not connect the jumper cable
from the negative terminal of the
booster battery to the negative ter-minal of the discharged battery. This can cause the discharged bat-tery to overheat and crack, releas-
ing battery acid.
EL UK 6.QXP 1/25/2010 9:58 AM Page 6
Page 299 of 560
67
What to do in an emergency
IF THE ENGINE OVERHEATS
If your temperature gauge indicates over-
heating, you experience a loss of power,
or hear loud pinging or knocking, the
engine is probably too hot. If this hap-
pens, you should:
1. Pull off the road and stop as soon as it is safe to do so.
2. Place the shift lever in P (automatic transaxle) or neutral (manual
transaxle) and set the parking brake. If
the air conditioning is on, turn it off.
3. If engine coolant is running out under the vehicle or steam is coming out
from the bonnet, stop the engine. Donot open the bonnet until the coolant
has stopped running or the steaming
has stopped. If there is no visible loss
of engine coolant and no steam, leave
the engine running and check to be
sure the engine cooling fan is operat-
ing. If the fan is not running, turn the
engine off.
4. Check to see if the water pump drive belt is missing. If it is not missing,
check to see that it is tight. If the drive
belt seems to be satisfactory, check
for coolant leaking from the radiator,
hoses or under the vehicle. (If the air
conditioning had been in use, it is nor-
mal for cold water to be draining from
it when you stop). 5. If the water pump drive belt is broken
or engine coolant is leaking out, stop the engine immediately and call the
nearest HYUNDAI authorised repairer
for assistance. 6. If the cause of the overheating cannot
be found, wait until the engine temper-
ature has returned to normal. Then, ifcoolant has been lost, carefully add
coolant to the reservoir to bring the
fluid level in the reservoir up to the
base of the radiator fill opening. Fill the
coolant expansion tank to the halfway
mark. To ensure the correct water to
coolant mix is obtained after top up,
testing by a HYUNDAI authorisedrepairer is required.
7. Proceed with caution, keeping alert for further signs of overheating. If over-heating happens again, call a
HYUNDAI authorised repairer for
assistance.
CAUTION
Serious loss of coolant indicates
there is a leak in the cooling systemand this should be checked as soonas possible by a HYUNDAI autho- rised repairer.
WARNING
Whilst the engine is running, keep
hair, hands and clothing away from
moving parts such as the fan and
drive belts to prevent injury.
WARNING
Do not remove the radiator cap
when the engine is hot. This can
allow coolant to be blown out of the
opening and cause serious burns.
EL UK 6.QXP 1/25/2010 9:58 AM Page 7
Page 301 of 560

69
What to do in an emergency
✽✽NOTICE
If the TPMS, Low Tyre Pressure and Position indicators do not illuminate
for 3 seconds when the ignitionswitch is turned to the ON position
or engine is running, or if they
remain illuminated after coming on
for approximately 3 seconds, take
your car to your nearest HYUNDAI
authorised repairer and have thesystem checked.Low tyre pressure tell- tale
Low tyre pressure posi- tion telltale
When the tyre pressure monitoring
system warning indicators are illumi-
nated, one or more of your tyres is
significantly under-inflated. The lowtyre pressure position telltale lightwill indicate which tyre is significant-
ly under-inflated by illuminating thecorresponding position light.
If either telltale illuminates, immedi-
ately reduce your speed, avoid hard
cornering and anticipate increased
stopping distances. You should stop
and check your tyres as soon as pos-
sible. Inflate the tyres to the proper
pressure as indicated on the vehi-
cle’s placard or tyre inflation pres-
sure label located on the driver’s side
centre pillar outer panel. If you can-
not reach a service station or if the
tyre cannot hold the newly added air,
replace the low pressure tyre with
the spare tyre. Then the TPMS malfunction indicator
may turn on and the Low Tyre
Pressure and Position telltales will
remain on after restarting and about
20 minutes of continuous driving
before you have the low pressuretyre repaired and replaced on the
vehicle.
CAUTION
In winter or cold weather, the
low tyre pressure telltale may beilluminated if the tyre pressurewas adjusted to the recom- mended tyre inflation pressurein warm weather. It does notmean your TPMS is malfunction- ing because the decreased tem-perature leads to a proportionallowering of tyre pressure.
When you drive your vehiclefrom a warm area to a cold area or from a cold area to a warmarea, or the outside temperatureis greatly higher or lower, you should check the tyre inflationpressure and adjust the tyres tothe recommended tyre inflation pressure.
EL UK 6.QXP 1/25/2010 9:58 AM Page 9
Page 306 of 560
What to do in an emergency
14
6
Removing and storing the spare tyre
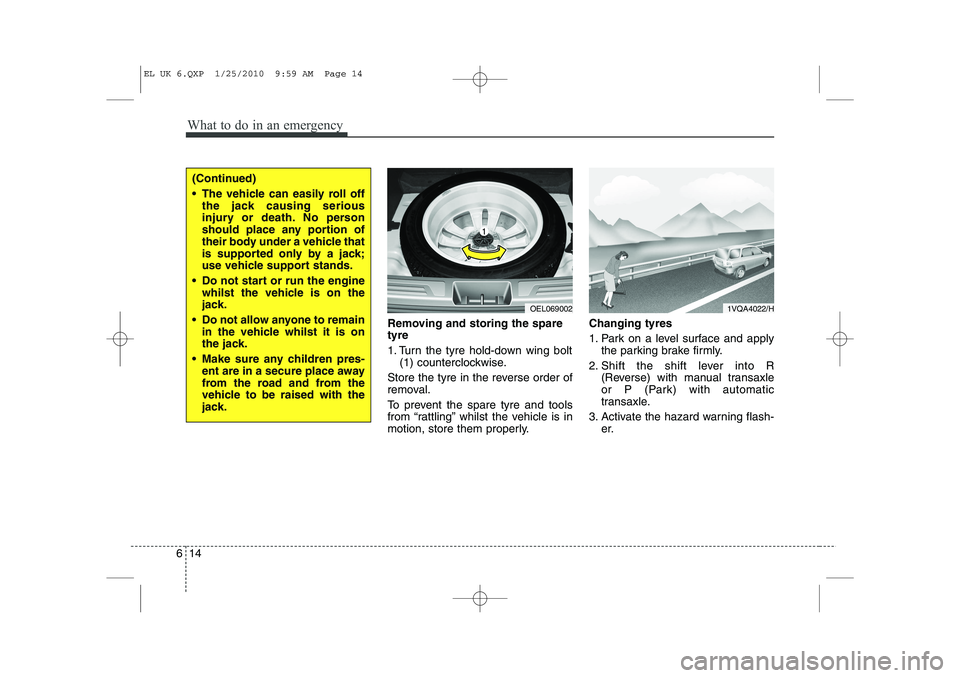
1. Turn the tyre hold-down wing bolt
(1) counterclockwise.
Store the tyre in the reverse order of
removal.
To prevent the spare tyre and tools
from “rattling” whilst the vehicle is in
motion, store them properly. Changing tyres
1. Park on a level surface and apply
the parking brake firmly.
2. Shift the shift lever into R (Reverse) with manual transaxle
or P (Park) with automatic
transaxle.
3. Activate the hazard warning flash- er.
OEL069002
(Continued)
The vehicle can easily roll offthe jack causing serious
injury or death. No person
should place any portion of
their body under a vehicle that
is supported only by a jack;
use vehicle support stands.
Do not start or run the engine whilst the vehicle is on the
jack.
Do not allow anyone to remain in the vehicle whilst it is on
the jack.
Make sure any children pres- ent are in a secure place away
from the road and from the
vehicle to be raised with the
jack.
1VQA4022/H
EL UK 6.QXP 1/25/2010 9:59 AM Page 14
Page 313 of 560
621
What to do in an emergency
Using the TyreMobilityKit
1. Filling the sealant
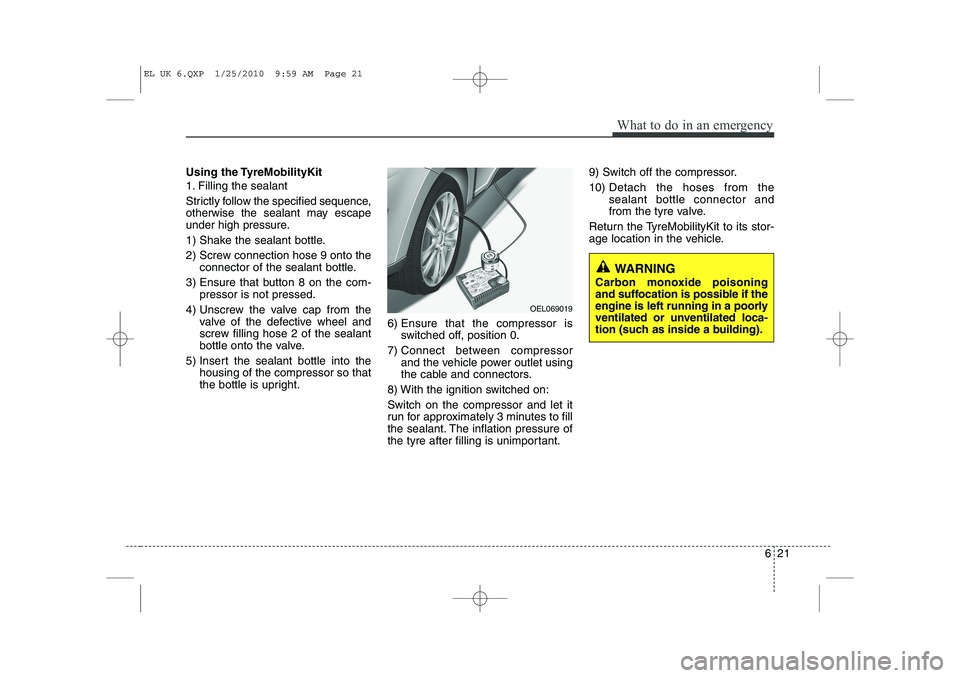
Strictly follow the specified sequence,
otherwise the sealant may escape
under high pressure.
1) Shake the sealant bottle.
2) Screw connection hose 9 onto theconnector of the sealant bottle.
3) Ensure that button 8 on the com- pressor is not pressed.
4) Unscrew the valve cap from the valve of the defective wheel and
screw filling hose 2 of the sealant
bottle onto the valve.
5) Insert the sealant bottle into the housing of the compressor so that
the bottle is upright. 6) Ensure that the compressor is
switched off, position 0.
7) Connect between compressor and the vehicle power outlet using
the cable and connectors.
8) With the ignition switched on: Switch on the compressor and let it
run for approximately 3 minutes to fill
the sealant. The inflation pressure of
the tyre after filling is unimportant. 9) Switch off the compressor. 10)
Detach the hoses from the sealant bottle connector and
from the tyre valve.
Return the TyreMobilityKit to its stor-
age location in the vehicle.
WARNING
Carbon monoxide poisoning
and suffocation is possible if the
engine is left running in a poorly
ventilated or unventilated loca-
tion (such as inside a building).
OEL069019
EL UK 6.QXP 1/25/2010 9:59 AM Page 21
Page 315 of 560

623
What to do in an emergency
Notes on the safe use of the
TyreMobilityKit
Park your car at the side of theroad so that you can work with the
TyreMobilityKit away from moving
traffic. Place your warning triangle
in a prominent place to make pass-
ing vehicles aware of your location.
To be sure your vehicle won't move, even when you're on fairly
level ground, always set your park-
ing brake.
Only use the TyreMobilityKit for sealing/inflation passenger car
tyres. Do not use on motorcycles,
bicycles or any other type of tyres.
Do not remove any foreign objects- such as nails or screws -that have
penetrated the tyre.
Before using the TyreMobilityKit, read the precautionary advice
printed on the sealant bottle!
Provided the car is outdoors, leave the engine running. Otherwise
operating the compressor may
eventually drain the car battery. Never leave the TyreMobilityKit
unattended whilst it is being used.
Do not leave the compressor run- ning for more than 10 min. at a time
or it may overheat.
Do not use the TyreMobilityKit if the ambient temperature is below -30°C(-22°F).
Do not use the sealing compound after its expiration date which can
be found on the label of the bottle.
Keep away from children. Technical Data
System voltage: DC 12 V
Working voltage: DC 10 - 15 V
Amperage rating: max. 15 A
Suitable for use at temperatures:
-30 ~ +70°C (-22 ~ +158°F)
Max. working pressure: 87 psi (6 bar)
Size
Compressor: 6.6 x 5.9 x 2.7 in. (168 x 150 x 68 mm)
Sealant bottle: 4.1 x ø 3.3 in. (104 x ø 85 mm)
Compressor weight: 2.31 lbs (1.05 kg)
Sealant volume: 18.3 cu. in. (300 ml)
❈ Sealing compound and spare
parts can be obtained and
replaced at an authorised vehicle
or tyre dealer. Empty sealing com-
pound bottles may be disposed of
at home. Liquid residue from thesealing compound should be dis-
posed of by your vehicle or tyredealer or in accordance with local
waste disposal regulations.
EL UK 6.QXP 1/25/2010 9:59 AM Page 23
Page 321 of 560
7
Engine compartment / 7-2 Maintenance services / 7-4
Owner maintenance / 7-6Scheduled maintenance service / 7-8Explanation of scheduled maintenance items / 7-19Engine oil / 7-12Engine coolant / 7-13Brake/clutch fluid / 7-16
Washer fluid / 7-17Parking brake / 7-17
Fuel filter / 7-18
Air cleaner / 7-19
Climate control air filter / 7-21
Wiper blades / 7-23Battery / 7-26
Tyres and wheels / 7-29 Fuses / 7-39 Light bulbs / 7-49
Appearance care / 7-57
Emission control system / 7-63
Maintenance
EL UK 7.QXP 1/25/2010 10:00 AM Page 1
Page 322 of 560
Maintenance
2
7
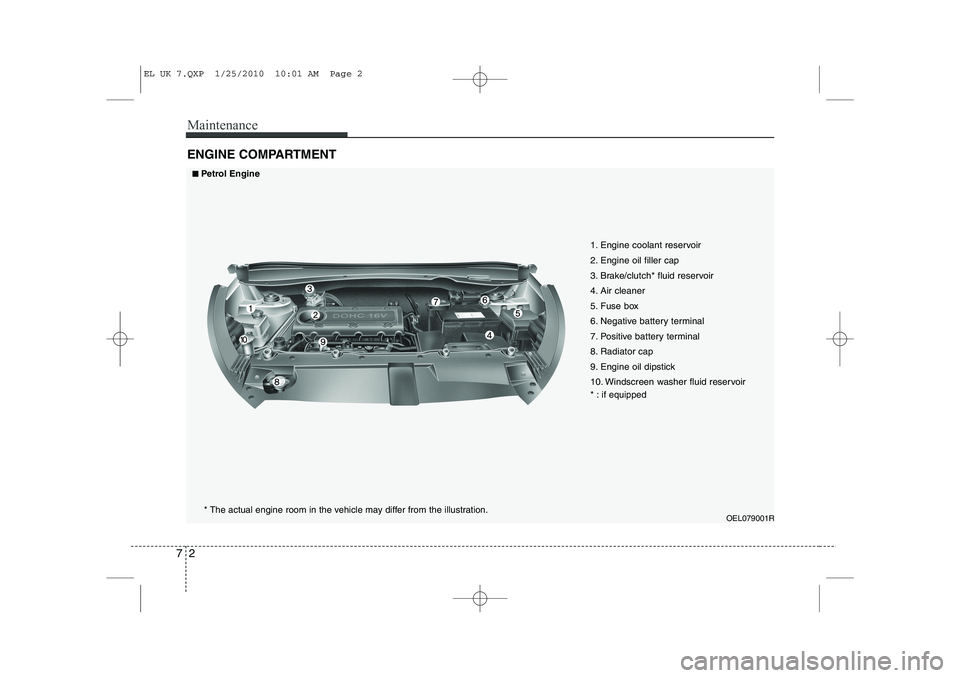
ENGINE COMPARTMENT
OEL079001R
1. Engine coolant reservoir
2. Engine oil filler cap
3. Brake/clutch* fluid reservoir
4. Air cleaner
5. Fuse box
6. Negative battery terminal
7. Positive battery terminal
8. Radiator cap
9. Engine oil dipstick
10. Windscreen washer fluid reservoir
* : if equipped
■■
Petrol Engine
* The actual engine room in the vehicle may differ from the illustration.
EL UK 7.QXP 1/25/2010 10:01 AM Page 2