2011 HYUNDAI IX20 ignition
[x] Cancel search: ignitionPage 272 of 420

Driving your vehicle
52
5
Use high quality ethylene glycol coolant
Your vehicle is delivered with high quality
ethylene glycol coolant in the cooling
system. It is the only type of coolant that
should be used because it helps prevent
corrosion in the cooling system, lubri-
cates the water pump and prevents
freezing. Be sure to replace or replenish
your coolant in accordance with themaintenance schedule in section 7.
Before winter, have your coolant tested toassure that its freezing point is sufficient
for the temperatures anticipated during
the winter.
Check battery and cables
Winter puts additional burdens on the
battery system. Visually inspect the bat-
tery and cables as described in section
7. The level of charge in your battery can
be checked by an authorized HYUNDAI
dealer or a service station. Change to "winter weight" oil if
necessary In some climates it is recommended that
a lower viscosity "winter weight" oil be
used during cold weather. See section 8
for recommendations. If you aren't sure
what weight oil you should use, consult
an authorized HYUNDAI dealer.
Check spark plugs and ignition system
Inspect your spark plugs as described in
section 7 and replace them if necessary.
Also check all ignition wiring and compo-
nents to be sure they are not cracked,
worn or damaged in any way.
WARNING
- Tire chains
The use of chains may adversely affect vehicle handling.
Do not exceed 30 km/h (20 mph) or the chain manufacturer’s rec-
ommended speed limit, whichev-
er is lower.
Drive carefully and avoid bumps, holes, sharp turns, and other
road hazards, which may cause
the vehicle to bounce.
Avoid sharp turns or locked- wheel braking.
CAUTION
Chains that are the wrong size or
improperly installed can damage
your vehicle's brake lines, sus-pension, body and wheels.
Stop driving and retighten the chains any time you hear themhitting the vehicle.
JC ENG 5.QXP 9/7/2010 11:53 AM Page 52
procarmanuals.com
Page 284 of 420
What to do in an emergency
2
6
ROAD WARNING
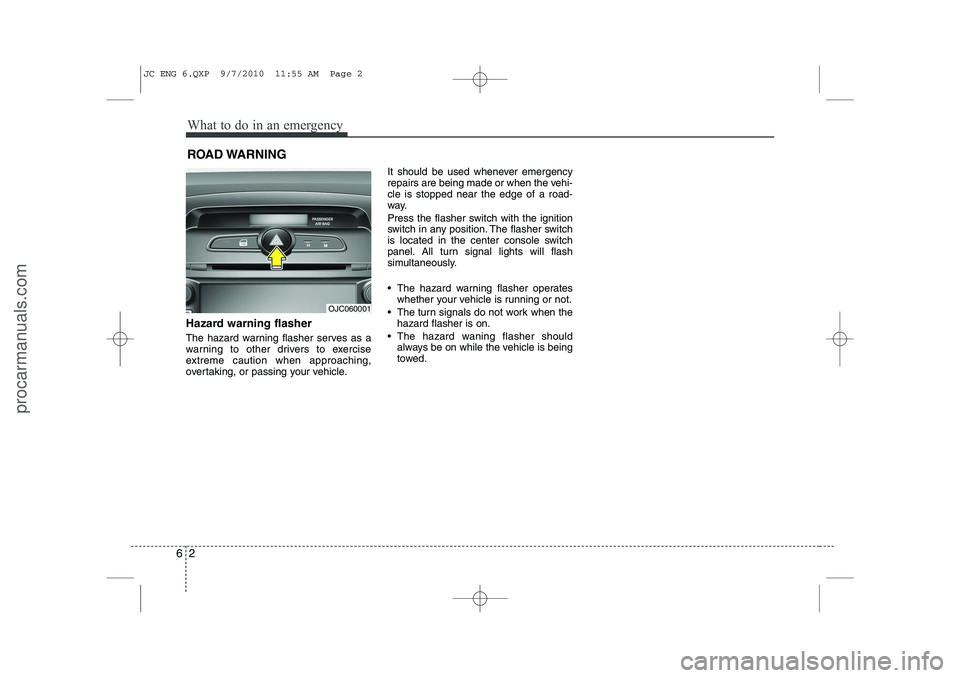
Hazard warning flasher
The hazard warning flasher serves as a
warning to other drivers to exercise
extreme caution when approaching,
overtaking, or passing your vehicle. It should be used whenever emergency
repairs are being made or when the vehi-cle is stopped near the edge of a road-
way.
Press the flasher switch with the ignition
switch in any position. The flasher switch
is located in the center console switch
panel. All turn signal lights will flash
simultaneously.
• The hazard warning flasher operates
whether your vehicle is running or not.
The turn signals do not work when the hazard flasher is on.
The hazard waning flasher should always be on while the vehicle is being
towed.
OJC060001
JC ENG 6.QXP 9/7/2010 11:55 AM Page 2
procarmanuals.com
Page 285 of 420
63
What to do in an emergency
IN CASE OF AN EMERGENCY WHILE DRIVING
If the engine stalls at a crossroad
or crossing
If the engine stalls at a crossroad or crossing, set the shift lever in the N
(Neutral) position and then push the
vehicle to a safe place.
If your vehicle has a manual transaxle not equipped with a ignition lock
switch, the vehicle can move forward
by shifting to the 2nd (Second) or 3 rd
(Third) gear and then turning the
starter without depressing the clutchpedal. If you have a flat tire while driving
If a tire goes flat while you are driving:
1. Take your foot off the accelerator pedal
and let the vehicle slow down while
driving straight ahead. Do not apply the
brakes immediately or attempt to pull
off the road as this may cause a loss of
control. When the vehicle has slowed
down to such a speed that it is safe to
do so, brake carefully and pull off the
road. Drive off the road as far as possi-
ble and park on a firm level ground. If
you are on a divided highway, do not
park in the median area between the
two traffic lanes.
2. When the vehicle is stopped, turn on your emergency hazard flashers, set
the parking brake and put the transaxle
in P (automatic transaxle) or Reverse
(manual transaxle).
3. Have all passengers get out of the vehicle. Be sure they all get out on the
side of the vehicle that is away from
traffic.
4. When changing a flat tire, follow the instruction provided later in this sec-tion. If engine stalls while driving
1. Reduce your speed gradually, keeping
a straight line. Move cautiously off the
road to a safe place.
2. Turn on your emergency flashers.
3. Try to start the engine again. If your vehicle will not start, contact an
authorized HYUNDAI dealer or seek
other qualified assistance.
JC ENG 6.QXP 9/7/2010 11:55 AM Page 3
procarmanuals.com
Page 286 of 420

What to do in an emergency
4
6
IF THE ENGINE WILL NOT START
If engine doesn't turn over or
turns over slowly
1. If your vehicle has an automatic transaxle, be sure the shift lever is in N
(Neutral) or P (Park) and the emer-
gency brake is set.
2. Check the battery connections to be sure they are clean and tight.
3. Turn on the interior light. If the light dims or goes out when you operate the
starter, the battery is discharged.
4. Check the starter connections to be sure they are securely tightened.
5. Do not push or pull the vehicle to start it. See instructions for "Jump starting". If engine turns over normally but
does not start
1. Check the fuel level.
2. With the ignition switch in the LOCK
position, check all connectors at the
ignition coils and spark plugs.
Reconnect any that may be discon-
nected or loose.
3. Check the fuel line in the engine com- partment.
4. If the engine still does not start, call an authorized HYUNDAI dealer or seek
other qualified assistance.
WARNING
If the engine will not start, do not
push or pull the vehicle to start it.This could result in a collision or
cause other damage. In addition,
push or pull starting may cause the
catalytic converter to be over-
loaded and create a fire hazard.
JC ENG 6.QXP 9/7/2010 11:55 AM Page 4
procarmanuals.com
Page 287 of 420
65
What to do in an emergency
EMERGENCY STARTING
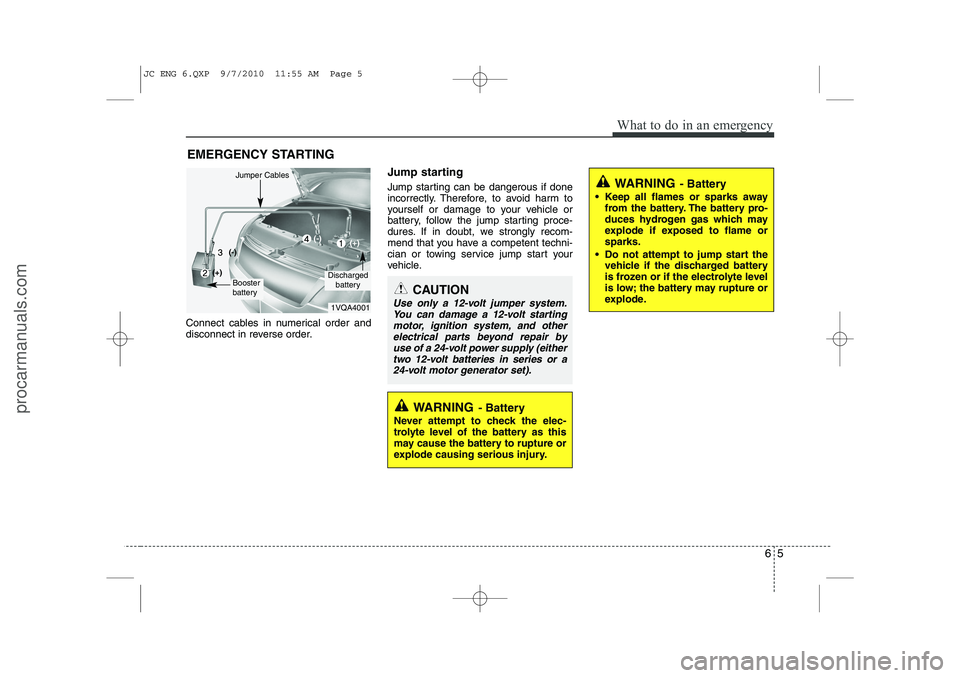
Connect cables in numerical order and
disconnect in reverse order. Jump starting
Jump starting can be dangerous if done
incorrectly. Therefore, to avoid harm to
yourself or damage to your vehicle or
battery, follow the jump starting proce-
dures. If in doubt, we strongly recom-
mend that you have a competent techni-
cian or towing service jump start your
vehicle.
CAUTION
Use only a 12-volt jumper system.
You can damage a 12-volt starting motor, ignition system, and otherelectrical parts beyond repair by
use of a 24-volt power supply (eithertwo 12-volt batteries in series or a 24-volt motor generator set).
WARNING - Battery
• Keep all flames or sparks away from the battery. The battery pro-
duces hydrogen gas which may
explode if exposed to flame orsparks.
Do not attempt to jump start the vehicle if the discharged battery
is frozen or if the electrolyte level
is low; the battery may rupture or
explode.
WARNING - Battery
Never attempt to check the elec-
trolyte level of the battery as this
may cause the battery to rupture or
explode causing serious injury.
1VQA4001
Discharged battery
Jumper Cables
Booster
battery
(-)
(+)
(+)(-)
JC ENG 6.QXP 9/7/2010 11:55 AM Page 5
procarmanuals.com
Page 288 of 420

What to do in an emergency
6
6
Jump starting procedure 1. Make sure the booster battery is 12-
volt and that its negative terminal is
grounded.
2. If the booster battery is in another vehicle, do not allow the vehicles comein contact.
3. Turn off all unnecessary electrical loads.
4. Connect the jumper cables in the exact sequence shown in the illustration.First connect one end of a jumper
cable to the positive terminal of the
discharged battery (1), then connect
the other end to the positive terminal
on the booster battery (2).
5. Proceed to connect one end of the other jumper cable to the negative ter-
minal of the booster battery (3), then
the other end to a solid, stationary,
metallic point (for example, the engine
lifting bracket) away from the battery
(4). Do not connect it to or near any
part that moves when the engine is
cranked.
Do not allow the jumper cables to con-
tact anything except the correct bat-
tery terminals or the correct ground.
Do not lean over the battery when
making connections. 6. Start the engine of the vehicle with the
booster battery and let it run at 2,000
rpm, then start the engine of the vehi-
cle with the discharged battery.
If the cause of your battery discharging is
not apparent, you should have your vehi- cle checked by an authorized HYUNDAI dealer.
CAUTION - Battery cables
Do not connect the jumper cable
from the negative terminal of the
booster battery to the negative ter- minal of the discharged battery.This can cause the discharged bat- tery to overheat and crack, releas-
ing battery acid.CAUTION -AGM battery (if equipped)
Absorbent Glass Matt (AGM) bat-
teries are maintenance-free andshould only be serviced by an
authorized HYUNDAI dealer. Forcharging your AGM battery, useonly fully automatic battery
chargers that are specially devel- oped for AGM batteries.
When replacing the AGM battery, use only the HYUNDAI genuinebattery for the ISG system.
If the AGM battery is reconnected or replaced, ISG function will notoperate immediately.
If you want to use the ISG func-tion, the battery sensor needs to
be calibrated for approximately 4hours with the ignition off.
JC ENG 6.QXP 9/7/2010 11:55 AM Page 6
procarmanuals.com
Page 301 of 420
619
What to do in an emergency
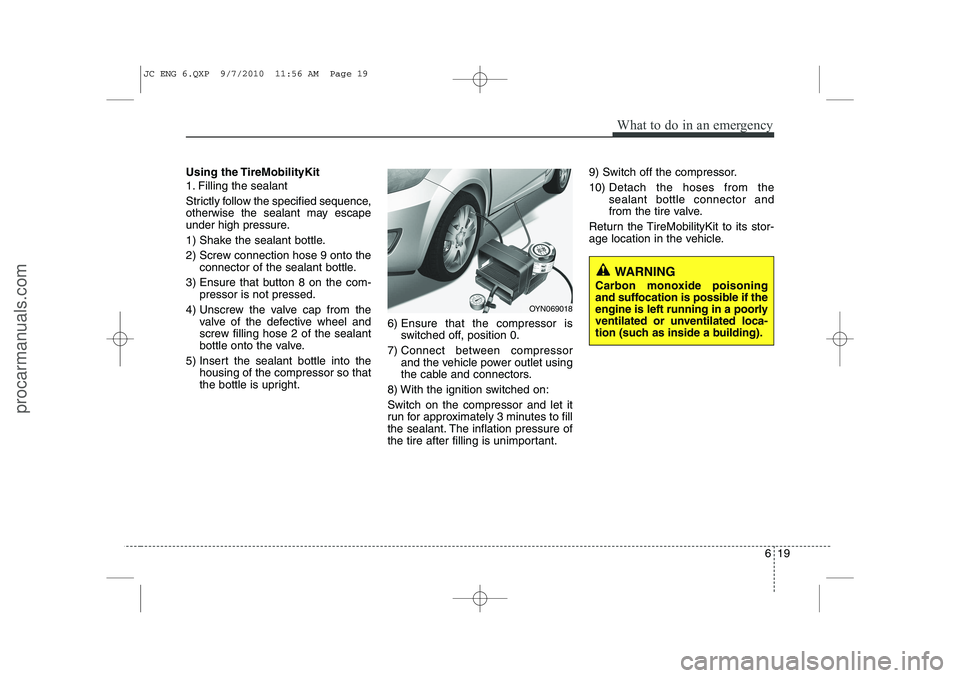
Using the TireMobilityKit
1. Filling the sealant
Strictly follow the specified sequence,
otherwise the sealant may escape
under high pressure.
1) Shake the sealant bottle.
2) Screw connection hose 9 onto theconnector of the sealant bottle.
3) Ensure that button 8 on the com- pressor is not pressed.
4) Unscrew the valve cap from the valve of the defective wheel and
screw filling hose 2 of the sealant
bottle onto the valve.
5) Insert the sealant bottle into the housing of the compressor so that
the bottle is upright. 6) Ensure that the compressor is
switched off, position 0.
7) Connect between compressor and the vehicle power outlet using
the cable and connectors.
8) With the ignition switched on: Switch on the compressor and let it
run for approximately 3 minutes to fill
the sealant. The inflation pressure of
the tire after filling is unimportant. 9) Switch off the compressor. 10)
Detach the hoses from the sealant bottle connector and
from the tire valve.
Return the TireMobilityKit to its stor-
age location in the vehicle.
WARNING
Carbon monoxide poisoning
and suffocation is possible if the
engine is left running in a poorly
ventilated or unventilated loca-
tion (such as inside a building).
OYN069018
JC ENG 6.QXP 9/7/2010 11:56 AM Page 19
procarmanuals.com
Page 302 of 420
What to do in an emergency
20
6
Distributing the sealant
Immediately drive approximately 3 km
(2 miles) to evenly distribute the
sealant in the tire. Producing the tire inflation pres- sure
1) After driving approximately 3 km (2
miles), stop at a suitable location.
2) Connect connection hose 9 of the compressor directly to the tire
valve.
3) Connect between compressor and the vehicle power outlet using
the cable and connectors.
4) Adjust the tire inflation pressure to 220 kPa (32 psi). With the ignition
switched on, proceed as follows.
- To increase the inflation pres- sure: Switch on the compressor,
position I. To check the current
inflation pressure setting, briefly
switch off the compressor. - To reduce the inflation pres-
sure: Press the button 8 on the
compressor.
WARNING
Do not let the compressor run for
more than 10 minutes, otherwise
the device will overheat and may
be damaged.
WARNING
The tire inflation pressure must
be at least 220 kPa (32 psi). If it is
not, do not continue driving. Call
for road side service or towing.
CAUTION
Do not exceed a speed of 60 km/h (35 mph). If possible, donot fall below a speed of 20 km/h (12 mph).
While driving, if you experienceany unusual vibration, ride dis-turbance or noise, reduce yourspeed and drive with caution until you can safely pull off ofthe side of the road.
Call for road side service or tow-ing.
CAUTION
If the inflation pressure is notmaintained, drive the vehicle asecond time, refer to Distributing the sealant. Then repeat steps 1to 4.
Use of the TireMobilityKit maybe ineffectual for tire damagelarger than approximately 4 mm (0.16 in).
Please contact the nearestHYUNDAI A/S center, or a work-shop that works according toHYUNDAI repair procedures with correspondingly trainedpersonnel if the tire cannot bemade roadworthy with the TireMobilityKit.
JC ENG 6.QXP 9/7/2010 11:56 AM Page 20
procarmanuals.com