Page 189 of 403
4113
Features of your vehicle
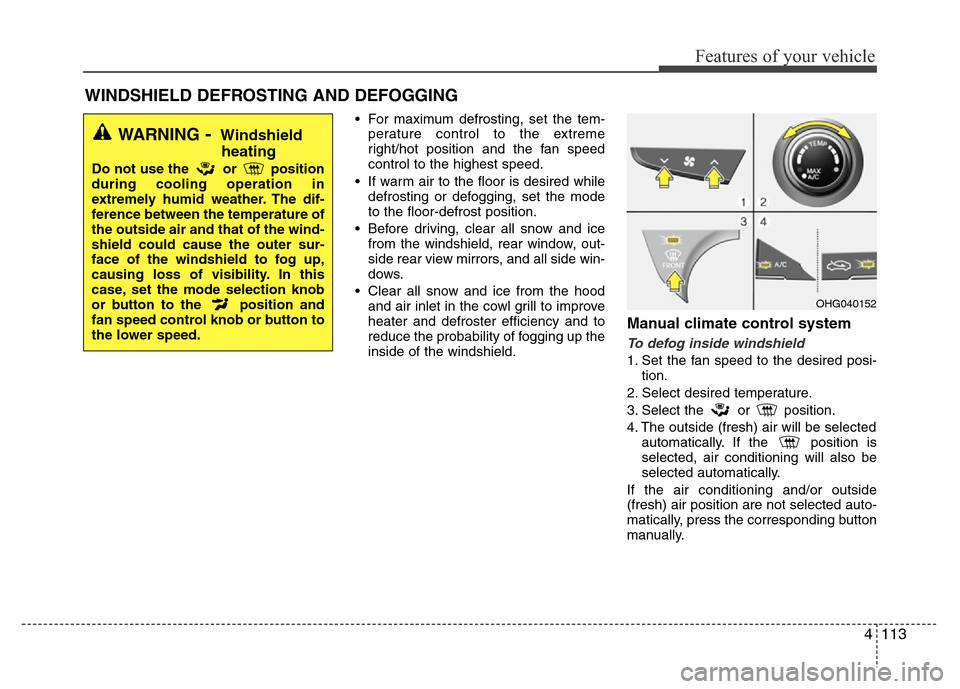
• For maximum defrosting, set the tem-
perature control to the extreme
right/hot position and the fan speed
control to the highest speed.
• If warm air to the floor is desired while
defrosting or defogging, set the mode
to the floor-defrost position.
• Before driving, clear all snow and ice
from the windshield, rear window, out-
side rear view mirrors, and all side win-
dows.
• Clear all snow and ice from the hood
and air inlet in the cowl grill to improve
heater and defroster efficiency and to
reduce the probability of fogging up the
inside of the windshield.
Manual climate control system
To defog inside windshield
1. Set the fan speed to the desired posi-
tion.
2. Select desired temperature.
3. Select the or position.
4. The outside (fresh) air will be selected
automatically. If the position is
selected, air conditioning will also be
selected automatically.
If the air conditioning and/or outside
(fresh) air position are not selected auto-
matically, press the corresponding button
manually.
WINDSHIELD DEFROSTING AND DEFOGGING
WARNING- Windshield
heating
Do not use the or position
during cooling operation in
extremely humid weather. The dif-
ference between the temperature of
the outside air and that of the wind-
shield could cause the outer sur-
face of the windshield to fog up,
causing loss of visibility. In this
case, set the mode selection knob
or button to the position and
fan speed control knob or button to
the lower speed.
OHG040152
Page 190 of 403
Features of your vehicle
114 4
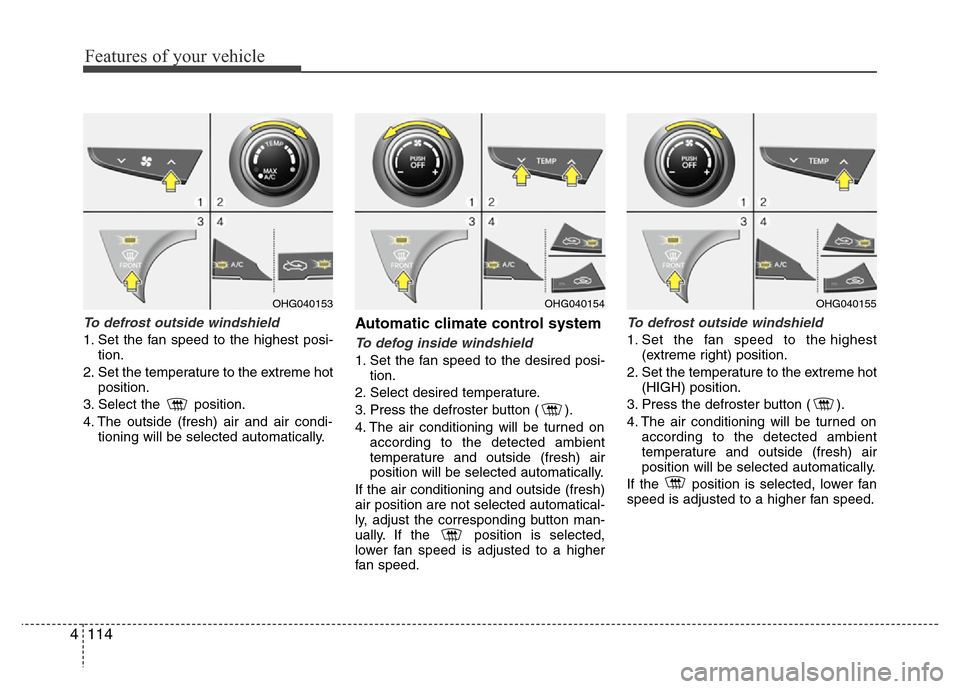
To defrost outside windshield
1. Set the fan speed to the highest posi-
tion.
2. Set the temperature to the extreme hot
position.
3. Select the position.
4. The outside (fresh) air and air condi-
tioning will be selected automatically.
Automatic climate control system
To defog inside windshield
1. Set the fan speed to the desired posi-
tion.
2. Select desired temperature.
3. Press the defroster button ( ).
4. The air conditioning will be turned on
according to the detected ambient
temperature and outside (fresh) air
position will be selected automatically.
If the air conditioning and outside (fresh)
air position are not selected automatical-
ly, adjust the corresponding button man-
ually. If the position is selected,
lower fan speed is adjusted to a higher
fan speed.
To defrost outside windshield
1. Set the fan speed to the highest
(extreme right) position.
2. Set the temperature to the extreme hot
(HIGH) position.
3. Press the defroster button ( ).
4. The air conditioning will be turned on
according to the detected ambient
temperature and outside (fresh) air
position will be selected automatically.
If the position is selected, lower fan
speed is adjusted to a higher fan speed.
OHG040154OHG040155OHG040153
Page 191 of 403
4115
Features of your vehicle
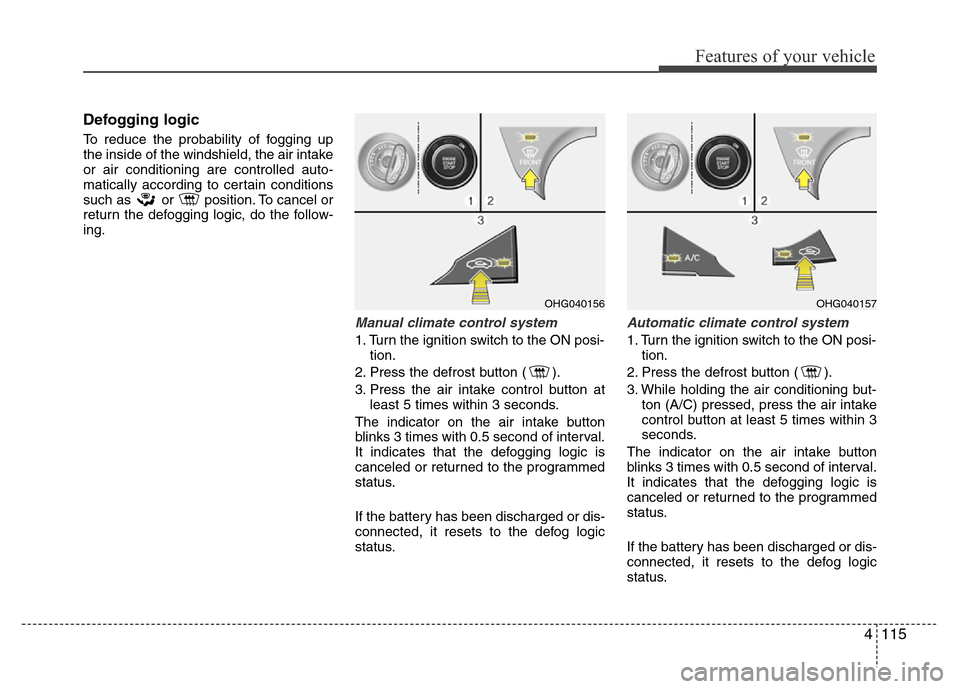
Defogging logic
To reduce the probability of fogging up
the inside of the windshield, the air intake
or air conditioning are controlled auto-
matically according to certain conditions
such as or position. To cancel or
return the defogging logic, do the follow-
ing.
Manual climate control system
1. Turn the ignition switch to the ON posi-
tion.
2. Press the defrost button ( ).
3. Press the air intake control button at
least 5 times within 3 seconds.
The indicator on the air intake button
blinks 3 times with 0.5 second of interval.
It indicates that the defogging logic is
canceled or returned to the programmed
status.
If the battery has been discharged or dis-
connected, it resets to the defog logic
status.
Automatic climate control system
1. Turn the ignition switch to the ON posi-
tion.
2. Press the defrost button ( ).
3. While holding the air conditioning but-
ton (A/C) pressed, press the air intake
control button at least 5 times within 3
seconds.
The indicator on the air intake button
blinks 3 times with 0.5 second of interval.
It indicates that the defogging logic is
canceled or returned to the programmed
status.
If the battery has been discharged or dis-
connected, it resets to the defog logic
status.
OHG040156OHG040157
Page 192 of 403

Features of your vehicle
116 4
Auto defogging system
(Only for automatic climate control
system, if equipped)
Auto defogging reduces the possibility of
fogging up the inside of the windshield by
automatically sensing the moisture of
inside the windshield.
The auto defogging system operates
when the heater or air conditioning is on.This indicator illuminates
when the auto defogging
system senses the moisture
of inside the windshield and
operates.
If more moisture is in the vehicle, higher
steps operate as follow. For example if
auto defogging does not defog inside the
windshield at step 1 Outside air position,
it tries to defog again at step 2 Blowing
air toward the windshield.
Step 1 : Outside air position
Step 2 : Blowing air toward the wind-
shield
Step 3 : Increasing air flow toward the
windshield
Step 4 : Operating the air conditioning
Step 5 : Maximizing the air conditioning
If your vehicle is equipped with the auto
defogging system, it is automatically acti-
vated when the conditions are met.
However, if you would like to cancel the
auto defogging system, press the front
defroster button 4 times within 2 seconds
while pressing the AUTO button. The
indicator of front defroster button will
blink 3 times to notify you that the system
is cancelled. To use the auto defogging
system again, follow the procedures
mentioned above.If the battery has been disconnected or
discharged, it resets to the auto defog-
ging status.
✽NOTICE
If the A/C off or recirculated air position
is manually selected while the auto
defogging system is on, the auto defog-
ging indicator will blink 3 times to give
notice that the A/C off or recirculated air
position operation cannot be selected.
OHG040158CAUTION
Do not remove the sensor cover
located on the upper end of the
driver side windshield glass.
Damage to the system parts could
occur and may not be covered by
your vehicle warranty.
Page 193 of 403
4117
Features of your vehicle
These compartments can be used to
store small items required by the driver
or passengers.
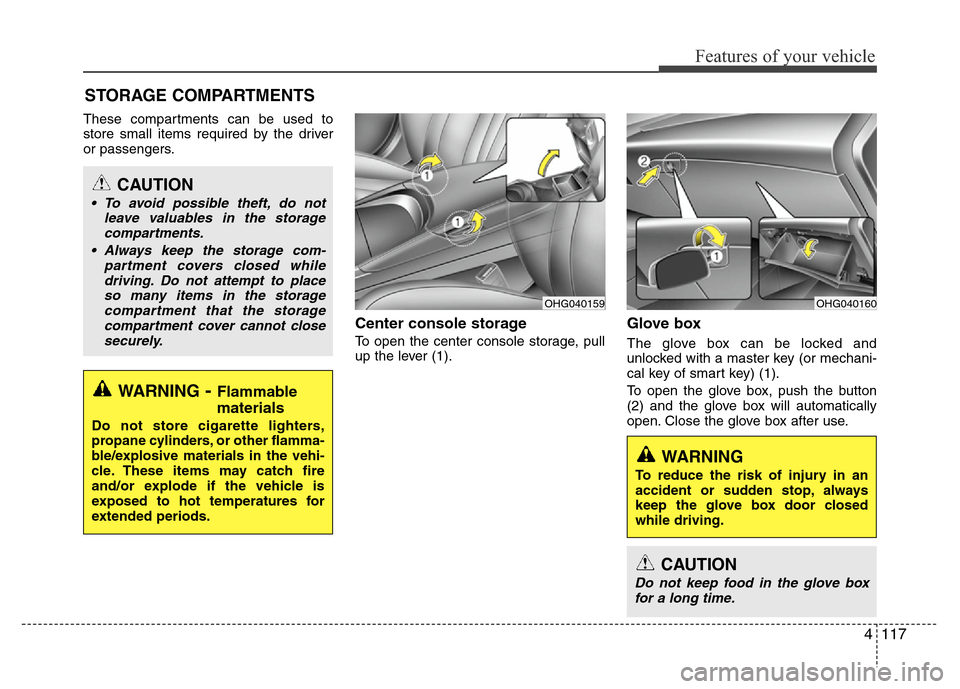
Center console storage
To open the center console storage, pull
up the lever (1).
Glove box
The glove box can be locked and
unlocked with a master key (or mechani-
cal key of smart key) (1).
To open the glove box, push the button
(2) and the glove box will automatically
open. Close the glove box after use.
STORAGE COMPARTMENTS
WARNING- Flammable
materials
Do not store cigarette lighters,
propane cylinders, or other flamma-
ble/explosive materials in the vehi-
cle. These items may catch fire
and/or explode if the vehicle is
exposed to hot temperatures for
extended periods.
CAUTION
• To avoid possible theft, do not
leave valuables in the storage
compartments.
• Always keep the storage com-
partment covers closed while
driving. Do not attempt to place
so many items in the storage
compartment that the storage
compartment cover cannot close
securely.
OHG040160OHG040159
WARNING
To reduce the risk of injury in an
accident or sudden stop, always
keep the glove box door closed
while driving.
CAUTION
Do not keep food in the glove box
for a long time.
Page 200 of 403
Features of your vehicle
124 4
Rear curtain (if equipped)
To fold the rear curtain, press the button.
To unfold the rear curtain, press the but-
ton again.The rear curtain will fold automatically
when you shift the shift lever into R
(Reverse) and unfold automatically when
you shift the shift lever from R (Reverse)
into P (Park).
After the rear curtain is folded by shifting
the shift lever into R (Reverse) and drive
more than 20 km/h with the shift lever in
D (Drive), the rear curtain will unfold
automatically.
Side curtain (if equipped)
To use the side curtain:
1. Lift the curtain by the hook (1).
2. Hang the curtain on both sides of the
hook.
CAUTION
Do not pull or fold the rear curtain by
hand. It could cause motor failure.
OHG040191L
OHG040174
■Type A
■Type B
OHG040176OHG040177
Page 202 of 403

Features of your vehicle
126 4
Steering wheel audio control
(if equipped)
The steering wheel audio control button
is installed to promote safe driving.
VOLUME (VOL +/-) (1)
• Push up the lever to increase volume.
• Push down the lever to decrease vol-
ume.
SEEK/PRESET ( / ) (2)
If the SEEK/PRESET button is pressed
for 0.8 seconds or more, it will work as
follows in each mode.
RADIO mode
It will function as the AUTO SEEK select
button. It will SEEK until you release the
button.
CDP mode
It will function as the FF/REW button.
CDC mode
It will function as the DISC UP/DOWN
button.
If the SEEK/PRESET button is pressed
for less than 0.8 seconds, it will work as
follows in each mode.RADIO mode
It will function as the PRESET STATION
select buttons.
CDP mode
It will function as the TRACK UP/DOWN
button.
CDC mode
It will function as the TRACK UP/DOWN
button.
Detailed information for audio control
buttons is included in the following pages
in this section.
MODE (3)
Press the MODE button to select Fadio,
CD (Compact Disc) or CDC* (Compact
Disc Changer).
MUTE (4) (if equipped)
• Press the MUTE button to cancel the
sound.
• Press the MUTE button again to acti-
vate the sound.
OHG040179L
CAUTION
Do not operate audio remote con-
trol buttons simultaneously.
Page 207 of 403
4131
Features of your vehicle
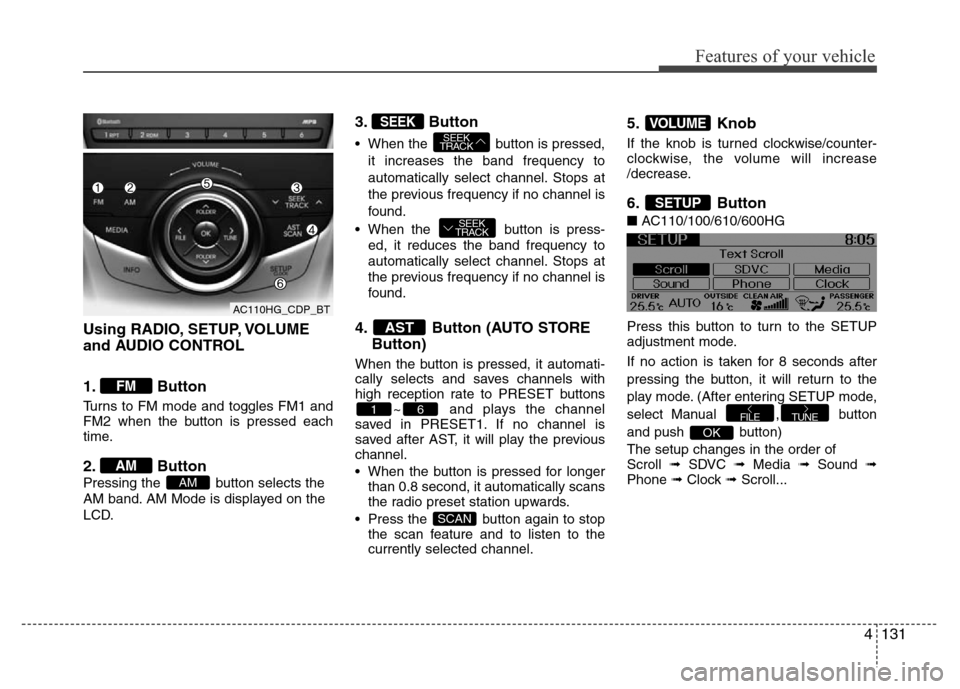
Using RADIO, SETUP, VOLUME
and AUDIO CONTROL
1. Button
Turns to FM mode and toggles FM1 and
FM2 when the button is pressed each
time.
2. Button
Pressing the button selects the
AM band. AM Mode is displayed on the
LCD.
3. Button
• When the button is pressed,
it increases the band frequency to
automatically select channel. Stops at
the previous frequency if no channel is
found.
• When the button is press-
ed, it reduces the band frequency to
automatically select channel. Stops at
the previous frequency if no channel is
found.
4. Button (AUTO STORE
Button)
When the button is pressed, it automati-
cally selects and saves channels with
high reception rate to PRESET buttons
~ and plays the channel
saved in PRESET1. If no channel is
saved after AST, it will play the previous
channel.
• When the button is pressed for longer
than 0.8 second, it automatically scans
the radio preset station upwards.
• Press the button again to stop
the scan feature and to listen to the
currently selected channel.
5. Knob
If the knob is turned clockwise/counter-
clockwise, the volume will increase
/decrease.
6. Button
■AC110/100/610/600HG
Press this button to turn to the SETUP
adjustment mode.
If no action is taken for 8 seconds after
pressing the button, it will return to the
play mode. (After entering SETUP mode,
select Manual , button
and push button)
The setup changes in the order of
Scroll ➟ SDVC ➟ Media ➟ Sound ➟
Phone ➟ Clock ➟ Scroll...
OK
TUNEFILE
SETUP
VOLUME
SCAN
61
AST
SEEK
TRACK
SEEK
TRACKSEEK
AM
AM
FM
AC110HG_CDP_BT