Page 171 of 403
495
Features of your vehicle
Temperature conversion
You can switch the temperature mode
between Centigrade to Fahrenheit as fol-
lows:
1. Select mode.
2. Press the OFF button.
3. Press the air intake control button
( ) 5 times within 3 seconds.
The display will change from Centigrade
to Fahrenheit, or from Fahrenheit to
Centigrade.
If the battery has been discharged or dis-
connected, the temperature mode dis-
play will reset to Centigrade.
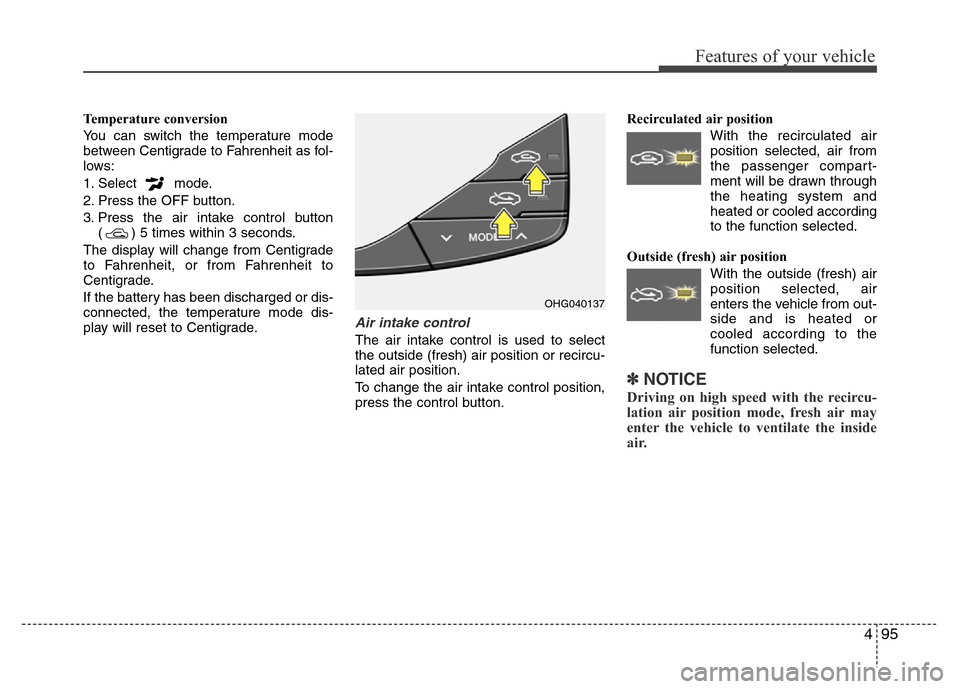
Air intake control
The air intake control is used to select
the outside (fresh) air position or recircu-
lated air position.
To change the air intake control position,
press the control button.Recirculated air position
With the recirculated air
position selected, air from
the passenger compart-
ment will be drawn through
the heating system and
heated or cooled according
to the function selected.
Outside (fresh) air position
With the outside (fresh) air
position selected, air
enters the vehicle from out-
side and is heated or
cooled according to the
function selected.
✽NOTICE
Driving on high speed with the recircu-
lation air position mode, fresh air may
enter the vehicle to ventilate the inside
air.
OHG040137
Page 182 of 403
Features of your vehicle
106 4
Adjusting the driver and passenger side
temperature equally
1. Press the DUAL button again to deac-
tivate DUAL mode. The passenger
side temperature will be set to the
same temperature as the driver side
temperature.
2. Operate the driver’s side temperature
control switch. The driver and passen-
ger side temperature will be adjusted
equally.Temperature conversion
You can switch the temperature mode
between Centigrade to Fahrenheit as fol-
lows:
While pressing the MODE button, press
the DUAL button for 3 seconds or more.
The display will change from Centigrade
to Fahrenheit, or from Fahrenheit to
Centigrade.
If the battery has been discharged or dis-
connected, the temperature mode dis-
play will reset to Centigrade.
Air intake control
This is used to select the outside (fresh)
air position or recirculated air position.
To change the air intake control position,
push the control button.
OHG040147
■Type A
■Type B
Page 185 of 403
4109
Features of your vehicle
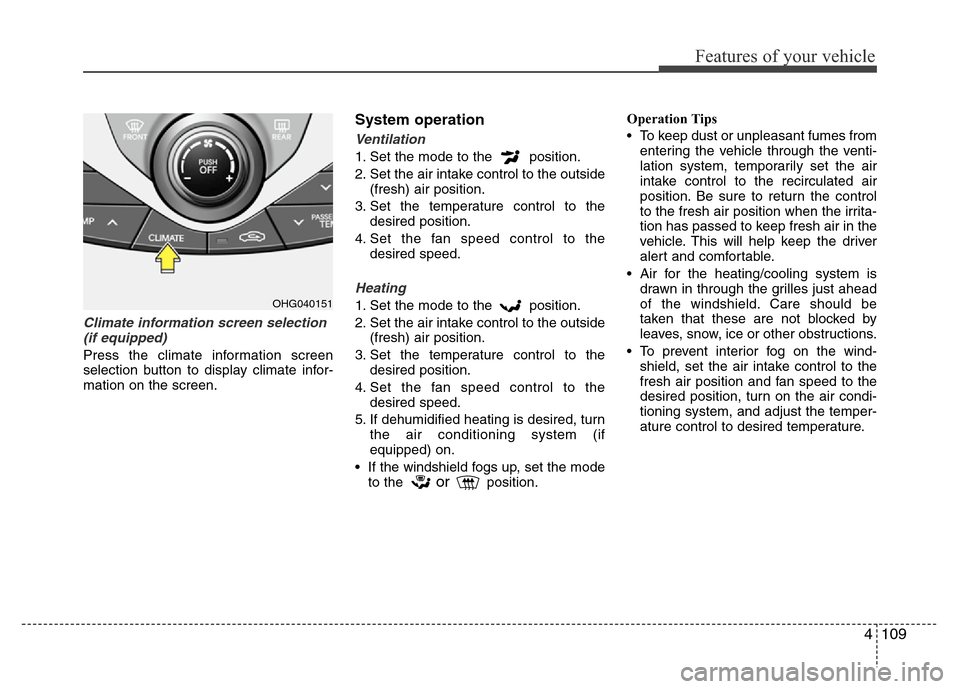
Climate information screen selection
(if equipped)
Press the climate information screen
selection button to display climate infor-
mation on the screen.
System operation
Ventilation
1. Set the mode to the position.
2. Set the air intake control to the outside
(fresh) air position.
3. Set the temperature control to the
desired position.
4. Set the fan speed control to the
desired speed.
Heating
1. Set the mode to the position.
2. Set the air intake control to the outside
(fresh) air position.
3. Set the temperature control to the
desired position.
4. Set the fan speed control to the
desired speed.
5. If dehumidified heating is desired, turn
the air conditioning system (if
equipped) on.
• If the windshield fogs up, set the mode
to the
orposition.Operation Tips
• To keep dust or unpleasant fumes from
entering the vehicle through the venti-
lation system, temporarily set the air
intake control to the recirculated air
position. Be sure to return the control
to the fresh air position when the irrita-
tion has passed to keep fresh air in the
vehicle. This will help keep the driver
alert and comfortable.
• Air for the heating/cooling system is
drawn in through the grilles just ahead
of the windshield. Care should be
taken that these are not blocked by
leaves, snow, ice or other obstructions.
• To prevent interior fog on the wind-
shield, set the air intake control to the
fresh air position and fan speed to the
desired position, turn on the air condi-
tioning system, and adjust the temper-
ature control to desired temperature.
OHG040151
Page 207 of 403
4131
Features of your vehicle
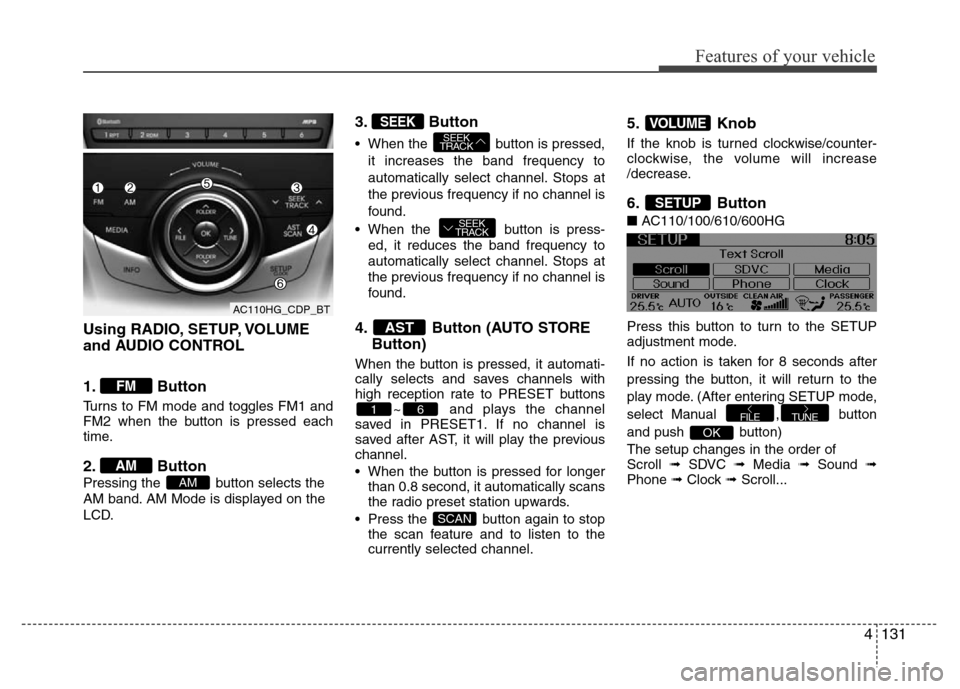
Using RADIO, SETUP, VOLUME
and AUDIO CONTROL
1. Button
Turns to FM mode and toggles FM1 and
FM2 when the button is pressed each
time.
2. Button
Pressing the button selects the
AM band. AM Mode is displayed on the
LCD.
3. Button
• When the button is pressed,
it increases the band frequency to
automatically select channel. Stops at
the previous frequency if no channel is
found.
• When the button is press-
ed, it reduces the band frequency to
automatically select channel. Stops at
the previous frequency if no channel is
found.
4. Button (AUTO STORE
Button)
When the button is pressed, it automati-
cally selects and saves channels with
high reception rate to PRESET buttons
~ and plays the channel
saved in PRESET1. If no channel is
saved after AST, it will play the previous
channel.
• When the button is pressed for longer
than 0.8 second, it automatically scans
the radio preset station upwards.
• Press the button again to stop
the scan feature and to listen to the
currently selected channel.
5. Knob
If the knob is turned clockwise/counter-
clockwise, the volume will increase
/decrease.
6. Button
■AC110/100/610/600HG
Press this button to turn to the SETUP
adjustment mode.
If no action is taken for 8 seconds after
pressing the button, it will return to the
play mode. (After entering SETUP mode,
select Manual , button
and push button)
The setup changes in the order of
Scroll ➟ SDVC ➟ Media ➟ Sound ➟
Phone ➟ Clock ➟ Scroll...
OK
TUNEFILE
SETUP
VOLUME
SCAN
61
AST
SEEK
TRACK
SEEK
TRACKSEEK
AM
AM
FM
AC110HG_CDP_BT
Page 208 of 403
Features of your vehicle
132 4
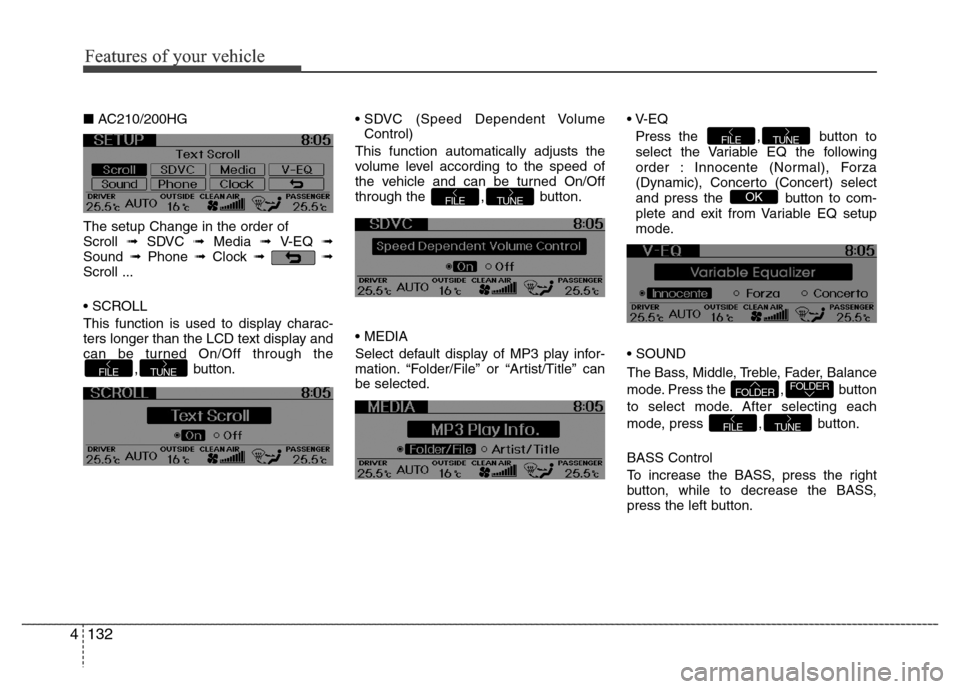
■AC210/200HG
The setup Change in the order of
Scroll ➟ SDVC ➟ Media ➟ V-EQ ➟
Sound ➟Phone ➟Clock ➟➟
Scroll ...
• SCROLL
This function is used to display charac-
ters longer than the LCD text display and
can be turned On/Off through the
, button.• SDVC (Speed Dependent Volume
Control)
This function automatically adjusts the
volume level according to the speed of
the vehicle and can be turned On/Off
through the , button.
• MEDIA
Select default display of MP3 play infor-
mation. “Folder/File” or “Artist/Title” can
be selected.• V-EQ
Press the , button to
select the Variable EQ the following
order : Innocente (Normal), Forza
(Dynamic), Concerto (Concert) select
and press the button to com-
plete and exit from Variable EQ setup
mode.
• SOUND
The Bass, Middle, Treble, Fader, Balance
mode. Press the , button
to select mode. After selecting each
mode, press , button.
BASS Control
To increase the BASS, press the right
button, while to decrease the BASS,
press the left button.
TUNEFILE
FOLDERFOLDER
OK
TUNEFILE
TUNEFILE
TUNEFILE
Features of your vehicle
Page 209 of 403

4133
Features of your vehicle
MIDDLE Control
To increase the MIDDLE, press the right
button, while to decrease the MIDDLE,
press the left button.
TREBLE Control
To increase the TREBLE, press the right
button, while to decrease the TREBLE,
press the left button.
FADER Control
Press the right button to emphasize rear
speaker sound(front speaker sound will
be attenuated). When the left button is
pressed, front speaker sound will be
emphasized(rear speaker sound will be
attenuated).BALANCE Control
Press the right button to emphasize right
speaker sound(left speaker sound will be
attenuated). When the left button is
pressed, left speaker sound will be
emphasized(right speaker sound will be
attenuated).
• PHONE
(if equipped)
Select this item to enter PHONE setup
mode. Refer to “BLUETOOTH PHONE
OPERATION” section for detailed infor-
mation.
❈“PHONE” menu is not available if the
audio does not support
Bluetooth®
Wireless Technology features.• CLOCK
Select this item to enter Clock setup
mode. Adjust the hour using ,
button and press the
button.
Adjust the minute using ,
button and press the
button to complete and exit from clock
adjustment mode.
Press the button for more than 1
seconds while in power off/on, you can
enter the Clock setup mode directly.
• Return( )
This function displays the previous
MODE screen.
SETUP
OKFOLDERFOLDER
TUNEFOLDERFOLDER
AC110HG_CDP_BT
Page 210 of 403
Features of your vehicle
134 4
8. PRESET Buttons
Push ~ buttons less than 0.8
seconds to play the channel saved in
each button. Push Preset button for 0.8
seconds or longer to save current chan-
nel to the respective button with a beep.
9. Button
• Turns on/off the set when the IGNI-
TION SWITCH is on ACC or ON.
10. Button
Turn ON/OFF the displayed data and
light on LCD.
When LCD Display is turned OFF, Press
any button to turn ON display.
DISP
61
AC110HG_CDP_BT
Page 211 of 403
4135
Features of your vehicle
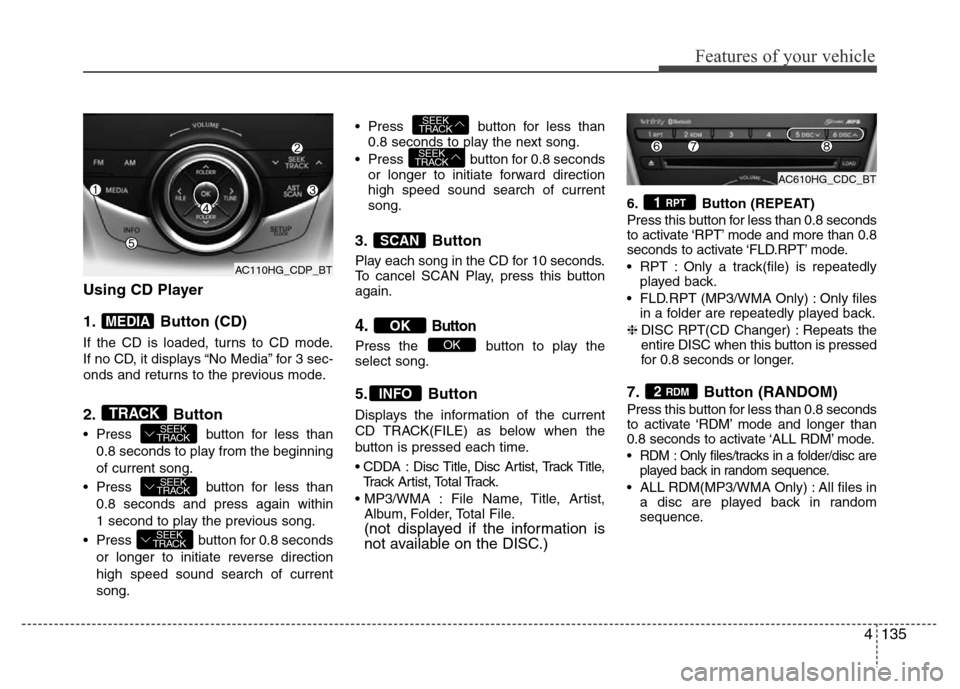
Using CD Player
1. Button (CD)
If the CD is loaded, turns to CD mode.
If no CD, it displays “No Media” for 3 sec-
onds and returns to the previous mode.
2. Button
• Press button for less than
0.8 seconds to play from the beginning
of current song.
• Press button for less than
0.8 seconds and press again within
1 second to play the previous song.
• Press button for 0.8 seconds
or longer to initiate reverse direction
high speed sound search of current
song.• Press button for less than
0.8 seconds to play the next song.
• Press button for 0.8 seconds
or longer to initiate forward direction
high speed sound search of current
song.
3. Button
Play each song in the CD for 10 seconds.
To cancel SCAN Play, press this button
again.
4.Button
Press the button to play the
select song.
5. Button
Displays the information of the current
CD TRACK(FILE) as below when the
button is pressed each time.
• CDDA : Disc Title, Disc Artist, Track Title,
Track Artist, Total Track.
• MP3/WMA : File Name, Title, Artist,
Album, Folder, Total File.
(not displayed if the information is
not available on the DISC.)
6. Button (REPEAT)
Press this button for less than 0.8 seconds
to activate ‘RPT’ mode and more than 0.8
seconds to activate ‘FLD.RPT’ mode.
• RPT : Only a track(file) is repeatedly
played back.
• FLD.RPT (MP3/WMA Only) : Only files
in a folder are repeatedly played back.
❈DISC RPT(CD Changer) : Repeats the
entire DISC when this button is pressed
for 0.8 seconds or longer.
7. Button (RANDOM)
Press this button for less than 0.8 seconds
to activate ‘RDM’ mode and longer than
0.8 seconds to activate ‘ALL RDM’ mode.
• RDM : Only files/tracks in a folder/disc are
played back in random sequence.
• ALL RDM(MP3/WMA Only) : All files in
a disc are played back in random
sequence.
2 RDM
1 RPT
INFO
OK
OK
SCAN
SEEK
TRACK
SEEK
TRACK
SEEK
TRACK
SEEK
TRACK
SEEK
TRACKTRACK
MEDIA
AC110HG_CDP_BTAC610HG_CDC_BT
AC110HG_CDP_BT