2011 Hyundai Accent clock
[x] Cancel search: clockPage 122 of 232
1
FEATURES OF YOUR HYUNDAI
111
1
FEATURES OF YOUR HYUNDAI
111
1
FEATURES OF YOUR HYUNDAI
111
1
FEATURES OF YOUR HYUNDAI
111
o FADER Control Turn the control knob clockwise to emphasize rear speaker sound (frontspeaker sound will be attenuated). When the control knob is turned counterclock- wise, front speaker sound will be em-phasized (rear speaker sound will be attenuated). o BALANCE Control Rotate the knob clockwise to empha- size right speaker sound. (Left speaker sound will be attenuated) When the control knob is turned counterclock-wise, left speaker sound will be empha- sized (Right speaker sound will be at- tenuated).
! CAUTION:
o Do not place beverages close to the audio system. The playback mechanism may be damaged if you spill them.
o Do not strike or allow anything to impact the audio system, damageto the system mechanisms could occur.
7. PRESET STATION Select But-
tons
Six stations for AM, FM1 and FM2respectively can be preset in the elec-tronic memory circuit. HOW TO PRESET STATIONS Six AM and twelve FM stations may be programmed into the memory of the radio. Then, by simply pressing the band select button and/or one of the sixstation select buttons, you may recall any of these stations instantly. To pro- gram the stations, follow these steps:
o Press AM, FM selector to set the band for AM, FM1 and FM2.
o Select the desired station to be stored by seek or manual tuning.
o Determine the preset station select button you wish to use to access that station.
o Press the station select button for more than two seconds. Beep soundwill be heard while depressing the button. You should then release thebutton, and proceed to program the next desired station. A total of 18 stations can be pro- grammed by selecting one AM andtwo FM station per button.
o When completed, any preset station
may be recalled by selecting AM,FM1 or FM2 band and the appropri- ate station button.
Page 126 of 232
1
FEATURES OF YOUR HYUNDAI
115
1
FEATURES OF YOUR HYUNDAI
115
1
FEATURES OF YOUR HYUNDAI
115
1
FEATURES OF YOUR HYUNDAI
115
!
CAUTION:
o Do not insert warped or poor qual- ity discs into the CD player as damage to the unit may occur.
o Do not insert anything like coins
into the player slot as damage tothe unit may occur.
o Do not place beverages close to
the audio system. The playbackmechanism may be damaged if you spill them.
10. CD SCAN Button
o To playback the first 10 seconds of
each track, press the CD SCAN button more than 1 second.
o To playback the first 10 seconds of
each track in the selected folder,press the CD SCAN button within 1 second. (MP3 CD only)
o Press the CD SCAN button again within 10 sec. when you have reachedthe desired track.
11. FILE SEARCH Knob (TUNE Select Knob)
o You can skip the track by turning the FILE SEARCH knob clockwise or counterclockwise.After selecting the desired track, press the FILE SEARCH knob to playback the track.If you do not press the FILE SEARCH knob within five seconds, the search will stop. 12. DIRECTORY SEARCH
Button
o You can move through the folder by pushing the DIR button to up ( ) anddown ( ). After moving the desired folder, press the FILE SEARCH knob to playbackthe selected folder. If you do not press the FILE SEARCH knob within five seconds, the searchwill stop.
NOTE :
o To assure proper operation of the unit, keep the vehicle interior tem- perature within a normal range by using the vehicle's air condition- ing or heating system.
o When replacing the fuse, replace it with a fuse having the correctcapacity.
o All stored bookmarks are all erased when the car battery is discon-nected or power to the vehicle islost. If this occurs, the bookmarks will have to be reset.
o This equipment is designed to be used only in a 12 volt DC batterysystem with negative ground.
o This unit is made of precisionparts. Do not attempt to disas- semble or adjust any parts.
o When driving your vehicle, be sure
to keep the volume of the unit setlow enough to allow you to hear sounds coming from the outside.
o Do not expose this equipment (in- cluding the speakers and tape) towater or excessive moisture.
Page 131 of 232
2 DRIVING YOUR HYUNDAI
4
!
C040A01E
KEY POSITIONS
C070C01A-AAT
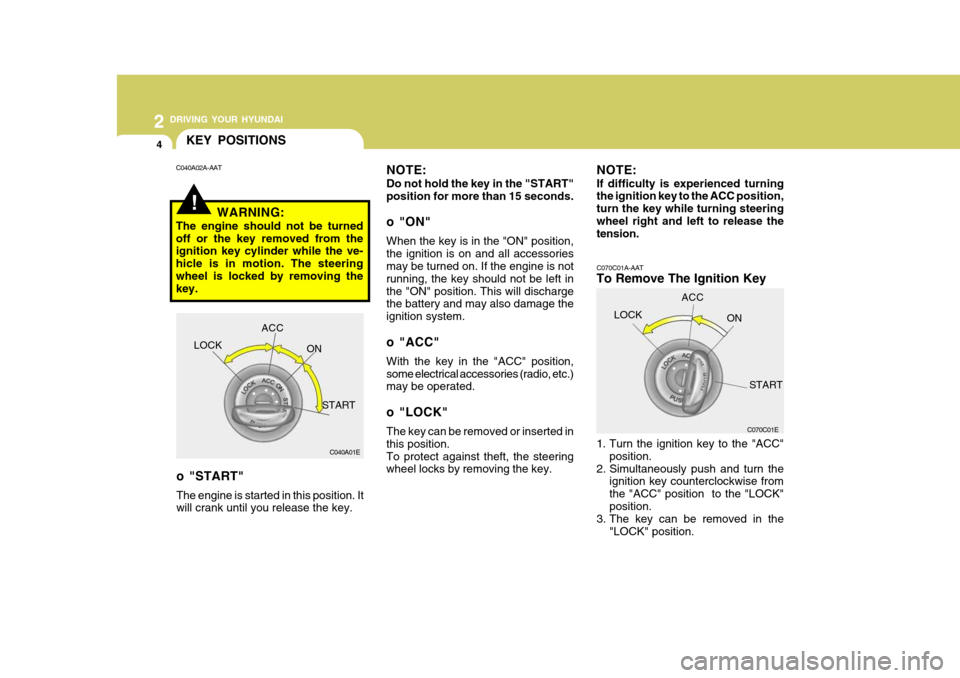
To Remove The Ignition Key
1. Turn the ignition key to the "ACC"position.
2. Simultaneously push and turn the ignition key counterclockwise from the "ACC" position to the "LOCK"position.
3. The key can be removed in the
"LOCK" position.
NOTE: Do not hold the key in the "START" position for more than 15 seconds.
o "ON" When the key is in the "ON" position, the ignition is on and all accessories may be turned on. If the engine is not running, the key should not be left inthe "ON" position. This will discharge the battery and may also damage the ignition system.
o "ACC" With the key in the "ACC" position, some electrical accessories (radio, etc.) may be operated.
o "LOCK" The key can be removed or inserted in this position.To protect against theft, the steering wheel locks by removing the key.
C040A02A-AAT
WARNING:
The engine should not be turned off or the key removed from the ignition key cylinder while the ve- hicle is in motion. The steeringwheel is locked by removing the key.
LOCK ACC
ON
START C070C01E
LOCK
ACC
ON
START
o "START" The engine is started in this position. It will crank until you release the key. NOTE: If difficulty is experienced turning the ignition key to the ACC position, turn the key while turning steeringwheel right and left to release the tension.
Page 164 of 232
3 WHAT TO DO IN AN EMERGENCY
12
CAUTION
It should be tightened firmly with your fingers until there is no more play in the towing hole. Towing hookis located in the jack case on the spare tyre.
! (3) Attach a tow cable, chain or strap to
the towing hook on the front bumper.
NOTE: Place the towing hook & towing hole cover in its original position when not in use.
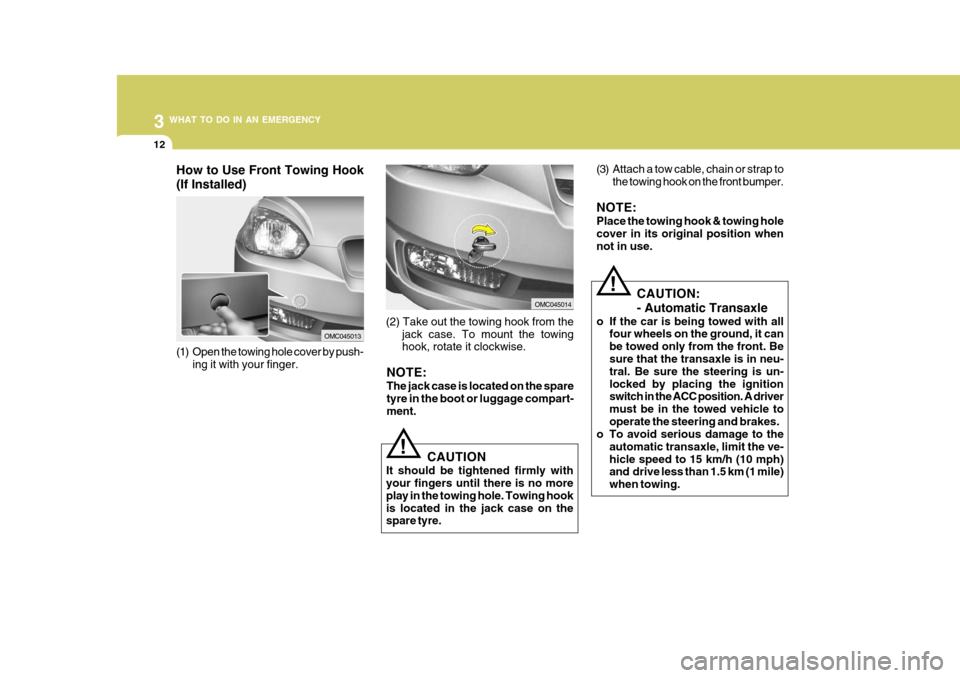
(2) Take out the towing hook from the jack case. To mount the towing hook, rotate it clockwise.
OMC045014
(1) Open the towing hole cover by push- ing it with your finger.
OMC045013
How to Use Front Towing Hook (If Installed)
NOTE: The jack case is located on the spare tyre in the boot or luggage compart- ment.
!CAUTION: - Automatic Transaxle
o If the car is being towed with all four wheels on the ground, it can be towed only from the front. Be sure that the transaxle is in neu- tral. Be sure the steering is un-locked by placing the ignition switch in the ACC position. A driver must be in the towed vehicle tooperate the steering and brakes.
o To avoid serious damage to the
automatic transaxle, limit the ve-hicle speed to 15 km/h (10 mph) and drive less than 1.5 km (1 mile) when towing.
Page 187 of 232
6 DO-IT-YOURSELF MAINTENANCE
6
!
!
!
CAUTION:
Slowly pour the recommended oil by using a funnel. Do not overfill not to damage engine.
WARNING:
Be very careful not to touch theradiator hose when adding the en-gine oil as it may be hot enough to burn you. NOTE:
o It is recommended that the engine oil and filter should be changed by an authorised Hyundai dealer.
o Always dispose of used engine oil
in an environmentally acceptablemanner. It is suggested that it be placed in a sealed container and taken to a service station for recla-mation. Do not pour the oil on the ground or put it in with the house- hold trash. WARNING:
Used motor oil may cause irritationor cancer of the skin if left in contactwith the skin for prolonged periods of time. Wash your hands thoroughly with soap and warm water as soon aspossible after handling used oil.
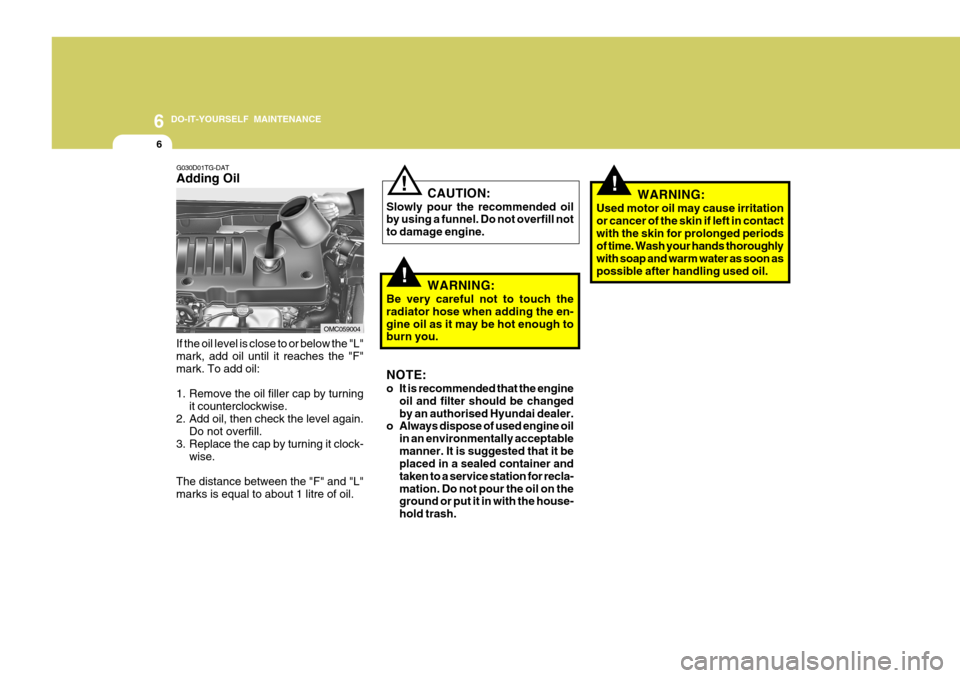
G030D01TG-DAT Adding Oil
If the oil level is close to or below the "L" mark, add oil until it reaches the "F" mark. To add oil:
1. Remove the oil filler cap by turning it counterclockwise.
2. Add oil, then check the level again. Do not overfill.
3. Replace the cap by turning it clock- wise.
The distance between the "F" and "L" marks is equal to about 1 litre of oil.
OMC059004
Page 200 of 232
6
DO-IT-YOURSELF MAINTENANCE
19
!
CHECKING THE BATTERY
o If battery fluid is on your skin, flushthe affected areas with water for at least 15 minutes and then seek medi- cal assistance.
o If battery fluid is in your eyes, rinse
out your eyes with water and getmedical assistance as soon as pos- sible. While you are being driven toget medical assistance, continue to rinse your eyes by using a sponge or soft cloth saturated with water.
o If you swallow battery fluid, drink a large quantity of water or milk fol-lowed by milk of magnesia, eat araw egg or drink vegetable oil. Get medical assistance as soon as pos- sible.
While batteries are being charged (ei- ther by a battery charger or by the vehicle's alternator), they produce ex-plosive gases. Always observe these warnings to reduce the risk of injury:
o Charge batteries only in a well ven- tilated area.
o Do not permit flames, sparks or smoking in the area.
o Keep children away from the area.
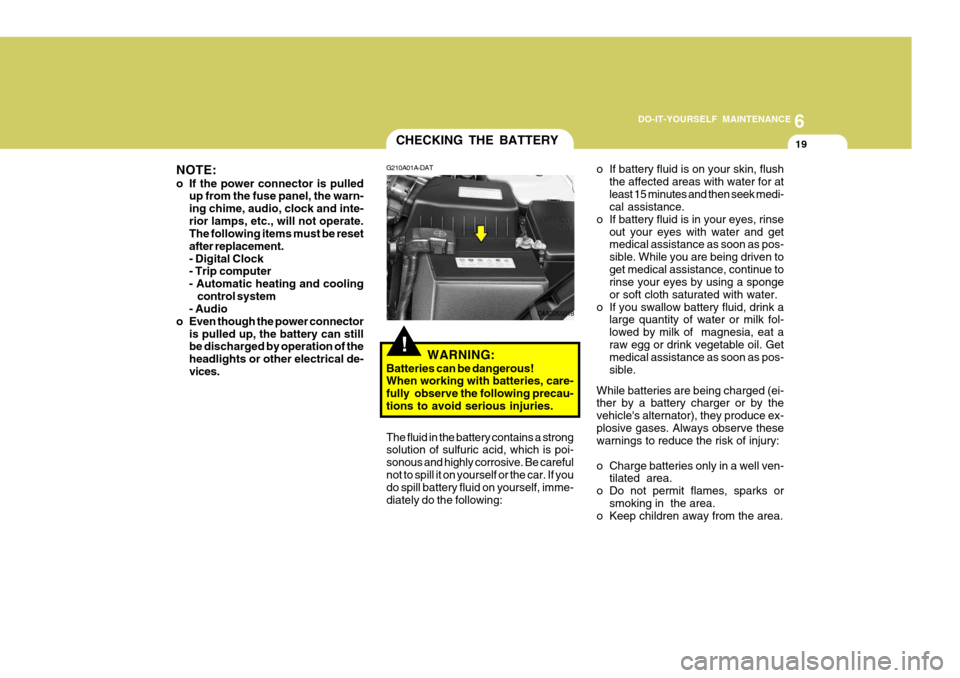
G210A01A-DAT
WARNING:
Batteries can be dangerous! When working with batteries, care- fully observe the following precau-tions to avoid serious injuries.
The fluid in the battery contains a strong solution of sulfuric acid, which is poi- sonous and highly corrosive. Be carefulnot to spill it on yourself or the car. If you do spill battery fluid on yourself, imme- diately do the following:
OMC055018
NOTE:
o If the power connector is pulled
up from the fuse panel, the warn- ing chime, audio, clock and inte-rior lamps, etc., will not operate. The following items must be reset after replacement.- Digital Clock - Trip computer
- Automatic heating and cooling control system
- Audio
o Even though the power connector is pulled up, the battery can stillbe discharged by operation of the headlights or other electrical de-vices.
Page 206 of 232
6
DO-IT-YOURSELF MAINTENANCE
25
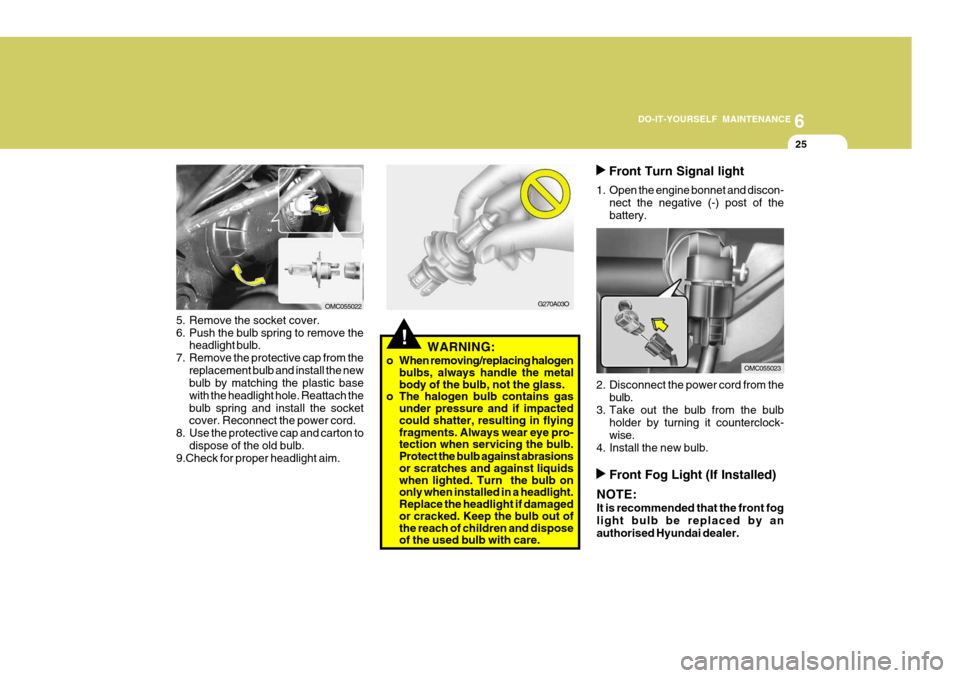
Front Turn Signal light
1. Open the engine bonnet and discon- nect the negative (-) post of the battery.
2. Disconnect the power cord from the bulb.
3. Take out the bulb from the bulb holder by turning it counterclock-wise.
4. Install the new bulb.
G270A03O
!WARNING:
o When removing/replacing halogen bulbs, always handle the metal body of the bulb, not the glass.
o The halogen bulb contains gas
under pressure and if impacted could shatter, resulting in flying fragments. Always wear eye pro- tection when servicing the bulb. Protect the bulb against abrasions or scratches and against liquids when lighted. Turn the bulb on only when installed in a headlight. Replace the headlight if damaged or cracked. Keep the bulb out of the reach of children and dispose of the used bulb with care.
5. Remove the socket cover.
6. Push the bulb spring to remove the
headlight bulb.
7. Remove the protective cap from the replacement bulb and install the new bulb by matching the plastic base with the headlight hole. Reattach thebulb spring and install the socket cover. Reconnect the power cord.
8. Use the protective cap and carton to dispose of the old bulb.
9.Check for proper headlight aim.
OMC055022
OMC055023
Front Fog Light (If Installed)
NOTE: It is recommended that the front fog light bulb be replaced by anauthorised Hyundai dealer.
Page 207 of 232
6 DO-IT-YOURSELF MAINTENANCE
26
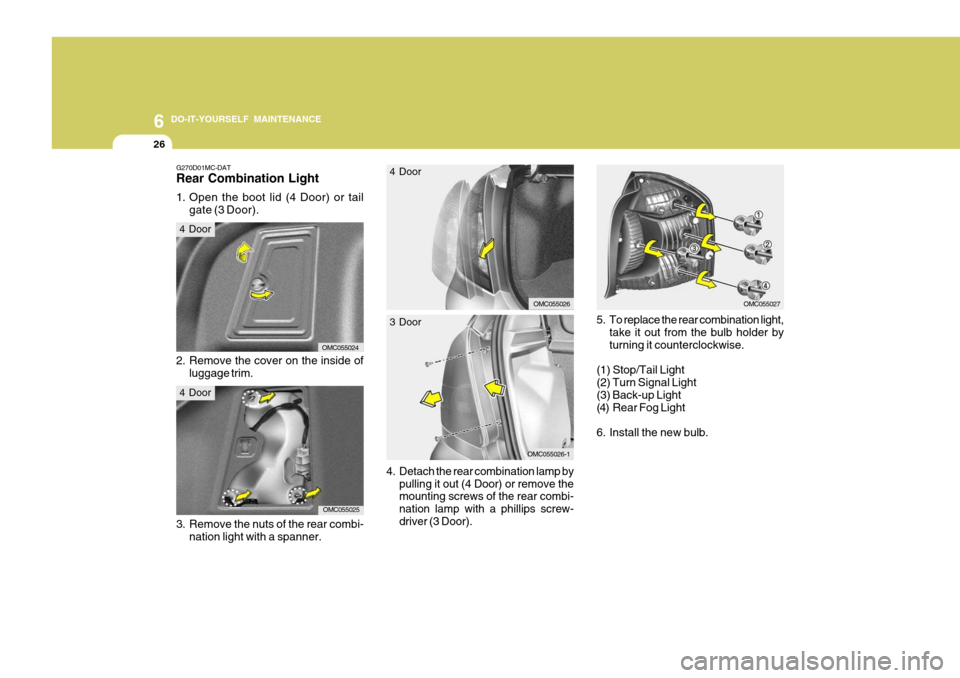
3. Remove the nuts of the rear combi-
nation light with a spanner.
G270D01MC-DAT Rear Combination Light
1. Open the boot lid (4 Door) or tailgate (3 Door).
OMC055024
OMC055025
2. Remove the cover on the inside of
luggage trim.
4 Door
4 Door 5. To replace the rear combination light,
take it out from the bulb holder by turning it counterclockwise.
(1) Stop/Tail Light(2) Turn Signal Light (3) Back-up Light
(4) Rear Fog Light
6. Install the new bulb.
OMC055027OMC055026
4 Door
3 Door
4.
Detach the rear combination lamp by pulling it out (4 Door) or remove the mounting screws of the rear combi- nation lamp with a phillips screw-driver (3 Door).
OMC055026-1