Page 292 of 427

Your vehicle is equipped with disc
brakes at all f our wheels. A power
assist helps reduce the ef f ort needed
on the brake pedal. The emergency
brake assist system increases the
stopping f orce when you depress the
brake pedal hard in an emergency
situation. The anti-lock brake system
(ABS) helps you retain steering
control when braking very hard.
Resting your f oot on the pedal keeps
the brakes applied lightly, builds up
heat, reduces their ef f ectiveness and
reduces brake pad lif e. In addition,
f uel economy can be reduced. It also
keeps your brake lights on all the
time, conf using drivers behind you.Constant application of the brakes
when going down a long hill builds
up heat and reduces their ef f ective-
ness. Use the engine to assist the
brakes by taking your f oot of f the
accelerator and downshif ting to a
lower gear.
Check the brakes after driving
through deep water. Apply the
brakes moderately to see if they f eel
normal. If not, apply them gently and
f requently until they do. Be extra
cautious and alert in your driving.
The hydraulic system that operates
the brakes has two separate circuits.
Each circuit works diagonally across
the vehicle (the lef t-f ront brake is
connected with the right-rear brake,
etc.). If one circuit should develop a
problem, you will still have braking
at two wheels.
If the brake pads need replacing, you
will hear a distinctive, metallic
screeching sound when you apply
the brake pedal. If you do not have
the brake pads replaced, they will
screech all the time. It is normal f or
the brakes to occasionally squeal or
squeak when you apply them.
Braking System Design
Brake Pad Wear Indicators
Braking System
288
Main MenuTable of Contents
Page 304 of 427

�´
Trailer lights and equipment must
comply with f ederal, state, province/
territory, and local regulations.
Check trailer light requirements f or
the areas where you plan to tow, and
use only equipment designed f or
your vehicle.Ref er to the above illustration f or
wiring information.
We recommend that you have your
dealer install a Honda wiring harness
and converter. This harness has
been designed f or your vehicle.
Your vehicle is equipped with a
trailer lighting connector.
Your vehicle is equipped with a
connector to install an optional trailer
lighting connector that mates with
your vehicle. You can get this
optional connector f rom your dealer. Since lighting and wiring vary with
trailer type and brand, you should
also have a qualif ied mechanic install
a suitable connector between the
vehicle and the trailer.Except RT models
On RT models
Trailer Lights
Towing a Trailer
300
TAILLIGHTS
(GREEN/BLACK) ELECTRIC BRAKE
(BROWN/WHITE)
RIGHT TURN SIGNAL
AND BRAKE LIGHTS
(GREEN/RED) GROUND
(BLACK)
B CHARGE
(GREEN)
LEFT TURN SIGNAL
AND BRAKE LIGHTS
(GREEN/RED)
BACK-UP LIGHTS
(BLUE)
Main MenuTable of Contents
Page 306 of 427
�´
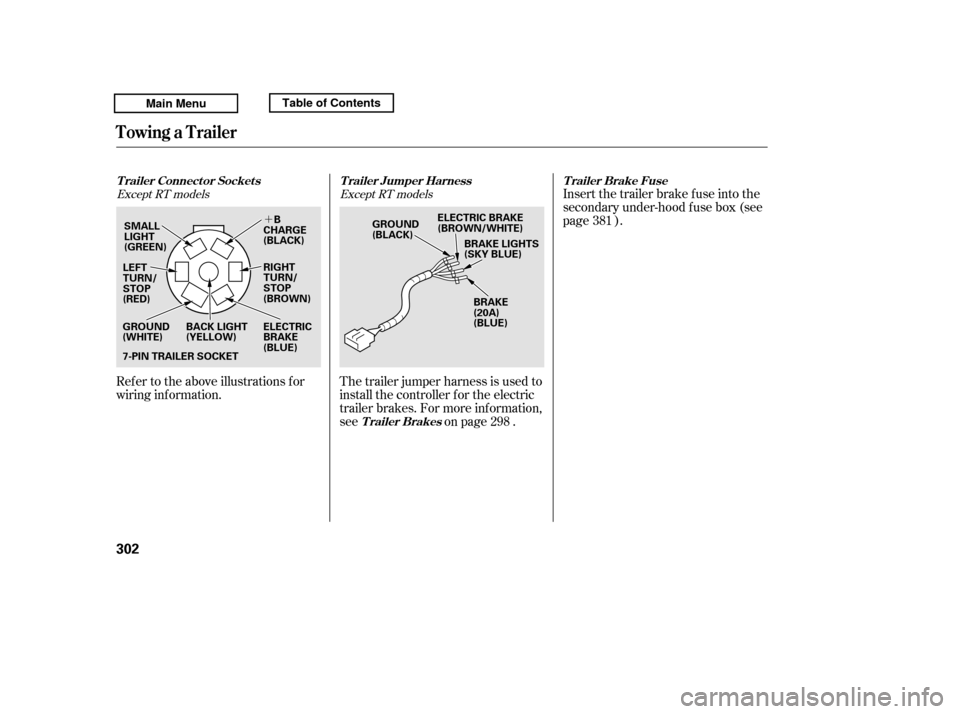
Ref er to the above illustrations f or
wiring information.The trailer jumper harness is used to
install the controller f or the electric
trailer brakes. For more inf ormation,
see on page .Insert the trailer brake f use into the
secondary under-hood f use box (see
page ).
298 381
Except RT models Except RT models
T railer Connect or Socket s T railer Jumper Harness
Trailer BrakesT railer Brake Fuse
Towing a Trailer
302
7-PIN TRAILER SOCKET
SMALL
LIGHT
(GREEN)
BACK LIGHT
(YELLOW)
GROUND
(WHITE) GROUND
(BLACK)
ELECTRIC BRAKE
(BROWN/WHITE)
LEFT
TURN/
STOP
(RED) BRAKE
(20A)
(BLUE)
B
CHARGE
(BLACK)
RIGHT
TURN/
STOP
(BROWN)
ELECTRIC
BRAKE
(BLUE) BRAKE LIGHTS
(SKY BLUE)
Main MenuTable of Contents
Page 321 of 427
CONT INUED
Press the TRIP/RESET button f or
about 10 seconds. The engine oil
lif e and the maintenance item
code(s) will blink.Press the TRIP/RESET button f or
another 5 seconds. The
maintenance item code(s) will
disappear, and the engine oil lif e
will reset to ‘‘100.’’To see the current engine oil lif e,
turn the ignition switch to the ON
(II) position, and push and release
the SEL/RESET button on the
dashboard repeatedly, until the
engine oil lif e is displayed (see page
).
3.
4.
83
On models with navigation system
Maintenance Minder
Maint enance
317
U.S. model is shown.
ENGINE OIL LIFE DISPLAY SEL/RESET BUTTON
TM
Main MenuTable of Contents
Page 325 of 427

�Û�Ý
All maintenance items displayed on
the inf ormation display are in code.
For an explanation of these
maintenance codes, see page . Your dealer will reset the display
af ter completing the required
maintenance service. You will see
‘‘OIL LIFE 100%’’ on the display the
next time you turn the ignition
switch to the ON (II) position.
If maintenance service is done by
someone other than your dealer,
reset the maintenance minder as
f ollows:
Turn the ignition switch to the ON
(II) position.
Press the SEL/RESET button on
the dashboard until you see the
engine oil lif e display. Press and hold the SEL/RESET
button f or 10 seconds. The multi-
inf ormation display will ask f or a
conf irmation.
If you are sure you want to reset
the display, press the SEL/
RESET button to select ‘‘OK.’’
If you do not want to reset the
display, press the INFO ( / )
button to select ‘‘Cancel.’’
1. 2.
3.
324
On models with navigation system On models with navigation system
Maintenance Main Items and Sub
Items Resetting the Engine Oil Lif e
Display
Maintenance Minder
Maint enance
321
MAINTENANCE
MAIN ITEM
MAINTENANCE SUB ITEM(S)
TM
Main MenuTable of Contents
Page 334 of 427

Make sure the engine and radiator
are cool.
When the radiator and engine are
cool, relieve any pressure in the
cooling system by turning the
radiator cap counterclockwise,
without pressing down.
Remove the radiator cap by
pushing down and turning
counterclockwise.The coolant level should be up to
the base of the f iller neck. Add
coolant if it is low.
Pourthecoolantslowlyand
caref ully so you do not spill any.
Clean up any spill immediately; it
could damage components in the
engine compartment.
Put the radiator cap back on, and
tighten it fully.
Pour coolant into the reserve tank.
Fill it to half way between the MAX
and MIN marks. Put the cap back
on the reserve tank.
Do not add any rust inhibitors or
other additives to your vehicle’s
cooling system. They may not be
compatible with the coolant or
engine components. Check the f luid level in the
windshield washer reservoir at least
monthly during normal use.
Fill the reservoir with a good-quality
windshield washer f luid. This
increases the cleaning capability and
prevents f reezing in cold weather.
The washer level indicator will come
on when the level is low (see page
).
If the washer f luid is low, a
‘‘WASHER FLUID LOW’’ message
appears on the multi-inf ormation
display.
When you ref ill the reservoir, clean
the edges of the windshield wiper
blades with windshield washer f luid
on a clean cloth. This will help to
condition them.
3. 4. 5.
1. 2. 67
On models without navigation system
On models with navigation system
Windshield Washers
Engine Coolant, Windshield Washers
330
RADIATOR CAP
Main MenuTable of Contents
Page 335 of 427
CONT INUED
Check the f luid level with the engine
at normal operating temperature.Park the vehicle on level ground.
Start the engine, let it run until the
radiator f an comes on, then shut
of f the engine. For accurate
results, wait about 60 seconds (but
no longer than 90 seconds) bef ore
doing step 2. Remove the dipstick (yellow loop)
f rom the transmission, and wipe it
with a clean cloth.
The transmission should be drained
and ref illed with new f luid when this
service is shown on the inf ormation
display or multi-inf ormation display
(depending on models). 1.
2.
Windshield Washers, A utomatic T ransmission Fluid
Automatic Transmission Fluid
Maint enance
331
DIPSTICK
Do not use engine antif reeze or a
vinegar/water solution in the
windshield washer reservoir. Antif reeze
can damage your vehicle’s paint, while
a vinegar/water solution can damage
the windshield washer pump. Use only
commercially-available windshield
washer f luid.
Main MenuTable of Contents
Page 349 of 427

The floor mats that came with your
vehicle hook over the f loor mat
anchors. This keeps the f loor mats
f rom sliding f orward, possibly
interf ering with the pedals, or
backwards, making the f ront
passenger’s weight sensors
inef f ective.
If you remove a f loor mat, make sure
tore-anchoritwhenyouputitback
in your vehicle.A non-Honda f loor mat may not f it
your vehicle properly. This could
prevent the proper operation of the
f olding rear seats and the passenger’s
seat weight sensors. We recommend
using genuine Honda f loor mats. Do
not put additional f loor mats on top
of the anchored mats.
This f ilter removes the dust and
pollenthatisbroughtinfromthe
outside through the heating and
cooling system/climate control
system.
Have your dealer replace the filter
when this service is indicated by a
maintenance message on the
inf ormation display or multi-
inf ormation display (depending on
the models). It should be replaced
every 15,000 miles (24,000 km) if you
drive primarily in urban areas that
have high concentrations of soot in
the air, or if the flow from the
heating and cooling system/climate
control system becomes less than
usual.
Floor Mats, Dust and Pollen Filter
Floor Mats
Dust and Pollen Filter
Maint enance
345
Main MenuTable of Contents
 will blink.Press the TRIP/RESET button f or
another 5 seconds. The
maintenance item")
