Page 7 of 427
�Î
�Î
�Î
CONT INUED: If equipped
Your Vehicle at a Glance
Your Vehicle at a Glance
3
POWER WINDOW
SWITCHES
HOOD RELEASE
HANDLE
MIRROR CONTROLS
ACCESSORY POWER SOCKETS
FUEL FILL DOOR
RELEASE HANDLE
POWER DOOR LOCK
MASTER SWITCH
(P.134)
(P.103)
(P.128)
(P.252)
(P.249)
INSTRUMENT PANEL INDICATORS
GAUGES
(P.62)
(P.76)
PARKING BRAKE
RELEASE HANDLE
(P.132)
(P.139)
Vehicle with navigation system is shown. PARKING BRAKE PEDAL
(P.132) (P.136)
CENTER CONSOLE AUXILIARY INPUT JACK
AUDIO SYSTEM
(P.159)
PASSENGER’S FRONT
AIRBAG
HEATING/COOLING
CONTROLS
CLIMATE CONTROL
SYSTEM
GLOVE BOX
(P.138) (P.9, 25)
(P.146)
(P.152)
(P.205)
DRIVER’S FRONT
AIRBAG
(P.9, 25) REAR VIEW MIRROR WITH
COMPASS
(P.213)
Main Menu
Page 64 of 427
�Î
�Î�Î
: If equipped
Control L ocat ions
60
Vehicle with navigation system is shown.(P.103)
POWER DOOR LOCK
MASTER SWITCH
MIRROR CONTROLS
ACCESSORY POWER SOCKETS
(P.134)
(P.139)
REAR VIEW MIRROR WITH COMPASS
(P.213)
(P.132)
PARKING BRAKE
RELEASE HANDLE
INSTRUMENT PANEL INDICATORS
GAUGES (P.76)
(P.62)
POWER WINDOW
SWITCHES
(P.128) PARKING BRAKE PEDAL
(P.132) (P.136) CENTER CONSOLE
HOOD RELEASE HANDLE
(P.252)
FUEL FILL DOOR RELEASE
HANDLE
(P.249) AUXILIARY INPUT JACK
(P.205)
AUDIO SYSTEM
HEATING/COOLING
CONTROLS
CLIMATE CONTROL
SYSTEM
GLOVE BOX
(P.138) (P.146)
(P.152)
(P.159)
Main MenuTable of Contents
Page 128 of 427

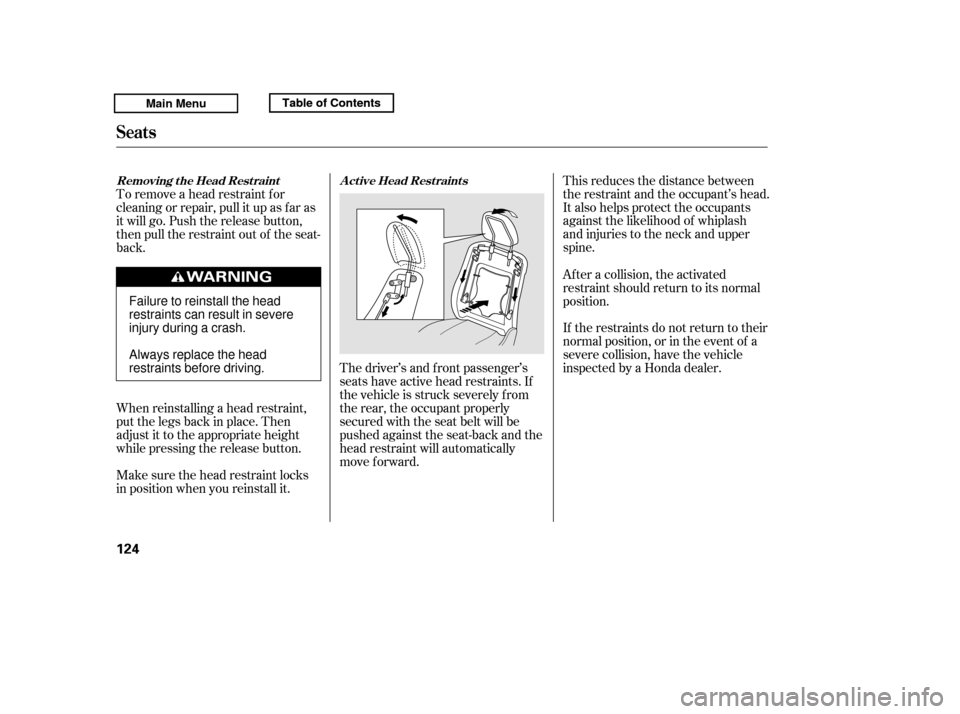
The driver’s and f ront passenger’s
seats have active head restraints. If
the vehicle is struck severely f rom
the rear, the occupant properly
secured with the seat belt will be
pushed against the seat-back and the
head restraint will automatically
move f orward.This reduces the distance between
the restraint and the occupant’s head.
It also helps protect the occupants
against the likelihood of whiplash
and injuries to the neck and upper
spine.
To remove a head restraint f or
cleaning or repair, pull it up as f ar as
it will go. Push the release button,
then pull the restraint out of the seat-
back.
When reinstalling a head restraint,
put the legs back in place. Then
adjust it to the appropriate height
while pressing the release button.
Make sure the head restraint locks
in position when you reinstall it. If the restraints do not return to their
normal position, or in the event of a
severe collision, have the vehicle
inspected by a Honda dealer.
Af ter a collision, the activated
restraint should return to its normal
position.
Seats
A ct ive Head Rest raint s
Removing t he Head Rest raint
124
Failure to reinstall the head
restraints can result in severe
injury during a crash.
Always replace the head
restraints before driving.
Main MenuTable of ContentsTable of Contents
Page 256 of 427
Put your f ingers under the f ront
edge of the hood. The hood latch
handle is above the ‘‘H’’ logo. Pull
this handle until it releases the
hood, then lif t the hood.To close the hood, lif t it up slightly to
remove the support rod f rom the
hole. Put the support rod back into
its holding clip. Lower the hood to
about a f oot (30 cm) above the
f ender, then let it drop. Make sure it
is securely latched.
If the hood latch handle moves
stif f ly, or you can open the hood
without lifting the handle, the
mechanism should be cleaned and
lubricated.
Park the vehicle, and set the
parking brake. Pull the hood
release handle under the lower lef t
corner of the dashboard. The
hood will pop up slightly.
Holding the grip, pull the support
rod out of its clip. Insert the end
into the designated hole in the
hood marked by an arrow.
1.
2.3.
Opening and Closing the Hood
Service Station Procedures
252
GRIP
HOOD RELEASE HANDLE
LATCH SUPPORT ROD
Main MenuTable of Contents