Page 321 of 574

CONT INUED
Pressing the REAR CTRL OFF
button disables rear control. The
indicator in the button comes on and
your passengers can no longer
operate the system with the rear
control panel. When the button is
pressed, the ‘‘CTRL OFF’’ message
appears in the overhead screen to let
your passengers know that the
control panel is disabled.
The rear system selects the source it
waslastsetto.Ifthatsourcehas
been removed (the DVD has been
ejected f rom the player, f or example),you will see ‘‘DVD EJECT’’ in the
display. You should select another
source or insert a DVD.
Your vehicle is equipped with a rear
entertainment system that includes a
DVD player f or the enjoyment of the
rear passengers.
With this system, the rear
passengers can enjoy a dif f erent
entertainment source (radio, disc
changer, DVD player, XM Radio, or
optional CD changer/tape player)
than the front seat occupants. The
audio is broadcast through the
supplied wireless headphones.
The ignition switch must be in the
ACCESSORY (I) or the ON (II)
position to operate the rear
entertainment system. Whenyouturnonthesystem,the
rear speakers are automatically
turned of f if the rear system selects
a dif f erent entertainment source
than the front system. You will see
the Rear Speakers Of f icon in the
audio display. The sound f or the rear
system is sent to the wireless
headphones.
If youwanttoturntherearspeakers
on again, press and hold the REAR
PWR button until the Rear Speakers
Of f icon goes of f .
The rear speakers are
connected to the f ront system, so
they will always play the source that
the f ront system is set to.
Press the REAR PWR button. The
indicator on the REAR PWR button
will come on. The rear seat
passengers can then operate the rear
system f rom the control panel in the
ceiling. The rear control panel can
also be detached and used as a
remote control, by pushing the
RELEASE button, and pulling the
remote toward you.
On vehicles with rear entertainment
systemTo Turn On the System
Rear Speakers
Rear Entertainment System
Features
317
NOTE:
10/01/26 19:17:15 31SZA620_322
2011 Pilot
Page 357 of 574

CONT INUED
The compass may need to be
manually calibrated af ter exposure to
a strong magnetic field. If the
compassseemstobecontinually
showing the wrong direction and is
not self -calibrating, or the compass
display is blinking with the CAL
indicator on, do the f ollowing.Turn the ignition switch to the ON
(II) position. Press and hold the MENU button
f or about 5 seconds until you hear
a beep. The display shows you the
compass setting menu items.
Compass operation can be af f ected
by driving near power lines or
stations, across bridges, through
tunnels, over railroad crossings, past
large vehicles, or driving near large
objects that can cause a magnetic
disturbance. It can also be af f ected
by accessories such as antennas and
roof racks that are mounted by
magnets.
If the compass display is blinking
and the CAL indicator is shown, the
compassisself-calibrating.
Press and hold the RPT button
and TUNE/SOUND knob f or
about 2 seconds until you hear a
beep. The display shows you the
compass setting menu items.
1. 2.
On vehicles without navigation system
On EX and EX-L modelsOn LX models
Compass
Compass Calibration
Compass Operation
Features
353
COMPASS COMPASS SETTING MENU ITEMS
10/01/26 19:23:16 31SZA620_358
2011 Pilot
Page 359 of 574

In most areas, there is a variation
between magnetic north and true
north. Zone selection is required so
the compass can compensate f or this
variation. To check and select the
zone, do this:Turn the ignition switch to the ON
(II) position.
Find the zone f or your area on the
map (see page ). If the correct
zone is not shown, turn the
selector or TUNE/SOUND knob
to cycle the zone lists up or down.
Press and hold the MENU button
f or about 5 seconds until you hear
a beep. The display shows you the
compass setting menu items.
Press and hold the RPT button
and TUNE/SOUND knob f or
about 2 seconds until you hear a
beep. The display shows you the
compass setting menu items.
Turn the selector or TUNE/
SOUND knob to select ‘‘ZONE.’’
Press the selector knob to enter
your selection. The display shows
you the currently selected zone
number.
If necessary, press the RETURN
button(onEXandEX-Lmodels)
to return to the previous display.
Pressing the MENU button will
cancel the compass setting mode.
Once the correct zone is displayed,
press the selector or TUNE/
SOUND knob. The display then
returns to normal.
4.
1.
2.
3.
5.
356
CONT INUED
On EX and EX-L models
On LX models
Compass
Compass Zone Selection
Features
355
ZONE NUMBER
10/01/26 19:23:40 31SZA620_360
2011 Pilot
Page 369 of 574
�Ì�Ì�Ì�Ì
CONT INUED
BluetoothHandsFreeL ink
How to Use HFL
Features
365
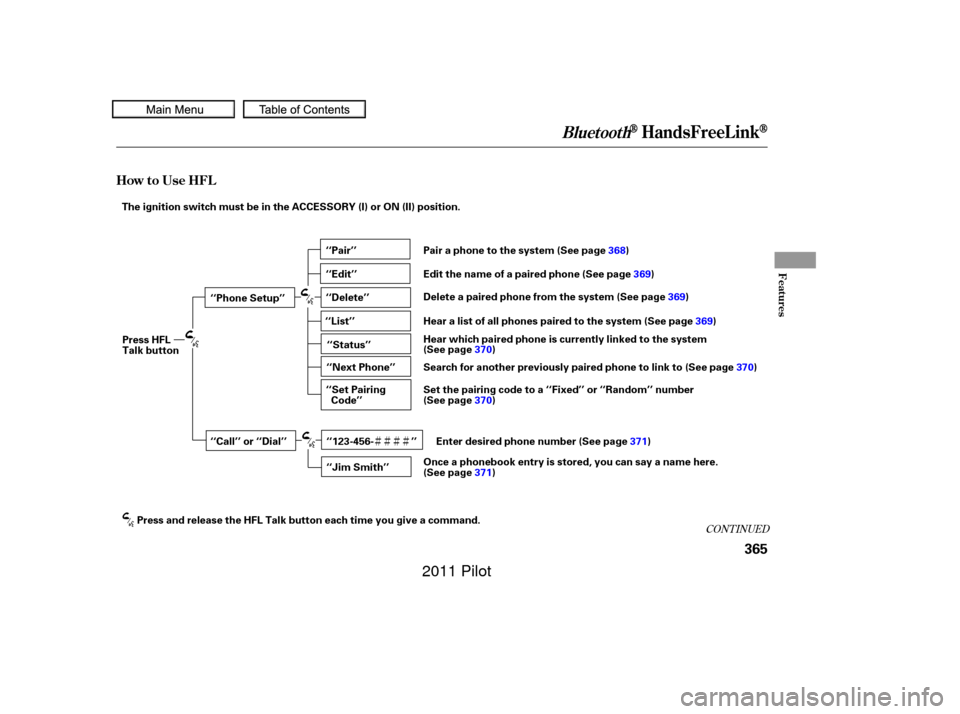
‘‘Phone Setup’’
‘‘Call’’ or ‘‘Dial’’‘‘Pair’’
‘‘Edit’’
‘‘Delete’’
‘‘Jim Smith’’
‘‘Set Pairing
Code’’
The ignition switch must be in the ACCESSORY (I) or ON (II) position.
‘‘List’’‘‘Status’’
‘‘Next Phone’’
Press HFL
Talk button
Press and release the HFL Talk button each time you give a command. Pair a phone to the system (See page
368)
Edit the name of a paired phone (See page 369)
Delete a paired phone from the system (See page 369)
Hear a list of all phones paired to the system (See page 369)
Hear which paired phone is currently linked to the system
(See page 370)
Search for another previously paired phone to link to (See page 370)
Set the pairing code to a ‘‘Fixed’’ or ‘‘Random’’ number
(See page 370)
Enter desired phone number (See page 371)
Once a phonebook entry is stored, you can say a name here.
(See page 371)
‘‘123-456- ’’
10/01/26 19:25:07 31SZA620_370
2011 Pilot
Page 375 of 574

CONT INUED
You can make calls using any phone
number or a name in the HFL
phonebook. You can also redial the
last number called.Press and release the HFL Talk
button bef ore a command.
Say ‘‘ ’’ or ‘‘ .’’
Follow the HFL prompts and say
the phone number you want to dial.
Follow the HFL prompts to
conf irm the number and say
‘‘ ’’ or ‘‘ .’’
Once connected, you will hear the
person you called through the audio
speakers. Press and release the HFL Talk
button bef ore a command.
Follow the HFL prompts to
conf irm the name and make the
call. Follow the HFL prompts and say
thenamestoredintheHFL
phonebook that you want to call. Say ‘‘ ’’ or ‘‘ .’’
HFLusesaClass2Bluetooth,which
means, the maximum range between
yourphoneandvehicleis30feet(10
meters).
During a call, HFL allows you to talk
up to 30 minutes af ter you remove
the key from the ignition switch.
However, this may weaken the
vehicle’s battery. 1.
2.
3.
1.
2.
3.
BluetoothHandsFreeL ink
Making a Call
Call Dial
Call Dial Call DialT o make a call using a phone
number: Tomakeacallusinganameinthe
HFL phonebook:
Features
371
10/01/26 19:26:21 31SZA620_376
2011 Pilot
Page 386 of 574
 or ON (II) position.
Press and release the")
�Î
�ÎIf you get into the vehicle while you
are on the phone, the call can be
automatically transferred to HFL
with the ignition switch in the
ACCESSORY (I) or ON (II) position.
Press and release the HFL Talk
button bef ore a command.
Say ‘‘ .’’
Press and release the HFL Talk
button bef ore a command.
Say ‘‘ .’’Press and release the HFL Talk
button bef ore a command.
Say ‘‘ .’’
Follow the HFL prompts to
conf irm the number. Follow the HFL prompts and say
the new 4-digit passcode. Say ‘‘ ’’ af ter the
prompts.
Follow the HFL prompts and say
‘‘ ’’ or ‘‘ .’’ You
can also say ‘‘ ’’ f or no audible
incoming call notif ication. Say ‘‘’’ af ter the
prompts.
The def ault setting is a ring tone. HFL will let you know if auto transf er is on or of f , depending on
the previous setting. Follow the
HFL prompts to change the
setting. Say ‘‘’’ af ter the
prompts.
2.
3.
4. 1.
2.
3.
1.
2.
3.
1.
: System setup
System setup
System setup
Change passcode
Ring tone PromptOf f
Call notif ication
Auto transf er
BluetoothHandsFreeL ink
T o change your securit y passcode: T o select eit her a ring t one or a prompt as t he incoming callnotification : To activate or deactivate the auto
transfer function:
382
10/01/26 19:29:00 31SZA620_387
2011 Pilot
Page 390 of 574

All obstacles may not always be
sensed. Even when the system is on,
you should look f or obstacles near
yourvehicletomakesureitissafeto
park.
Your vehicle has a parking sensor
system. The system lets you know
theapproximatedistancebetween
your vehicle and most obstacles
while you are parking. When the
system is on and your vehicle is
nearinganobstacle,youwillheara
beeper and see system messages on
the multi-information display.
To activate the system, push the
switch on the dashboard with the
ignition in the ON (II) position. The
indicator in the switch comes on
when the system is on. To turn the
system of f , push the switch again.The system has two front corner
sensors, two rear corner sensors,
and two rear center sensors.
The rear center sensors work when
the shif t lever is in reverse (R).
The corner sensors do not work
when the shift lever is in drive (D),
and the vehicle speed is more than 5
mph (8 km/h).
On Touring models
Parking Sensor System
386
PARKING SENSOR SYSTEM SWITCH
10/01/26 19:29:35 31SZA620_391
2011 Pilot
Page 394 of 574

For the best picture, always keep the
rearview camera clean, and do not
cover the camera lens. To avoid
scratching the lens when you clean it,
use a moist, sof t cloth.
Since the rearview camera display
area is limited, you should always
back up slowly and caref ully, and
look behind you f or obstacles.
When the system is af f ected by
some electrical equipment or
devices generating an ultrasonic
wave.
When operating the vehicle in bad
weather.
The system may not sense thin or
low objects, or sonic-absorptive
materials such as snow, cotton, or
sponge.
The system cannot sense objects
directly under the bumper. Whenever you shif t to reverse (R)
with the ignition switch in the ON
(II) position, the rear view is shown
on the navigation system screen. On
vehicles without a navigation system,
the rear view is shown on the lef t
side of the inside mirror.
This device complies with IndustryCanada Standard RSS-210. Operation issubject to the f ollowing two conditions:(1) this device may not causeinterf erence, and (2) this device mustaccept any interf erence that may causeundesired operation of the device.
Canadian Owners:
This ISM device complies with CanadianICES-001. On EX-L and Touring models
Parking Sensor System, Rearview Camera and Monitor
Rearview Camera and Monitor
390
10/01/26 19:30:23 31SZA620_395
2011 Pilot