Page 340 of 574
�Ý�Û
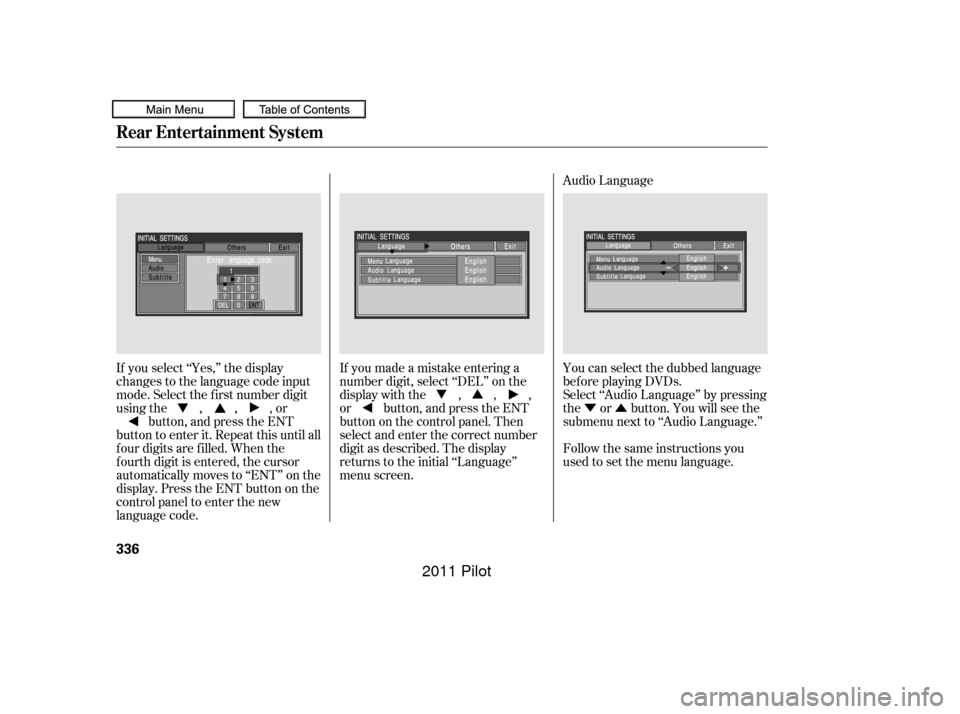
Audio Language
If you select ‘‘Yes,’’ the display
changes to the language code input
mode. Select the f irst number digit
usingthe,,,or button, and press the ENT
button to enter it. Repeat this until all
f our digits are f illed. When the
f ourth digit is entered, the cursor
automatically moves to ‘‘ENT’’ on the
display. Press the ENT button on the
control panel to enter the new
language code. If you made a mistake entering a
number digit, select ‘‘DEL’’ on the
display with the , , ,
or button, and press the ENT
buttononthecontrolpanel.Then
select and enter the correct number
digit as described. The display
returns to the initial ‘‘Language’’
menu screen.
You can select the dubbed language
bef ore playing DVDs.
Select ‘‘Audio Language’’ by pressing
the or button. You will see the
submenu next to ‘‘Audio Language.’’
Follow the same instructions you
used to set the menu language.
Rear Entertainment System
336
10/01/26 19:20:30 31SZA620_341
2011 Pilot
Page 353 of 574

The security system automatically
sets 15 seconds after you lock the
doors, the hood, the tailgate, and the
glass hatch. For the system to
activate, you must lock the doors,
thetailgateandtheglasshatchfrom
the outside with the key, driver’s
lock tab, door lock master switch, or
remote transmitter. The security
system indicator on the instrument
panel starts blinking immediately to
show you the system is setting itself . The security system helps to protect
your vehicle and valuables f rom thef t.
The horn sounds and a combination
of headlights, parking lights, side
marker lights and taillights f lashes if
someone attempts to break into your
vehicle or remove the audio unit.
This alarm continues for two
minutes, then the system resets. To
reset an activated system bef ore the
two minutes have elapsed, unlock
the driver’s door with the key or the
remote transmitter.Once the security system is set,
opening any door, the tailgate, the
glass hatch, or the hood without
using the key or the remote
transmitter will cause the alarm to
activate. It will also activate if the
radio is removed f rom the dashboard
or the wiring is cut.The security system will not set if
the hood, the tailgate, the glass
hatch, or any door is not f ully closed.
If the system will not set, check that
thedoors,thetailgateandthehood
are f ully closed.
Do not attempt to alter this system
or add other devices to it.
Except LX models
Security System
Features
349
SECURITY SYSTEM INDICATOR
10/01/26 19:22:28 31SZA620_354
2011 Pilot
Page 357 of 574

CONT INUED
The compass may need to be
manually calibrated af ter exposure to
a strong magnetic field. If the
compassseemstobecontinually
showing the wrong direction and is
not self -calibrating, or the compass
display is blinking with the CAL
indicator on, do the f ollowing.Turn the ignition switch to the ON
(II) position. Press and hold the MENU button
f or about 5 seconds until you hear
a beep. The display shows you the
compass setting menu items.
Compass operation can be af f ected
by driving near power lines or
stations, across bridges, through
tunnels, over railroad crossings, past
large vehicles, or driving near large
objects that can cause a magnetic
disturbance. It can also be af f ected
by accessories such as antennas and
roof racks that are mounted by
magnets.
If the compass display is blinking
and the CAL indicator is shown, the
compassisself-calibrating.
Press and hold the RPT button
and TUNE/SOUND knob f or
about 2 seconds until you hear a
beep. The display shows you the
compass setting menu items.
1. 2.
On vehicles without navigation system
On EX and EX-L modelsOn LX models
Compass
Compass Calibration
Compass Operation
Features
353
COMPASS COMPASS SETTING MENU ITEMS
10/01/26 19:23:16 31SZA620_358
2011 Pilot
Page 359 of 574

In most areas, there is a variation
between magnetic north and true
north. Zone selection is required so
the compass can compensate f or this
variation. To check and select the
zone, do this:Turn the ignition switch to the ON
(II) position.
Find the zone f or your area on the
map (see page ). If the correct
zone is not shown, turn the
selector or TUNE/SOUND knob
to cycle the zone lists up or down.
Press and hold the MENU button
f or about 5 seconds until you hear
a beep. The display shows you the
compass setting menu items.
Press and hold the RPT button
and TUNE/SOUND knob f or
about 2 seconds until you hear a
beep. The display shows you the
compass setting menu items.
Turn the selector or TUNE/
SOUND knob to select ‘‘ZONE.’’
Press the selector knob to enter
your selection. The display shows
you the currently selected zone
number.
If necessary, press the RETURN
button(onEXandEX-Lmodels)
to return to the previous display.
Pressing the MENU button will
cancel the compass setting mode.
Once the correct zone is displayed,
press the selector or TUNE/
SOUND knob. The display then
returns to normal.
4.
1.
2.
3.
5.
356
CONT INUED
On EX and EX-L models
On LX models
Compass
Compass Zone Selection
Features
355
ZONE NUMBER
10/01/26 19:23:40 31SZA620_360
2011 Pilot
Page 404 of 574

Excessive idling, accelerating and
braking in stop-and-go traf f ic
Cold engine operation (engines
aremoreefficientwhenwarmed
u")
�µ�µ�µ
�µ �µ
�µ
Aggressive driving (hard
acceleration and braking)
Excessive idling, accelerating and
braking in stop-and-go traf f ic
Cold engine operation (engines
aremoreefficientwhenwarmed
up)
Driving with a heavy load or the
air conditioner running
Improperly inf lated tires
The f ollowing f actors can lower your
vehicle’s f uel economy:
A properly maintained vehicle
maximizes f uel economy. Poor
maintenance can signif icantly reduce
f uel economy. Always maintain your
vehicle according to the maintenance
messages displayed on the
inf ormation display (see
on page ).
For example: An underinf lated tire increases
‘‘rolling resistance,’’ which reduces
f uel economy.
It puts a heavier
load on the engine, increasing f uel
consumption. In
particular, a build-up of snow or
mud on your vehicle’s underside
adds weight and rolling resistance.
Frequent cleaning helps your f uel
economy.
Rapid
acceleration, abrupt cornering,
and hard braking increase fuel
consumption. Aerodynamic drag has a big ef f ect
on f uel economy at speeds above
45 mph (75 km/h). Reduce your
speed and you reduce the drag.
Trailers, car top carriers, roof
racks and bike racks are also big
contributors to increased drag.
Idling
results in 0 miles per gallon (0 kms
per liter).
467
Fuel Economy Factors
Use the recommended viscosity
motor oil, displaying the A PI
Certif ication Seal (see page ).
Improving Fuel Economy Owner’s
Maintenance Checks Maintain proper tire inf lation
A void carrying excess weight in
your vehicle
K eep your vehicle clean
Drive moderatelyObserve the speed limit
Avoid excessive idling
472
Vehicle Maint enance
Drive Ef f icient ly
Fuel Economy
400
10/01/26 19:32:12 31SZA620_405
2011 Pilot
Page 415 of 574
.
Check the steering wheel
adjustment (see page ).Without touching the accelerator
pedal, turn the ignition switch to
the S")
CONT INUED
Check the adjustment of the
inside and outside mirrors (see
page ).
Check the steering wheel
adjustment (see page ).Without touching the accelerator
pedal, turn the ignition switch to
the START (III) position, then
release the ignition switch. You do
not need to hold the ignition
switch in the START (III) position
to start the engine. Depending on
the outside temperature, thestarter motor runs f or about 6 to 9
seconds until the engine starts.
If you hold the ignition switch in
the START (III) position f or more
than 7 seconds, the starter motor,
depending on the outside
temperature, runs f or about 10 to
25 seconds until the engine starts.
If the engine does not start, wait at
least 10 seconds bef ore trying
again.
Make sure the shif t lever is in
Park. Press on the brake pedal. In cold weather, turn of f all
electrical accessories to reduce
the drain on the battery. Apply the parking brake.
Fasten your seat belt. Check that
your passengers have f astened
their seat belts (see page ). Your vehicle’s starter system has an
auto control mode. When you turn
the ignition switch to the START
(III) position, this f eature keeps the
engine’s starter motor running until
the engine starts. Follow these
instructions to start the engine:
When you start the engine, check
the gauges and indicators in the
instrument panel, and the
messages on the inf ormation
display or multi-inf ormation
display (depending on models)
(seepages,,,and ).
Make sure the doors, the tailgate,
and the glass hatch are securely
closed and locked.
1.
2.
3.
4.
6.
7.
8.
9.
10. 170
133
17
67 68 82
94
Preparing to Drive, Starting the Engine
Starting the Engine
Driving
411
T he immobilizer system protects your
vehicle f rom thef t. If an improperly
coded key (or other device) is used, the
engine’s f uel system is disabled. For
more inf ormation, see page . 135
10/01/28 14:48:16 31SZA620_416
2011 Pilot
Page 416 of 574
If this message is on, the ignition
switchhastobeheldinthe
START (III) position manually
until the engine starts. The
ignitionswitchcanbeheldinthat
position up to 15 seconds.
Even though you may be able to
start the engine manually without
the auto control mode of the starter
system, have your dealer inspect
your vehicle.
If there is a problem with the starter
system, you will see a ‘‘CHECK
STARTER SYSTEM’’ message on
the multi-information display when
the ignition switch is turned to the
ON (II) position. You will also see
this message when the auto control
mode of the starter system has a
problem.
On vehicles with navigation system
Starting the Engine
Check Starter System Message
412
U.S.
CanadaThe engine is harder to start in cold
weather. Also, the thinner air f ound at
altitudes above 8,000 f eet (2,400
meters) adds to this problem.
10/01/26 19:34:34 31SZA620_417
2011 Pilot
Page 417 of 574

CONT INUED
These indicators on the instrument
panel show which position the shif t
lever is in.
The ‘‘D’’ indicator comes on f or a
f ew seconds when you turn the
ignition switch to the ON (II)
position. If it f lashes while driving (in
any shif t position), it indicates a
possible problem in the transmission.If the malf unction indicator lamp
comes on along with the ‘‘D’’
indicator, there is a problem with the
automatic transmission control
system. Avoid rapid acceleration, and
have the transmission checked by
your dealer as soon as possible.
When the ‘‘D’’ indicator warns of a
possible problem with the
transmission, you will see a ‘‘CHECK
TRANSMISSION’’ message on the
multi-inf ormation display (see page
). To shif t f rom any position, press
f irmly on the brake pedal and the
release button on the side of the
shiftlever.Youcannotshiftoutof
Park when the ignition switch is in
the LOCK (0) or ACCESSORY (I)
position.
96
On vehicles with navigation system
Shif t L ever Position Indicators
Shif ting
Automatic Transmission
Driving
413
U.S. model is shown.
10/01/26 19:34:46 31SZA620_418
2011 Pilot
 position manually
until the engine starts. The
ignitionswitchcanbeheldinthat
position up to 15 seconds.
Even though you may be ab")