Page 311 of 722

To take the system out of the
Audio mode, press one of
the other source buttons than the
USB/AUX button. When a
compatible audio unit is connected to
the auxiliary input jack, press the
USB/AUX button to select it.
Switching to another mode pauses
the music playing f rom your phone.
If you receive a call when the
Audio is playing, press the
PICK-UPbuttononthesteering
wheel. The display switches to the
HFLmode(seepage ).
Af ter ending the call, press the
HANG-UP button to go back to theAudio mode. 496
Bluetooth
As required by the FCC:
This device complies with Part 15 of theFCC rules. Operation is subject to thef ollowing two conditions: (1) This devicemay not cause harmf ul interf erence, and(2) this device must accept anyinterf erence received, includinginterf erence that may cause undesiredoperation.
Changes or modif ications not expresslyapproved by the party responsible f orcompliance could void the user’sauthority to operate the equipment.
This device complies with IndustryCanada Standard RSS-210.Operation is subject to the f ollowing twoconditions: (1) this device may not causeinterf erence, and (2) this device mustaccept any interf erence that may causeundesired operation of the device.
Bluetooth
Bluetooth
T o swit ch t o HFL mode
T o t urn of f t he Bluet oot h
Audio
mode
Bluetooth
Audio System (Models without navigation system)
308
10/07/17 10:15:18 31TK8600_313
2011 Odyssey
Page 312 of 722
Connect the USB f lash memory
device that includes pictures you
want to store. Press the SETUP
button to display the setup menu.
Turn the selector knob to
‘‘Wallpaper Setup’’ and press the
selector knob.The display will change to the
wallpaper setup menu. Turn the
selector knob to ‘‘Import Picture
f rom USB,’’ then press the
selector knob.
If the USB f lash memory device
does not have any picture, ‘‘No
Files’’ message will appear on the
display.
Ref er to the navigation system
manual f or operation of the
wallpaper setup. The wallpaper setup function can
change, store or delete the wallpaper
on the display. You can store up to
five pictures from USB flash
memory devices. Two def ault
wallpapers are already stored.
1.2.
CONT INUED
On vehicles with navigation system
EX-L models without navigation system
and Canadian EX model Import Pict ure f rom USB
Wallpaper Setup
Features
309
10/07/17 10:15:26 31TK8600_314
2011 Odyssey
Page 315 of 722
On the display setup menu, select
adjustment menu and press the
selector knob to enter the setting.
Adjust the setting by turning the
selector knob.
If you want to adjust the Menu
Color, select it by turning the
selector knob and press the
selector knob.The display will change to as
shown above. You can change the
color of the screen to blue, red,
amber, gray. Turn the selector
knob to the setting you want, then
press the selector knob.
Press and release the RETURN
buttontogobacktothesetup
menu.
To adjust the display, highlight
‘‘Display Setup’’ f rom the setup menu
with the selector knob. You can
adjust these display settings:
Menu Color Contrast Brightness
Press the SETUP button to display
the setup menu. Turn the selector
knob to ‘‘Display Setup’’ and press
the selector knob.
1.
2.
3.4.
EX-L models without navigation system
and Canadian EX modelDisplay Setup312
10/07/17 10:15:50 31TK8600_317
2011 Odyssey
Page 319 of 722
�Ú
On vehicles with navigation systemThe navigation system receives
signals f rom the global positioning
system (GPS), and the displayed
time is updated automatically by the
GPS. Ref er to the navigation system
manual f or how to adjust the time.
Turn the selector knob to change
the setting between 12H and 24H,
and count the numbers up or down.
To enter the clock setting, press
the selector knob repeatedly to
select ‘‘SET’’ or ‘‘EXIT,’’ then press
the knob. The display will return
to the setup menu.
Press the selector knob to select
the item which you want to adjust.
Each time you press the selector
knob, the selected item changes
between hours, minutes, SET and
EXIT. The selected item is
indicated with in the display.
2. 3.
4.
Setting the Clock316U.S. EX models
EX-L and Canadian EX models
10/07/17 10:16:26 31TK8600_321
2011 Odyssey
Page 320 of 722
Turn the selector knob to the
language you want, then press the
selector knob to change the display.
Press and release the RETURN
buttontogobacktothesetupmenu.
You can change the display language
to English, Spanish, or French. Press
the SETUP button to display the
setup menu. Turn the selector knob
to ‘‘Language’’ and press the selector
knob.
EX-L models without navigation system and Canadian EX model
Setting the Language
Features
317
10/07/17 10:16:31 31TK8600_322
2011 Odyssey
Page 321 of 722
The dial turns lef t and right. Use it to
make selections or adjustments to a
list or menu on the screen.
The selector can be pushed lef t,
right, up, down, and in. Use the
selector to scroll through lists, to
select menus, and to highlight menu
items. When you make a selection,
push the center of the selector
(ENTER)togotothatselection.
Most audio system f unctions can still
be controlled by standard buttons,
dials, and knobs, but some f unctions
can only be accessed using the
interf ace dial. The interf ace dial has
twoparts,adialandaselector.
The audio system, including the
music search f eature Song By
Voice , can be operated by voice
control. See the navigation system
manual f or complete details.
Interf ace Dial
Voice Control System
Audio System (Models with navigation system)318
SELECTOR
DIAL ENTER
TM
10/07/17 10:16:37 31TK8600_323
2011 Odyssey
Page 322 of 722
Playing the FM/A M Radio (Models with navigation system)
Features
Wit hout rear ent ert ainment syst emWit h rear ent ert ainment syst em
319
CENTER DISPLAY
INTERFACE DIAL
AUDIO
BUTTON POWER/
VOLUME
KNOB AM
BUTTON FM
BUTTON
AM/FM
BUTTON
POWER/
VOLUME
KNOB
AUDIO
BUTTONTUNE/SOUND
KNOBPRESET
BUTTONS
SCAN
BUTTON
PRESET
BUTTONS
TUNE/SOUND
KNOB
SCAN
BUTTON
INTERFACE DIALAUDIO SCREEN
10/07/17 10:16:44 31TK8600_324
2011 Odyssey
Page 323 of 722

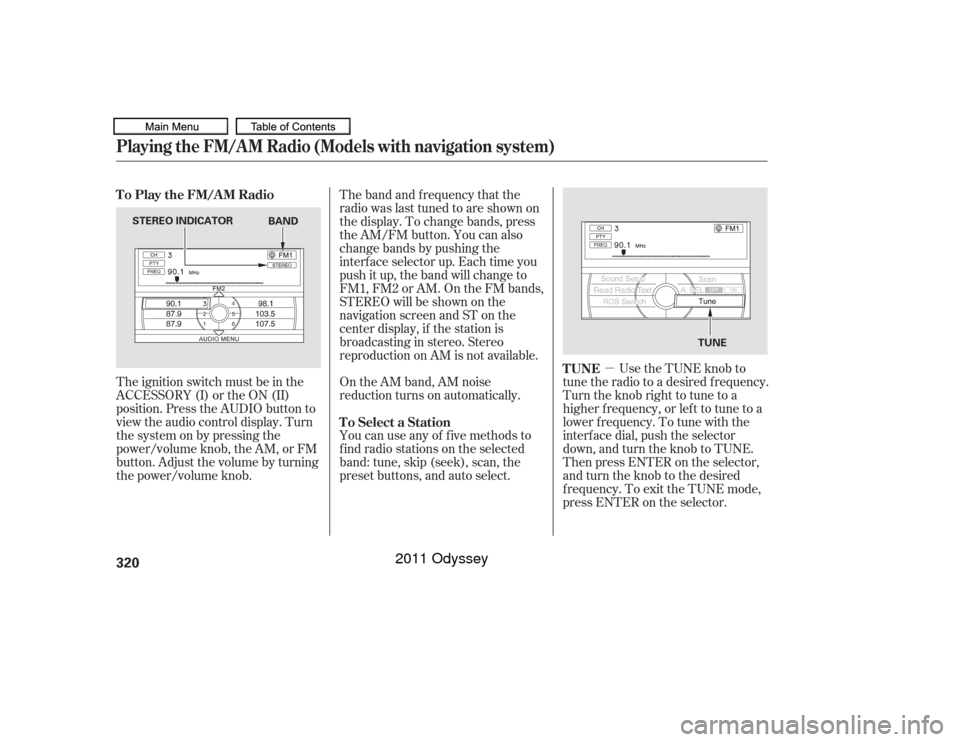
�µUse the TUNE knob to
tune the radio to a desired frequency.
Turn the knob right to tune to a
higher f requency, or lef t to tune to a
lower f requency. To tune with the
interf ace dial, push the selector
down, and turn the knob to TUNE.
Then press ENTER on the selector,
andturntheknobtothedesired
f requency. To exit the TUNE mode,
press ENTER on the selector.
The ignition switch must be in the
ACCESSORY (I) or the ON (II)
position. Press the AUDIO button to
view the audio control display. Turn
the system on by pressing the
power/volume knob, the AM, or FM
button. Adjust the volume by turning
the power/volume knob.
On the AM band, AM noise
reduction turns on automatically.
You can use any of f ive methods to
f ind radio stations on the selected
band: tune, skip (seek), scan, the
preset buttons, and auto select. The band and f requency that the
radio was last tuned to are shown on
the display. To change bands, press
the AM/FM button. You can also
change bands by pushing the
interf ace selector up. Each time you
push it up, the band will change to
FM1, FM2 or AM. On the FM bands,
STEREO will be shown on the
navigation screen and ST on the
center display, if the station is
broadcasting in stereo. Stereo
reproduction on AM is not available.
TUNE
To Play the FM/AM Radio
To Select a Station
Playing the FM/A M Radio (Models with navigation system)320
STEREO INDICATOR TUNE
BAND
10/07/17 10:16:53 31TK8600_325
2011 Odyssey